I recently needed to convert a web2py-based CRM app hosted on an Apache server with a SQLite backend to MySQL. Below are the steps that worked for me. I created a sample application to work with if you’d like to follow along, you can download all files here.
Please note: I am using web2py version 2.4.7 on a Unix environment. Before starting, make sure you have SQLite installed on your system. You can install this with pip,
pip install sqlite, or you can grab the binary files at http://sqlite.org/download.html. You also need MySQL installed. If you need assistance, follow the tutorials here.
The current database has all the default web2py tables as well as a users table with the fields id, start_date, and end_date:
db.define_table(
    'users',
    Field('start_date','string'),
    Field('end_date','string')
)
This code follows the web2py DAL syntax. There are 30,000 rows of data in the table.
Data cleanse
Download your application’s latest SQLite database. By default, it is the file named storage.sqlite under the “/web2py/applications/
$ sqlite3 storage.sqlite .dump > output_before.sql
Using a text editor, edit the output_before.sql file:
- Remove all lines that start with
PRAGMA,BEGIN TRANSACTION,CREATE TABLEandCOMMIT. - Remove all lines pertaining to the
sqlite_sequencetable (i.e.,DELETE FROM sqlite_sequence;). - For all
INSERT INTO "<table_name>" VALUES(...)statements, replace the double quotes (" ") before and after the<table_name>with backticks (` `) - e.g.INSERT INTO `table_name` VALUES(...).
Finally, save the file as output_after.sql on your desktop.
MySQL setup
Create the MySQL database on the remote server. Take note of the database name, username and password. You can also set up your database locally for testing, which I will be using for this tutorial:
$ mysql.server start
$ mysql -u root -p
Enter password:
mysql> create database migration;
Query OK, 1 row affected (0.03 sec)
mysql> exit;
Configure your application to use MySQL. Launch your web2py admin. Edit db.py:
db = DAL('mysql://<mysql_user>:<mysql_password>@localhost/<mysql_database>')
Save the file.
Allow web2py to initialize the MySQL database:
- Backup the contents of
/web2py/applications/<your_application>/databases/folder. Then delete the contents of the folder. - Back on the web2py admin. Click the “database administration” button to create the tables in your local MySQL database.
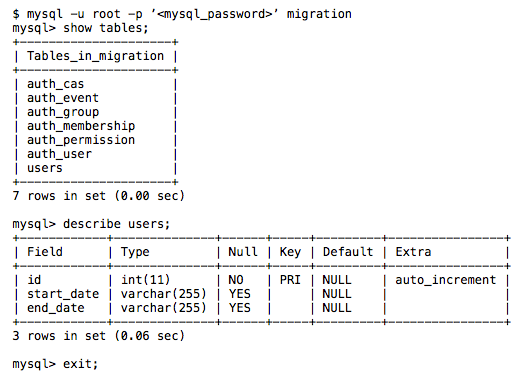
Fire up your MySQL database in the terminal to check to make sure the empty tables were added to the database:
Add data
Navigate to where you saved output.sql (should be your desktop), then run the following command to add data to MySQL:
$ mysql -u root migration < output_after.sql
This will take a few minutes to fully execute.
Within the web2py admin, check your database and application to make sure the new data is accessible.

