
This tutorial details how AWS Lambda and API Gateway can be used to develop a simple code evaluation API, where an end user submits code via an AJAX form submission, which is then executed securely by a Lambda function.
Check out the live demo of what you’ll be building in action here.
WARNING: The code found in this tutorial is used to build a toy app to prototype a proof of concept and is not meant for production use.
This tutorial assumes that you already have an account set up with AWS. Also, we will use the US East (N. Virginia) / us-east-1 region. Feel free to use the region of your choice. For more info, review the Regions and Availability Zones guide.
Objectives
By the end of this tutorial you will be able to…
- Explain what AWS Lambda and API Gateway are and why would would want to use them
- Discuss the benefits of using AWS Lambda functions
- Create an AWS Lambda function with Python
- Develop a RESTful API endpoint with API Gateway
- Trigger an AWS Lambda function from API Gateway
What Is AWS Lambda?
Amazon Web Services (AWS) Lambda is an on-demand compute service that lets you run code in response to events or HTTP requests.
Use cases:
| Event | Action |
|---|---|
| Image added to S3 | Image is processed |
| HTTP Request via API Gateway | HTTP Response |
| Log file added to Cloudwatch | Analyze the log |
| Scheduled event | Back up files |
| Scheduled event | Synchronization of files |
For more examples, review the Examples of How to Use AWS Lambda guide from AWS.
You can run scripts and apps without having to provision or manage servers in a seemingly infinitely-scalable environment where you pay only for usage. This is “serverless” computing in a nut shell. For our purposes, AWS Lambda is a perfect solution for running user-supplied code quickly, securely, and cheaply.
As of writing, Lambda supports code written in JavaScript (Node.js), Python, Java, and C#.
Project Setup
Start by cloning down the base project:
$ git clone https://github.com/realpython/aws-lambda-code-execute \
  --branch v1 --single-branch
$ cd aws-lambda-code-execute
Then, check out the v1 tag to the master branch:
$ git checkout tags/v1 -b master
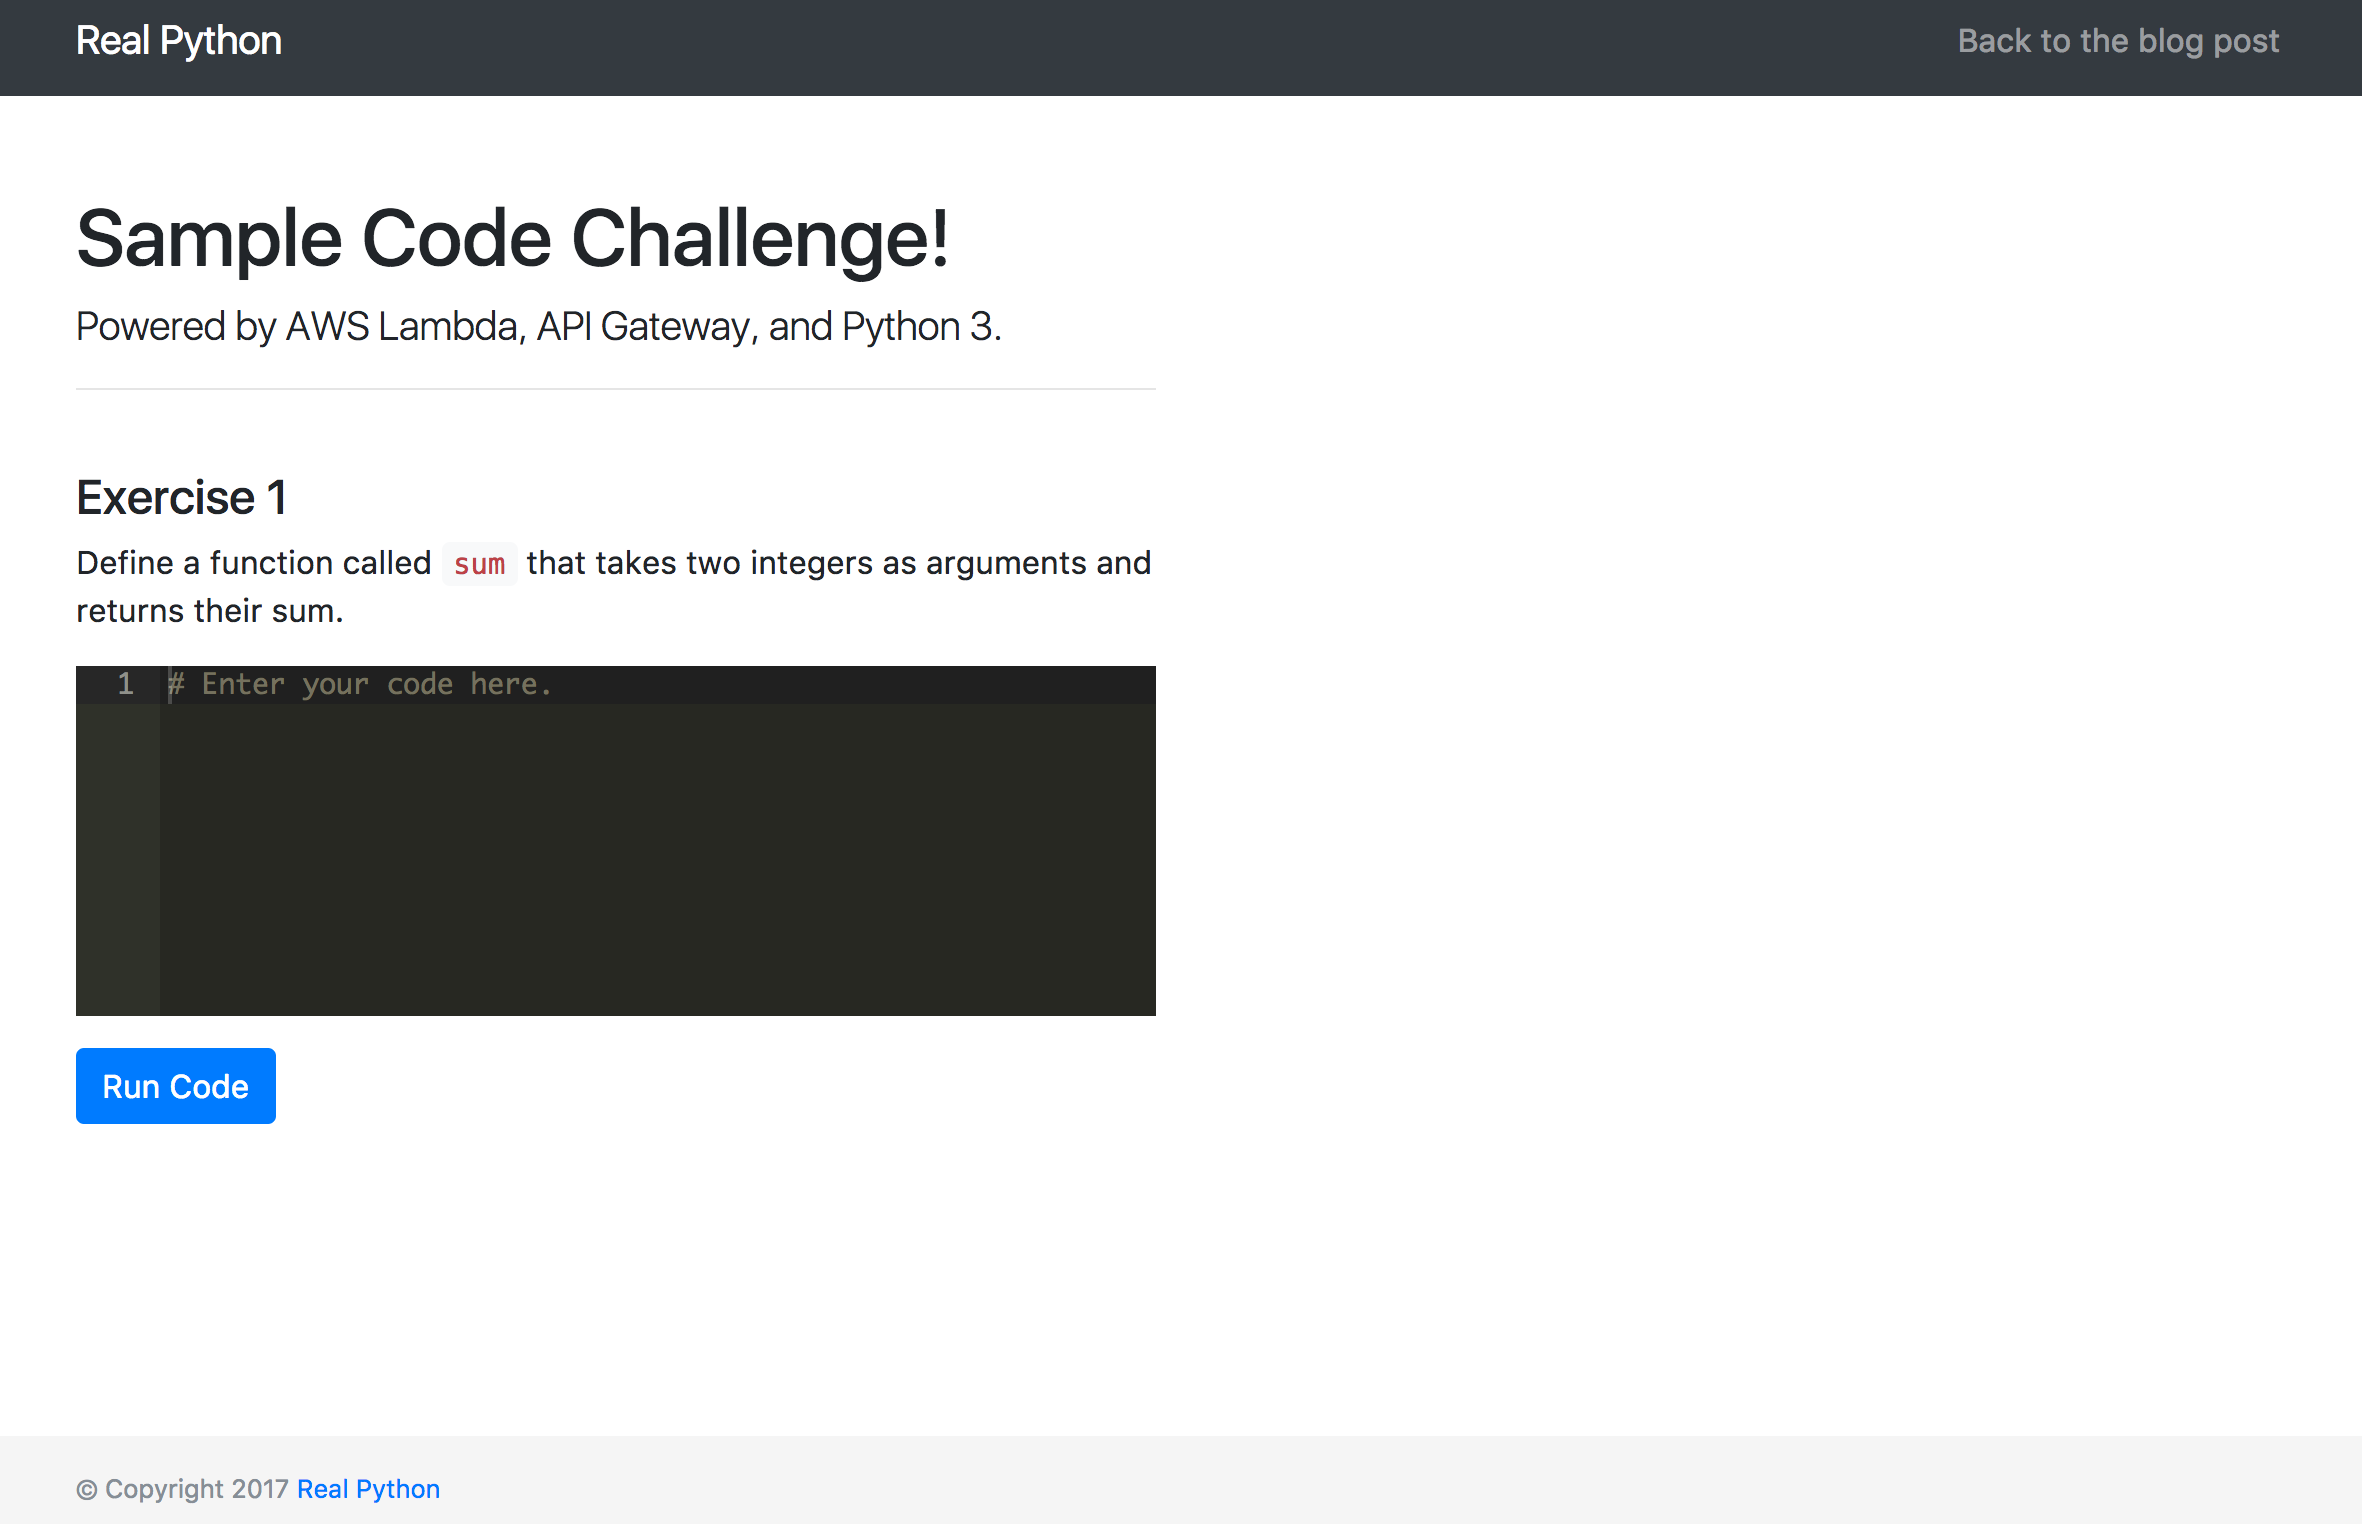
Open the index.html file in your browser of choice:
Then, open the project in your favorite code editor:
├── README.md
├── assets
│   ├── main.css
│   ├── main.js
│   └── vendor
│       ├── bootstrap
│       │   ├── css
│       │   │   ├── bootstrap-grid.css
│       │   │   ├── bootstrap-grid.min.css
│       │   │   ├── bootstrap-reboot.css
│       │   │   ├── bootstrap-reboot.min.css
│       │   │   ├── bootstrap.css
│       │   │   └── bootstrap.min.css
│       │   └── js
│       │       ├── bootstrap.js
│       │       └── bootstrap.min.js
│       ├── jquery
│       │   ├── jquery.js
│       │   └── jquery.min.js
│       └── popper
│           ├── popper.js
│           └── popper.min.js
└── index.html
Let’s quickly review the code. Essentially, we just have a simple HTML form styled with Bootstrap. The input field is replaced with Ace, an embeddable code editor, which provides basic syntax highlighting. Finally, within assets/main.js, a jQuery event handler is wired up to grab the code from the Ace editor, when the form is submitted, and send the data somewhere (eventually to API Gateway) via an AJAX request.
Lambda Setup
Within the AWS Console, navigate to the main Lambda page and click “Create a function”:

Create Function
Steps…
-
Select blueprint: Click “Author from scratch” to start with a blank function:

-
Configure Triggers: We’ll set up the API Gateway integration later, so simply click “Next” to skip this part.
-
Configure function: Name the function
execute_python_code, and add a basic description -Execute user-supplied Python code. Select “Python 3.6” in the “Runtime” drop-down.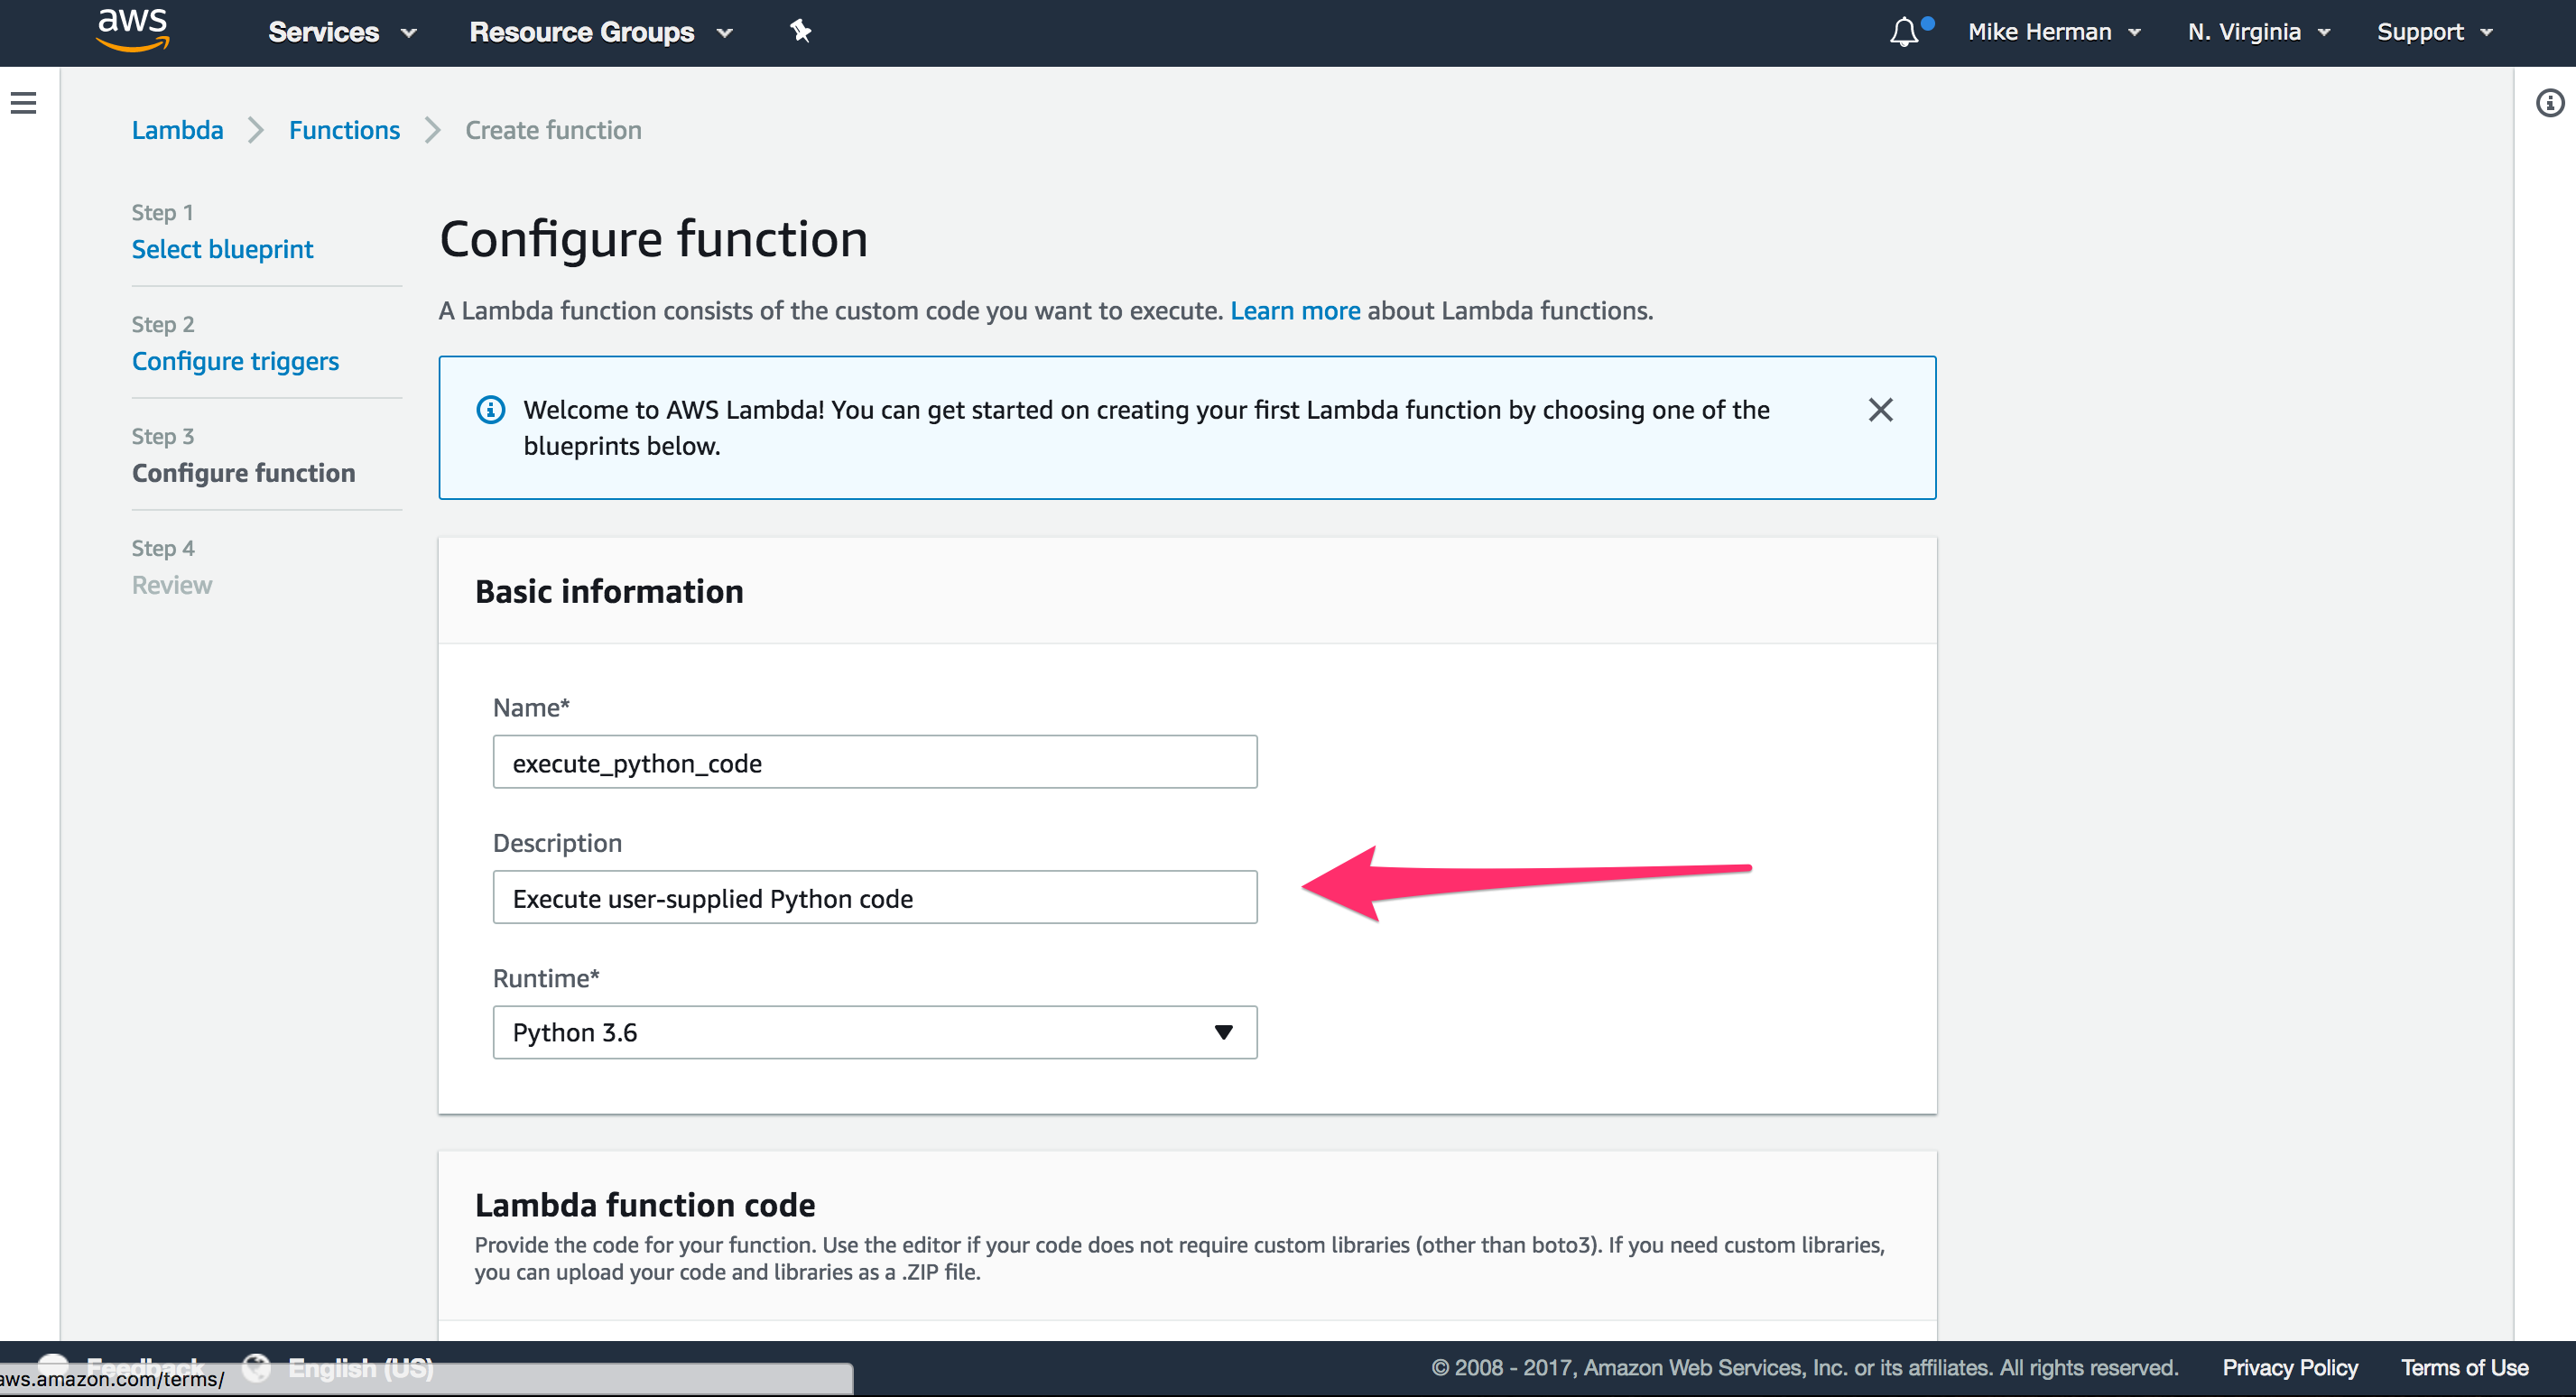
-
Within the inline code editor, update the
lambda_handlerfunction definition with:PythonCopied!import sys from io import StringIO def lambda_handler(event, context): # Get code from payload code = event['answer'] test_code = code + '\nprint(sum(1,1))' # Capture stdout buffer = StringIO() sys.stdout = buffer # Execute code try: exec(test_code) except: return False # Return stdout sys.stdout = sys.stdout # Check if int(buffer.getvalue()) == 2: return True return FalseHere, within
lambda_handler, which is the default entry point for Lambda, we parse the JSON request body, passing the supplied code along with some test code -sum(1,1)- to the exec function - which executes the string as Python code. Then, we simply ensure the actual results are the same as what’s expected - e.g., 2 - and return the appropriate response.
Under “Lambda function handler and role”, leave the default handler and then select “Create a new Role from template(s)” from the drop-down. Enter a “Role name”, like
api_gateway_access, and select ” Simple Microservice permissions” for the “Policy templates”, which provides access to API Gateway.
Click “Next”.
-
Review: Create the function after a quick review.
Test
Next click on the “Test” button to execute the newly created Lambda:

Using the “Hello World” event template, replace the sample with:
{
  "answer": "def sum(x,y):\n    return x+y"
}

Click the “Save and test” button at the bottom of the modal to run the test. Once done, you should see something similar to:

With that, we can move on to configuring the API Gateway to trigger the Lambda from user-submitted POST requests…
API Gateway Setup
API Gateway is used to define and host APIs. In our example, we’ll create a single HTTP POST endpoint that triggers the Lambda function when an HTTP request is received and then responds with the results of the Lambda function, either true or false.
Steps:
- Create the API
- Test it manually
- Enable CORS
- Deploy the API
- Test via cURL
Create the API
-
To start, from the API Gateway page, click the “Get Started” button to create a new API:

-
Select “New API”, and then provide a descriptive name, like
code_execute_api:
Then, create the API.
-
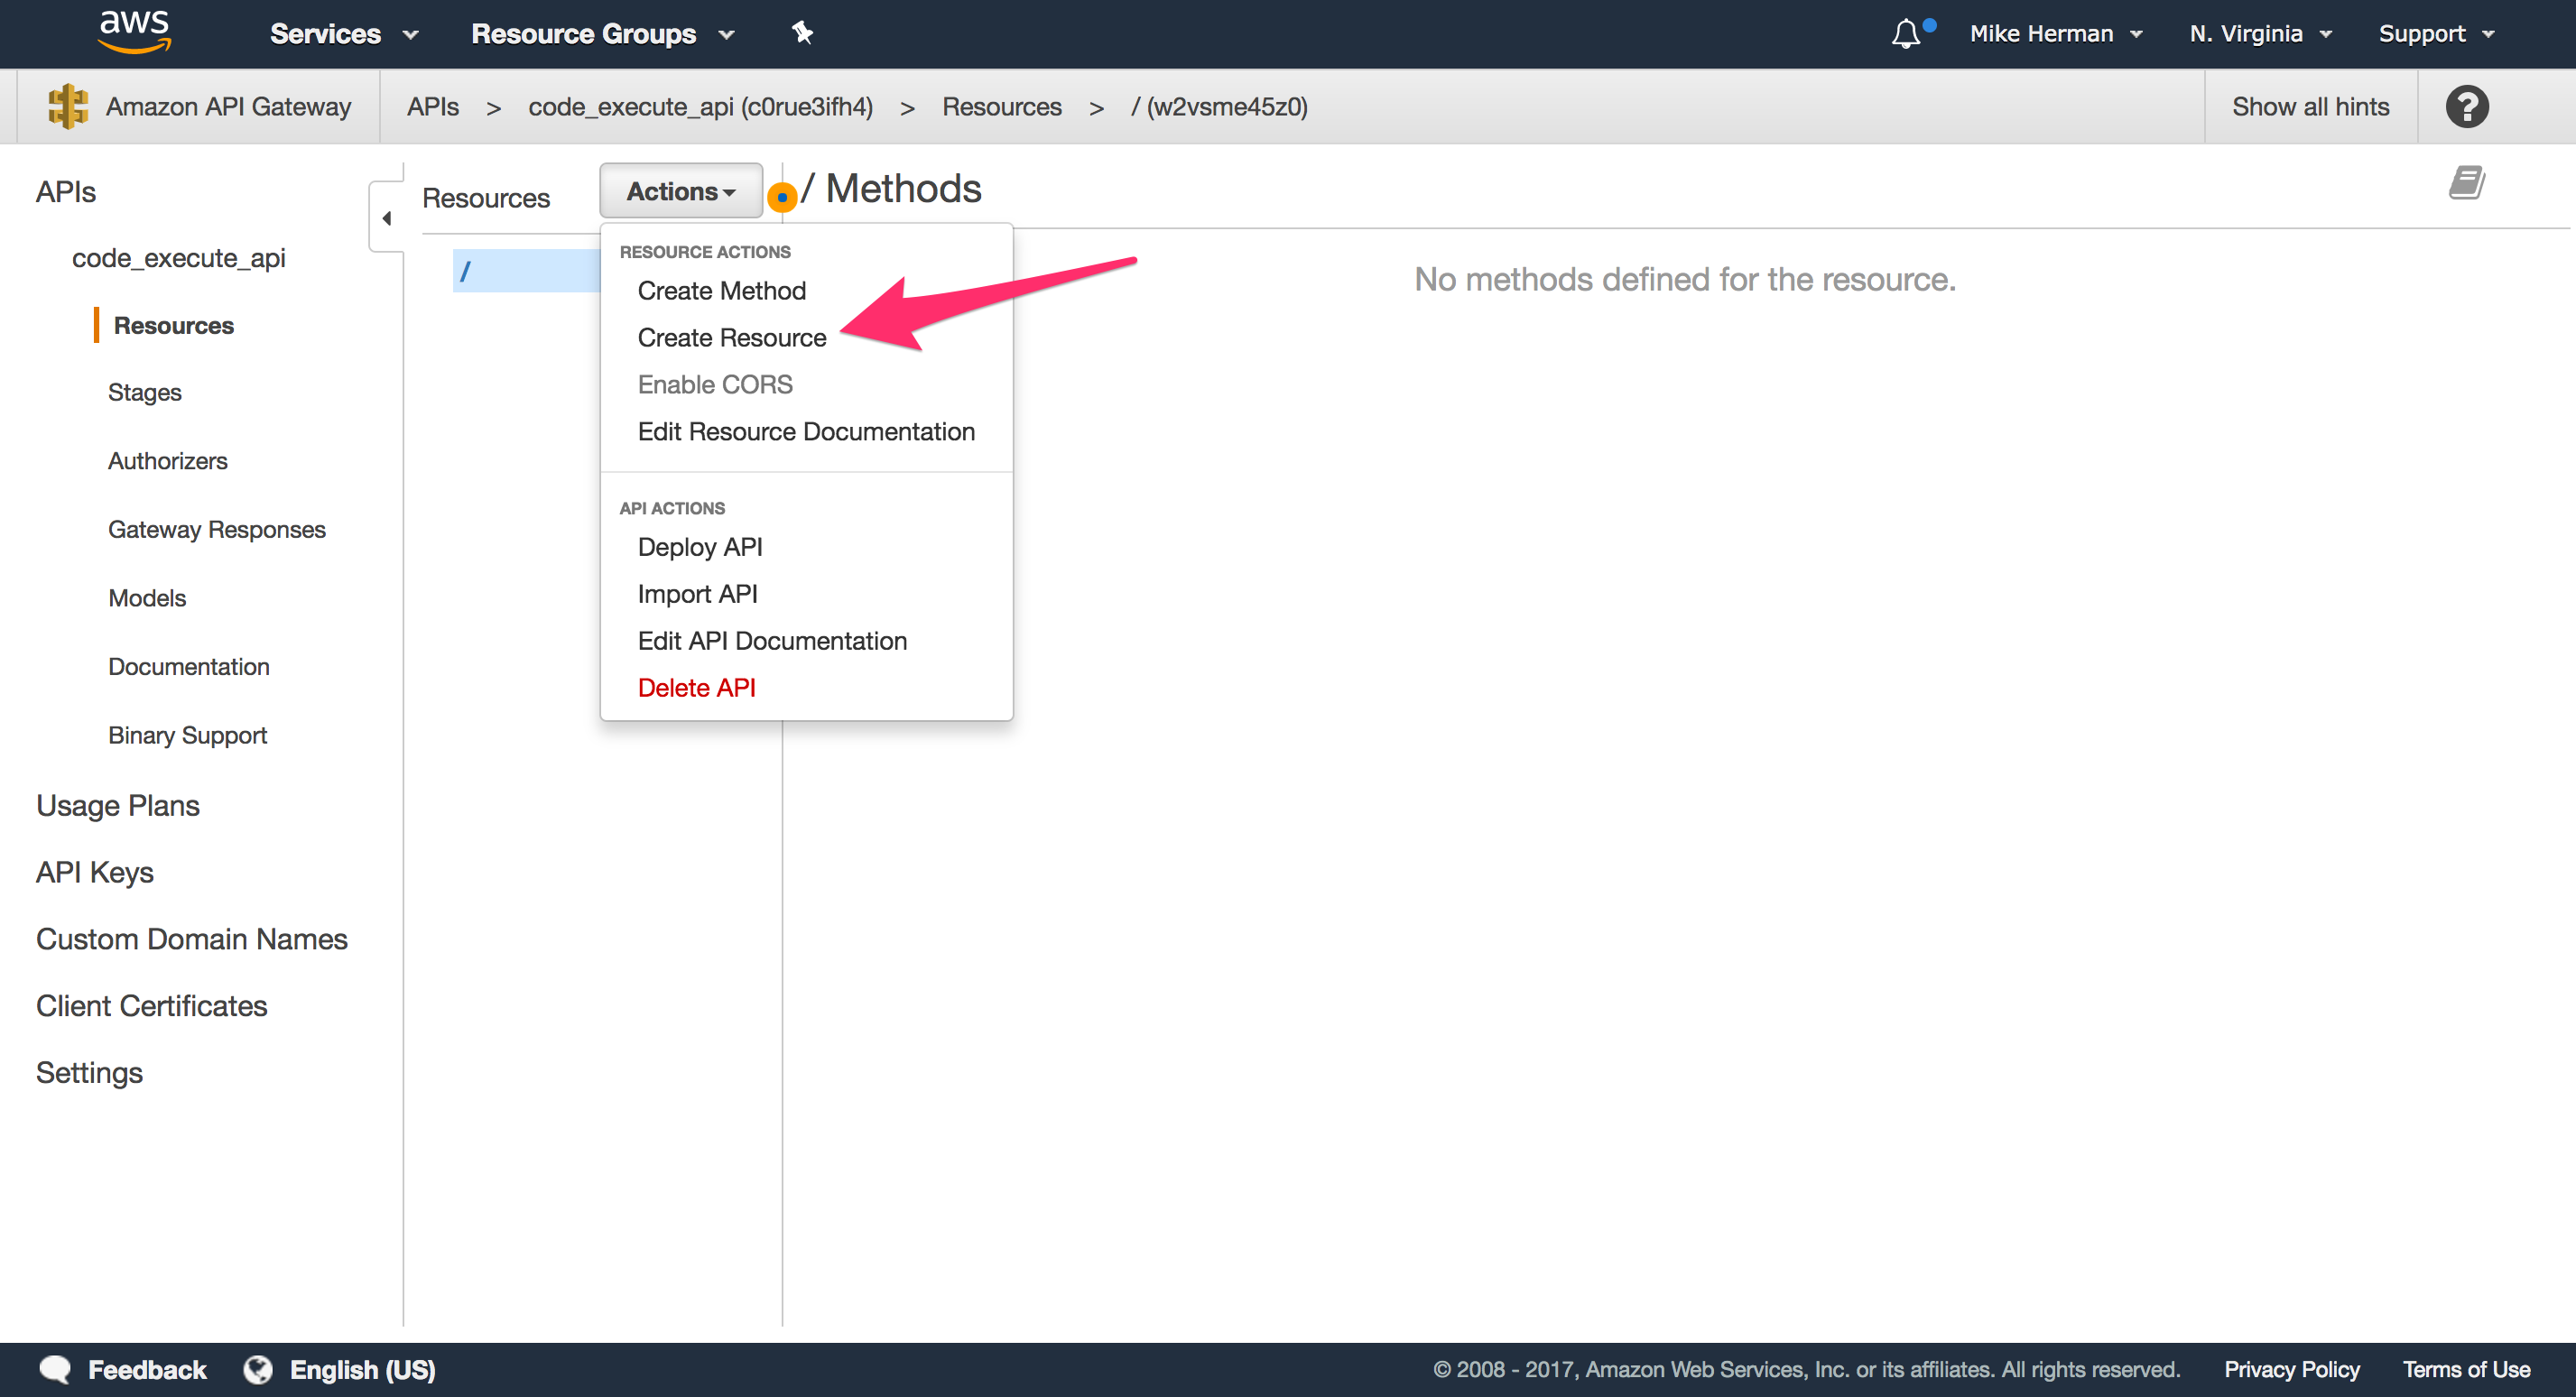
Select “Create Resource” from the “Actions” drop-down.
-
Name the resource
execute, and then click “Create Resource”.
-
With the resource highlighted, select “Create Method” from the “Actions” drop-down.

-
Choose “POST” from the method drop-down. Click the checkmark next to it.

-
In the “Setup” step, select “Lambda Function” as the “Integration type”, select the “us-east-1” region in the drop-down, and enter the name of the Lambda function that you just created.

-
Click “Save”, and then click “OK” to give permission to the API Gateway to run your Lambda function.
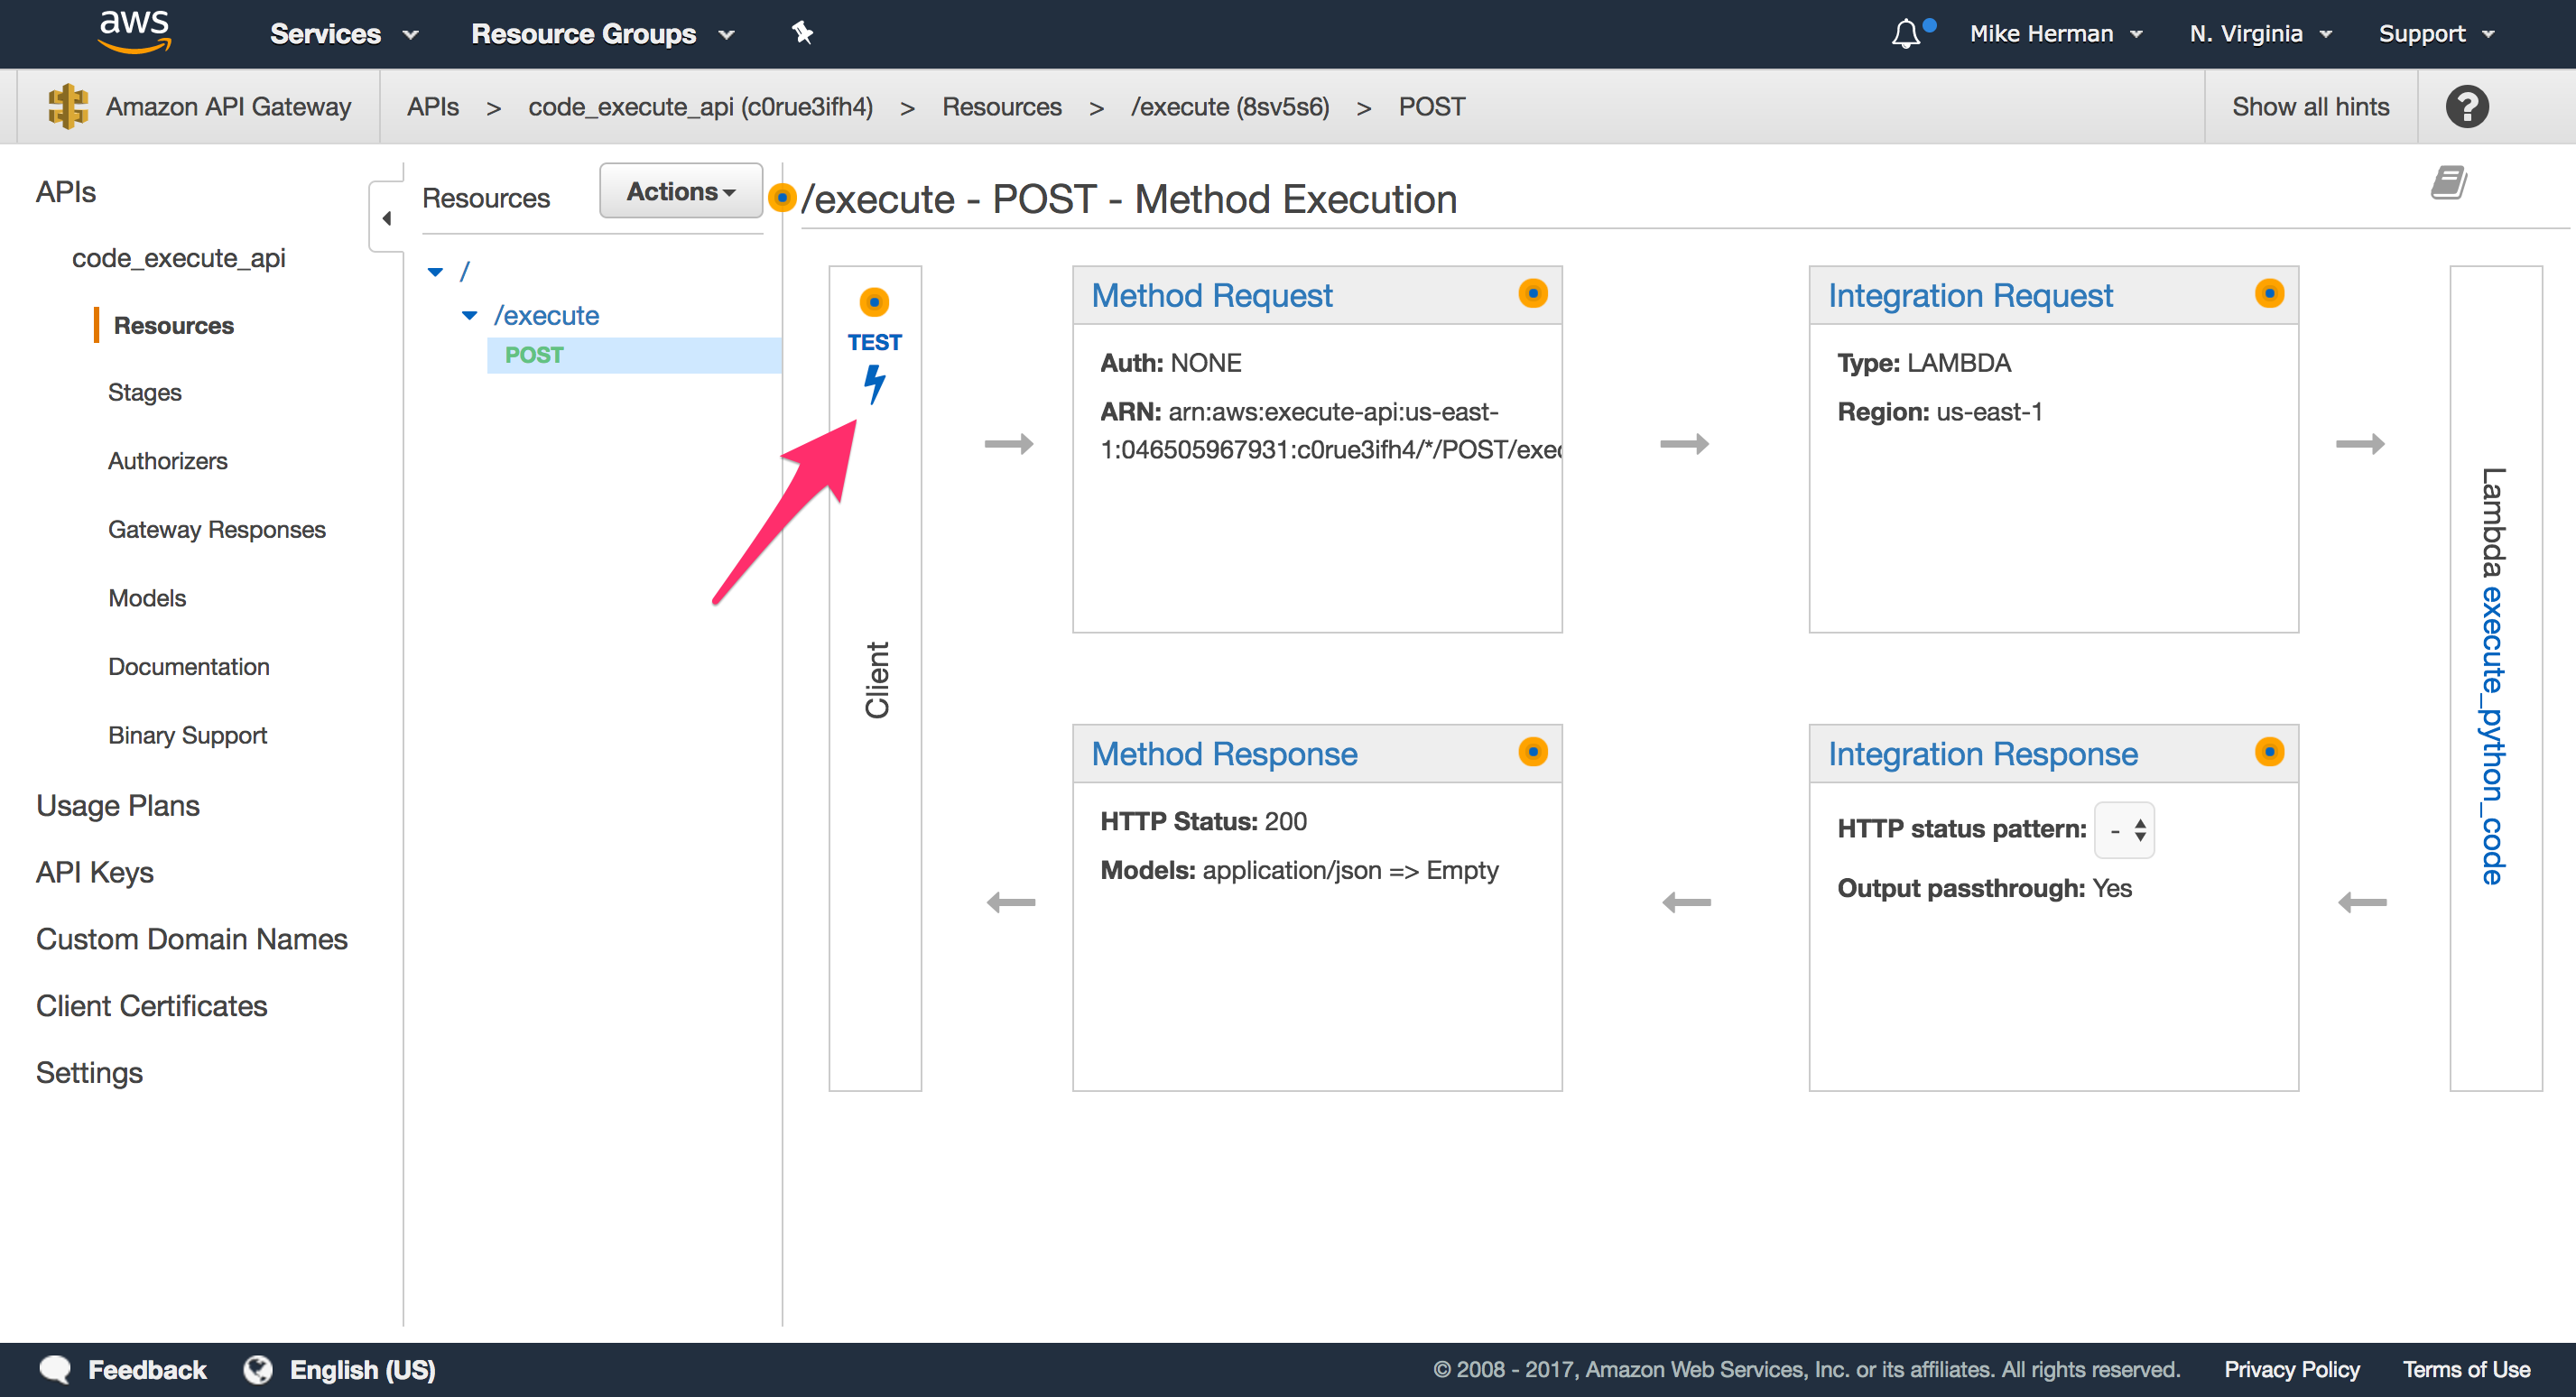
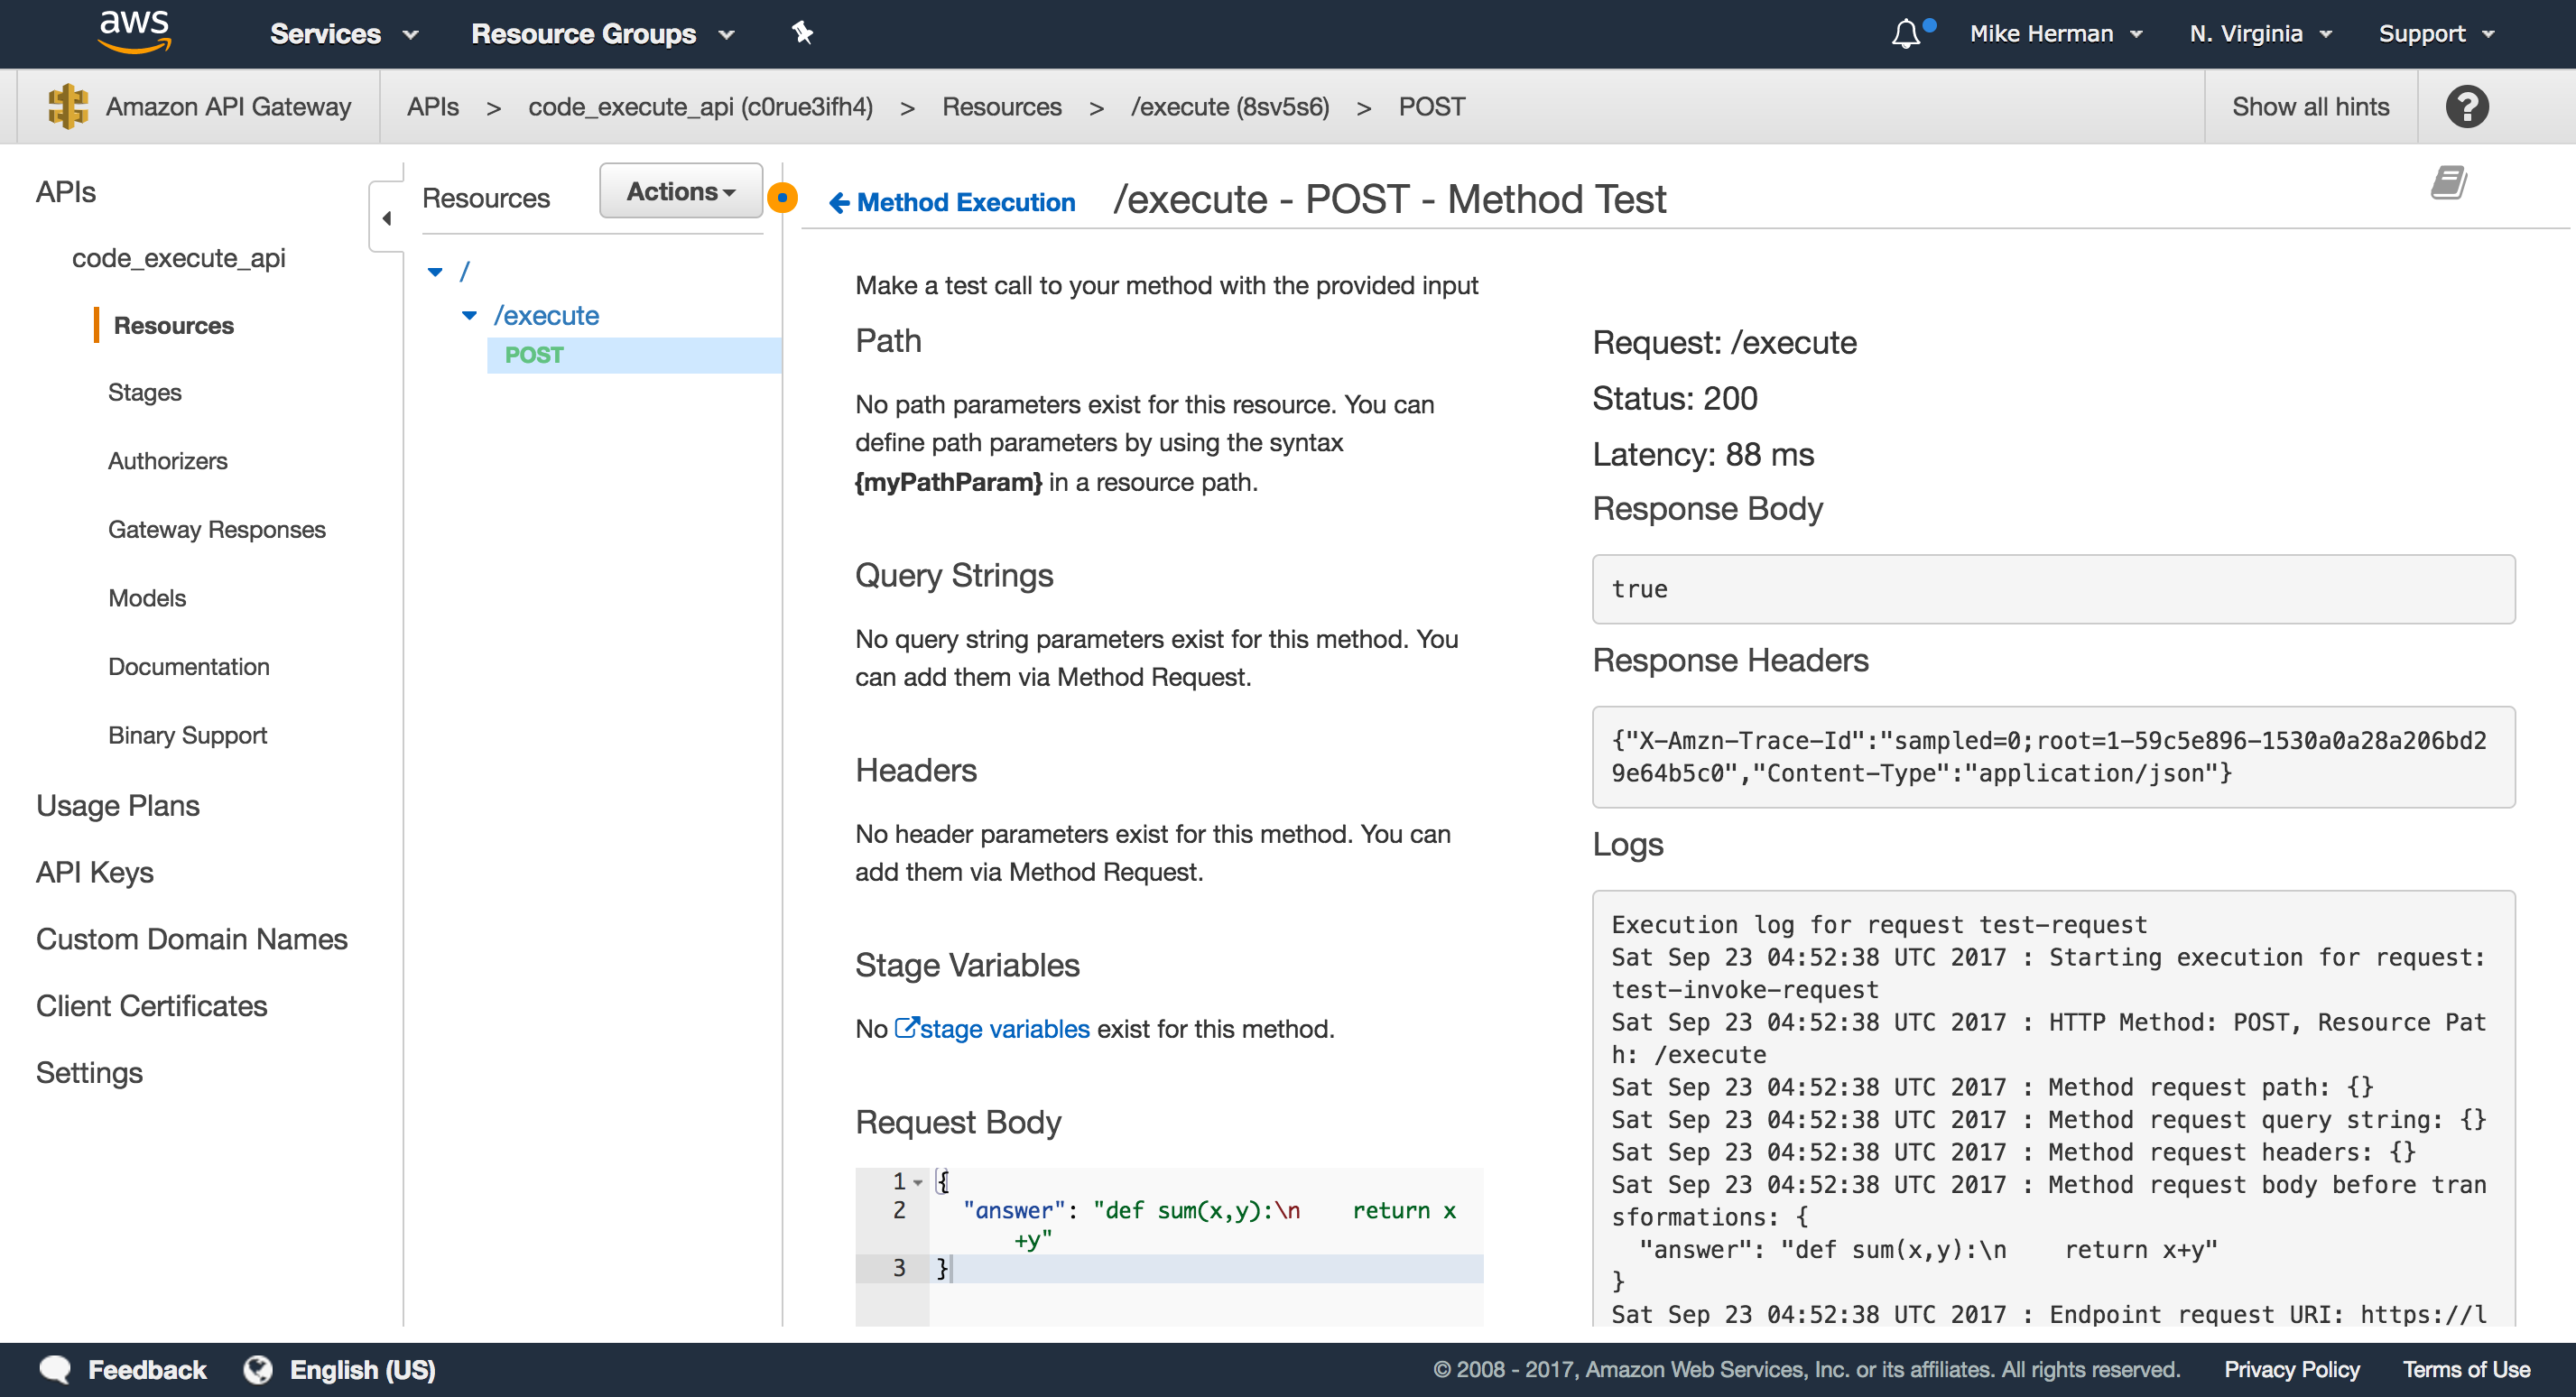
Test It Manually
To test, click on the lightning bolt that says “Test”.
Scroll down to the “Request Body” input and add the same JSON code we used with the Lambda function:
{
  "answer": "def sum(x,y):\n    return x+y"
}
Click “Test”. You should see something similar to:
Enable CORS
Next, we need to enable CORS so that we can POST to the API endpoint from another domain.
With the resource highlighted, select “Enable CORS” from the “Actions” drop-down:

Just keep the defaults for now since we’re still testing the API. Click the “Enable CORS and replace existing CORS headers” button.
Deploy the API
Finally, to deploy, select “Deploy API” from the “Actions” drop-down:

Create a new “Deployment stage” called ‘v1’:

API gateway will generate a random subdomain for the API endpoint URL, and the stage name will be added to the end of the URL. You should now be able to make POST requests to a similar URL:
https://c0rue3ifh4.execute-api.us-east-1.amazonaws.com/v1/execute

Test via cURL
$ curl -H "Content-Type: application/json" -X POST \
  -d '{"answer":"def sum(x,y):\n    return x+y"}' \
  https://c0rue3ifh4.execute-api.us-east-1.amazonaws.com/v1/execute
Update the Form
Now, to update the form so that it sends the POST request to the API Gateway endpoint, first add the URL to the grade function in assets/main.js:
function grade(payload) {
  $.ajax({
    method: 'POST',
    url: 'https://c0rue3ifh4.execute-api.us-east-1.amazonaws.com/v1/execute',
    dataType: 'json',
    contentType: 'application/json',
    data: JSON.stringify(payload)
  })
  .done((res) => { console.log(res); })
  .catch((err) => { console.log(err); });
}
Then, update the .done and .catch() functions, like so:
function grade(payload) {
  $.ajax({
    method: 'POST',
    url: 'https://c0rue3ifh4.execute-api.us-east-1.amazonaws.com/v1/execute',
    dataType: 'json',
    contentType: 'application/json',
    data: JSON.stringify(payload)
  })
  .done((res) => {
    let message = 'Incorrect. Please try again.';
    if (res) {
      message = 'Correct!';
    }
    $('.answer').html(message);
    console.log(res);
    console.log(message);
  })
  .catch((err) => {
    $('.answer').html('Something went terribly wrong!');
    console.log(err);
  });
}
Now, if the request is a success, the appropriate message will be added - via the jQuery html method - to an HTML element with a class of answer. Add this element, just below the HTML form, within index.html:
<h5 class="answer"></h5>
Let’s add a bit of style as well to the assets/main.css file:
.answer {
  padding-top: 30px;
  color: #dc3545;
  font-style: italic;
}
Test it out!


Next Steps
- Production: Think about what’s required for a more robust, production-ready application - HTTPS, authentication, possibly a data store. How would you implement these within AWS? Which AWS services can/would you use?
- Dynamic: Right now the Lambda function can only be used to test the
sumfunction. How could you make this (more) dynamic, so that it can be used to test any code challenge (maybe even in any language)? Try adding a data attribute to the DOM, so that when a user submits an exercise the test code along with solution is sent along with the POST request - i.e.,<some-html-element data-test="\nprint(sum(1,1))" data-results"2" </some-html-element>. - Stack trace: Instead of just responding with
trueorfalse, send back the entire stack trace and add it to the DOM when the answer is incorrect.
Thanks for reading. Add questions and/or comments below. Grab the final code from the aws-lambda-code-execute repo. Cheers!

