One of Django’s most popular features is the admin interface. For developers, it provides an out-of-the-box tool kit to work with your project’s data models. And it gives non-technical administrators an intuitive user interface (UI) for interacting with the database and creating website content. However, the Django admin doesn’t provide a way to format text-based content. Using Markdown with Django is a great solution.
Markdown is a plain text formatting language that can automatically convert to HTML for publishing on the Web. Due to its accessible syntax and widespread use in static site generators, productivity apps, and content management tools, it’s become a popular alternative to rich-text editors for both technical and non-technical content creators.
There are also several third-party What You See is What You Get (WYSIWYG) editors available for Django. These provide an interface for formatting text by using buttons on a menu bar while writing, similar to a word processor program. Other options include using a content management system such as Wagtail CMS, or working directly in HTML template files.
But when used in combination with the Django admin, Markdown provides a simpler alternative to a full-blown CMS and a friendlier user experience than working with HTML templates for both developers and content authors.
Many writers find it faster and more straightforward to work with Markdown than a WYSIWYG interface. Plus, there are additional benefits to separating the text and presentation layers of your web content, including increased security, less risk of syntax errors, and the ability to publish across multiple formats, such as email or PDF documents.
In this tutorial, you’ll learn how to render Markdown content with Django so that your website’s content creators can take advantage of the simplicity and convenience that have made Markdown such a popular choice for formatting text-based content. This tutorial assumes that you have some prior Django experience, so if you’re totally new to the framework, then you can learn to build your first Django app here.
Get Your Code: Click here to download the free sample code that shows you how to render Markdown in your Django apps.
How to Use Markdown for Content in a Django Application
In a Django application, incorporating Markdown can enhance the content management workflow for users who prefer to format their writing in plain text over a WYSIWYG editor. In this section of the tutorial, you’ll learn how to extend a Django application to allow the creation, management, and rendering of Markdown content.
You’ll walk through setting up a Django project and app, defining a model to store Markdown content, and creating Django templates to render that content as HTML. Additionally, you’ll explore using Python-Markdown to convert Markdown to HTML within your Django views.
By the end of this section, you’ll have a fully functional Markdown content management system within your Django application.
Create a Django App to Display Content
To render HTML content written as Markdown with Django, begin by creating a new Django project named dmd_project inside a Python virtual environment. You use dmd as a shorthand for Django Markdown:
The only dependencies that you’ll need for this tutorial are Django and the Python-Markdown package, which provides an API for working with Markdown in Python. Install markdown into your virtual environment with pip:
Now create a new Django app with the manage.py startapp command:
You’ve used the startapp command to create the dmd_app/ folder, which contains the necessary files for composing that content through the Django admin interface, storing it in your project’s database, and displaying it to users as HTML. Add your new app to the INSTALLED_APPS setting in your project’s settings.py file:
dmd_project/settings.py
INSTALLED_APPS = [
    "django.contrib.admin",
    "django.contrib.auth",
    "django.contrib.contenttypes",
    "django.contrib.sessions",
    "django.contrib.messages",
    "django.contrib.staticfiles",
    "dmd_app",
]
To create a new database table for storing your project’s content, define a MarkdownContent model in the models.py file inside your dmd_app/ directory:
dmd_app/models.py
from django.db import models

class MarkdownContent(models.Model):
    title = models.CharField(max_length=100)
    content = models.TextField()

    class Meta:
        verbose_name_plural = "Markdown content"

    def __str__(self):
        return self.title
Your MarkdownContent model contains two fields: a title field limited to a hundred characters and a content field that can contain an unlimited amount of text. The content field is where you’ll store your web-based content as Markdown.
After defining your model, run the makemigrations and migrate Django management commands, which translate your Python code into SQL and execute it on your project’s database to create the table:
Now that you’ve defined your MarkdownContent model, register it with the admin module. This allows your website’s content creators to log in and compose their content through the admin interface:
dmd_app/admin.py
from django.contrib import admin
from .models import MarkdownContent

admin.site.register(MarkdownContent)
In order to log in to the admin site, you need to create a new superuser account for yourself. Follow the prompts at the console after entering the following command:
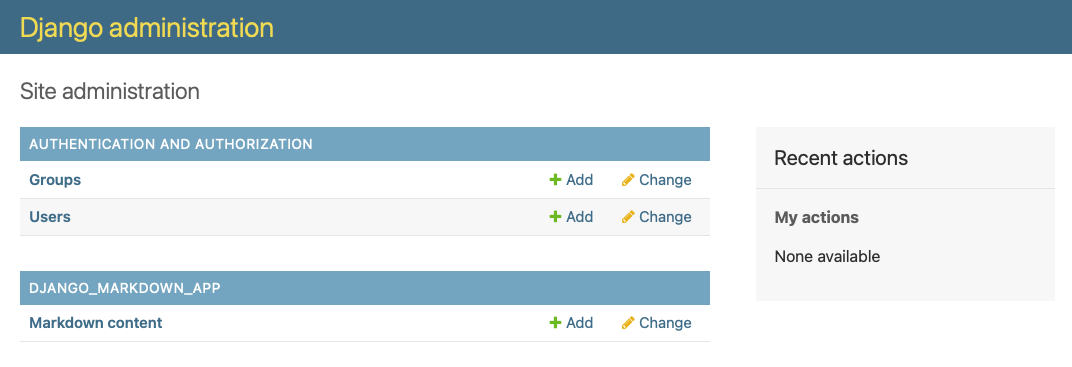
Use the runserver Django management command to start your local development server and then navigate to http://127.0.0.1:8000/admin/ in your browser. Now, you should see the admin login screen where you can enter the username and password that you just created. Log in to view the admin interface with a section for creating database records for your MarkdownContent model:
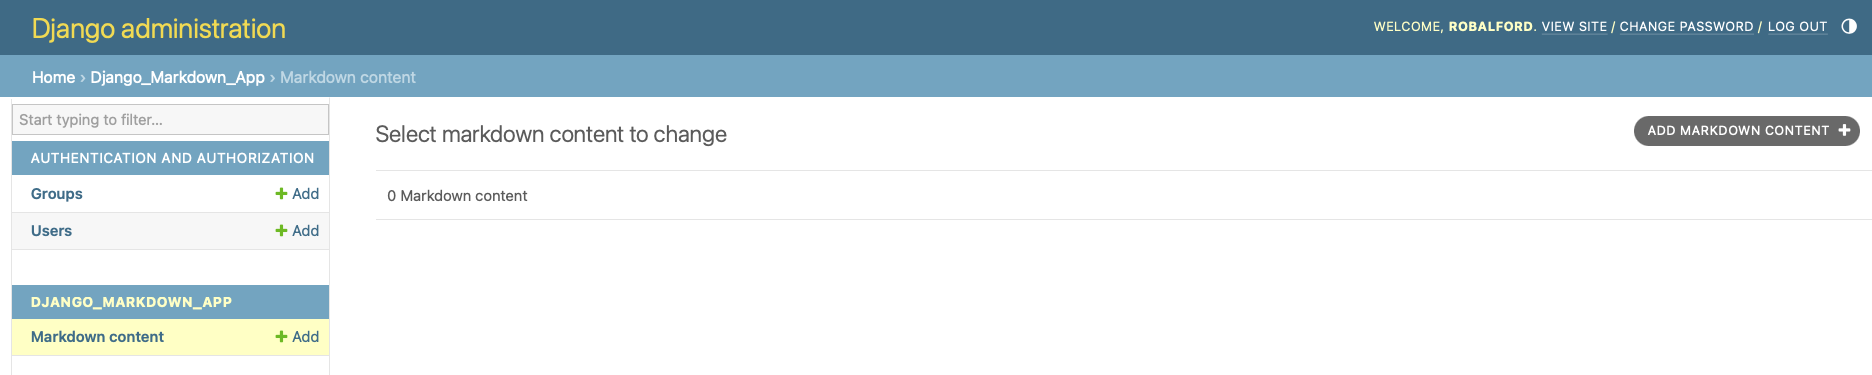
Click the Markdown content link, followed by the button that reads ADD MARKDOWN CONTENT at the top right of the screen:
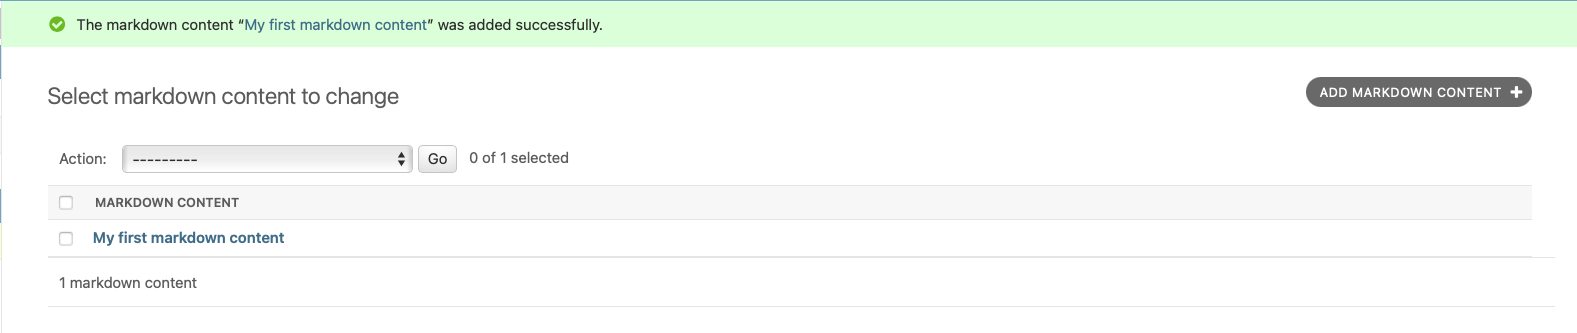
Enter a title and some content into the form fields to create a new MarkdownContent record and select Save, which will redirect you to the admin list view for your MarkdownContent model:
Now that you’ve created some initial content, you can add the final pieces that your Django project needs to display that content for your users:
- An HTML template file
- A Python view function
- A URL pattern for your page
Start by creating a new folder to hold your Django template files at dmd_app/templates/. Then, create a subfolder inside of templates/ named dmd_app/ with a new file inside named markdown_content.html.
This folder-nesting convention helps the Django template loader find the right templates by creating a unique namespace for templates that are specific to this Django app. Add the following code to that file:
dmd_app/templates/dmd_app/markdown_content.html
<!doctype html>
<html lang="en-US">
  <head>
    <meta charset="utf-8" />
    <title>Django Markdown</title>
  </head>
  <body>
    <h1>{{ markdown_content.title }}</h1>
    <p>{{ markdown_content.content }}</p>
  </body>
</html>
Here, you’ve created an HTML template using the Django template variable syntax of {{ markdown_content.title }}, which Django will replace with your MarkdownContent model instance values when rendering the page in the browser. But first, you need to load your model instance from the database in your Django view file.
In your dmd_app/ directory’s views.py file, define a view function to retrieve the MarkdownContent record that you just created as a model instance and pass that instance as a context variable to render in your template:
dmd_app/views.py
from django.shortcuts import render
from .models import MarkdownContent

def markdown_content_view(request):
    markdown_content = MarkdownContent.objects.first()
    context = {"markdown_content": markdown_content}
    return render(
        request,
        "dmd_app/markdown_content.html",
        context=context
    )
This code uses .objects.first() to retrieve the single MarkdownContent instance that you created in the Django admin. Note that this view code will fail if you haven’t already created a MarkdownContent model instance. You’ll improve this code later in the tutorial, but for now, be sure to create your initial model instance in the admin, following the steps above, before it runs.
Add a new path object to the urlpatterns list in your project’s urls.py file to define the URL pattern for your content page:
dmd_project/urls.py
from django.contrib import admin
from django.urls import path
from dmd_app.views import markdown_content_view

urlpatterns = [
    path("admin/", admin.site.urls),
    path(
        "markdown-content/", markdown_content_view, name="markdown-content"
    ),
]
The path object that you added to urlpatterns includes three parameters. You have the URL string, the view function markdown_content_view() that Django will call when a user navigates to the URL in their browser, and a unique URL name for use in Django templates.
Now, if you navigate to http://127.0.0.1:8000/markdown-content/ in your browser, then you should see the content that you created in the admin. With all the necessary pieces in place to create, save, and display content for your website, you can now add Markdown-rendering capabilities to your Django project.
Add Markdown Content to Your Django App
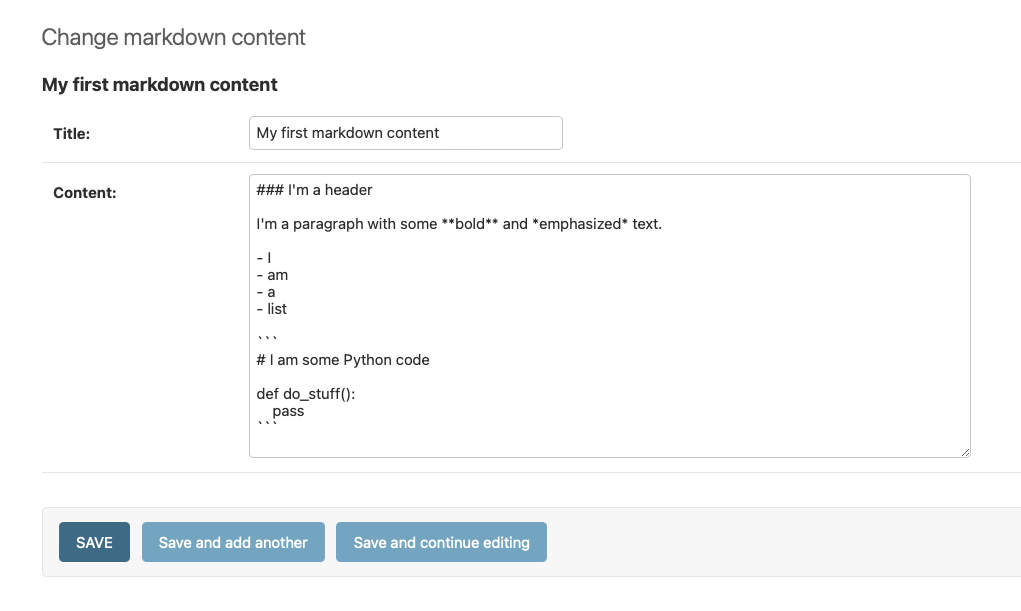
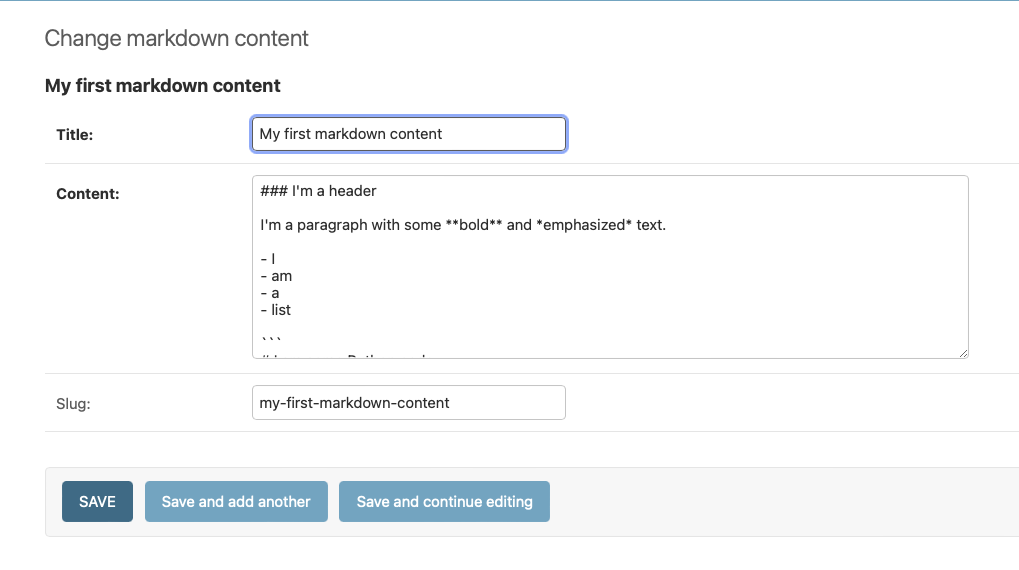
Log back into the admin, select Markdown content, and then click on the link to the Markdown content with your model instance from the list titled Select markdown content to change. Replace the text that you entered in the Content field with new text that includes Markdown:
### I'm a header

I'm a paragraph with some **bold** and *emphasized* text.

- I
- am
- a
- list

```
# I am some Python code

def do_stuff():
    pass
```
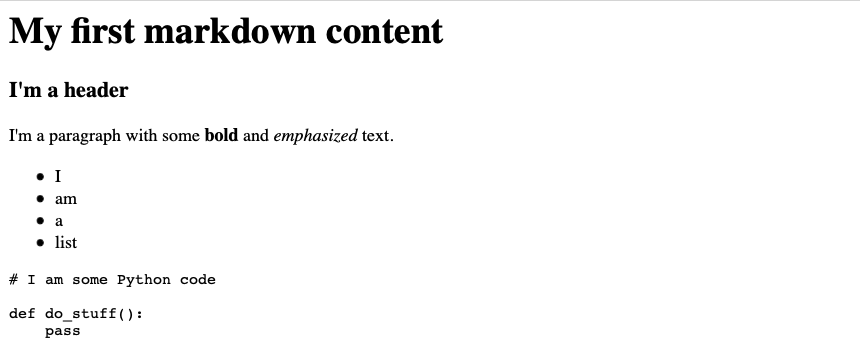
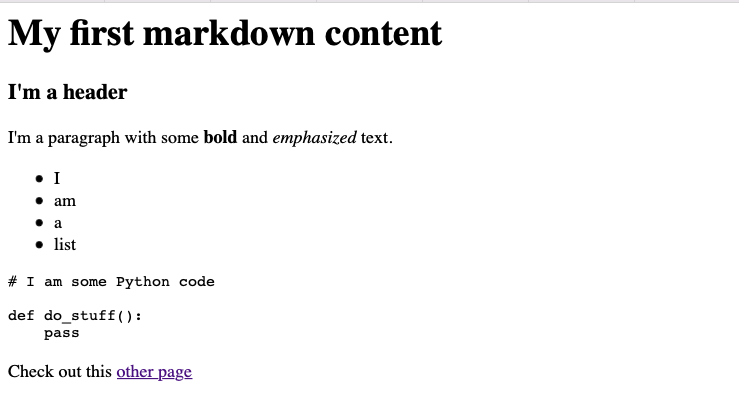
This text uses Markdown syntax to create a header, paragraph, unordered list, and code block. After replacing your content with text that includes Markdown, click Save:
Return to http://127.0.0.1:8000/markdown-content/ in your browser, and you’ll see a great big mess:

But you can clean that up using the Python-Markdown package that you installed in the initial setup of your project. In your dmd_app/views.py file, import the markdown module and edit your code to look like this:
dmd_app/views.py
import markdown
from django.shortcuts import render
from .models import MarkdownContent

def markdown_content_view(request):
    md = markdown.Markdown(extensions=["fenced_code"])
    markdown_content = MarkdownContent.objects.first()
    markdown_content.content = md.convert(markdown_content.content)
    context = {"markdown_content": markdown_content}
    return render(
        request,
        "dmd_app/markdown_content.html",
        context=context
    )
Here, you initialize markdown.Markdown in your view function, passing in the fenced_code option to the extensions parameter, which allows you to display formatted code blocks. You then call .convert() on your markdown_content model instance’s content attribute, converting your content into HTML. But now, if you load the page at http://127.0.0.1:8000/markdown-content/, then you’ll see the actual HTML markup displayed on the screen:

You can fix that by adding Django’s built-in safe filter to the markdown_content.content variable in your template file:
dmd_app/templates/dmd_app/markdown_content.html
<!doctype html>
<html lang="en-US">
  <head>
    <meta charset="utf-8" />
    <title>Django Markdown</title>
  </head>
  <body>
      <h1>{{ markdown_content.title }}</h1>
      <p>{{ markdown_content.content|safe }}</p>
  </body>
</html>
This built-in template filter tells the Django template engine that the content field’s dynamic content comes from a trusted source and is safe to transform into HTML. Now, your content should render properly for the users of your website:
Now you’ve got Markdown formatting working in the Django admin. And, if you want to format content on other pages of your website, then you can turn to a more reusable solution by creating a custom template filter in the next section.
Format Markdown With a Custom Django Template Filter
This approach to Markdown formatting works as a quick, one-off solution in a Django application. But it’s tightly coupled to the view and model code for this particular use case. And if you want to use Markdown in other areas of your website, then you’re going to end up with a lot of repeated and redundant code that’s tedious to maintain—and that’s never a good thing!
Wouldn’t it be nice if you could write the formatting code once and add it to any field in your templates in the same way that you added the built-in safe filter in the previous example? Thanks to Django’s custom template tags and filters feature, you can.
Custom template filters provide an interface for defining your own Python functions to manipulate the context variable values in your templates in exactly the same way as Django’s built-in filters.
To define a custom Markdown filter, begin by creating a new templatetags/ directory inside dmd_app/ alongside views.py and other boilerplate files. Be sure to add an empty __init__.py inside templatetags/ so that Django can recognize it as a new Python package. Then create a new dmd_extras.py file alongside __init__.py and add the following code:
dmd_app/templatetags/dmd_extras.py
import markdown

from django import template
from django.template.defaultfilters import stringfilter
from django.utils.safestring import mark_safe

register = template.Library()

@register.filter
@stringfilter
def render_markdown(value):
    md = markdown.Markdown(extensions=["fenced_code"])
    return mark_safe(md.convert(value))
In this code, @register.filter registers your render_markdown() filter function with your project’s tag and filter library using the template.Library instance named register. The @stringfilter decorator indicates that your function will accept only string values. The mark_safe() function works like the safe built-in filter, indicating that the HTML characters from the md.convert() method are safe to render without further escaping.
Note that in a real-world project, you’d need to think through your specific use case to ensure that the text that you’re processing is indeed safe. Django provides a range of flexible character escaping options to use when defining custom tags and filters.
Now that you’ve moved the Markdown rendering code into your custom filter function, you can remove the Markdown-related code from your view function:
dmd_app/views.py
from django.shortcuts import render
from .models import MarkdownContent

def markdown_content_view(request):
    markdown_content = MarkdownContent.objects.first()
    context = {"markdown_content": markdown_content}
    return render(
        request,
        "dmd_app/markdown_content.html",
        context=context
    )
You can use your new render_markdown() filter in your template code instead:
dmd_app/templates/dmd_app/markdown_content.html
{% load dmd_extras %}

<!doctype html>
<html lang="en-US">
  <head>
    <meta charset="utf-8" />
    <title>Django Markdown</title>
  </head>
  <body>
    <h1>{{ markdown_content.title }}</h1>
    <p>{{ markdown_content.content|render_markdown }}</p>
  </body>
</html>
Now, if you reload the page at http://127.0.0.1:8000/markdown-content/, then you should see your content rendered properly as HTML, just as before. But now Django uses your custom template filter, which you can also use anywhere else that you want to allow for Markdown-based editing in your project’s admin.
Create Your Own Custom Python-Markdown Extension
Although the Python-Markdown package provides all the necessary functionality to begin working with Markdown-formatted text in Python, it also gives you the ability to define your own custom extensions. This allows you to customize Markdown syntax to further streamline its integration with Django.
To test this out, you’ll create an extension that can link to website pages by slugs rather than URLs while using the standard Markdown inline link syntax of [link text](url). In web development, the term slug refers to a component of a URL consisting of letters, numbers, underscores, or hyphens and often deriving from the title of a web page or section of a website.
Your custom syntax will allow authors to write [link text](slug:page-slug), where page-slug is the slug field value defined on the page’s model. This will be a nice user experience improvement for content creators, saving them from having to type out the entire URL for each internal page that they want to link to.
Django provides a SlugField model field that you can add to your MarkdownContent model definition and then apply to your project’s database by running python manage.py makemigrations followed by python manage.py migrate in your console:
dmd_app/models.py
from django.db import models

class MarkdownContent(models.Model):
    title = models.CharField(max_length=100)
    content = models.TextField()
    slug = models.SlugField(blank=True)

    class Meta:
        verbose_name_plural = "Markdown content"

    def __str__(self):
        return self.title
After running your migration commands, edit dmd_app/admin.py to create a value for your MarkdownContent.slug field based on the value of your title field when you enter that value into the admin form for your model like so:
dmd_app/admin.py
from django.contrib import admin
from .models import MarkdownContent

class MarkdownContentAdmin(admin.ModelAdmin):
    prepopulated_fields = {"slug": ["title"]}

admin.site.register(MarkdownContent, MarkdownContentAdmin)
Now, if you return to the admin to edit the content for your MarkdownContent page, then you should see the new Slug field populate when you select the form field for your Title field:
Select Save and then edit your project’s urls.py file to use the MarkdownContent.slug field in the page URL:
dmd_project/urls.py
from django.contrib import admin
from django.urls import path
from dmd_app.views import markdown_content_view

urlpatterns = [
    path("admin/", admin.site.urls),
    path(
        "markdown-content/<slug:slug>/",
        markdown_content_view,
        name="markdown-content",
    ),
]
In this code, you’ve updated your path object to use a new slug parameter in the URL string. Now, if you point your browser to http://127.0.0.1:8000/markdown-content/my-first-markdown-content/, then Django will take the slug value of my-first-markdown-content and pass it as a parameter to markdown_content_view().
But first, you need to modify your view code to accept the page slug as a parameter and use Django’s get_object_or_404() function to query for the page or return an error message if the slug in the URL doesn’t exist:
dmd_app/views.py
from django.shortcuts import render, get_object_or_404
from .models import MarkdownContent

def markdown_content_view(request, slug):
    markdown_content = get_object_or_404(MarkdownContent, slug=slug)
    context = {"markdown_content": markdown_content}
    return render(
        request,
        "dmd_app/markdown_content.html",
        context=context
    )
Now, in order to navigate to one of your MarkdownContent pages in your browser, you’ll need to add the slug for the specific page to the end of the URL like this: http://127.0.0.1:8000/markdown-content/my-first-markdown-content/.
You can now build a custom Python-Markdown extension that allows content authors to use your new slug field as a more concise way to reference internal website URLs in their Markdown content. Begin by creating a new file inside your dmd_app/ directory called markdown_extensions.py. Then add the following code to that file:
dmd_app/markdown_extensions.py
import markdown
from django.urls import reverse
from markdown.inlinepatterns import LinkInlineProcessor, LINK_RE

class SlugFieldLinkInlineProcessor(LinkInlineProcessor):
    def getLink(self, data, index):
        href, title, index, handled = super().getLink(data, index)
        if href.startswith("slug"):
            slug = href.split(":")[1]
            relative_url = reverse("markdown-content", args=[slug])
            href = relative_url
        return href, title, index, handled

class SlugFieldExtension(markdown.Extension):
    def extendMarkdown(self, md, *args, **kwargs):
        md.inlinePatterns.register(
            SlugFieldLinkInlineProcessor(LINK_RE, md), "link", 160
        )
Here, SlugFieldLinkInlineProcessor inherits from LinkInlineProcessor, which is responsible for processing inline links written in the Markdown syntax pattern [link text](url). In order to use the same syntax pattern to link to pages with their slugs, you override .getLink() in your subclass and check for inline links that use your custom [link text](slug:page-slug) pattern.
If an inline link begins with "slug," then you use .reverse() to build out the entire relative URL and return that as the href value. Then, you subclass markdown.Extension to replace LinkInlineProcessor with your custom extension.
Python-Markdown processors run in a specific order to properly convert the Markdown syntax to HTML code. They must handle backticks and escaped characters first, followed by links, and then inline HTML. Because your extension adds functionality to the existing LinkInlineProcessor processor, you want to use the same 160 priority level as the original base class.
When creating your own custom extensions, you can refer to Python-Markdown’s default processor ordering by viewing the source code. Plus, you can learn more about implementing custom Python-Markdown extensions in their official tutorial.
The next step is to add your custom SlugFieldExtension to the list of Python-Markdown extensions where you instantiate the markdown.Markdown class in your dmd_extras.render_markdown() custom template filter:
dmd_app/templatetags/dmd_extras.py
import markdown

from django import template
from django.template.defaultfilters import stringfilter
from django.utils.safestring import mark_safe

from dmd_app.markdown_extensions import SlugFieldExtension

register = template.Library()

@register.filter
@stringfilter
def render_markdown(value):
    md = markdown.Markdown(extensions=["fenced_code", SlugFieldExtension()])
    return mark_safe(md.convert(value))
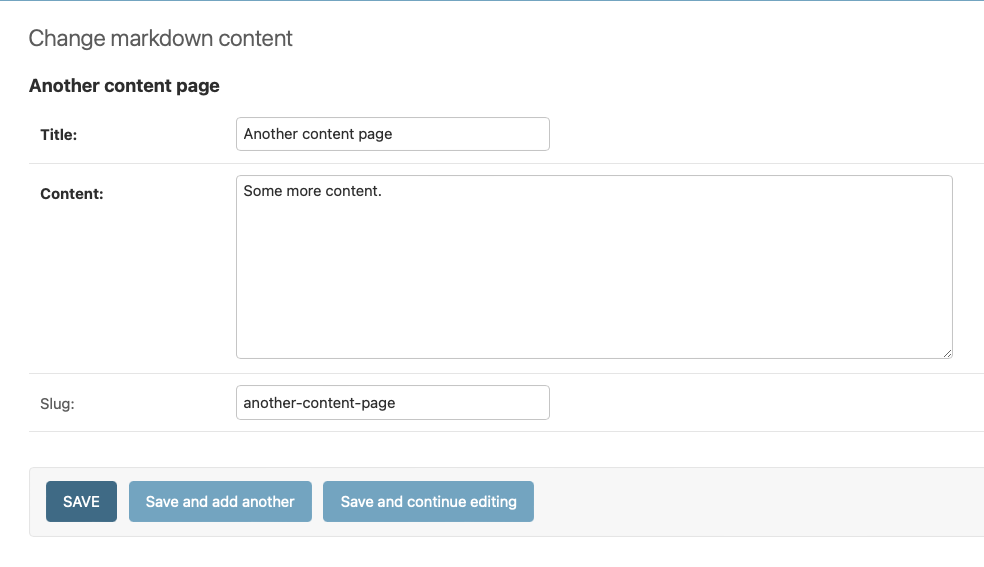
Now log back into the admin and create a new Markdown content page record:
Then edit the Content field of your original Markdown content page to use the custom slug field Markdown syntax, [link text](slug:page-slug), where page-slug is the slug field value of the new Markdown content page that you just created:
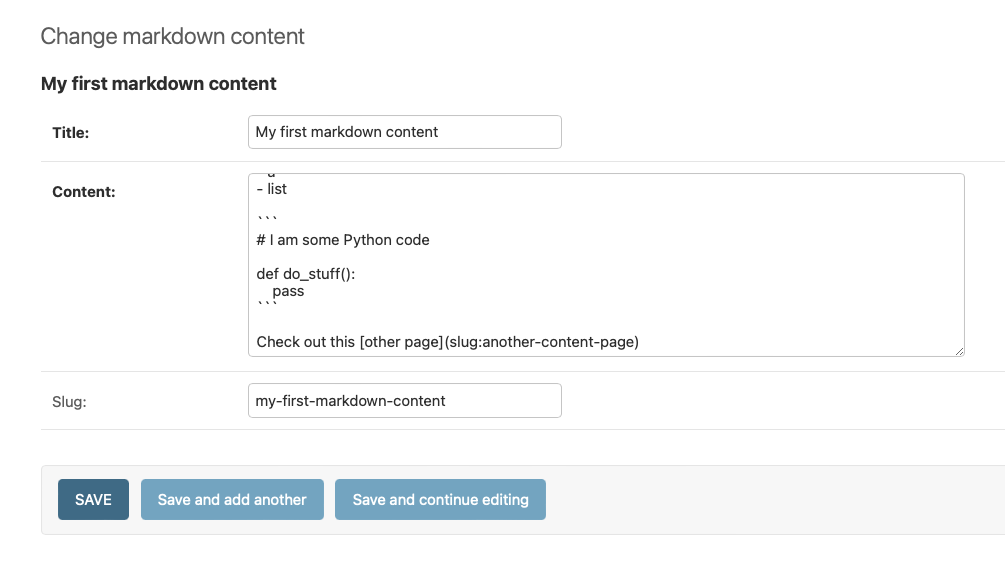
Save your changes and navigate to your original content page, where you should see your new content rendered as an inline HTML anchor link:
Click on the link, and your browser will navigate to your new Markdown content page using the relative URL value that your custom Python-Markdown extension retrieved from the page slug:

With the ability to hook into the Python-Markdown code at any stage in the rendering process, there are countless ways to extend its default functionalities and customize your own Markdown integrations to work with Django. In this small example, you modified Markdown’s inline link syntax to work with Django’s slug field and django.urls.reverse(), so you now have a sense of the potential advantages of pairing these two technologies.
Add Code Syntax Highlighting to Your Markdown Content
Having the ability to write your own Python-Markdown extensions is great, but like all things in software development, it’s better not to reinvent the wheel when there’s an out-of-the-box solution available to meet your needs.
Adding syntax highlighting to the code blocks in your Markdown content would be a nice feature to improve readability for your website’s users. But this would be a major undertaking to implement as a custom extension. Thankfully, Python-Markdown provides an officially supported CodeHilite extension that you can plug into your project and use for free.
To use the CodeHilite extension, you must first install Pygments, a code syntax highlighting package for Python:
With Pygments installed, you can use its pygmentize command-line utility to generate a CSS stylesheet to add syntax highlighting to your code blocks.
But first, you need to create a new static/ folder inside dmd_app/ so that Django knows where to find your static CSS file. Inside that static/ folder, create another new folder called dmd_app/, which works to namespace these files in the same way that you did before with your template folder structure.
Change directories to your new static file folder and run the following pygmentize command:
This command tells Pygments to create a new styles.css file with the CSS styles to add syntax highlighting to your project’s HTML code using Pygments’ default color settings and a .codehilite CSS class name. The CodeHilite extension will then add the .codehilite CSS class name to your code blocks when Python-Markdown renders your HTML from Markdown.
To use the styles.css file in your HTML, you’ll need to make the following modifications to your template code:
dmd_app/templates/dmd_app/markdown_content.html
{% load static %}
{% load dmd_extras %}

<!doctype html>
<html lang="en-US">
  <head>
    <meta charset="utf-8" />
    <title>Django Markdown</title>
    <link rel="stylesheet" type="text/css"
          href="{% static 'dmd_app/styles.css' %}">
  </head>
  <body>
    <h1>{{ markdown_content.title }}</h1>
    <p>{{ markdown_content.content|render_markdown }}</p>
  </body>
</html>
This code uses Django’s static template tag to point to your styles.css file so that you can load it with an HTML <link> element.
Navigate to the Django admin interface in your browser and return to the first Markdown content instance that you created. Update the code block that you entered in your Content field to look like this:
```python
# I am some Python code

def do_stuff():
    pass
```
Adding python to the Markdown code block tells CodeHilite which programming language to use for syntax highlighting. You can test this out by adding another code block to your Content field with some HTML code to highlight:
```html
<!-- I am some HTML code -->

<h1>My Cool Headline</h1>
```
Save your changes and open dmd_extras.py, where you defined your custom render_markdown() template filter. Update render_markdown() to use the CodeHilite extension:
dmd_app/templatetags/dmd_extras.py
# ...

@register.filter
@stringfilter
def render_markdown(value):
    md = markdown.Markdown(
        extensions=["fenced_code", "codehilite", SlugFieldExtension()]
    )
    return mark_safe(md.convert(value))
Because CodeHilite is one of Python-Markdown’s officially supported extensions, all you have to do is add the "codehilite" string to your extensions list argument, and it’ll just work.
View your original Markdown content page in your browser again, and you should see the syntax highlighting working properly for your Python and HTML code blocks:

Now your HTML content includes syntax highlighting, which is a nice readability feature to add for your website’s users. In addition to Python-Markdown’s officially supported extensions, many third-party extensions are available as well.
Conclusion
In this tutorial, you learned how to leverage the Python-Markdown package to render Markdown content in a Django application. This package provides the capability to write website content using Markdown syntax in the Django admin.
You began by creating a single dedicated Django view and template to display your rendered content as HTML. Then, you created a custom template filter for a more flexible approach. You can reuse this filter in other templates in your project.
You discovered the potential of custom Python-Markdown extensions by creating an extension that uses Markdown’s inline link syntax to convert web page slugs to URLs. And you began to explore the ecosystem of official and third-party Markdown extensions by using the CodeHilite extension to add syntax highlighting to code blocks in your website content.
Get Your Code: Click here to download the free sample code that shows you how to render Markdown in your Django apps.