Have you ever struggled to keep track of the things that you need to do? Perhaps you’re in the habit of using a handwritten to-do list to remind you of what needs doing, and by when. But handwritten notes have a way of getting lost or forgotten. Because you’re a Python coder, it makes sense to build a Django to-do list manager!
In this step-by-step tutorial, you’re going to create a web app using Django. You’ll learn how Django can integrate with a database that stores all your to-do items in lists that you can define. Each item will have a title, a description, and a deadline. With this app, you can manage your own deadlines and help your entire team stay on track!
In this tutorial, you’ll learn how to:
- Create a web app using Django
- Build a data model with one-to-many relationships
- Use the Django admin interface to explore your data model and add test data
- Design templates for displaying your lists
- Leverage class-based views to handle the standard database operations
- Control the Django URL dispatcher by creating URL configurations
Along the way, you’ll learn how Django’s class-based views leverage the power of object-oriented programming. That’ll save you a ton of development effort!
Get Source Code: Click here to get the source code you’ll use to build your to-do list app.
Demo
In this tutorial, you’ll build a Django to-do list manager. Your main page will display all of your to-do lists. By clicking the Add a new list button, you’ll display a page where you can name and create a new list:
You’ll be able to add to-do items to your list by clicking Add a new item. There, you can give your item a title, and you can add more details in the Description box. You can even set a due date.
Project Overview
To build this app, you’ll start by creating a virtual environment and setting up a Django project. Next, you’ll design a data model that represents the relationships between to-do items and lists. You’ll use Django’s built-in object-relational mapping tool to automatically generate the database and tables that’ll support this model.
As you develop your Django to-do list app, you’ll use Django’s handy runserver command whenever you need to verify that things are working as expected. This can help even before your web pages are ready, thanks to Django’s ready-made admin interface.
Next, you’ll develop your own web pages to display your app. In Django, these take the form of templates. Templates are skeleton HTML pages that can be populated with real application data.
Templates aren’t meant to provide much logic, such as deciding which template to display and what data to send it. To perform that logic, you’ll need views. Django’s views are the natural home for the application’s logic.
You’ll code views and templates for list creation and updates, as well as for the items that those lists will contain. You’ll learn how to use Django’s URL dispatcher to connect your pages and pass them the data that they need. Next, you’ll add more views and templates that enable your users to delete lists and items.
Finally, you’ll test your new user interface by adding, editing, and deleting to-do lists and to-do items.
By completing this project, you’ll learn how to build this app and also understand how the various components fit together. Then, you’ll be ready to undertake your next Django project on your own.
Prerequisites
To complete this tutorial, you should be comfortable with the following skills:
- Running Python scripts from the command line
- Coding in Python IDLE, or your favorite code editor
- Using Python modules and packages
- Understanding object-oriented programming in Python, including object inheritance
If you don’t have all of the prerequisite knowledge before starting this tutorial, that’s okay. In fact, you might learn more by going ahead and getting started! You can always stop and review the resources linked here if you get stuck.
You don’t need to have used Django before, because you’ll get step-by-step instructions for installing and using it below. However, if you’re interested in a more detailed introduction to this powerful web framework, there’s a whole range of Django tutorials that you can consult.
Step 1: Set Up Your Virtual Environment and Django
In this step, you’re going to perform a few standard housekeeping tasks that you should only need to do once per Django project. Specifically, you’ll make and activate a virtual environment, install Django, and test that Django is installed correctly.
With those minor chores out of the way, you’ll be ready to start building your Django to-do list app!
To download the initial code for this project, click the following link and navigate to the source_code_step_1/ folder:
Get Source Code: Click here to get the source code you’ll use to build your to-do list app.
Create a Virtual Environment and a Project Directory
Whenever you develop something using Python, and especially if you’ll be using external libraries, it’s important to create a virtual environment. This way, you create an isolated world for your code so that the Python and library versions that you choose can’t accidentally break any other applications that you’ve written for other versions.
Then, if you later use a different version of Python or an updated library for another project, you won’t break anything from this project, because it’ll continue to use its own Python and library versions.
Creating a virtual environment involves just a couple of steps. First, create a directory as the root of your new application, and cd into it using the syntax appropriate for your operating system:
With that, you’ve created your project root. Everything that you do in this tutorial will take place inside this folder. You’ve called it todo_list, and just to keep things tidy, you’ve put it inside an existing folder named projects/ in your home directory.
Make sure that you have Python 3.6 or newer installed, and then you can use Python’s built-in module venv to create and activate your virtual environment:
The first line creates your virtual environment in the subdirectory venv/. It also copies pip and setuptools into it. The second line activates the virtual environment, and your console prompt may change to remind you of that fact.
After activating, you’re using a completely independent Python interpreter and ecosystem. Any libraries that you install from now on, including Django, will be isolated to this environment.
Later, when you’ve finished working in the virtual environment, you can just type deactivate, after which everything will go back to how it was. Your system’s default Python interpreter will be reinstated, along with your globally installed Python libraries.
Note: Don’t deactivate right now, as you want to continue in the activated environment!
When needed, you can always reactivate the environment by repeating the activate step above.
Install and Test Django
Your next step is to install the Django library and its dependencies. You’ll specify a particular version here, though it’s also possible to leave the version unspecified, in which case pip will just install the latest one.
The pip machinery takes care of installing all the Django dependencies too, as you’ll notice from the list of packages that scrolls past.
After the clicking and whirring is done, you should see a success message:
Successfully installed asgiref-3.4.1 django-3.2.9 pytz-2021.3 sqlparse-0.4.2
The Django library is now installed in your virtual environment. Django, its command-line tools, and its libraries will remain available as long as this environment is active.
You can use the Python interpreter to check that Django has been installed correctly. After invoking python from the command line, you can import Django and check its version interactively:
>>> import django
>>> django.get_version()
'3.2.9'
>>> exit()
If you get a version number, as above, and not an ImportError, then you can be confident that your Django installation is good to go.
It’s a good idea now to pin your dependencies. This records the versions of all the Python libraries currently installed in your virtual environment:
The text file requirements.txt now lists the exact versions of all the packages that you’re using, so you or another developer can exactly reproduce your virtual environment at a later time.
With that, you’ve set up the code environment and installed the necessary libraries. It’s time to start generating some Django code!
Step 2: Create Your Django To-Do App
Now that your environment is active and you have Django ready to roll, you’re almost ready to start your own coding. First, though, you need to use Django’s tooling to perform a few project-specific steps. These include:
- Generating the parent project framework
- Creating the web app’s framework
- Integrating the web app into the project
All Django projects share a similar structure, so understanding this layout will benefit your future projects too. Once you’re familiar with this process, you should be able to complete it within a couple of minutes.
To download the code for this stage of the project, click the following link and navigate to the source_code_step_2/ folder:
Get Source Code: Click here to get the source code you’ll use to build your to-do list app.
Scaffold the Parent Project
Django distinguishes between a project and an app. A project can manage one or many apps. For this tutorial, you’re just creating one app, but it must still be managed by a project, which you can call todo_project. Start your new project now:
Notice the final dot (.) here. It stops django-admin from creating an extra level of folders.
This command has automatically created a file named manage.py, along with a subfolder named todo_project/ containing several Python files:
todo_list/
│
├── todo_project/
│   ├── __init__.py
│   ├── asgi.py
│   ├── settings.py
│   ├── urls.py
│   └── wsgi.py
│
├── venv/
│
├── manage.py
└── requirements.txt
The contents of the todo_list/venv/ folder are too large to show here. You’ll learn about some of the other files below.
The file named __init__.py is empty. It exists only to tell Python that its containing folder should be treated as a package. Conceptually, a Python module is a single source file, and a package is a container for a bunch of modules. By organizing modules inside packages, you can reduce name pollution and improve code isolation.
Two of the files inside todo_list/todo_project/ are important for your app:
settings.pyholds the project-wide configuration. This includes a list of all the apps that the project knows about, as well as a setting that describes which database it’ll use.urls.pyhas a list of all the URLs that the server must listen for.
You’ll soon need to edit both of these files as you set things up. You’ll need to add your app’s name to settings.py and also provide a URL as an entry point for browsers wanting to access the application.
Get Started on Your Django To-Do List App
Now it’s time to create your app using the django-admin command-line tool. All you need to supply is a name. You may as well call it todo_app:
This command sets up a new Django app, with a few starter files and folders. If you check your folder, then you’ll find that you now have three subfolders inside your project root:
todo_list/
│
├── todo_app/
│
├── todo_project/
│
└── venv/
It helps to remember that todo_project/ is your project folder and contains project-wide information. That means general project settings, and information that the web server will need to find the app or apps that your project contains.
On the other hand, your last command just created the todo_app/ folder and its contents. todo_app/ is your app folder and contains files specific to your app. Have a look at the files inside this folder:
todo_app/
│
├── migrations/
│   └── __init__.py
│
├── __init__.py
├── admin.py
├── apps.py
├── models.py
├── tests.py
└── views.py
The django-admin tool created all these files for you, but you don’t need to concern yourself with all of them now. However, there are a few that are definitely worth noticing:
- The two
__init__.pyfiles are there, as usual, just to define their containing folders as packages. - The
migrations/subfolder will hold information about changes to your future database. - The
models.pyfile will define the data model for your app. - The
views.pyfile will handle the logic controlling the app display.
Along the way, you’ll also create a few more files of your own. These will include a data model, new views, and new templates.
First, though, you need to configure your project so that it knows about your app. The project-level configuration lives in the project directory, in the file todo_list/todo_project/settings.py.
Open that file now and glance through the code to get an idea of what’s available.
Configure Your Project
You’ll notice an array named INSTALLED_APPS with a short list of app names, starting with django.contrib. Django provides these apps and helpfully installs them by default to address common needs. But one all-important app name is missing from the list: yours! So you need to add todo_app as an item in the array INSTALLED_APPS:
# todo_list/todo_project/settings.py
INSTALLED_APPS = [
    "django.contrib.admin",
    "django.contrib.auth",
    "django.contrib.contenttypes",
    "django.contrib.sessions",
    "django.contrib.messages",
    "django.contrib.staticfiles",
    "todo_app",
]
While you have settings.py open, notice that it contains a few other interesting variables. One example of such a variable is DATABASES:
# Database
# https://docs.djangoproject.com/en/3.2/ref/settings/#databases

DATABASES = {
    "default": {
        "ENGINE": "django.db.backends.sqlite3",
        "NAME": BASE_DIR / "db.sqlite3",
    }
}
DATABASES is set up by default to use the sqlite3 database. This is the easiest option to use, but you can experiment with using other databases later if you’re interested.
Two variables that affect the security of your app are SECRET_KEY and DEBUG:
- # SECURITY WARNING: keep the secret key used in production secret

SECRET_KEY = (
    "django-insecure-!r4sgi-w($+vmxpe12rg%bvyf$7kz$co3tzw6klpu#f)yfmy#3"
)

# SECURITY WARNING: don't run with debug turned on in production

DEBUG = True
These two keys can be left alone during development, but you should know about them for any app that you plan to publish on the Web.
SECRET_KEYis important if you plan to put your app on a public server. Django generates a new random SECRET_KEY for every new project. You can ignore it for now.DEBUGis a very useful setting while you are developing the app, but you should be sure to set it toFalsebefore your app goes out on the big bad Web, as it reveals way too much about the workings of your code!
Now save the file settings.py and close it.
The second file that you need to modify in the project folder is urls.py, which controls the URL lookup at the project level. Django’s URL dispatcher uses the elements in the urlpatterns array in this file to decide how to dispatch incoming requests. You’re about to add a new urlpattern element to this array, which will cause the URL dispatcher to redirect incoming URL traffic to your new to-do app:
 1# todo_list/todo_project/urls.py
 2from django.contrib import admin
 3from django.urls import include, path
 4
 5urlpatterns = [
 6    path("admin/", admin.site.urls),
 7    path("", include("todo_app.urls"))
 8]
The lines that you need to change or add are highlighted above. Check out what’s happening in this code:
Line 6 contains the original urlpatterns element, which exists to tell Django that incoming URLs starting with "admin/" should be handled by the admin app.
Line 7 adds an element that can handle an empty string, such as a URL without a leading app name. Such a URL will be passed on to the todo_app URL configuration. If there were other apps in the project, then you could distinguish them by using different URL patterns, but that’s not necessary here. The URL configuration for todo_app, in turn, is held in a urlpatterns array contained in a file named todo_list/todo_app/urls.py.
You’ll create that app-level URL configuration file now. Open a new file in your editor and save it in the todo_list/todo_app directory under the name urls.py:
 1# todo_list/todo_app/urls.py
 2
 3urlpatterns = [
 4]
Leave the app’s urlpatterns array empty for now. You’ll add some real routes soon.
You now have a complete, working project and app setup, though it doesn’t do much yet. The whole infrastructure is in place, but you need to add some content. You can test your work so far by starting the Django development server:
Ignore the warning messages about migrations. You’ll deal with those shortly. The final message displayed on the console should say that your server is running, and that’s good enough for now!
Note: The runserver command shown above is worth remembering, as you can use it at each step of your development to test that your code is working as expected.
Navigate to http://localhost:8000/ in your browser. At this stage, Django has no app pages to display, so you should see the framework’s generic success page:
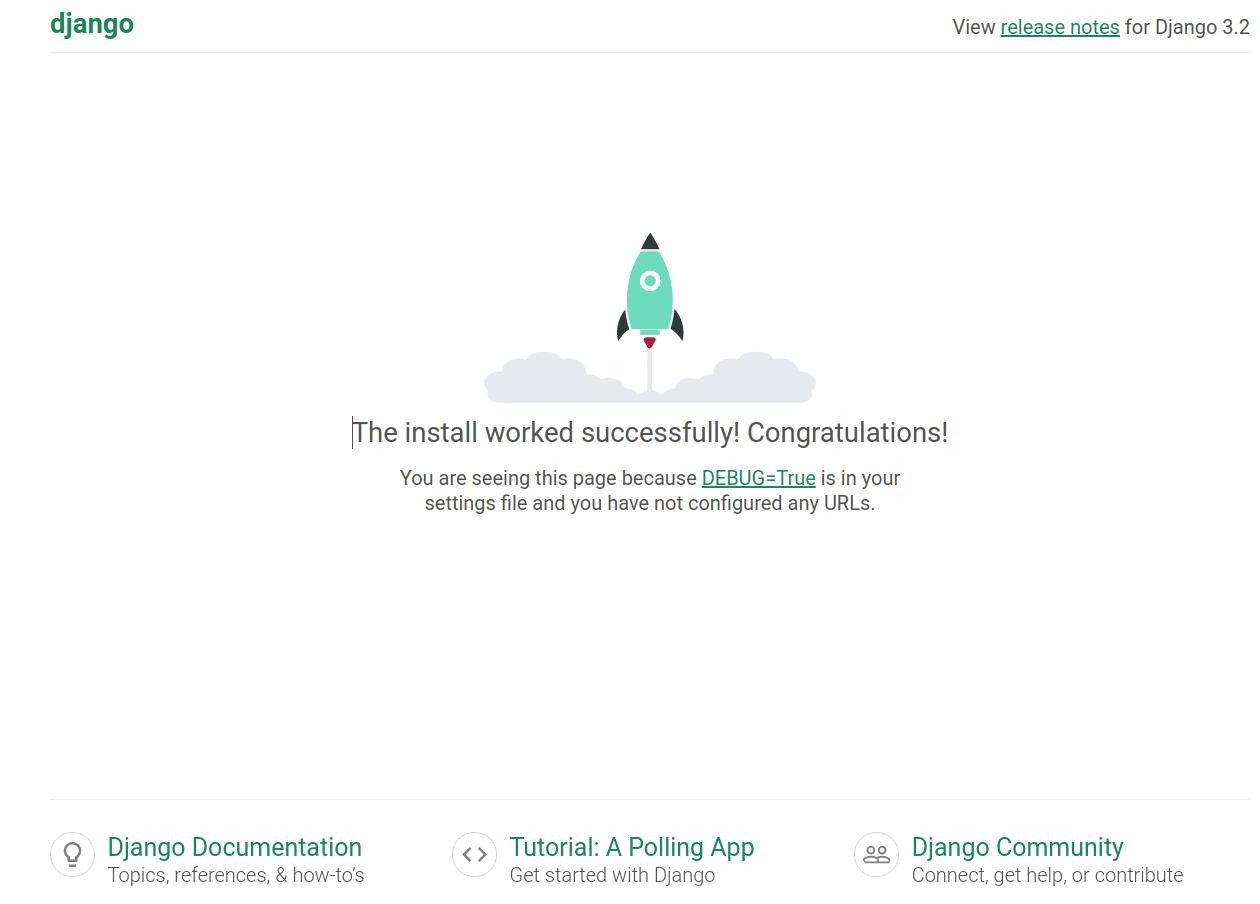
Django’s default page provides links to lots of helpful documentation. You can explore those links later.
Note: When you’ve finished testing, you can type Ctrl+C or Cmd+C in the console window to stop the server.
You’ve completed all the standard setup tasks for a new Django app. It’s time to start coding the unique features of your application.
Step 3: Design Your To-Do Data
The heart of any application is its data structures. In this step, you’ll design and code the application data model and the relations between application objects. Then you’ll use Django’s object-relational modeling tools to map that data model into database tables.
To download the code for this stage of the project, click the following link and navigate to the source_code_step_3/ folder:
Get Source Code: Click here to get the source code you’ll use to build your to-do list app.
Each type of user data will require its own data model. Your to-do list app will contain just two basic types of data:
- A
ToDoListwith a title: You can have as many of these as you want. - A
ToDoItemthat is linked to a particular list: Again, there’s no limit to the number ofToDoItemobjects. EachToDoItemwill have its own title, a longer description, a created date, and a due date.
Your data models will form the backbone of your app. Next up, you’ll define them by editing the file models.py.
Define Your Data Models
Open the file models.py in your editor. It’s pretty minimal at the moment:
# todo_list/todo_app/models.py
from django.db import models

# Create your models here.
This is just placeholder text to help you remember where to define data models. Replace this text with the code for your data models:
 1# todo_list/todo_app/models.py
 2from django.utils import timezone
 3
 4from django.db import models
 5from django.urls import reverse
 6
 7def one_week_hence():
 8    return timezone.now() + timezone.timedelta(days=7)
 9
10class ToDoList(models.Model):
11    title = models.CharField(max_length=100, unique=True)
12
13    def get_absolute_url(self):
14        return reverse("list", args=[self.id])
15
16    def __str__(self):
17        return self.title
18
19class ToDoItem(models.Model):
20    title = models.CharField(max_length=100)
21    description = models.TextField(null=True, blank=True)
22    created_date = models.DateTimeField(auto_now_add=True)
23    due_date = models.DateTimeField(default=one_week_hence)
24    todo_list = models.ForeignKey(ToDoList, on_delete=models.CASCADE)
25
26    def get_absolute_url(self):
27        return reverse(
28            "item-update", args=[str(self.todo_list.id), str(self.id)]
29        )
30
31    def __str__(self):
32        return f"{self.title}: due {self.due_date}"
33
34    class Meta:
35        ordering = ["due_date"]
The file models.py defines your entire data model. In it, you’ve defined one function and two data model classes:
-
Lines 7 to 8 define a stand-alone utility function,
one_week_hence(), that’ll be useful for settingToDoItemdefault due dates. -
Lines 10 to 35 define two classes that extend Django’s
django.db.models.Modelsuperclass. That class does most of the heavy lifting for you. All you need to do in the subclasses is define the data fields in each model, as described below.
The Model superclass also defines an id field, which is automatically unique for each object and serves as its identifier.
The django.db.models submodule also has handy classes for all the field types that you might want to define. These allow you to set up useful default behavior:
-
Lines 11 and 20 declare
titlefields that are each limited to one hundred characters. In addition,ToDoList.titlemust be unique. You can’t have twoToDoListobjects with the same title. -
Line 21 declares a
ToDoItem.descriptionfield that may be empty. -
Lines 22 and 23 each provide useful defaults for their date fields. Django will automatically set
.created_dateto the current date the first time aToDoItemobject is saved, while.due_dateusesone_week_hence()to set a default due date one week in the future. Of course, the application will allow the user to change the due date if this default value doesn’t suit them. -
Line 24 declares what is perhaps the most interesting field,
ToDoItem.todo_list. This field is declared as a foreign key. It links theToDoItemback to itsToDoList, so that eachToDoItemmust have exactly oneToDoListto which it belongs. In database lingo, this is a one-to-many relationship. Theon_deletekeyword in the same line ensures that if a to-do list is deleted, then all the associated to-do items will be deleted too. -
Lines 16 to 17 and 31 to 32 declare
.__str__()methods for each model class. This is the standard Python way of creating a readable representation of an object. It’s not strictly necessary to write this function, but it can help with debugging. -
Lines 13 to 14 and 26 to 29 implement the
.get_absolute_url()method, a Django convention for data models. This function returns the URL for the particular data item. This allows you to reference the URL conveniently and robustly in your code. The return statement of both implementations of.get_absolute_url()usesreverse()to avoid hard-coding the URL and its parameters. -
Line 34 defines the nested
Metaclass, which allows you to set some useful options. Here, you’re using it to set a default ordering forToDoItemrecords.
Now save the models.py file with its two model classes.
With this file, you’ve just declared the data model for the entire app. Soon, you’ll use Django tooling to map the model to your database.
Create the Database
So far, you’ve defined the two model classes in your Python code. Now the magic happens! Use the command line to create and activate the migrations:
These two subcommands, makemigrations and migrate, are provided by manage.py and help to automate the process of keeping your physical database structure in line with the data model in your code.
With makemigrations, you’re telling Django that you’ve changed the application’s data model, and you’d like to record those changes. In this particular case, you’ve defined two brand-new tables, one for each of your data models. In addition, Django has automatically created its own data models for the admin interface and for its own internal use.
Each time you make a change to the data model and call makemigrations, Django adds a file to the folder todo_app/migrations/. The files in this folder store a history of the changes that you’ve made to the database structure. This allows you to revert and then reapply those changes later if need be.
With the migrate command, you put those changes into effect by running commands against the database. Just like that, you’ve created your new tables, along with some useful admin tables.
Your data model is now mirrored in the database, and you’ve also created an audit trail in preparation for any structural changes that you may apply later.
Step 4: Add Your Sample To-Do Data
So now you have a data model and a database, but you don’t yet have any actual data in the form of to-do lists or items. Soon, you’ll be building web pages to create and manipulate these, but for now, you can create a little test data in the easiest way, by using Django’s ready-made admin interface. This tool enables you not only to manage model data, but also to authenticate users, display and handle forms, and validate input.
To download the code for this stage of the project, click the following link and navigate to the source_code_step_4/ folder:
Get Source Code: Click here to get the source code you’ll use to build your to-do list app.
Meet the Django Admin Interface
To use the admin interface, you should have a superuser. This will be someone with extraordinary powers who can be trusted with the keys to the whole Django server. Does this sound like you? Create your new superuser now:
Just follow the prompts to register yourself as a superuser. Your superpowers are installed!
Although you now have access to the admin interface, there’s one more step to complete before it can make use of your new data models. You need to register the models with the admin app, which you can do by editing the file admin.py:
# todo_list/todo_app/admin.py

from django.contrib import admin
from todo_app.models import ToDoItem, ToDoList

admin.site.register(ToDoItem)
admin.site.register(ToDoList)
And now you’re ready to use the Django administration app. Launch the development server and start exploring. First, make sure the development server is running:
Now open a web browser and go to the address http://127.0.0.1:8000/admin/. You should see the admin app’s login screen.
Enter your newly minted credentials, and the admin landing page appears:
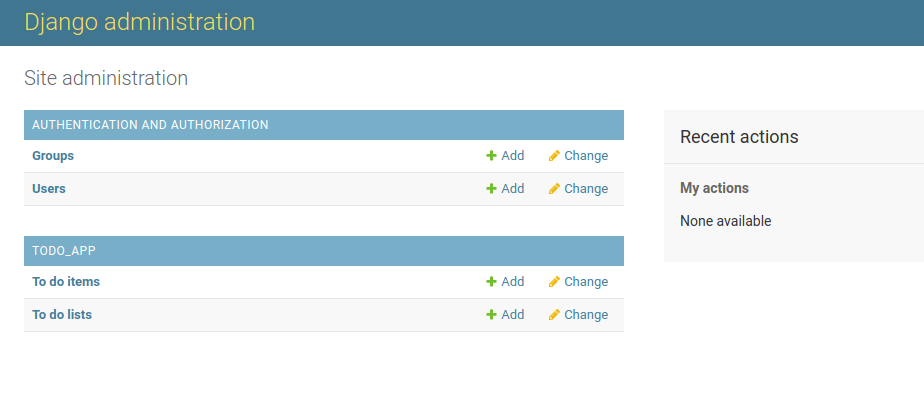
Notice that it already displays links for To do lists and To do items. You’re ready to view and change the data.
Start a To-Do List
At the left of the main Django administration page, click on To do lists. On the next screen, click on the button at the top right that says ADD TO DO LIST.
You’re ready to create your first to-do list. Give it a title, for example “Things to do today,” and click the SAVE button on the extreme right of the screen. The new list now appears on a page headed Select to do list to change. You can ignore this and instead click on the + Add button that appears next to To do items on the left of the screen. A new form appears:
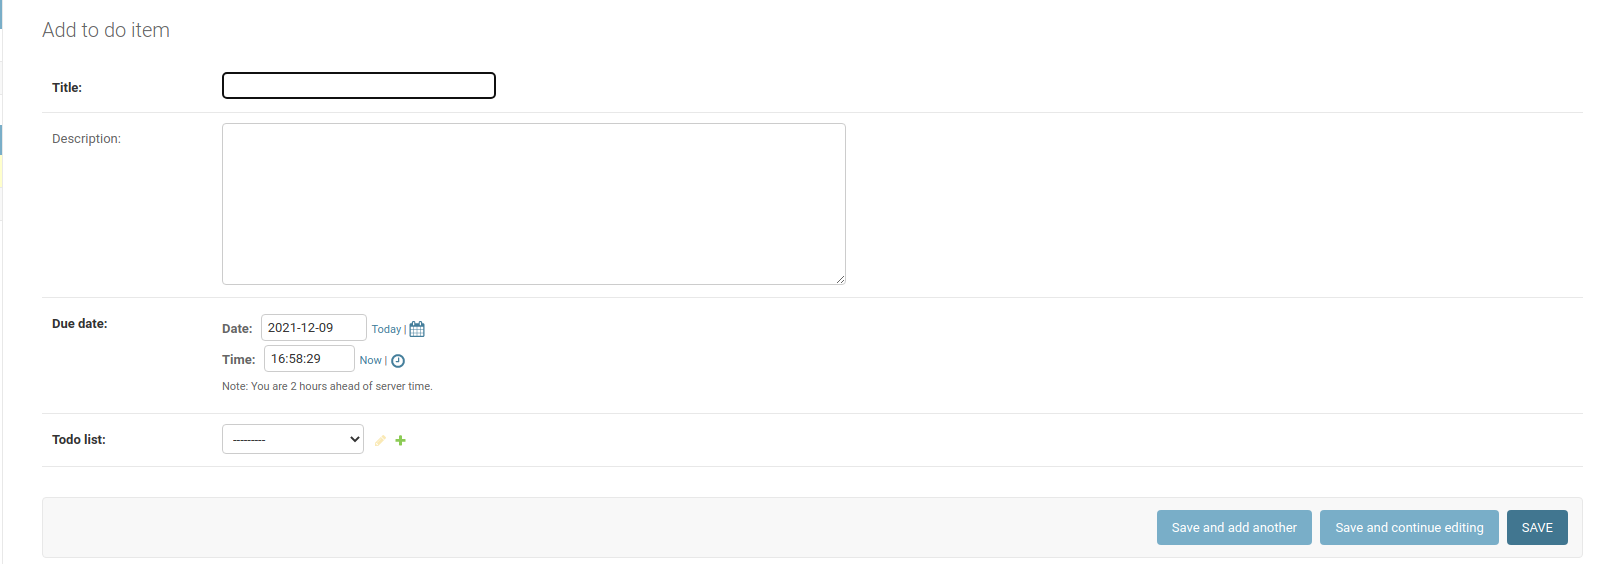
Fill the item with some sample data. Give your item the title “Start my to-do list” and the description “First things first.” Leave the due date as it is, exactly one week from today. For Todo list, select your newly created to-do list title from the dropdown menu. Then hit SAVE.
That’s it. You’ve created one list and one item with the admin interface. Feel free to stay and explore the pages to get a feel for how they work. The admin interface is great for you, as the developer, to use for quick and dirty hacking on the data, but it’s not intended to be seen by regular users. Important business awaits. You need to create the public user interface!
Step 5: Create the Django Views
In this step, you’ll learn how to create the public interface for your app. In Django, this involves using views and templates. A view is the code that orchestrates web pages, the presentation logic of your web app. The template is the component that more closely resembles an HTML page, as you’ll see.
To download the code for this stage of the project, click the following link and navigate to the source_code_step_5/ folder:
Get Source Code: Click here to get the source code you’ll use to build your to-do list app.
Code Your First View
A view is Python code that tells Django how to navigate between pages and which data to send along to be displayed. A web application works by receiving an HTTP request from the browser, deciding what to do with it, and then sending back a response. The application then sits back and waits for the next request.
In Django, this request-response cycle is controlled by the view, which, in its most basic form, is a Python function living inside the file views.py. The view function’s main input data is an HttpRequest Python object, and its job is to return an HttpResponse Python object.
There are two basic approaches to coding a view. You can just create a function, as described above, or you can use a Python class, whose methods will handle the requests. In either case, you need to inform Django that your view is intended for handling a particular type of request.
There are some definite advantages to using a class:
-
Consistency: Each HTTP request is associated with a command to the server, known as its method or verb. This may be GET, POST, HEAD, or another, according to the response required. Each verb has its own matching method name in your class. For example, the method for handling an HTTP GET request is named
.get(). -
Inheritance: You can use the power of inheritance by extending existing classes that already do most of what you need the views to do.
In this tutorial, you’ll be using the class-based approach and taking advantage of Django’s pre-built generic views for maximum code reuse. Here’s where you can benefit from the wisdom of Django’s designers. There are many, many different databases and data models out there, but fundamentally they’re all based on units of information called records and four basic operations that you can do on them:
- Create records
- Read records
- Update records
- Delete records
These activities are commonly known as CRUD, and they’re more or less standard across many applications.
For example, a user expects to be able to select a record, edit its fields, and save it, regardless of whether the record represents a to-do item, an inventory item, or anything else. So Django provides developers with class-based views, which are pre-built views implemented as classes that already contain most of the code to do these things.
All you, the developer, have to do is customize them for your data model and your application, perhaps tweaking their behavior here and there as you do so.
In your editor, open the file todo_app/views.py. Currently, it contains no useful code.
Clear the file and create your first view:
# todo_list/todo_app/views.py
from django.views.generic import ListView
from .models import ToDoList


class ListListView(ListView):
    model = ToDoList
    template_name = "todo_app/index.html"
The ListListView class will display a list of the to-do list titles. As you can see, not much code is required here. You’re making use of the generic class django.views.generic.ListView. It already knows how to retrieve a list of objects from the database, so you only need to tell it two things:
- The data-model class that you’d like to fetch
- The name of the template that’ll format the list into a displayable form
In this case, the data-model class is ToDoList, which you created in Step 3. Now it’s time to learn about templates.
Understand Templates
A template is just a file containing HTML markup, with a few additional placeholders to accommodate dynamic data. Because you want to be able to reuse your code, you’re going to start by creating a base template that contains all the boilerplate HTML code that you want to appear on every page. The actual app pages will then inherit all this boilerplate, like how your views will inherit much of their functionality from base classes.
Note: You can learn more from the official documentation on templates.
Create a Base Template
Create a new folder inside the todo_app/ directory named templates/.
Now add a new file to this folder. You can call it base.html. Create your base template:
 1<!-- todo_list/todo_app/templates/base.html -->
 2<!-- Base template -->
 3<!doctype html>
 4<html lang="en">
 5
 6<head>
 7    <!-- Required meta tags -->
 8    <meta charset="utf-8">
 9    <meta name="viewport" content="width=device-width, initial-scale=1">
10    <!--Simple.css-->
11    <link rel="stylesheet" href="https://cdn.simplecss.org/simple.min.css">
12    <title>Django To-do Lists</title>
13</head>
14
15<body>
16    <div>
17        <h1 onclick="location.href='{% url "index" %}'">
18            Django To-do Lists
19        </h1>
20    </div>
21    <div>
22        {% block content %}
23        This content will be replaced by different html code for each page.
24        {% endblock %}
25    </div>
26</body>
27
28</html>
For the most part, this is just a skeleton HTML page with the standard structure. Lines 22 to 24, however, declare special {% block content %} … {% endblock %} tags. These placeholders reserve a space that’ll receive more HTML markup from the pages that inherit from this one.
Line 11 imports the open-source Simple.css library. Raw HTML without CSS renders in a way most people find, well, ugly. Just by importing Simple.css like this, you automatically make your site look much better, with no further effort. Now you can develop and test your site logic without hurting your eyes. Of course, you’ll still have the option of adding your own creative touches later!
Line 17 introduces the template syntax {% url "index" %} as the target of an onclick event handler. The Django template engine will find the urlpatterns entry named "index" in the URLConf file todo_app/urls.py and replace this template with the correct path. The effect of this is that a click on the Django To-do Lists heading will cause the browser to redirect itself to the URL named "index", which will be your home page.
Note: This means that you can return to the app’s home page from anywhere in the app by clicking on the Django To-do Lists heading.
So base.html is a complete web page, but not very exciting as it stands. To make it more interesting, you need some markup to go between the {% block content %} and {% endblock %} tags.
The inheriting templates will each supply their own markup to fill this block.
Add a Home Page Template
Django’s convention for the templates belonging to an app is that they live in a folder named templates/<appname> inside the app folder.
So although the base template base.html went in the todo_app/templates/ folder, the others will all be placed inside a folder named todo_app/templates/todo_app/:
Your first objective will be to code the template for the home page of your website, traditionally named index.html. Create a new file in your editor and save it in the folder that you’ve just created:
 1<!-- todo_list/todo_app/templates/todo_app/index.html -->
 2
 3{% extends "base.html" %}
 4{% block content %}
 5<!--index.html-->
 6{% if object_list %}
 7<h3>All my lists</h3>
 8{% endif %}
 9<ul>
10    {% for todolist in object_list %}
11    <li>
12        <div
13            role="button"
14            onclick="location.href='{% url "list" todolist.id %}'">
15            {{ todolist.title }}
16        </div>
17    </li>
18    {% empty %}
19    <h4>You have no lists!</h4>
20    {% endfor %}
21</ul>
22
23{% endblock %}
Line 3 sets the scene: you’re extending the base template. That means that everything from the base template will appear in the rendered version of index.html, except everything between and including the {% block content %} and {% endblock %} tags. Instead, that section of base.html will be replaced by the code inside the corresponding pair of {% block content %} and {% endblock %} tags in index.html.
There’s more template magic to be found inside index.html, where more template tags allow some quite Python-like logic:
-
Lines 6 to 8 define a code block delimited by
{% if object_list %}and{% endif %}tags. These ensure that the headingAll my listswon’t appear ifobject_listis null or empty.ListViewautomatically provides the context variableobject_listto the template, andobject_listcontains the list of to-do lists. -
Lines 10 to 20 define a loop bracketed by the
{% for todolist in object_list %}and{% endfor %}tags. This construct renders the enclosed HTML once for each object in the list. As a nice bonus, the{% empty %}tag in line 18 lets you define what should be rendered instead, if the list is empty. -
Line 15 demonstrates the mustache syntax. The double curly brackets (
{{…}}) cause the template engine to emit HTML that displays the value of the enclosed variable. In this case, you’re rendering thetitleproperty of the loop variabletodolist.
You’ve now created the home page of your application, which will display a list of all your to-do lists if you have any, or an informative message if not. Your user will be directed to other pages, or back to this one, by the URL dispatcher. You’ll see how the dispatcher does its work in the next section.
Build a Request Handler
The life of a web app is mostly spent waiting for HTTP Requests to arrive from the browser. The two most common HTTP request verbs are GET and POST. The action performed by a GET request is mostly defined by its URL, which not only routes the request back to the correct server, but also contains parameters that tell the server exactly what information the browser is requesting. A typical HTTP URL might look like http://example.com/list/3/item/4.
This hypothetical URL, sent with a GET request, might be interpreted by the server at example.com as a request to use the default app to show item four from list three.
A POST request may also have URL parameters, but it behaves a little differently. POST sends some further information, besides the URL parameters, to the server. This information, which isn’t displayed in the browser’s search bar, might be used to update a record from a web form, for example.
Note: There’s lots more to learn about HTTP requests. The first section of Exploring HTTPS With Python offers more detail about how HTTP works. It then goes on to explore HTTPS, the secure form of the protocol.
Django’s URL dispatcher has the responsibilty of parsing URLs and forwarding the requests to the appropriate views. The URLs may be received from the browser or sometimes internally, from the server itself.
The URL dispatcher does its job by consulting what’s known as the URLconf, a set of URL patterns mapped to views. These mappings are conventionally stored in a file named urls.py. Once the URL dispatcher finds a match, then it calls the matching view with the URL parameters.
Back in Step 2, you created a urlpatterns item in the project-level URLconf file, todo_project/urls.py.
That urlpattern sees to it that any HTTP request starting with http://example.com[:port]/... will be passed to your app. The app-level urls.py takes it from there.
You’ve already created the app-level URL file. Now it’s time to add the first route to that file. Edit the file todo_app/urls.py to add the route:
 1# todo_list/todo_app/urls.py
 2from django.urls import path
 3from . import views
 4
 5urlpatterns = [
 6    path("", views.ListListView.as_view(), name="index"),
 7]
Line 6 tells Django that if the rest of the URL is empty, your ListListView class should be called to handle the request. Notice that the name="index" parameter matches the target of the {% url "index" %} macro that you saw in line 18 of the base.html template.
So now you have all the ingredients to produce your first home-baked view. The request-response cycle proceeds as follows:
- When the server receives a GET request with this URL from the browser, it creates an
HTTPRequestobject and sends it to theListListViewthat you previously defined inviews.py. - This particular view is a
ListViewbased on theToDoListmodel, so it fetches all theToDoListrecords from the database, turns them intoToDoListPython objects, and appends them to a list, namedobject_listby default. - The view then passes the list to the template engine for display, using the specified template,
index.html. - The template engine builds the HTML code from
index.html, automatically combining it withbase.htmland using the passed-in data plus the template’s embedded logic to populate the HTML elements. - The view constructs an
HttpResponseobject containing the fully built HTML and returns this to Django. - Django turns the
HttpResponseinto an HTTP message and sends that back to the browser. - The browser, seeing a fully formed HTTP page, displays it to the user.
You’ve just created your first end-to-end Django request handler!
However, you may have noticed that your index.html file references a URL name that doesn’t exist yet: "list". That means that if you try to run your app now, it won’t work. You’ll need to define that URL and create the corresponding view to make the app work properly.
This new view, like ListListView and all the other views in this tutorial, will be class-based. Before diving into more code, it’s important to understand what that means.
Reuse Class-Based Generic Views
In this tutorial, you’re using class-based generic views. A class that’s intended to work as a view should extend the class django.views.View and override that class’s methods, such as .get() and .post(), that handle the corresponding HttpRequest types. Each of these methods accepts an HttpRequest and returns an HttpResponse.
Class-based generic views take reusability to the next level. Most of the expected functionality is already encoded in the base class. A view class based on the generic view class ListView, for example, needs to know just two things:
- What data type it’s listing
- What template it’ll use to render the HTML
With that information, it can render a list of objects.
Of course, ListView, like other generic views, doesn’t limit you to this very basic pattern. You can tweak and subclass the base class to your heart’s content. But the basic functionality is already there, and it costs you nothing.
Subclass ListView to Display a List of To-Do Items
You’ve already created your first view to extend the generic class django.views.generic.list.ListView as a new subclass, ListListView, whose job is to display a list of to-do lists.
Now you can do something very similar to display a list of to-do items. You’ll start by creating another view class, this time called ItemListView. Like the class ListListView, ItemListView will extend the generic Django class ListView.
Open views.py and add your new class:
 1# todo_list/todo_app/views.py
 2from django.views.generic import ListView
 3from .models import ToDoList, ToDoItem
 4
 5class ListListView(ListView):
 6    model = ToDoList
 7    template_name = "todo_app/index.html"
 8
 9class ItemListView(ListView):
10    model = ToDoItem
11    template_name = "todo_app/todo_list.html"
12
13    def get_queryset(self):
14        return ToDoItem.objects.filter(todo_list_id=self.kwargs["list_id"])
15
16    def get_context_data(self):
17        context = super().get_context_data()
18        context["todo_list"] = ToDoList.objects.get(id=self.kwargs["list_id"])
19        return context
In your ItemListView implementation, you’re specializing ListView a little bit. When you show a list of ToDoItem objects, you don’t want to show every ToDoItem in the database, just those that belong to the current list. To do this, lines 13 to 14 override the ListView.get_queryset() method by using the model’s objects.filter() method to restrict the data returned.
Every descendant of the View class also has a .get_context_data() method. The return value from this is the template’s context, a Python dictionary that determines what data is available for rendering. The result of .get_queryset() is automatically included in context under the key object_list, but you’d like the template to be able to access the todo_list object itself, and not just the items within it that were returned by the query.
Lines 16 to 19 override .get_context_data() to add this reference to the context dictionary. It’s important that line 17 calls the superclass’s .get_context_data() first, so that the new data can be merged with the existing context instead of clobbering it.
Notice that both of the overridden methods make use of self.kwargs["list_id"]. This implies that there must be a keyword argument named list_id passed to the class when it’s constructed. You’ll soon learn where this argument comes from.
Show the Items in a To-Do List
Your next task is to create a template for displaying the TodoItems in a given list. Once again, the {% for <item> in <list> %} … {% endfor %} construct will be indispensable. Create the new template, todo_list.html:
 1<!-- todo_list/todo_app/templates/todo_app/todo_list.html -->
 2{% extends "base.html" %}
 3
 4{% block content %}
 5<div>
 6    <div>
 7        <div>
 8            <h3>Edit list:</h3>
 9            <h5>{{ todo_list.title | upper }}</h5>
10        </div>
11        <ul>
12            {% for todo in object_list %}
13            <li>
14                <div>
15                    <div
16                        role="button"
17                        onclick="location.href='#'">
18                        {{ todo.title }}
19                        (Due {{ todo.due_date | date:"l, F j" }})
20                    </div>
21                </div>
22            </li>
23            {% empty %}
24            <p>There are no to-do items in this list.</p>
25            {% endfor %}
26        </ul>
27        <p>
28            <input
29                value="Add a new item"
30                type="button"
31                onclick="location.href='#'" />
32        </p>
33    </div>
34</div>
35{% endblock %}
This template for displaying a single list with its to-do items is similar to index.html, with a couple of extra wrinkles:
-
Lines 9 and 19 exhibit a curious syntax. These expressions with a pipe symbol (
|) are called template filters, and they provide a convenient way of formatting the title and the due date, respectively, using the pattern to the right of the pipe. -
Lines 15 to 17 and 28 to 31 define a couple of button-like elements. Right now, their
onclickevent handlers do nothing useful, but you’ll soon be fixing that.
So you’ve coded an ItemListView class, but so far, there’s no way for your user to invoke it. You need to add a new route into urls.py so that ItemListView can be used:
 1# todo_list/todo_app/urls.py
 2from todo_app import views
 3
 4urlpatterns = [
 5    path("",
 6        views.ListListView.as_view(), name="index"),
 7    path("list/<int:list_id>/",
 8        views.ItemListView.as_view(), name="list"),
 9]
Line 7 declares a placeholder as the new route’s first parameter. This placeholder will match a positional parameter in the URL path that the browser returns. The syntax list/<int:list_id>/ means that this entry will match a URL like list/3/ and pass the named parameter list_id = 3 to the ItemListView instance. If you revisit the ItemListView code in views.py, you’ll notice that it references this parameter in the form self.kwargs["list_id"].
Now you can view all of your lists, thanks to the route, view, and template that you’ve created. You’ve also created a route, view, and template for listing individual to-do items.
It’s time to test what you’ve done so far. Try running your development server now, in the usual way:
Depending on what you added from the admin interface, you should see one or more list names. You can click on each one to show the items that particular list contains. You can click on the main Django To-do Lists heading to navigate back to the app’s main page.
Your app can now display lists and items. You’ve implemented just the Read part of the CRUD operations. Run your development server now. You should be able to navigate back and forth between the list of to-do lists and the items in a single list, but you cannot yet add or delete lists, or add, edit, and remove items.
Step 6: Create and Update Model Objects in Django
In this step, you’ll enhance your app by enabling Creation and Update of lists and items. You’ll do this by extending some more of Django’s generic view classes. Through this process, you’ll notice how the logic already baked into these classes accounts for many of the typical CRUD use cases. But remember that you’re not limited to the pre-baked logic. You can override almost any part of the request-response cycle.
To download the code for this stage of the project, click the following link and navigate to the source_code_step_6/ folder:
Get Source Code: Click here to get the source code you’ll use to build your to-do list app.
The first item on the agenda will be to add the new views that support the Create and Update actions. Next, you’ll add URLs referencing those views, and finally, you’ll update the todo_items.html template to provide links allowing the user to navigate to the new URLs.
Add your new imports and view classes to views.py:
 1# todo_list/todo_app/views.py
 2from django.urls import reverse
 3
 4from django.views.generic import (
 5    ListView,
 6    CreateView,
 7    UpdateView,
 8)
 9from .models import ToDoItem, ToDoList
10
11class ListListView(ListView):
12    model = ToDoList
13    template_name = "todo_app/index.html"
14
15class ItemListView(ListView):
16    model = ToDoItem
17    template_name = "todo_app/todo_list.html"
18
19    def get_queryset(self):
20        return ToDoItem.objects.filter(todo_list_id=self.kwargs["list_id"])
21
22    def get_context_data(self):
23        context = super().get_context_data()
24        context["todo_list"] = ToDoList.objects.get(id=self.kwargs["list_id"])
25        return context
26
27class ListCreate(CreateView):
28    model = ToDoList
29    fields = ["title"]
30
31    def get_context_data(self):
32        context = super(ListCreate, self).get_context_data()
33        context["title"] = "Add a new list"
34        return context
35
36class ItemCreate(CreateView):
37    model = ToDoItem
38    fields = [
39        "todo_list",
40        "title",
41        "description",
42        "due_date",
43    ]
44
45    def get_initial(self):
46        initial_data = super(ItemCreate, self).get_initial()
47        todo_list = ToDoList.objects.get(id=self.kwargs["list_id"])
48        initial_data["todo_list"] = todo_list
49        return initial_data
50
51    def get_context_data(self):
52        context = super(ItemCreate, self).get_context_data()
53        todo_list = ToDoList.objects.get(id=self.kwargs["list_id"])
54        context["todo_list"] = todo_list
55        context["title"] = "Create a new item"
56        return context
57
58    def get_success_url(self):
59        return reverse("list", args=[self.object.todo_list_id])
60
61class ItemUpdate(UpdateView):
62    model = ToDoItem
63    fields = [
64        "todo_list",
65        "title",
66        "description",
67        "due_date",
68    ]
69
70    def get_context_data(self):
71        context = super(ItemUpdate, self).get_context_data()
72        context["todo_list"] = self.object.todo_list
73        context["title"] = "Edit item"
74        return context
75
76    def get_success_url(self):
77        return reverse("list", args=[self.object.todo_list_id])
There are three new view classes here, all derived from Django’s generic view classes. Two of the new classes extend django.view.generic.CreateView, while the third extends django.view.generic.UpdateView:
- Lines 27 to 34 define
ListCreate. This class defines a form containing the sole publicToDoListattribute, itstitle. The form itself also has a title, which is passed in the context data. - Lines 36 to 59 define the
ItemCreateclass. This generates a form with four fields. The.get_initial()and.get_context_data()methods are overridden to provide useful information to the template. The.get_success_url()method provides the view with a page to display after the new item has been created. In this case, it calls thelistview after a successful form submit to display the full to-do list containing the new item. - Lines 61 to 77 define
ItemUpdate, which is very similar toItemCreatebut supplies a more appropriate title.
You’ve now defined three new view classes for creating and updating to-do lists and their items. Your code and templates will instantiate these classes on demand, complete with the relevant list or item data.
Lists and Items
ListCreate and ItemCreate both extend the class CreateView. This is a generic view that can be used with any Model subclass.
The Django documentation describes CreateView as follows:
A view that displays a form for creating an object, redisplaying the form with any validation errors highlighted, and eventually saving the object. (Source)
So CreateView can be a base class for any view designed to create objects.
ItemUpdate will extend the generic view class UpdateView. This is quite similar to CreateView, and you can use the same template for both. The main difference is that the ItemUpdate view will pre-populate the template form with the data from an existing ToDoItem.
The generic views know how to handle the POST request generated by the form on a successful submit action.
As always, the child classes need to be told which Model they’re based on. These models will be ToDoList and ToDoItem, respectively. The views also have a fields property that you can use to restrict which of the Model data fields are displayed to the user. For example, the ToDoItem.created_date field is completed automatically in the data model, and you probably don’t want the user to change it, so you can omit it from the fields array.
Now you need to define routes, so that the user can reach each of the new views with the appropriate data values set.
Add the routes as new items in the urlpatterns array, naming them "list-add", "item-add", and "item-update":
 1# todo_list/todo_app/urls.py
 2from django.urls import path
 3from todo_app import views
 4
 5urlpatterns = [
 6    path("", views.ListListView.as_view(), name="index"),
 7    path("list/<int:list_id>/", views.ItemListView.as_view(), name="list"),
 8    # CRUD patterns for ToDoLists
 9    path("list/add/", views.ListCreate.as_view(), name="list-add"),
10    # CRUD patterns for ToDoItems
11    path(
12        "list/<int:list_id>/item/add/",
13        views.ItemCreate.as_view(),
14        name="item-add",
15    ),
16    path(
17        "list/<int:list_id>/item/<int:pk>/",
18        views.ItemUpdate.as_view(),
19        name="item-update",
20    ),
21]
Now you’ve associated names, URL patterns, and views with the three new routes, each of which corresponds to an action on the data.
Notice that the "item-add" and "item-update" URL patterns contain parameters, just like the "list" path. To create a new item, your view code needs to know the list_id of its parent list. To update an item, both its list_id and the item’s own ID, which is here called pk, must be known to the view.
New Views
Next, you’ll need to provide some links in your templates to activate the new views.
Just before the {% endblock %} tag in index.html, add a button:
<p>
    <input
        value="Add a new list"
        type="button"
        onclick="location.href='{% url "list-add" %}'"/>
</p>
A click on this button will now generate a request with the "list-add" pattern. If you look back at the corresponding urlpattern item in todo_app/urls.py, then you’ll see that the associated URL looks like "list/add/", and it causes the URL dispatcher to instantiate a ListCreate view.
Now you’ll update the two dummy onclick events in todo_list.html:
 1<!-- todo_list/todo_app/templates/todo_app/todo_list.html -->
 2{% extends "base.html" %}
 3
 4{% block content %}
 5<div>
 6    <div>
 7        <div>
 8            <h3>Edit list:</h3>
 9            <h5>{{ todo_list.title | upper }}</h5>
10        </div>
11        <ul>
12            {% for todo in object_list %}
13            <li>
14                <div>
15                    <div
16                        role="button"
17                        onclick="location.href=
18                        '{% url "item-update" todo_list.id todo.id %}'">
19                        {{ todo.title }}
20                        (Due {{ todo.due_date | date:"l, F j"}})
21                    </div>
22                </div>
23            </li>
24            {% empty %}
25            <p>There are no to-do items in this list.</p>
26            {% endfor %}
27        </ul>
28        <p>
29            <input
30                value="Add a new item"
31                type="button"
32                onclick="location.href='{% url "item-add" todo_list.id %}'"
33            />
34        </p>
35    </div>
36</div>
37{% endblock %}
The onclick event handlers now invoke the new URLs named "item-update" and "item-add". Notice again the syntax {% url "key" [param1 [, param2 [,...]]]%} in lines 18 and 32, where the urlpattern name is combined with data from context to construct hyperlinks.
For example, in lines 15 to 21, you’re setting up a button-like div element with an onclick event handler.
Notice that the "item-update" URL requires IDs for both the list and the item to be updated, whereas "item-add" required only todo_list.id.
You’ll need templates to render your new ListCreate, ItemCreate, and ItemUpdate views. The first one that you’ll tackle is the form for creating a new list. Create a new template file named todolist_form.html:
 1<!-- todo_list/todo_app/templates/todo_app/todolist_form.html -->
 2{% extends "base.html" %}
 3
 4{% block content %}
 5
 6<h3>{{ title }}</h3>
 7<div>
 8    <div>
 9        <form method="post">
10            {% csrf_token %}
11            {{ form.as_p }}
12            <input
13                value="Save"
14                type="submit">
15            <input
16                value="Cancel"
17                type="button"
18                onclick="location.href='{% url "index" %}';">
19        </form>
20    </div>
21</div>
22
23{% endblock %}
This page contains a <form> element in lines 9 to 19 that’ll generate a POST request when the user submits it, with the user-updated form contents as part of its payload. In this case, the form contains only the list title.
-
Line 10 uses the
{% csrf_token %}macro, which generates a Cross-Site Request Forgery token, a necessary precaution for modern web forms. -
Line 11 uses the
{{ form.as_p }}tag to invoke the view class’s.as_p()method. This auto-generates the form contents from thefieldsattribute and the model structure. The form will be rendered as HTML inside a<p>tag.
Next, you’ll create another form that’ll allow the user to create a new ToDoItem, or edit the details of an existing one.
Add the new template todoitem_form.html:
 1<!-- todo_list/todo_app/templates/todo_app/todoitem_form.html -->
 2{% extends "base.html" %}
 3
 4{% block content %}
 5
 6<h3>{{ title }}</h3>
 7<form method="post">
 8    {% csrf_token %}
 9    <table>
10        {{ form.as_table }}
11    </table>
12    <input
13        value="Submit"
14        type="submit">
15    <input
16        value="Cancel"
17        type="button"
18        onclick="location.href='{% url "list" todo_list.id %}'">
19</form>
20
21{% endblock %}
This time, you’re rendering the form as a table (lines 9 to 11), because there are several fields per item. Both CreateView and UpdateView contain a .form member with convenient methods like form.as_p() and form.as_table() to perform an automatic layout. The Submit button will generate a POST request using the form’s contents. The Cancel button will redirect the user to the "list" URL, passing along the current list id as a parameter.
Run your development server again to verify that you can now create new lists and add items to those lists.
Step 7: Delete To-Do Lists and Items
You’ve written code to create and update both to-do lists and to-do items. But no CRUD application is complete without the Delete functionality. In this step, you’ll add links to the forms to allow the user to delete one item at a time, or even an entire list. Django provides generic views that handle these cases too.
To download the code for this stage of the project, click the following link and navigate to the source_code_step_7/ folder:
Get Source Code: Click here to get the source code you’ll use to build your to-do list app.
Make DeleteView Subclasses
You’ll start by adding view classes that extend django.views.generic.DeleteView.
Open views.py and make sure that you have all the necessary imports:
# todo_list/todo_app/views.py
from django.urls import reverse, reverse_lazy

from django.views.generic import (
    ListView,
    CreateView,
    UpdateView,
    DeleteView,
)
Also, add the two new view classes that support deleting objects. You’ll need one for lists and one for items:
# todo_list/todo_app/views.py
class ListDelete(DeleteView):
    model = ToDoList
    # You have to use reverse_lazy() instead of reverse(),
    # as the urls are not loaded when the file is imported.
    success_url = reverse_lazy("index")

class ItemDelete(DeleteView):
    model = ToDoItem

    def get_success_url(self):
        return reverse_lazy("list", args=[self.kwargs["list_id"]])

    def get_context_data(self, **kwargs):
        context = super().get_context_data(**kwargs)
        context["todo_list"] = self.object.todo_list
        return context
Both of your new classes extend django.views.generic.edit.DeleteView. The official Django documentation describes DeleteView like this:
A view that displays a confirmation page and deletes an existing object. The given object will only be deleted if the request method is POST. If this view is fetched via GET, it will display a confirmation page that should contain a form that POSTs to the same URL.(Source)
Define Deletion Confirmations and URLS
Because you’ll be offering the user the Delete option from the editing pages, you only need to create new templates for the corresponding confirmation pages. There’s even a default name for these confirmation templates:
<modelname>_confirm_delete.html. If such a template exists, your classes derived from DeleteView will automatically render it when the associated form is submitted.
Create a new template in the file todolist_confirm_delete.html:
<!-- todo_list/todo_app/templates/todo_app/todolist_confirm_delete.html -->
{% extends "base.html" %}

{% block content %}
<!--todolist_confirm_delete.html-->

<h3>Delete List</h3>

<p>Are you sure you want to delete the list <i>{{ object.title }}</i>?</p>

<form method="POST">
    {% csrf_token %}
    <input
        value="Yes, delete."
        type="submit">
</form>
<input
    value="Cancel"
    type="button"
    onclick="location.href='{% url "index" %}';">

{% endblock %}
The DeleteView subclass will still be in control when this template is rendered. By clicking the Yes, delete. button, you submit the form, and the class goes ahead and deletes the list from the database. If you click Cancel, it does nothing. In either case, Django then redirects you to the home page.
That’s it for deleting ToDoList objects. Now you can do the same for the deletion of ToDoItem objects. Create another new template, named todoitem_confirm_delete.html:
<!-- todo_list/todo_app/templates/todo_app/todoitem_confirm_delete.html -->
{% extends "base.html" %}

{% block content %}

<h3>Delete To-do Item</h3>

<p>Are you sure you want to delete the item: <b>{{ object.title }}</b>
   from the list <i>{{ todo_list.title }}</i>?</p>

<form method="POST">
    {% csrf_token %}
    <input
        value="Yes, delete."
        type="submit">
    <input
        value="Cancel"
        type="button"
        onclick="location.href='{% url "list" todo_list.id %}';">
</form>

{% endblock %}
Exactly the same logic applies, though this time if the Cancel button is pressed, the user will be redirected to the "list" URL to display the parent list, rather than to the app’s index page.
Now you need to define routes for the deletion URLs. You can do that by adding the highlighted lines to the application’s urls.py:
 1# todo_list/todo_app/urls.py
 2from django.urls import path
 3from todo_app import views
 4
 5urlpatterns = [
 6    path("", views.ListListView.as_view(), name="index"),
 7    path("list/<int:list_id>/", views.ItemListView.as_view(), name="list"),
 8    # CRUD patterns for ToDoLists
 9    path("list/add/", views.ListCreate.as_view(), name="list-add"),
10    path(
11        "list/<int:pk>/delete/", views.ListDelete.as_view(), name="list-delete"
12    ),
13    # CRUD patterns for ToDoItems
14    path(
15        "list/<int:list_id>/item/add/",
16        views.ItemCreate.as_view(),
17        name="item-add",
18    ),
19    path(
20        "list/<int:list_id>/item/<int:pk>/",
21        views.ItemUpdate.as_view(),
22        name="item-update",
23    ),
24    path(
25        "list/<int:list_id>/item/<int:pk>/delete/",
26        views.ItemDelete.as_view(),
27        name="item-delete",
28    ),
29]
These new URLs will load the DeleteView subclasses as views.
There’s no need to define special URLs for delete confirmation because Django handles that requirement by default, rendering the confirmation page with the <modelname>_confirm_delete templates that you’ve just added.
Enable Deletions
So far, you’ve created views and URLS to delete things, but there’s no mechanism for your user to invoke this functionality. You’ll fix that next.
You’ll start by adding a button to todoitem_form.html to allow the user to delete the current item.
Open todoitem_form.html and add the highlighted lines:
<!-- todo_list/todo_app/templates/todo_app/todoitem_form.html -->
{% extends "base.html" %}

{% block content %}

<h3>{{ title }}</h3>
<form method="post">
    {% csrf_token %}
    <table>
        {{ form.as_table }}
    </table>
    <input
        value="Submit"
        type="submit">
    <input
        value="Cancel"
        type="button"
        onclick="location.href='{% url "list" todo_list.id %}'">
    {% if object %}
        <input
            value="Delete this item"
            type="button"
            onclick="location.href=
            '{% url "item-delete" todo_list.id object.id %}'">
    {% endif %}
</form>

{% endblock %}
Recall that this view is used for both creating items and updating them. In the case of creation, there will be no item instance loaded in the form. So to avoid confusing the user, you need to wrap the new input element in the conditional template block {% if object %} … {% endif %} so that the Delete this item option only appears if the item already exists.
Now you need to add the user interface element for deleting an entire list. Add the highlighted lines to todolist.html:
<!-- todo_list/todo_app/templates/todo_app/todo_list.html -->
{% extends "base.html" %}

{% block content %}
<div>
    <div>
        <div>
            <h3>Edit list:</h3>
            <h5>{{ todo_list.title | upper }}</h5>
        </div>
        <ul>
            {% for todo in object_list %}
            <li>
                <div>
                    <div
                        role="button"
                        onclick="location.href=
                        '{% url "item-update" todo_list.id todo.id %}'">
                        {{ todo.title }}
                        (Due {{ todo.due_date | date:"l, F j" }})
                    </div>
                </div>
            </li>
            {% empty %}
            <p>There are no to-do items in this list.</p>
            {% endfor %}
        </ul>
        <p>
            <input
                value="Add a new item"
                type="button"
                onclick="location.href=
                '{% url "item-add" todo_list.id %}'" />
            <input
                value="Delete this list"
                type="button"
                onclick="location.href=
                '{% url "list-delete" todo_list.id %}'" />
        </p>
    </div>
</div>
{% endblock %}
In this case, there’s always a ToDoList instance associated with the template, so it always makes sense to offer the Delete this list option.
Step 8: Use Your Django To-Do List App
Your project code is now complete. You can download the complete code for this project by clicking the following link and navigating to the source_code_step_final folder:
Get Source Code: Click here to get the source code you’ll use to build your to-do list app.
You’ve built the entire to-do list application. That means you’re ready to put the whole app through its paces!
One more time, fire up your development server.
If the console displays errors, then you’ll have to resolve them before continuing.
Otherwise, use your browser to navigate to http://localhost:8000/. If all is well, you should be greeted by the home page of your application:
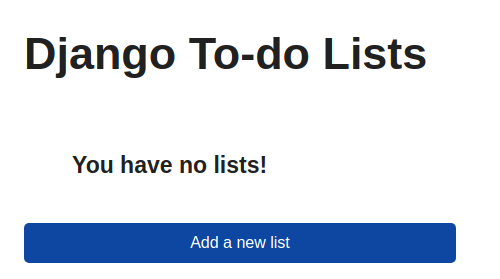
The app heading Django To-do Lists will appear on every page. It serves as a link back to the home page, allowing the user to return there from anywhere in the application.
There may be some data already in the app, depending on your previous testing. Now you can start exercising the app logic.
- Click on Add a new list. A new screen appears, offering a blank text box for the new list’s title.
- Give your new list a name and press Save. You’re taken to the Edit List page, with the message There are no to-do items in this list.
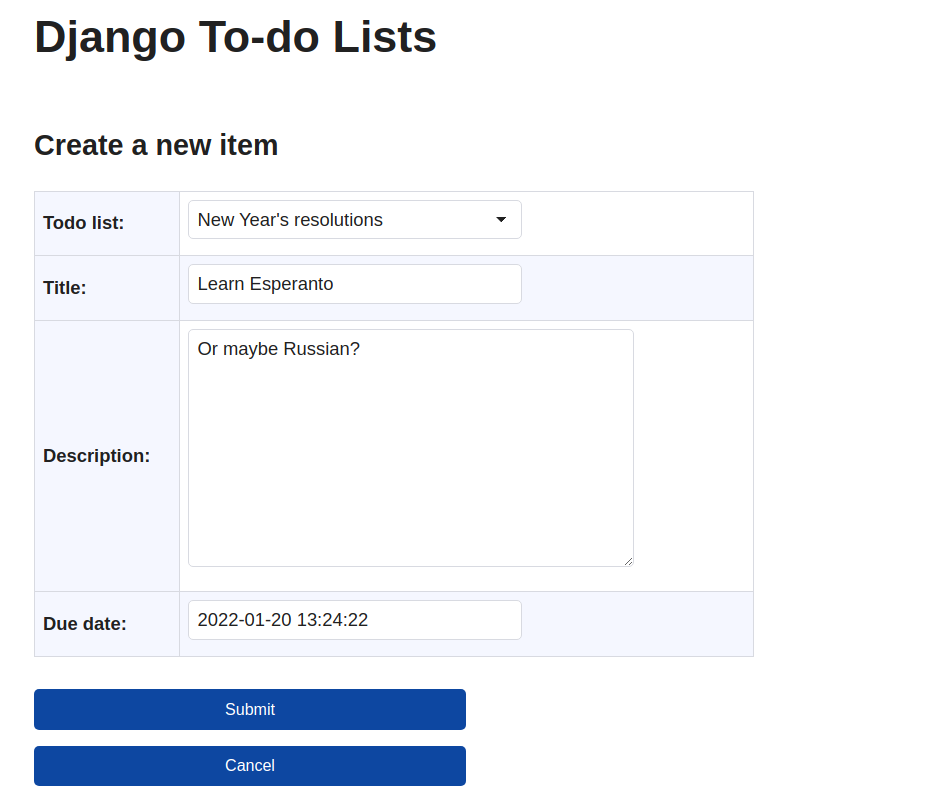
- Click on Add a new item. The Create a new item form appears. Fill in a title and a description, and notice that the default due date is exactly one week ahead. You can change it if you like.
The form allows you to fill in and edit all the relevant fields of the to-do item. Here’s how this might look:
Click again on Django To-do Lists to return to the home page. Now you can continue to test the app’s navigation and functionality by adding more lists, adding more items to lists, modifying item details, and deleting items and lists.
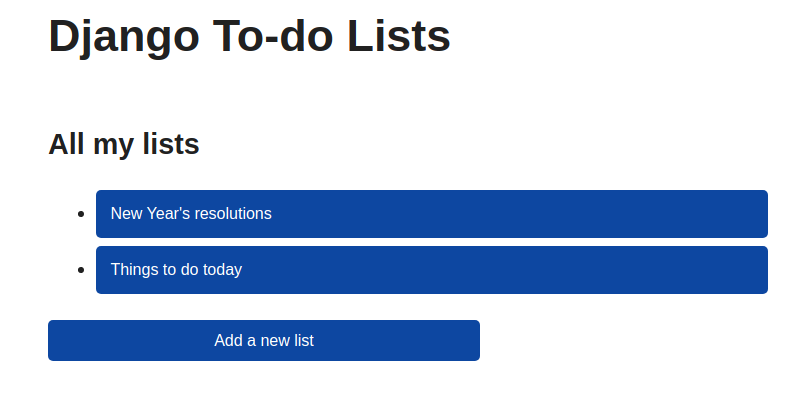
Here’s an example of how your home page might look after you’ve added a couple of lists:
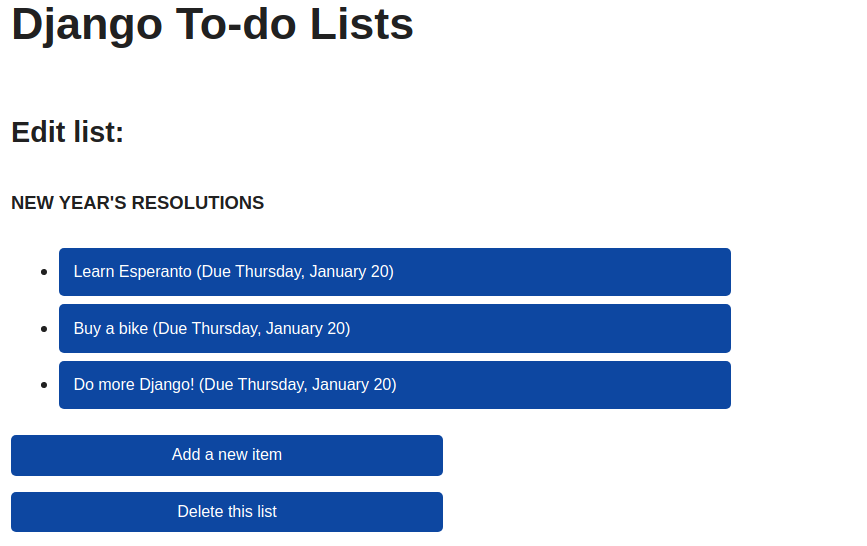
And this is how one of those lists might look after you click on its link:
If something doesn’t work, try to use the explanations above, along with the step-by-step code downloads, to figure out what might be wrong. Or if you still can’t solve it, you can download the full project code and check where yours is different. Click on the link below and navigate to the source_code_final/ folder:
Get Source Code: Click here to get the source code you’ll use to build your to-do list app.
If you were able to interact with your app as described here, then you can feel confident that you’ve built a functioning application. Congratulations!
Conclusion
So now you’ve coded a full-fledged, database-backed Django web application from scratch.
Along the way, you’ve learned about web applications, as well as Django and its architecture. You’ve applied modern object-oriented principles and inheritance to achieve code reuse and improve maintainability.
In this tutorial, you’ve learned how to:
- Use Django to create a web app
- Structure a data model with one-to-many relationships
- Explore your data model and add test data through the Django admin interface
- Display your lists by coding templates
- Handle the standard database operations through class-based views
- Create URL configurations to control the Django URL dispatcher and route requests to the proper views
Django’s class-based views are designed to help you to bootstrap an application in minimum time. They cover the majority of use cases in their unmodified form. But because they’re class-based, they’re not restrictive. You can change almost anything you might want to change about view behavior.
Class-based views aren’t the only way to go. For a basic application, you may find that the older function-based view approach is simpler and easier to understand. And even if you decide that classes are best, you’re not tied to using Django’s generic views. You can plug any function or method that fulfills the request-response contract into your application, and you’ll continue to benefit from Django’s rich infrastructure and ecosystem.
With the experience that you’ve gained in this tutorial, you know how to handle the nuts and bolts of building a web app. It’s up to you to apply these skills to your next creative idea!
Next Steps
Now that you’ve completed this tutorial, it’s time to think about where you can go from here. By further developing this app, you can build your knowledge and consolidate your skills while creating an attractive addition to your programming portfolio. Here are a few suggestions for what you might do next:
-
Style the application: The to-do list application’s user interface (UI) is unapologetically bland and unadorned.
Simple.csshas helped you to create an acceptable UI, but nothing more than that. You might want to investigate some ways to improve it:-
The
Simple.csswebsite has links to several sites that have built on the base CSS fromSimple.cssto produce something more attractive. -
There are many other free CSS libraries out there! For instance, you could investigate Bootstrap, Semantic UI, or Font Awesome.
-
You can also use raw CSS. CSS is an extremely powerful styling tool, and if you’re willing to invest the time to learn its ins and outs, there’s no limit to what you can make it do.
-
-
Enhance the application: There are plenty of useful features that you could add to this application. One obvious improvement would be to handle task completion and deadlines. You could add a
completedfield to the to-do items so that your users can distinguish between completed tasks and those that still need action. You could even add logic to send email reminders if they miss due dates. -
Make it multi-user: If you find a to-do list manager useful, then a logical step might be to extend it to multiple users, such as members of your team. Each user could have their own space with their individual to-do lists, and you could consider implementing shared lists to enable cooperative planning. In this case, you should explore some of Django’s security options, as well as learning about a multi-user database like MySQL or Postgres.
-
Explore more class-based views: In this project, you’ve made use of several of Django’s generic class-based views. But Django has a rich architecture of class-based views and mixins to enable maximum code reuse, and you’ve hardly scratched the surface here. You can read much more about your options in the official Django documentation on class-based views.
-
Build your expertise with more Django projects: Real Python has many Django project tutorials at different levels. Now that you’ve completed this one, you might want to investigate some of these: