
Writing code that runs in the terminal or in your web browser is good fun. Writing code that affects the real world, however, can be satisfying on a whole other level. Writing this sort of code is called embedded development, and Python is making it more accessible than ever!
In this tutorial, you’ll learn:
- What embedded development is and why you would use Python to do it
- What your hardware and software options are for running Python on an embedded system
- When Python is a good fit for an embedded system and when it’s not
- How to write a basic game on the BBC micro:bit with MicroPython
This tutorial contains code snippets that allow you to build a simple game on the BBC micro:bit. To access the full code and get a sneak preview on what you’ll be building, click the link below:
Get Sample Code: Click here to get the sample code you’ll use to learn about embedded development with Python in this tutorial.
What Is Embedded Development?
Embedded development is writing code for any device that isn’t a general-purpose computer. This definition is a little bit ambiguous, so some examples might help:
- General-purpose computers include laptops, desktop PCs, smartphones, and so on.
- Embedded systems include washing machines, digital machines, robots, and so on.
As a general rule of thumb, if you wouldn’t call something a computer, but it still has code running on it, then it’s probably an embedded system. The name comes from the idea of embedding a computer into a physical system to perform some task.
Embedded systems tend to be designed to do a single task, which is why we refer to regular computers as “general purpose”: they are designed to do more than one task.
In the same way that you need a computer to run regular code, to run embedded code, you need some kind of hardware. These pieces of hardware are usually referred to as development boards, and this tutorial will introduce you to a few designed to run Python.
Python for Embedded Development
One of the best things about learning Python is that it’s applicable in so many places. You can write code that runs anywhere, even on embedded systems. In this section, you’ll learn about the trade-offs that come with using Python for your embedded project and some things to be aware of when starting out.
Benefits of Using Python
The core benefit that Python brings when building an embedded system is development speed. Python has libraries available for most tasks, and this still mostly holds true for its embedded implementations. You can focus on building your system since many of the problems you’d encounter have been solved already.
Since Python is higher level than other common embedded languages, the code you’ll write will be more concise. This helps development speed, meaning you’ll write code faster, but it also helps keep your code understandable.
Python is memory managed. C++, a common choice for embedded development, is not. In C++, you are responsible for freeing up memory when you’re done with it, something that is very easy to forget, leading to your program running out of memory. Python does this for you.
Disadvantages of Using Python
While Python’s memory management is a big help, it does incur a minor speed and memory cost. The MicroPython docs have a good discussion on memory issues.
Another thing to consider is that the Python interpreter itself takes up space. With a compiled language, the size of your program depends just on your program, but Python programs need the interpreter that runs them. The Python interpreter also takes up RAM. On the micro:bit, you can’t write Bluetooth code with Python since there’s not enough room for Python and Bluetooth at the same time.
Since Python is interpreted, it can never be quite as fast as a compiled language. An interpreted language needs to decode each instruction before running it, but a compiled language can just run. In practice, though, this rarely matters as Python programs still run fast enough for most use cases.
Things to Watch Out for When New to Embedded Development
Modern computers have lots of memory to work with. When you’re programming them, you don’t have to worry too much about the size of lists you create or loading a whole file at once. Embedded systems, however, have limited memory. You have to be careful when writing your programs not to have too many things in memory at once.
Similarly, processor speeds on embedded systems are much slower than on desktop computers. The processor speed determines how quickly your code gets executed, so running a program on an embedded computer will take longer than running it on a desktop computer. It’s more important to think about the efficiency of embedded code—you don’t want it to take forever to run!
Perhaps the biggest change when programming embedded systems is power requirements. Laptops, phones and desktop computers either plug into the wall or have large batteries. Embedded systems often have tiny batteries and have to last for a really long time, sometimes even years. Every line of code that you run costs a little bit of battery life, and it all adds up.
Here are some other things that you should be aware of when you start out:
- If you have a network connection on your device, then it’s likely to be slow or unreliable.
- You have a much smaller selection of libraries to choose from.
- Embedded systems don’t usually have a large amount of persistent storage.
Embedded development is a large field, with a lot for newcomers to learn. For now, though, just remember that it’s more important to write lean code on embedded systems. This makes embedded systems great for learning efficiency in your code!
Hardware Options for Running Embedded Python
Before writing any embedded code, you have to choose what hardware your code will run on. There is a huge selection of development boards available, even within those that run Python. Your choice will come down to the project that you use them for. In this section, you’ll go over some of the available options.
BBC micro:bit
The BBC micro:bit is an embedded system designed for educational use. On board a micro:bit, there are lots of components, including buttons, a 5x5 LED screen, a speaker and microphone, an accelerometer, and a Bluetooth module. Unfortunately, the Bluetooth module is unusable with Python, but you can still use the radio directly. It’s programmable in Scratch, JavaScript, and most importantly, Python.
Here’s a photo of one from the back showing some of the cool components that are available:
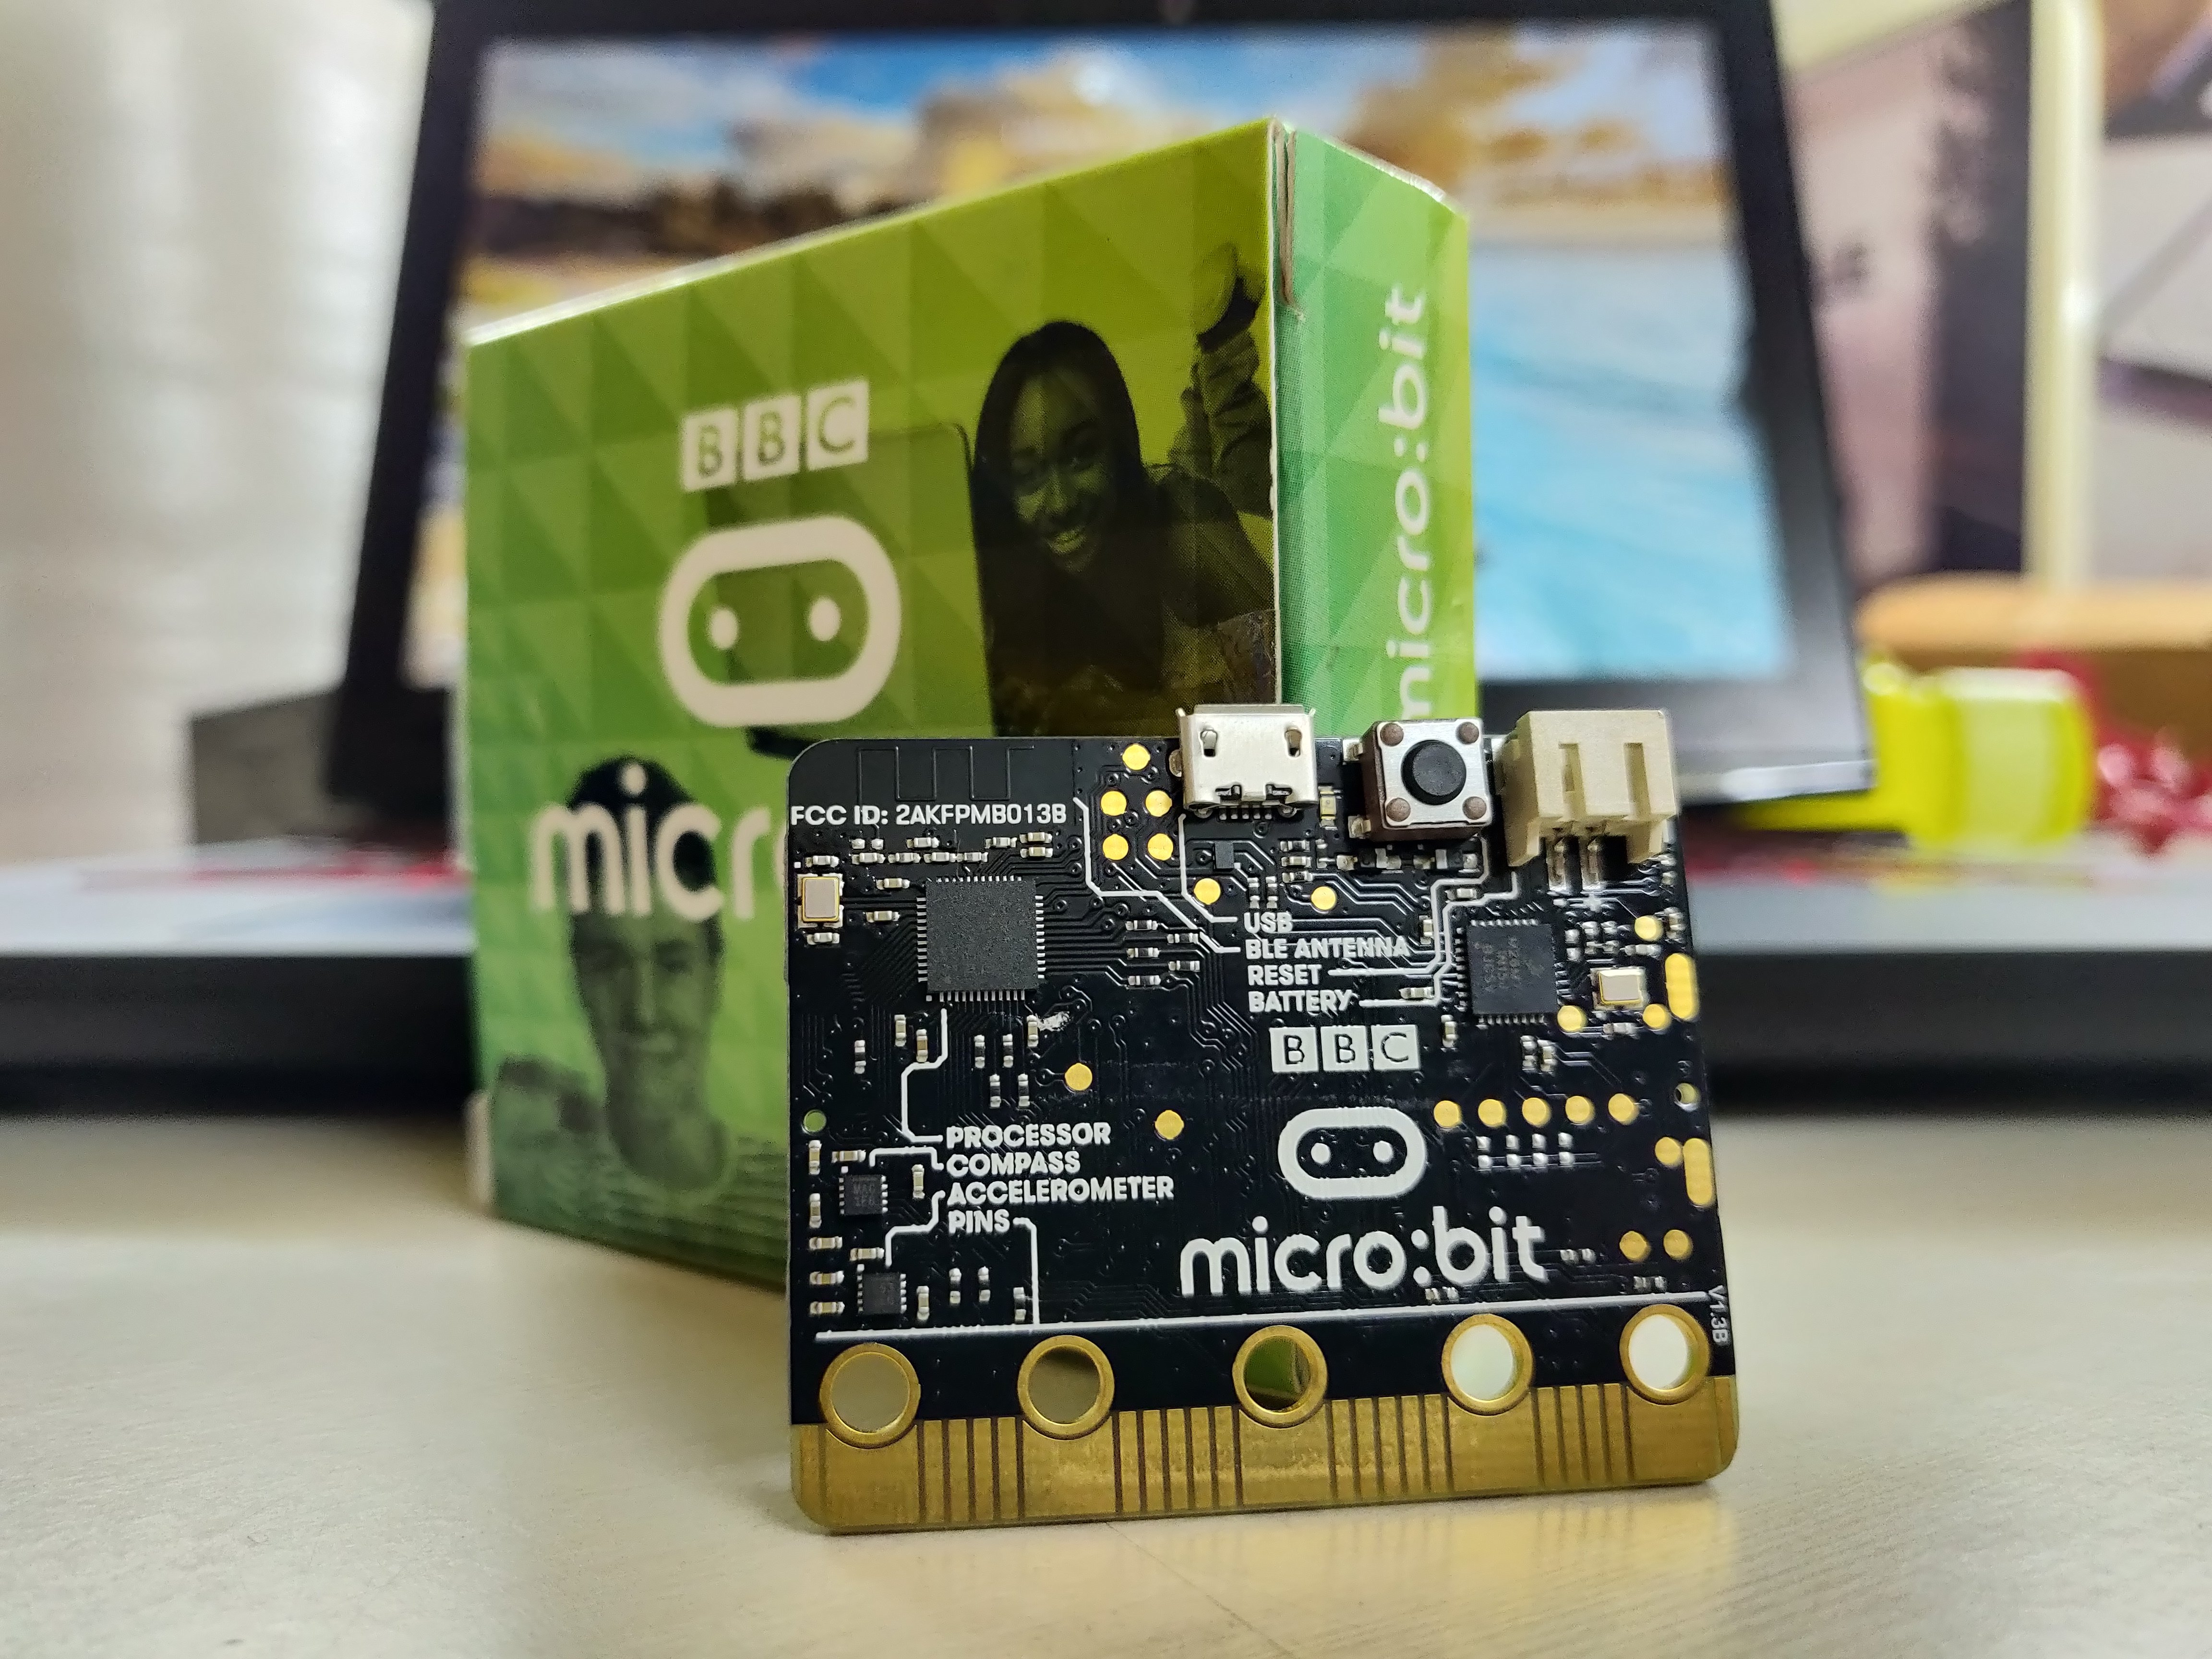
The micro:bit has a lot of great resources online to help you get started and come up with project ideas.
Raspberry Pi
Most Raspberry Pis are technically single-board computers instead of embedded systems, but they all still allow access to external hardware through their GPIO pins. One exception to the rule is the Raspberry Pi Pico, which is a microcontroller development board. Other Raspberry Pis run Linux, meaning that you can use them as a full computer, and all Pis support Python right out of the box.
There are a few different models of Raspberry Pi available, but all of them are able to run Python and work with electronics. Which model you should pick depends on your project needs. Here’s one of the latest models:
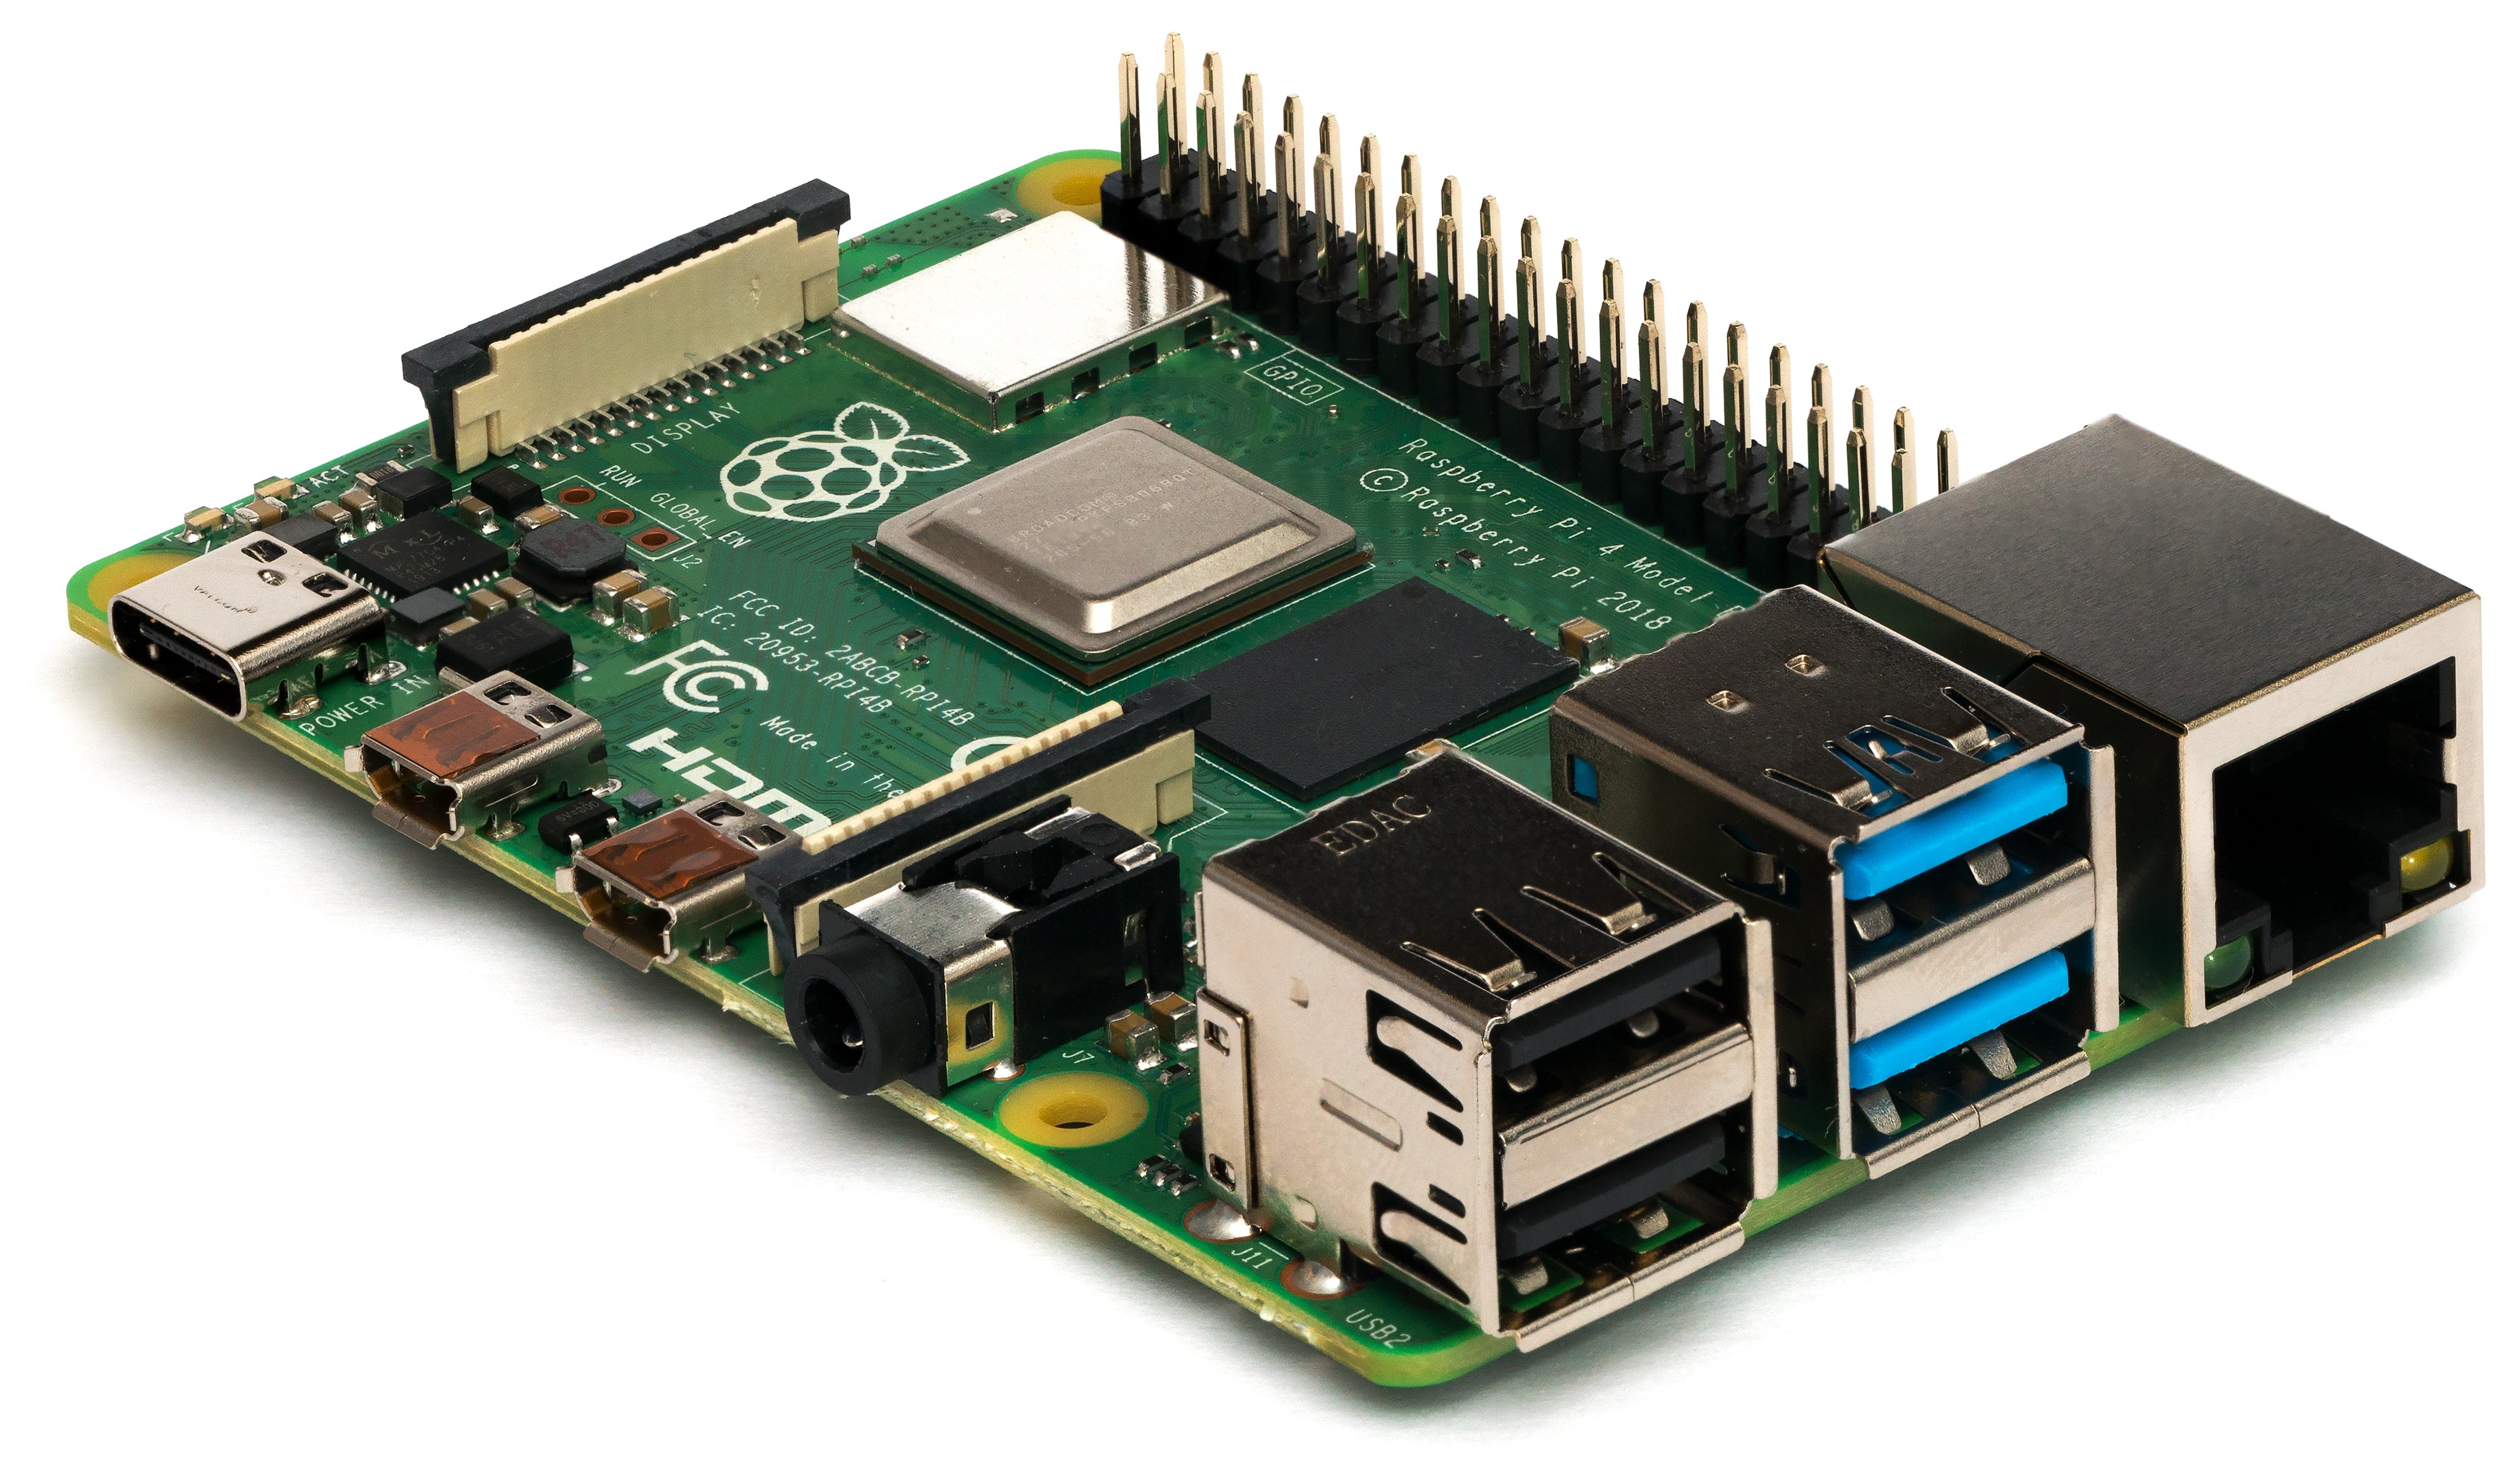
You can find out more about the different models of the Raspberry Pi on the official site. For an example of a project you can make with a Raspberry Pi and Python, check out Build Physical Projects With Python on the Raspberry Pi.
pyboard
The pyboard is an electronics development board that is designed to run MicroPython. It’s a lot more powerful than a micro:bit but comes without any extra goodies like the on-board screen and sensors of the micro:bit. Here’s the pyboard 1.0:
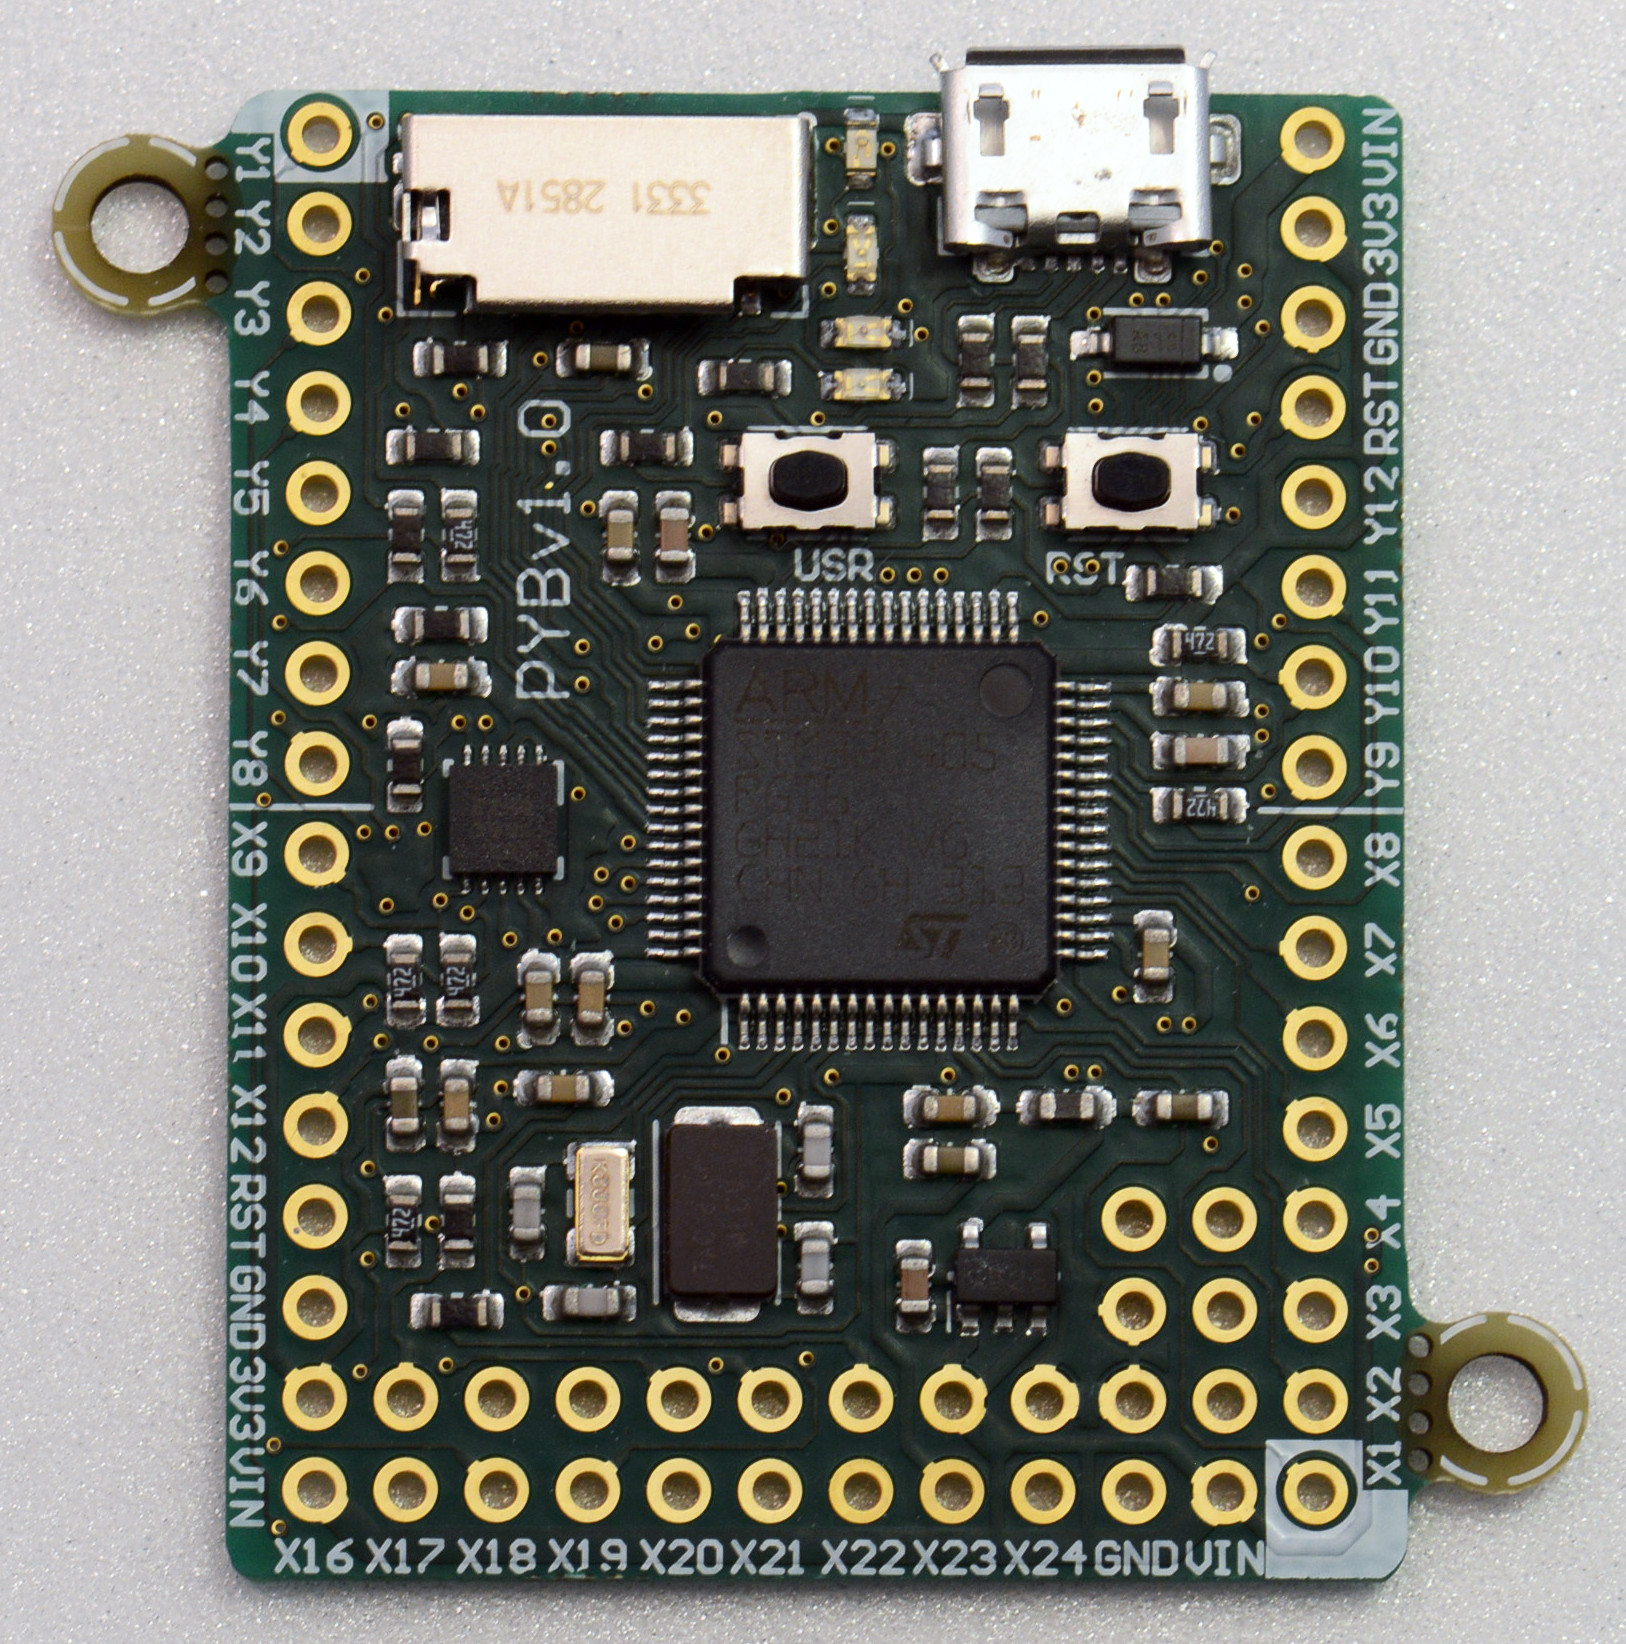
You may notice lots of golden circles on the board. These are called pins and are used to connect the pyboard to other electronic components. For example, if you were building a remote-controlled car, you might connect some motors to them.
Others
There are lots of Python-compatible boards and kits out there, far too many to list here. However, there are a few interesting ones that are good to call out:
- The LoPy from Pycom connects to specialist Internet of Things networks such as LoRa and Sigfox.
- ESP8266-based boards all run MicroPython. The ESP8266 is a cheap Wi-Fi-enabled microcontroller. Its successors, the ESP32 family of chips, also all run MicroPython.
- Python also runs on the Nintendo DS. The setup looks a little bit complicated for beginners, but this project is too fun to not mention.
There are many more MicroPython-compatible boards than this tutorial has space for. You should do some research to find the right one for your projects. A good place to start could be Adafruit’s MicroPython store.
Software Options for Writing Embedded Python
When you install Python on your computer, you’re usually installing a specific implementation of Python called CPython. An implementation of Python is the program that runs your Python code.
You could call CPython the default Python implementation since it’s written by the people who define the language itself. However, CPython isn’t the only implementation of Python. In this section, you’ll learn about some implementations that are specifically aimed at writing embedded code.
MicroPython
MicroPython is the de facto standard embedded Python implementation. It is a Python 3.x implementation designed to run on microcontrollers. It is not 100 percent CPython-compatible, but it is very close. This means that if you have written code to run on versions up to Python 3.4, then there’s a good chance you can get it to run in MicroPython.
CircuitPython
CircuitPython is a fork of MicroPython that supports a slightly different list of boards and has some changes to make it more friendly to beginners. For the most part, your experience will be very similar when using CircuitPython as it will when using MicroPython. You might choose to use CircuitPython if your board only supported it and not other implementations.
For more on CircuitPython, check out The Real Python Podcast Episode 161: Resources and Advice for Building CircuitPython Projects.
Project: A Simon Says Game on the BBC micro:bit
Nothing compares to practical experience, so in this section you’re going to build a Simon Says game on the BBC micro:bit. Don’t worry if you don’t have one! There are simulators available online to get you started.
Simon Says is a children’s game where one person gives instructions to a group. If they prefix their instructions with “Simon says,” then the group has to do it. If they give the instruction without saying “Simon says” first, then the group has to ignore the instruction. To make our game simpler, we’ll focus just on the instruction-giving part.
The game will work as follows:
- The micro:bit will think of a direction and tell it to the player.
- The player will try to tilt the micro:bit in that direction.
- If the player manages to correctly tilt the micro:bit in time, then they get a point!
- If the player doesn’t make the correct tilt in time, then the micro:bit displays their score and the game starts again.
Before you start coding, you’ll need to set up your environment.
Setting Up Your Environment
Whether or not you have a physical micro:bit, the quickest path to get started coding is to use the available online editors. For this tutorial, you will be using the create.withcode editor. When you open up the editor, you’ll see the following screen:
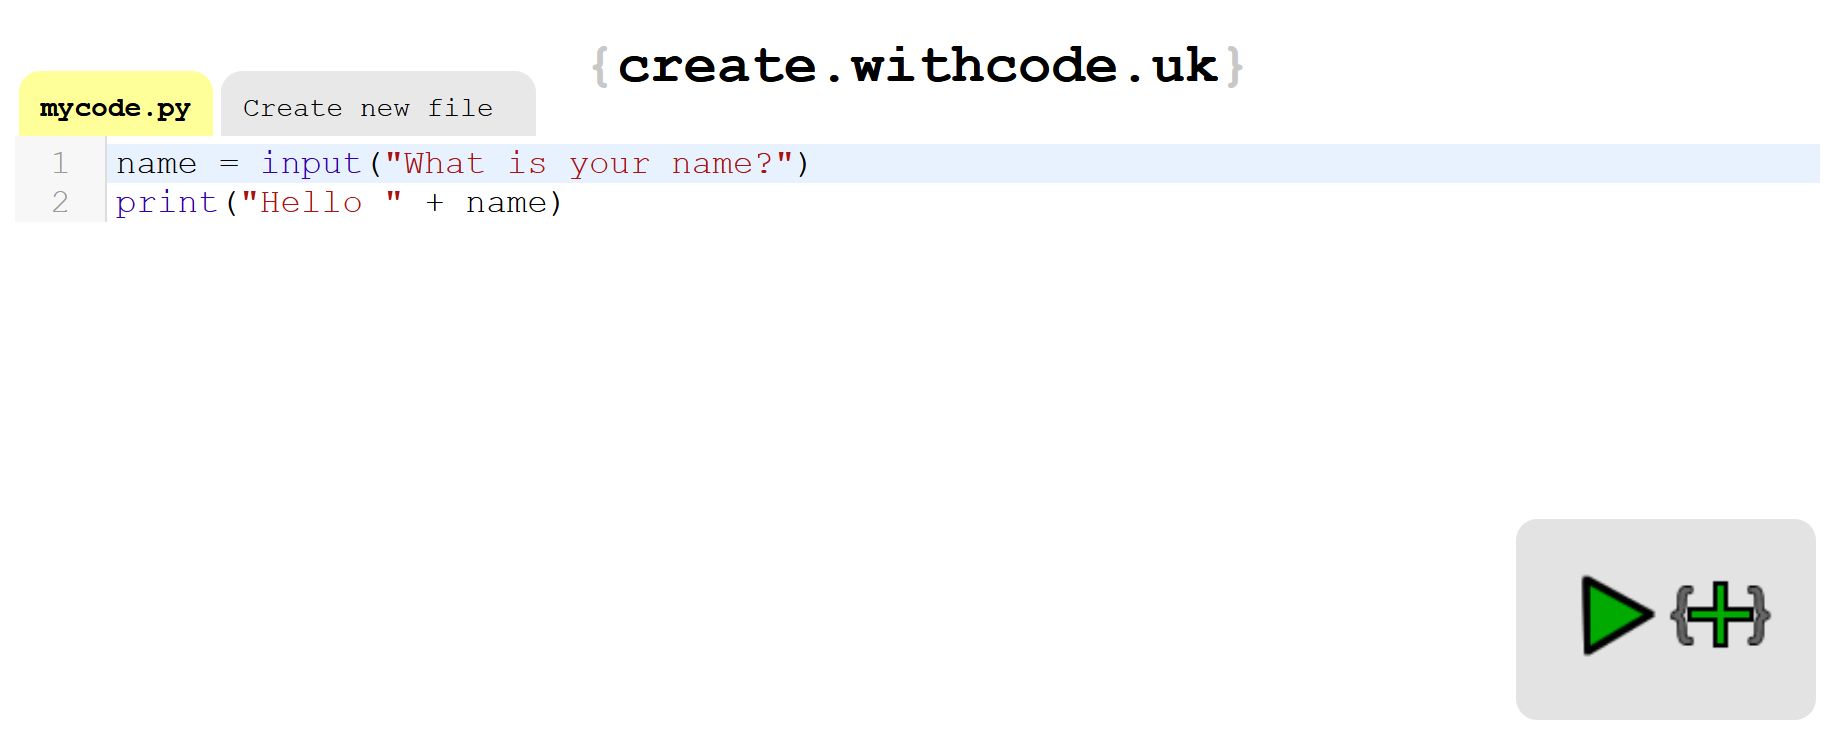
Most of the screen is taken up with the text buffer where you can enter your code. On the bottom right, you’ll see a play button. This will let you run your code once you’ve written it.
Displaying Instructions on the Screen
The first thing that your game needs to do is to come up with a direction and tell it to the player. For the purposes of this game, you can use three directions: left, right, and stay still. Your code will need to pick one of these directions and display it to the player. This will be wrapped in an infinite while loop so that it can run multiple times.
Note: Infinite while loops are more common in embedded programming than in other types of programming. This is because embedded systems tend to do only one job, so there’s no risk of hanging up the system and preventing other programs from running.
Here’s what your code may look like:
from microbit import *
from random import randrange

# Define left, stay still, and right
directions = ["L", "O", "R"]

# While the micro:bit is on
while True:
    # Pick a random direction
    direction = directions[randrange(3)]
    display.show(direction)
    # Sleep for a second (1000ms)
    sleep(1000)
This code will display a different random direction every second. The first two lines import the necessary functions:
- The
microbitmodule contains all the code necessary to interface with the micro:bit. For example, thedisplayandaccelerometermodules are in here. Themicrobitmodule comes pre-loaded with MicroPython on the micro:bit, so you may encounter an error if you try to import it when running code on your computer. - The
randommodule allows you to pick a random number.
After the imports, the code defines the directions list. This contains three characters that represent the available directions. The advantage of defining this list with characters is that they can be displayed directly since the micro:bit screen only has space for one character at a time.
The while True: loop tells the micro:bit to run the code inside it forever. In reality, this means it will run while the micro:bit is powered. Inside, the code first picks a random direction with randrange() and shows it. Afterward, it sleeps for a second. This forces the micro:bit to do nothing for a second, which makes sure that the player has time to see the instruction.
Running Your Code
Now that you have some code, you can run it! Thankfully, you don’t need a micro:bit to run your code as your editor comes with a built-in simulator. You can access it and run your code by clicking the play button in the bottom-right corner.
When you click the play button, you’ll see the following overlay pop-up in your editor:
In it, you’ll see a micro:bit, and the screen should display random characters from the directions list. If not, then try copying the code from above into the editor and click the play button again.
Note: The create.withcode simulator is a wonderful resource, but it can be a little buggy at times. The following may help if you run into problems:
- Sometimes, when you paste code into the editor, it can look like half of the editor screen has disappeared. Click anywhere inside the editor to get it to come back.
- If you don’t stop your code by pressing the red button before running it again, it can sometimes run both instances of the code at once, causing strange output. Pressing the red stop button before running your code again fixes this issue.
If you are a more advanced coder, you can set up Visual Studio Code as a micro:bit development environment using the Device Simulator Express extension and pseudo-microbit module for code auto-completion.
This is the general development flow that you’ll be following for the rest of the tutorial.
Optional: Run Your Code on a Physical micro:bit
If you have a physical micro:bit, then there are a couple of extra steps to run your code. You’ll need to download a .hex file and then copy it onto your micro:bit.
To download the .hex file, look for the following button in your editor:
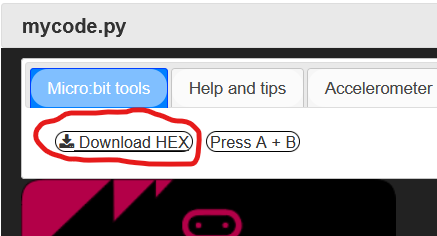
This will ask you to save the file to your computer. Save it and then grab your micro:bit. Connect your micro:bit to your computer using a USB cable. You should see it appear in the same way that USB drives do.
To program the micro:bit, drag the downloaded .hex file onto your micro:bit. A red LED on the back of your micro:bit should flash. Once it stops, your program is loaded onto the device and will start executing straight away!
Tips: Here are some tips that may help if you get stuck:
- If you need to restart the program from the beginning, there’s a reset button on the back of the micro:bit, next to the USB connector.
- Errors in your code will scroll across the screen. If you’re patient and watch them, they can give you good clues as to how to fix your scripts.
You’ll have to try very hard to break your micro:bit! If something goes wrong, check your code carefully and don’t be afraid to try things, even if you’re not sure it will work.
Now that you’ve got your micro:bit set up for development, you’re ready to move on to some coding.
Getting Player Input
Now that the micro:bit can tell the player what to do, it’s time to get the player’s input. To do this, you’ll be using the accelerometer. An accelerometer is a device that measures movement. It can tell if the micro:bit is moving in a specific direction, and importantly for the game, whether the micro:bit is tilting in a specific direction. Take a look at the following diagram:
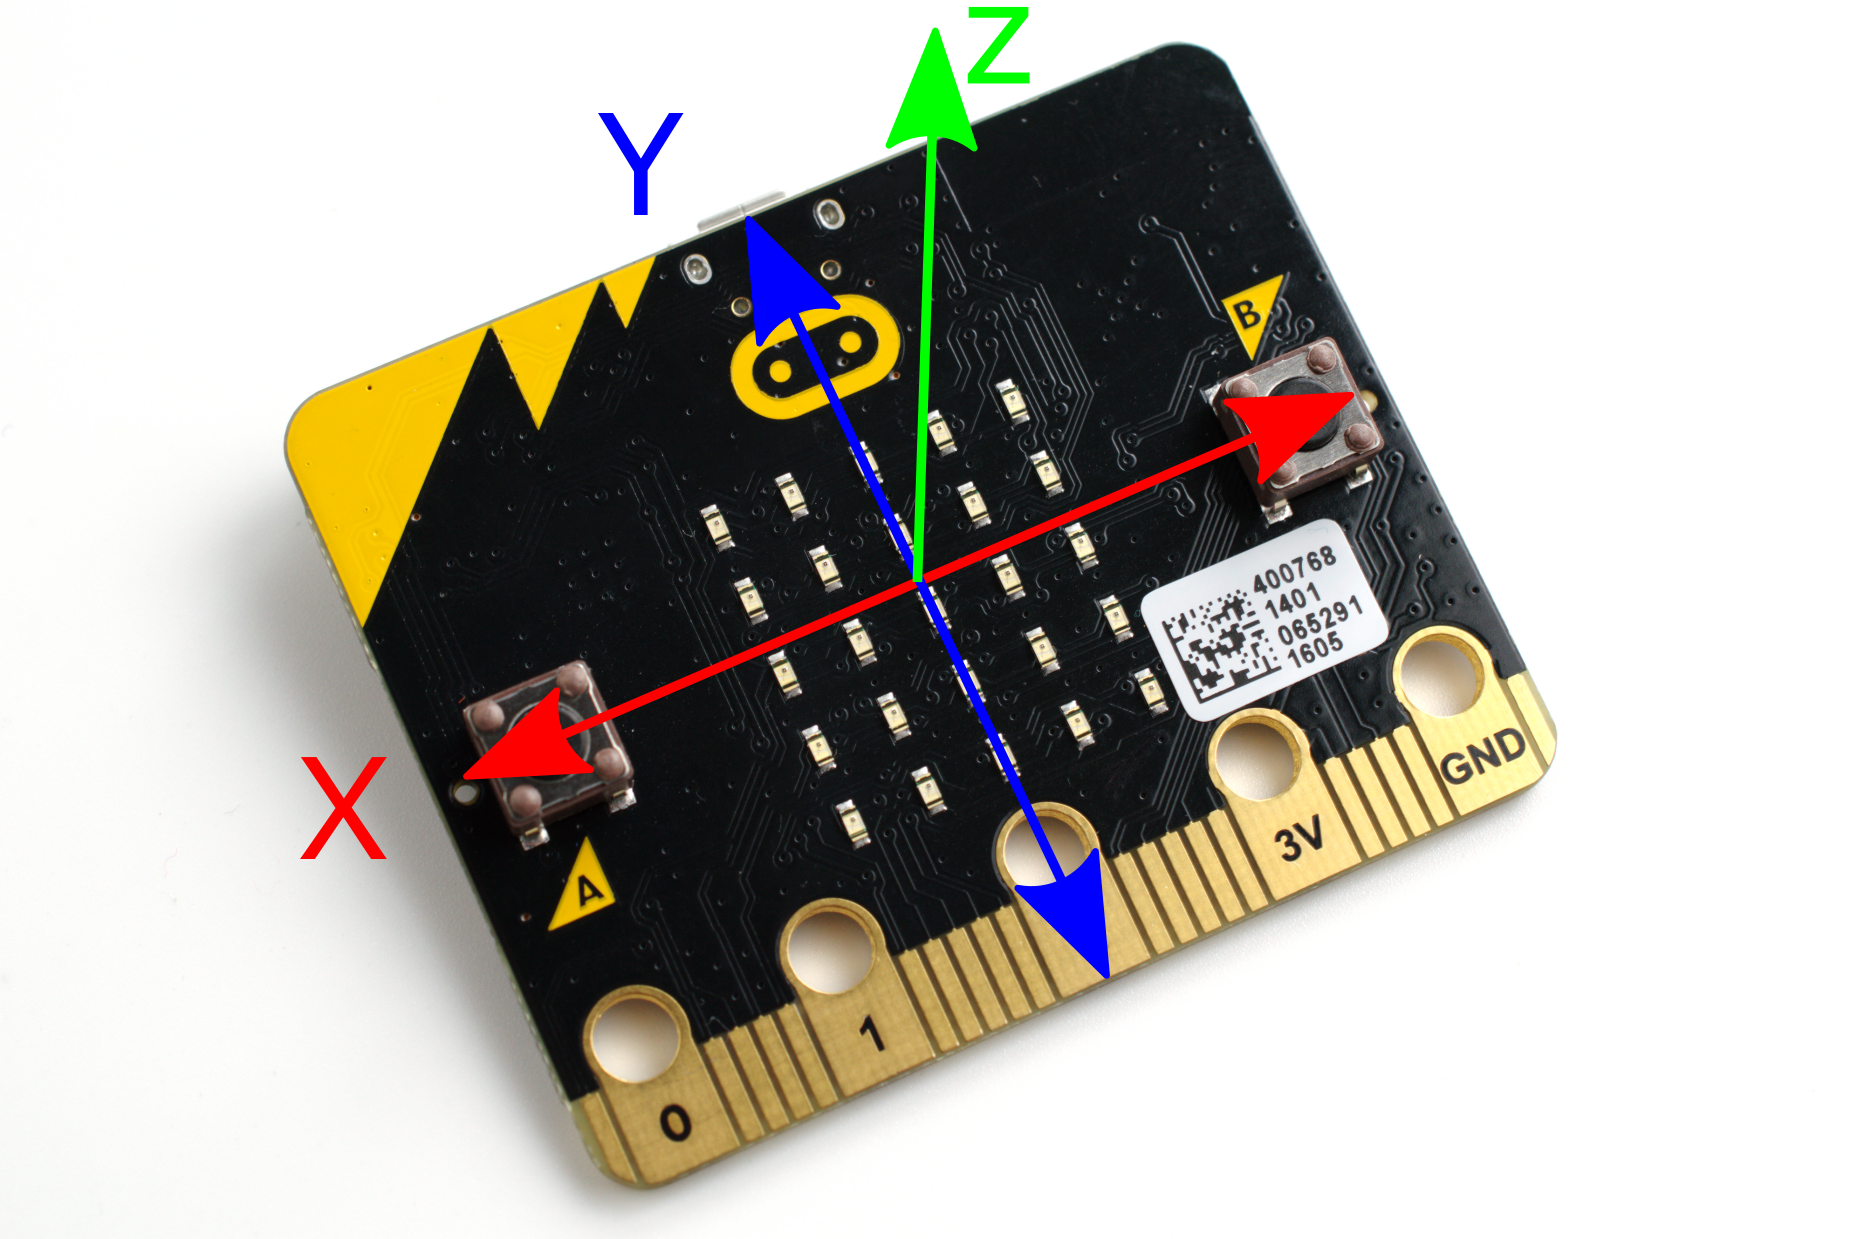
In the diagram, you’ll see three axes: X, Y, and Z. These are just like the axes that you might have seen in graphs at school. The X-axis represents side-to-side motion, the Y-axis represents up-and-down motion, and the Z-axis represents motion toward or away from you.
The accelerometer on the micro:bit returns the values from these three axes. Since your game only cares about tilting to the left and right, all you’ll need is the X-axis for now. accelerometer.get_x() returns values in the range (-2000, 2000), where -2000 is tilted all the way to the left and 2000 is tilted all the way to the right.
Your code to get the player’s input will need to take three steps:
- Read the accelerometer’s X value.
- Decide whether that X value represents a left, right, or staying still movement.
- Decide if that was the correct direction to move.
Here’s the code to accomplish those steps:
# Previous code...

while True:
    # Previous code...

    # Get the X-axis (left-right) tilt
    acc_x = accelerometer.get_x()
    # Determine direction
    if acc_x < -200:
        player_in = "L"
    elif abs(acc_x) < 200:
        player_in = "O"
    elif acc_x > 200:
        player_in = "R"

    # Check win condition
    if player_in == direction:
        # Player input correctly
        display.show(Image.HAPPY)
    else:
        display.show(Image.SAD)
    sleep(1000)
This code is a little bit longer since you have to check a lot of different conditions. The first thing you do is get the X-axis value from the accelerometer with accelerometer.get_x(). Remember, this will be in the range (-2000, 2000).
After getting the X value, you run through a series of checks to figure out which movement it represents. Anything greater than 200 in either direction is considered tilting, and anything less than 200 is considered staying still.
abs() helps shorten the code by stripping the negative sign from the accelerometer value. This means that numbers in the range (-200, 200) will be considered staying still. You may want to play with that threshold to make the game more or less challenging.
After getting the directional input from the player, you check if it was correct or not. If it was the correct direction, then the code displays a happy face. Otherwise, it displays a sad face. The code then sleeps for a second to allow the player to see the result without it disappearing very quickly.
Testing Accelerometer Code in the Simulator
Since the accelerometer is a sensor that detects physical movement, you may be wondering how to interact with it in the simulator. Thankfully, the simulator provides a virtual accelerometer that you can control with your mouse.
Run your code in the same way as you did before, by clicking the play button in the bottom-right corner. You will see the micro:bit overlay appear. The overlay has some tabs along the top that control the various components of the micro:bit. Click the tab labeled Accelerometer.
In this tab, you will see three sliders, one for each axis. You will be using the X-axis slider to test your game.
As you move the slider to the right, the X value of the accelerometer will increase. Similarly, as you move the slider to the left, the X value will decrease. This is equivalent to tilting the micro:bit left and right and allows you to play your game in the browser.
Points and Losing
Now that the base game is in place, it’s time to think about adding in points and losing to complete the game. Remember the behavior described in the specification was that when the player lost, the micro:bit would display the points total that the player had gotten up to that point. If the player gets it right, the micro:bit should not display anything:
# Previous code...
points = 0

while True:
    # Previous code...

    if player_in == direction:
        # Player's input is correct
        points += 1
    else:
        display.scroll(points)
        display.show(Image.SAD)
        points = 0
        sleep(1000)
Thankfully this is a smaller change than the previous step. Outside of the while loop, you define a variable points that will track the player’s points.
Further down, you’ve changed the check for whether the player’s input was in the correct direction. If the player moved the correct direction, you increase their points total by 1. Otherwise, you make the points total scroll across the screen with display.scroll(), show a sad face, and reset the points total.
You also move sleep() into the loss code since no image is displayed for getting it correct. This makes the game slightly more challenging!
To help you check your code and to cement what you’ve learned, here’s the full code for the game:
from microbit import display, Image, accelerometer, sleep
from random import randrange

# Define left, stay still, and right
directions = ["L", "O", "R"]
points = 0

# While the micro:bit is on
while True:
    # Pick a random direction
    direction = directions[randrange(3)]
    display.show(direction)
    # Sleep for a second (1000ms)
    sleep(1000)

    # Get the X-axis (left-right) tilt
    acc_x = accelerometer.get_x()
    # Determine direction
    if acc_x < -200:
        player_in = "L"
    elif abs(acc_x) < 200:
        player_in = "O"
    elif acc_x > 200:
        player_in = "R"

    # Check win condition
    if player_in == direction:
        # Player's input is correct
        points += 1
    else:
        display.scroll(points)
        display.show(Image.SAD)
        points = 0
        sleep(1000)
Congratulations on building your very own game! You’ll notice this code takes up just over thirty lines including comments, which is much shorter than an equivalent program in a traditional embedded language.
Take It a Step Further
There you have it—you’ve built a complete game on an embedded system! If you want some extra challenges, here are some ideas:
- Incorporate the other accelerometer axes and turn this into a micro:bit version of Bop It!
- Shorten the time the player has to move the micro:bit if they get a certain number correct. What’s the shortest time you can do? Why do you think that is?
- Include accelerometer gestures. Out of the box, the micro:bit can detect shaking, being face down or face up, and even going into freefall.
- Add in multiplayer functionality so you can play with friends. The micro:bit has a radio module that allows communication between micro:bits.
This list is not definitive but instead should get you thinking. If you come up with a cool way to extend the game, then please share it in the comments!
Further Reading
Embedded development is a huge field, with a lot to learn. If you’re looking to learn more about embedded development with Python, then thankfully there are lots of great resources out there. Here are some links to get you started.
micro:bit Resources
One of the best things about the micro:bit is the huge collection of educational resources out there:
- microbit.org: The official micro:bit site with projects, lessons and more code editors
- micro:bit MicroPython docs: Highly readable documentation for Python on the micro:bit
- Build a snake game on the BBC micro:bit: A tutorial for a more complex game that walks you through the process slowly
The Micro:bit Educational Foundation recently released a second version of the micro:bit which will hopefully encourage a whole new wave of resources.
Other Boards That Run Python
The micro:bit isn’t the only board out there. It’s definitely worth exploring to find the right one for your project:
- MicroPython board tutorials: MicroPython has some official tutorials for some of the boards it supports. For example, here’s the one for the ESP8266.
- Hackaday projects tagged MicroPython: This site features writeups of projects that people have built and could give you some inspiration!
- Pycom tutorials: Pycom make MicroPython-compatible boards that have the ability to connect to various networks. These tutorials are a good way to get an idea of what’s possible.
There are many more interesting devices that run Python. You’ll be sure to find one that fits your project.
Conclusion
Python can be a great choice to write code for embedded systems. It enables you to develop your code faster and comes with safety guarantees that you won’t find with lower-level languages. You now have the knowledge to begin your embedded development journey with Python and are familiar with some of the options available to you.
In this tutorial, you learned:
- What embedded development is and why you would use Python to do it
- What the differences are between programming embedded systems and general-purpose computers
- Which options are available for writing Python code for embedded systems
- How to write a basic game on the BBC micro:bit with MicroPython
Embedded development is a wide and exciting field, filled with interesting things to discover. Keep learning, and be sure to share your discoveries in the comments below!
If you want to download the code from this tutorial to refer to offline, then click the link below:
Get Sample Code: Click here to get the sample code you’ll use to learn about embedded development with Python in this tutorial.