Watch Now This tutorial has a related video course created by the Real Python team. Watch it together with the written tutorial to deepen your understanding: Using Google Login With Flask
You’ve probably seen the option for Google Login on various websites. Some sites also have more options like Facebook Login or GitHub Login. All these options allow users to utilize existing accounts to use a new service.
In this article, you’ll work through the creation of a Flask web application. Your application will allow a user to log in using their Google identity instead of creating a new account. There are tons of benefits with this method of user management. It’s going to be safer and simpler than managing the traditional username and password combinations.
This article will be more straightforward if you already understand the basics of Python. It would also help to know a bit about web frameworks and HTTP requests, but that’s not strictly necessary.
By the end of this article, you’ll be able to:
- Create a Flask web application that lets users log in with Google
- Create client credentials to interact with Google
- Use Flask-Login for user session management in a Flask application
- Better understand OAuth 2 and OpenID Connect (OIDC)
You can click the box below to get the code for the application you’ll make in this article:
Download Sample Project: Click here to download the code for the Flask application with Google login you’ll build in this article.
Why Use Google Login for Your Users?
You may want individual users to have profiles. Or perhaps you want to provide features to only certain users. In any case, you’ll need to know who’s interacting with your application. In other words, you’ll need to authenticate users and identify them in some unique way.
The traditional solution is to use a unique username and a secret password. Your application would store that information and ask for it when needed. However, there are a few downsides to that solution:
- You have to securely manage the passwords.
- You have to implement any account-related functionality:
- Two-factor authentication
- Password reset
- You have to protect against malicious login attempts.
- Your users have to remember yet another username and password.
By using Google login for your users, you push all that responsibility to them. Your application waits for the user to go through authentication. Google then tells your application about that user. At that point, you can effectively log them into your application.
You don’t have to store any passwords, and Google handles all the security.
How Applications Use Google Login
There are two very popular and important specifications called OAuth 2 and OpenID Connect (OIDC). OIDC is built on top of OAuth 2, adding a few new ideas and concepts.
These specifications define how a third-party application can obtain information from another service. This usually involves obtaining consent from a user. To unpack this a bit, let’s look at how this applies to the application you’re about to build.
You’re about to write a third-party application, and it will let a user use a Google Login button to log in. To do that, Google needs to know about your application. Luckily, you can register your application as a client to Google.
Once a user comes to your application and presses the Google Login button, you can send them to Google. From there, Google needs to make sure that the user consents to pass along their email and other information to your application. Should the user consent, Google sends back some information to your application. You then store that information and can reference it later, effectively logging the user in.
OpenID Connect Details
To request information on behalf of a user, you must become a client to the authentication server, also known as the provider. The first thing you’ll realize if you dig into these specifications is that there are a lot of overlapping terms and concepts.
So as a third-party application (also known as a client), you want to get info from the provider on the user’s behalf. There are a series of steps that enable that to happen, and those steps must happen in a specific order. That’s why you’ll sometimes hear OAuth 2 and OpenID Connect referred to as a handshake, flow, or dance.
Those steps are, broadly:
- You register a third-party application as a client to the provider:
- You receive unique client credentials from the provider.
- You’ll use these client credentials to authenticate (prove who you are) to the provider later on.
- The client sends a request to the provider’s
authorizationURL - The provider asks the user to authenticate (prove who they are)
- The provider asks the user to consent to the client acting on their behalf:
- Usually this includes limited access, and it’s made clear to the user what the client is asking for.
- This is like when you have to approve an app on your phone to have access to location or contacts.
- The provider sends the client a unique authorization code.
- The client sends the authorization code back to the Provider’s
tokenURL. - The provider sends the client tokens to use with other provider URLs on behalf of the user.
Note: The steps above are for the Authorization Code Flow, as defined by OAuth 2.
Those steps include both of the standards mentioned so far. OpenID Connect (OIDC) is built on top of OAuth 2, adding a few additional features and requirements, mostly involving the process of authentication. Other than the authentication mentioned in the flow above, the important OIDC concepts for your application are the provider configuration and userinfo endpoint.
The provider configuration contains information about the provider, including the exact URLs you need to use for the OAuth 2 flow. There’s a standard URL on an OIDC provider you can use to get back a document with standardized fields.
The userinfo endpoint will return information about the user after you’ve gone through the OAuth 2 flow. This will include their email and some basic profile information you’ll use in your application. In order to obtain this user information, you’ll need a token from the provider, as described in the last step in the flow above.
You’ll see the details about how the provider configuration and user info endpoint can be utilized later on.
Creating a Google Client
The first step to enable a Google Login option is to register your application as a client to Google. Let’s walk through the steps to do that.
First, note that you will need a Google Account. You already have one if you use Gmail.
Next, go to the Google developers credentials page.
Once in, you may be prompted to agree to their terms of service. Should you agree to those, press the Create credentials button on the next page. Select the option for OAuth client ID:
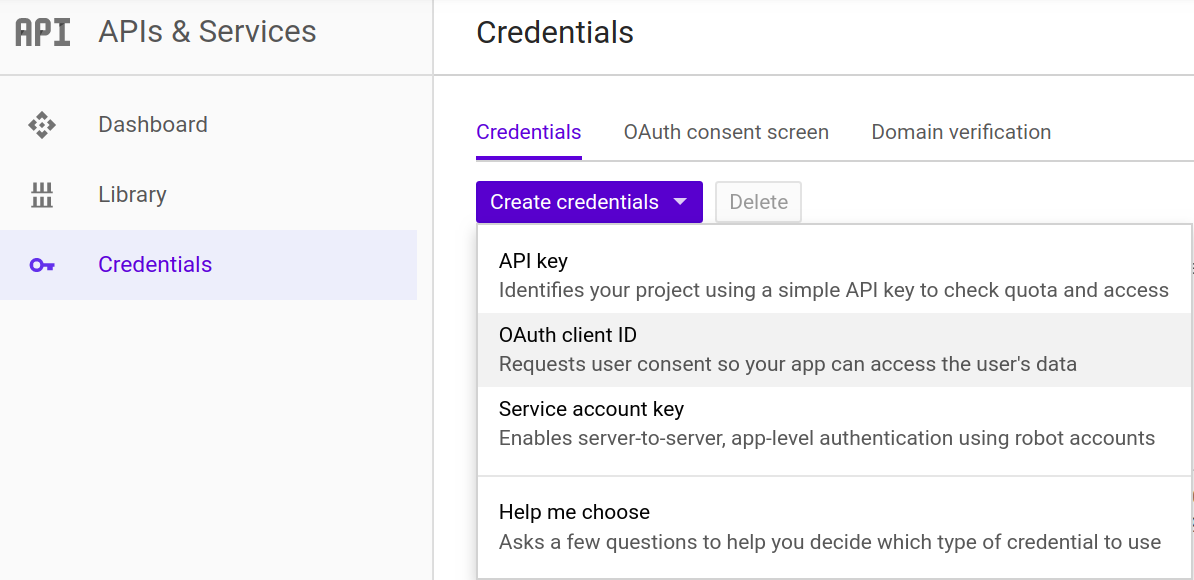
Select the Web application option at the top. You can provide a name for the client in the Name field as well. The name you provide will be displayed to users when they are consenting to your application acting on their behalf.
You’ll be running your web application locally for now, so you can set the Authorized JavaScript origins to https://127.0.0.1:5000 and Authorized redirect URIs to https://127.0.0.1:5000/login/callback. This will allow your local Flask application to communicate with Google.
Finally, hit Create and take note of the client ID and client secret. You’ll need both later.
Creating Your Own Web Application
Now for the fun part where you apply the knowledge you learned to create an actual web application!
Let’s start with the goal in mind. You want to create an application that lets users log in with their Google account. That application should be able to retrieve some basic information about the user from Google, like their email address. Then the application should store basic user information in a database.
First, though, let’s take a look at the framework and libraries you’ll be using.
Flask
Flask is a lightweight web-framework, a self-proclaimed microframework. It comes with built-in tools for the basic tasks that a web application will perform, like routing URLs and handling HTTP requests.
I’ve chosen to use Flask as an example for both its popularity and simplicity. However, the things you’ve learned about OAuth 2 and OIDC are not specific to Flask. In fact, even the library you’ll be using to make OAuth 2 and OIDC easier is usable in any Python code. In other words, with some minor modifications, you can take what you learn here and apply it to another framework of your choice.
Flask-Login
Another tool you can use to make the handling of users easier is flask_login, which provides user session management.
This library does a few things behind the scenes and gives you some tools to help with users. Namely, it provides utilities for you to know when a user is logged in and logged out. It does this by managing a user session inside a browser cookie.
It also handles the logging in and logging out of users, including the creation of database entries for those users. From the aspect of your code though, it really just makes everything a lot simpler (which you’ll see soon).
OAuthLib
There’s a common phrase that holds very true for security-related and standard-compliant code: “Don’t reinvent the wheel.”
OAuth 2 and OpenID Connect standards are complicated. Have a look at the RFC and specifications, and you’ll see. They’re dense. One mistake means that you could be opening up a vulnerability in your application.
So, you are not going to be writing code to implement these standards. You’re going to use a Python package that was chosen on some very specific criteria:
- It’s a popular and generally recommended library. Lots of other packages use this library internally.
- It is very active, with people patching bugs frequently.
- It’s battle-hardened and has been around since 2012.
There are web-framework-specific packages that use this library to more closely integrate into Flask, Django, Pyramid, and others. However, to keep the code you learn here framework-agnostic, you’ll use this library directly without any fancy wrappers.
Installing Dependencies
There are a number of third-party dependencies that you’ll use to make your life easier. Here’s a summary of those dependencies:
- A web framework to make typical web application tasks easier (Flask)
- A headache-free way of managing user sessions (Flask-Login)
- A battle-hardened OIDC library (
oauthlib)
Additionally, you’ll use the following:
- A database to store some information about users who log in (SQLite
- An user-friendly way to send HTTP requests to Google (
requests) - A quick way to enable running securely with
httpslocally (pyOpenSSL)
SQLite is part of the standard Python library, but the other packages are not. So you have a couple of dependencies to install. For now, let’s just go through the creation of this application step by step.
First, you’ll need to install those third-party dependencies mentioned above. You’ll do this by creating a requirements.txt file with the following contents:
requests==2.21.0
Flask==1.0.2
oauthlib==3.0.1
pyOpenSSL==19.0.0
Flask-Login==0.4.1
Note: Other versions of the packages may work, but these are versions that were used during the writing and testing of this article.
Next, you can install those dependencies using pip, Python’s package installer.
Note: It is generally recommended to use virtual environments if you’re going to be installing dependencies for different Python applications on your computer. See Python Virtual Environments: A Primer to learn more.
To install from the requirements.txt file, run the following command in your terminal:
$ pip install -r requirements.txt
Now you’re ready to rock and roll! Let’s dig right into the code.
Imports, Configuration, and Setup
Start by adding a few files to support some basic database functionality and user management. These won’t be described section by section, mostly because diving into Python database implementation details is a rabbit hole that would distract us from our goal.
This file will handle some database functionality. This is almost line by line from Flask’s official database tutorial:
# http://flask.pocoo.org/docs/1.0/tutorial/database/
import sqlite3

import click
from flask import current_app, g
from flask.cli import with_appcontext

def get_db():
    if "db" not in g:
        g.db = sqlite3.connect(
            "sqlite_db", detect_types=sqlite3.PARSE_DECLTYPES
        )
        g.db.row_factory = sqlite3.Row

    return g.db

def close_db(e=None):
    db = g.pop("db", None)

    if db is not None:
        db.close()

def init_db():
    db = get_db()

    with current_app.open_resource("schema.sql") as f:
        db.executescript(f.read().decode("utf8"))

@click.command("init-db")
@with_appcontext
def init_db_command():
    """Clear the existing data and create new tables."""
    init_db()
    click.echo("Initialized the database.")

def init_app(app):
    app.teardown_appcontext(close_db)
    app.cli.add_command(init_db_command)
Now that you have some database utilities, you can start to think about the schema. You may notice that this code is looking for a schema.sql file, which you’ll create next.
The schema.sql file is just some SQL that will create a user table in our database. You can see the fields you’ll be storing per user in this file.
Here you have a single table, user, which will house a few things related to users (their name, the email they log in with, and their profile picture from Google):
CREATE TABLE user (
  id TEXT PRIMARY KEY,
  name TEXT NOT NULL,
  email TEXT UNIQUE NOT NULL,
  profile_pic TEXT NOT NULL
);
The code in the db.py file will actually execute this SQL to create the table in your database.
This next file contains our User class, which will store and retrieve information from the database. The name, email, and profile picture will all be retrieved from Google, which you’ll see later on in the article.
The User class has methods to get an existing user from the database and create a new user:
from flask_login import UserMixin

from db import get_db

class User(UserMixin):
    def __init__(self, id_, name, email, profile_pic):
        self.id = id_
        self.name = name
        self.email = email
        self.profile_pic = profile_pic

    @staticmethod
    def get(user_id):
        db = get_db()
        user = db.execute(
            "SELECT * FROM user WHERE id = ?", (user_id,)
        ).fetchone()
        if not user:
            return None

        user = User(
            id_=user[0], name=user[1], email=user[2], profile_pic=user[3]
        )
        return user

    @staticmethod
    def create(id_, name, email, profile_pic):
        db = get_db()
        db.execute(
            "INSERT INTO user (id, name, email, profile_pic) "
            "VALUES (?, ?, ?, ?)",
            (id_, name, email, profile_pic),
        )
        db.commit()
The code executes SQL statements against the database, which is retrieved from the get_db() function from the previous db.py file. Each new user results in the insertion of an additional row in the database.
After you’ve created the db.py, schema.sql, and user.py files from the above code, you can create a new app.py file. Add to it the following imports:
# Python standard libraries
import json
import os
import sqlite3

# Third-party libraries
from flask import Flask, redirect, request, url_for
from flask_login import (
    LoginManager,
    current_user,
    login_required,
    login_user,
    logout_user,
)
from oauthlib.oauth2 import WebApplicationClient
import requests

# Internal imports
from db import init_db_command
from user import User
You’ll use all these later on, so it’s not so important to understand each of them at the moment. The next portion in your app.py is some configuration:
# Configuration
GOOGLE_CLIENT_ID = os.environ.get("GOOGLE_CLIENT_ID", None)
GOOGLE_CLIENT_SECRET = os.environ.get("GOOGLE_CLIENT_SECRET", None)
GOOGLE_DISCOVERY_URL = (
    "https://accounts.google.com/.well-known/openid-configuration"
)
Here’s how you’ll store the Google Client ID and Client Secret, which you should have created earlier in the article. These will be used later in the OIDC flow.
Your application will try to get the client credentials by reading environmental variables. There are a couple reasons for this:
- You don’t have to change your code later if you want to use different credentials, you just have to update the environment.
- You can’t accidentally commit your secret credentials to GitHub (or another public repository).
Lots of people accidentally commit secrets to public repositories, posing a pretty serious security risk. It’s better to protect against that by using environmental variables.
Tip: You can set your client credentials as environmental variables in Linux bash terminal and Mac OS X terminal using export GOOGLE_CLIENT_ID=your_client_id (similarly for GOOGLE_CLIENT_SECRET).
If you’re on Windows, you can use set GOOGLE_CLIENT_ID=your_client_id in Command Prompt.
Alternatively, you could paste the strings directly here and store them in these variables. However, the client secret should not be shared or committed to any public repository. In other words, be very careful not to check in this file if you paste your real client credentials in here.
Finally, below is some code with global variables and some naive database initialization logic. Most of this, other than the database initialization, is the standard way to set up Flask, Flask-Login, and OAuthLib, which you read about earlier:
# Flask app setup
app = Flask(__name__)
app.secret_key = os.environ.get("SECRET_KEY") or os.urandom(24)

# User session management setup
# https://flask-login.readthedocs.io/en/latest
login_manager = LoginManager()
login_manager.init_app(app)

# Naive database setup
try:
    init_db_command()
except sqlite3.OperationalError:
    # Assume it's already been created
    pass

# OAuth 2 client setup
client = WebApplicationClient(GOOGLE_CLIENT_ID)

# Flask-Login helper to retrieve a user from our db
@login_manager.user_loader
def load_user(user_id):
    return User.get(user_id)
Note that you are already using the Client ID from Google to initialize our oauthlib client in the WebApplicationClient.
You can create another environment variable SECRET_KEY that Flask and Flask-Login will use to cryptographically sign cookies and other items.
Web Application Endpoints
Now, for the fun stuff. You’re going to write four endpoints for your web application:
- One for the homepage
- One for beginning the user login process
- One for a callback where Google will redirect to after a user logs in
- One for logging out
These endpoints will be defined by different URLs on your application with very creative names:
- Homepage:
/ - Login:
/login - Login Callback:
/login/callback - Logout:
/logout
Of course, you may want to add additional pages and functionality later. The end result of this application will be totally extensible to add anything you want to it.
You’ll add all the following code for these endpoints into the app.py file. Let’s take a look at each of these endpoints’ code, one at a time.
Homepage
This is nothing fancy visually, but you’ll add some neat logic to display something different if a user is logged in. When they’re not logged in, a link will appear that says Google Login.
Pressing the link will redirect them to your /login endpoint, which will initiate the login flow. After a successful login, the homepage will now display both the user’s Google email and their public Google profile picture!
Without further ado, you can start adding more code to your app.py file:
@app.route("/")
def index():
    if current_user.is_authenticated:
        return (
            "<p>Hello, {}! You're logged in! Email: {}</p>"
            "<div><p>Google Profile Picture:</p>"
            '<img src="{}" alt="Google profile pic"></img></div>'
            '<a class="button" href="/logout">Logout</a>'.format(
                current_user.name, current_user.email, current_user.profile_pic
            )
        )
    else:
        return '<a class="button" href="/login">Google Login</a>'
You’ll note that you’re returning HTML as a string, which Flask will be able to serve. The current_user.is_authenticated is a lovely addition of the Flask-Login library. It’s a straightforward way to determine if the current user interacting with your application is logged in or not. This lets you apply conditional logic. In this case, it’s displaying some information you have saved about the user if they’re logged in.
You can get fields from your database entry for the user by just accessing them as attributes on the current_user object, such as current_user.email. This is another addition of Flask-Login.
Login
Now let’s get to the OAuth 2 flow. The Google Login button from above will redirect to this endpoint. The first step in the flow is to figure out where Google’s OAuth 2 Authorization endpoint is.
Here’s where the lines between what’s defined by OAuth 2 and by OpenID Connect (OIDC) start to blur. As discussed previously, OIDC has a standard endpoint for a provider configuration, which contains a bunch of OAuth 2 and OIDC information. The document with that information is served from a standard endpoint everywhere, .well-known/openid-configuration.
Assuming you copied the previous code that defined GOOGLE_DISCOVERY_URL, here’s a quick, naive, function for retrieving Google’s provider configuration:
def get_google_provider_cfg():
    return requests.get(GOOGLE_DISCOVERY_URL).json()
Tip: To make this more robust, you should add error handling to the Google API call, just in case Google’s API returns a failure and not the valid provider configuration document.
The field from the provider configuration document you need is called authorization_endpoint. This will contain the URL you need to use to initiate the OAuth 2 flow with Google from your client application.
You can put all that logic together with the following code:
@app.route("/login")
def login():
    # Find out what URL to hit for Google login
    google_provider_cfg = get_google_provider_cfg()
    authorization_endpoint = google_provider_cfg["authorization_endpoint"]

    # Use library to construct the request for Google login and provide
    # scopes that let you retrieve user's profile from Google
    request_uri = client.prepare_request_uri(
        authorization_endpoint,
        redirect_uri=request.base_url + "/callback",
        scope=["openid", "email", "profile"],
    )
    return redirect(request_uri)
Luckily, oauthlib makes the actual request to Google easier. You used your pre-configured client that you already gave your Google Client ID to. Next, you provided the redirect you want Google to use. Finally, you asked Google for a number of OAuth 2 scopes.
You can think of each scope as a separate piece of user information. In your case, you’re asking for the user’s email and basic profile information from Google. The user will, of course, have to consent to give you this information.
Note: openid is a required scope to tell Google to initiate the OIDC flow, which will authenticate the user by having them log in. OAuth 2 doesn’t actually standardize how authentication happens, so this is necessary for our flow in this case.
Login Callback
Let’s do this one in pieces, since it’s a bit more involved than the previous few endpoints.
Once you redirect to Google’s authorization endpoint, a lot happens on Google’s end.
The login endpoint on your application is the jumping point for all of Google’s work authenticating the user and asking for consent. Once the user logs in with Google and agrees to share their email and basic profile information with your application, Google generates a unique code that it sends back to your application.
As a reminder, here are the OIDC steps you read about earlier:
- You register a third-party application as a client to the provider.
- The client sends a request to the provider’s
authorizationURL. - The provider asks the user to authenticate (prove who they are).
- The provider asks the user to consent to the client acting on their behalf.
- The provider sends the client a unique authorization code
- The client sends the authorization code back to the provider’s
tokenURL - The provider sends the client tokens to use with other URLs on behalf of the user
When Google sends back that unique code, it’ll be sending it to this login callback endpoint on your application. So your first step is to define the endpoint and get that code:
@app.route("/login/callback")
def callback():
    # Get authorization code Google sent back to you
    code = request.args.get("code")
The next thing you’re going to do is send that code back to Google’s token endpoint. After Google verifies your client credentials, they will send you back tokens that will allow you to authenticate to other Google endpoints on behalf of the user, including the userinfo endpoint you read about earlier. In your case, you only asked to view basic profile information, so that’s the only thing you can do with the tokens.
To start with, you need to figure out what Google’s token endpoint is. You’ll use the provider configuration document again:
# Find out what URL to hit to get tokens that allow you to ask for
# things on behalf of a user
google_provider_cfg = get_google_provider_cfg()
token_endpoint = google_provider_cfg["token_endpoint"]
oauthlib comes to your rescue a few times in this next block of code. First, you need to construct the token request. Once the request is constructed, you’ll use the requests library to actually send it out. Then oauthlib, once again, will help you with parsing the tokens from the response:
# Prepare and send a request to get tokens! Yay tokens!
token_url, headers, body = client.prepare_token_request(
    token_endpoint,
    authorization_response=request.url,
    redirect_url=request.base_url,
    code=code
)
token_response = requests.post(
    token_url,
    headers=headers,
    data=body,
    auth=(GOOGLE_CLIENT_ID, GOOGLE_CLIENT_SECRET),
)

# Parse the tokens!
client.parse_request_body_response(json.dumps(token_response.json()))
Now that you have the necessary tools to get the user’s profile information, you need to ask Google for it. Luckily, OIDC defines a user information endpoint, and its URL for a given provider is standardized in the provider configuration. You can get the location by checking the userinfo_endpoint field in the provider configuration document. Then you can use oauthlib to add the token to your request and use requests to send it out:
# Now that you have tokens (yay) let's find and hit the URL
# from Google that gives you the user's profile information,
# including their Google profile image and email
userinfo_endpoint = google_provider_cfg["userinfo_endpoint"]
uri, headers, body = client.add_token(userinfo_endpoint)
userinfo_response = requests.get(uri, headers=headers, data=body)
The next step in your journey is to parse the response from the userinfo endpoint. Google uses an optional field, email_verified, to confirm that not only has the user created an account, but they’ve verified the email address to complete the account creation. It’s generally safe to conditionally check for this verification, as it’s another layer of security that Google offers.
That being said, you’ll check for that, and if Google says the user is verified, then you’ll parse their information. The 4 pieces of basic profile information you’ll use are:
sub: the subject, a unique identifier for the user in Googleemail: the user’s Google email addresspicture: the user’s public profile picture in Googlegiven_name: the user’s first and last name in Google
All of that parsing results in the following code:
# You want to make sure their email is verified.
# The user authenticated with Google, authorized your
# app, and now you've verified their email through Google!
if userinfo_response.json().get("email_verified"):
    unique_id = userinfo_response.json()["sub"]
    users_email = userinfo_response.json()["email"]
    picture = userinfo_response.json()["picture"]
    users_name = userinfo_response.json()["given_name"]
else:
    return "User email not available or not verified by Google.", 400
The final steps in this callback are:
- Create a user in your database with the information you just got from Google
- Begin a user session by logging that user in
- Send user back to the homepage (where you’ll now display their public profile information)
The code to fulfill those steps is as follows:
# Create a user in your db with the information provided
# by Google
user = User(
    id_=unique_id, name=users_name, email=users_email, profile_pic=picture
)

# Doesn't exist? Add it to the database.
if not User.get(unique_id):
    User.create(unique_id, users_name, users_email, picture)

# Begin user session by logging the user in
login_user(user)

# Send user back to homepage
return redirect(url_for("index"))
So what you’re doing here is creating a new row in your database for the user if they don’t already exist. Then, you’re starting a session using Flask-Login.
Logout
The logout endpoint is much less code than the last few endpoints. You just call a logout function and redirect back to the homepage. Done and done. Here it is:
@app.route("/logout")
@login_required
def logout():
    logout_user()
    return redirect(url_for("index"))
The @login_required decorator is something important to mention here. It’s another tool from the Flask-Login toolbox and will make sure that only logged in users can access this endpoint. You can use this if only logged in users should be accessing something. In this case, only logged in users can log out.
Testing Your Application Locally
You can run your Flask application on your local computer to test the login flow by adding some final code to app.py:
if __name__ == "__main__":
    app.run(ssl_context="adhoc")
You can run your Flask application with the following command in your terminal:
$ python app.py
Note: Because of the naive database initialization logic, the first time you run this command, it will create the database. To start your app, you have to run the same command again.
Flask should print to your terminal where it’s running the development server. It should be https://127.0.0.1:5000/.
Note that Flask’s development server is running locally and using https to ensure an encrypted connection with Google. This is achieved by the ssl_context="adhoc" argument to app.run in the code above. This requires you to have the package PyOpenSSL installed.
The downside is that the certificate used is generated on the fly, so when you go to https://127.0.0.1:5000/ in your browser, it will probably give you a big warning screen about your connection being insecure or not private. You can effectively ignore these warnings.
Once past the warning screen, you should see a single button that says Google Login. Pressing it will send you to the official Google login. After you log in, Google will prompt you to consent to the “third-party application” getting access to your email and profile information.
After consenting, you’ll be redirected back to your Flask application, where the page should show your Google email and public profile picture! Finally, a Logout button allows you to, well, log out.
Conclusion
Allowing users to use their existing accounts to log into your web application has many benefits. Most importantly, the security and complexity of account management does not have to rest on your shoulders. This frees you up to write your fancy new web application without worrying about the nitty gritty details of two-factor authentication and the like.
The application you made in this article is a great starting point. You can click the box below to get the code:
Download Sample Project: Click here to download the code for the Flask application with Google login you’ll build in this article.
Your next step could be to do the following:
- Rework the database initialization to happen separately from running the application
- Separate out the HTML/CSS from the Python code for easier management:
- You could use templates.
- You could also load static files (like JS and CSS) from elsewhere.
- Host your application in the cloud
- Purchase a domain name
- Use a real SSL certificate and get rid of that pesky warning
In this article, you’ve gone through the basics of OAuth 2 and OpenID Connect. You’ve seen how to use well-known Python packages to create a web application that allows users to log in with their existing Google account. Most importantly, you have example code that serves as a great starting point for your next web application!
Watch Now This tutorial has a related video course created by the Real Python team. Watch it together with the written tutorial to deepen your understanding: Using Google Login With Flask