Watch Now This tutorial has a related video course created by the Real Python team. Watch it together with the written tutorial to deepen your understanding: Start Managing Multiple Python Versions With pyenv
Have you ever wanted to contribute to a project that supports multiple versions of Python but aren’t sure how you would easily test all the versions? Are you ever curious about the latest and greatest versions of Python? Maybe you’d like to try out these new features, but you don’t want to worry about messing up your development environment. Luckily, managing multiple versions of Python doesn’t have to be confusing if you use pyenv.
This article will provide you with a great overview of how to maximize your time spent working on projects and minimize the time spent in headaches trying to use the right version of Python.
In this article, you’ll learn how to:
- Install multiple versions of Python
- Install the latest development version of Python
- Switch between the installed versions
- Use virtual environments with
pyenv - Activate different Python versions and virtual environments automatically
Take the Quiz: Test your knowledge with our interactive “Managing Multiple Python Versions With pyenv” quiz. You’ll receive a score upon completion to help you track your learning progress:

Interactive Quiz
Managing Multiple Python Versions With pyenvIn this quiz, you'll test your understanding of how to use pyenv to manage multiple versions of Python. Pyenv allows you to try out new Python features without disrupting your development environment, and quickly switch between different Python versions.
Free Download: Get a sample chapter from Python Tricks: The Book that shows you Python’s best practices with simple examples you can apply instantly to write more beautiful + Pythonic code.
Why Use pyenv?
pyenv is a wonderful tool for managing multiple Python versions. Even if you already have Python installed on your system, it is worth having pyenv installed so that you can easily try out new language features or help contribute to a project that is on a different version of Python. Using pyenv is also a great way to install pre-release versions of Python so that you can test them for bugs.
Why Not Use System Python?
“System Python” is the Python that comes installed on your operating system. If you’re on Mac or Linux, then by default, when you type python in your terminal, you get a nice Python REPL.
So, why not use it? One way to look at it is that this Python really belongs to the operating system. After all, it came installed with the operating system. That’s even reflected when you run which:
$ which python
/usr/bin/python
Here, python is available to all users as evidenced by its location /usr/bin/python. Chances are, this isn’t the version of Python you want either:
$ python -V
Pyhton 2.7.12
To install a package into your system Python, you have to run sudo pip install. That’s because you’re installing the Python package globally, which is a real problem if another user comes along and wants to install a slightly older version of the package.
Problems with multiple versions of the same package tend to creep up on you and bite you when you least expect it. One common way this problem presents itself is a popular and stable package suddenly misbehaving on your system. After hours of troubleshooting and Googling, you may find that you’ve installed the wrong version of a dependency, and it’s ruining your day.
Even if your Python version is installed in /usr/local/bin/python3, you’re still not safe. You will run into the same permissions and flexibility problems described above.
In addition, you don’t really have much control over what version of Python comes installed on your OS. If you want to use the latest features in Python, and you’re on Ubuntu for example, you might just be out of luck. The default versions might be too old, which means you’ll just have to wait for a new OS to come out.
Finally, some operating systems actually use the packaged Python for operation. Take yum for example, which makes heavy use of Python to do its job. If you install a new version of Python and aren’t careful to install it into your user space, you could seriously damage your ability to use your OS.
What About a Package Manager?
The next logical place to look is package managers. Programs such as apt, yum, brew, or port are typical next options. After all, this is how you install most packages to your system. Unfortunately, you’ll find some of the same problems using a package manager.
By default, package managers tend to install their packages into the global system space instead of the user space. Again, these system level packages pollute your development environment and make it hard to share a workspace with others.
Once again, you still don’t have control over what version of Python you can install. It’s true some repositories give you a greater selection, but by default, you’re looking at whatever version of Python your particular vendor is up to on any given day.
Even if you do install Python from a package manager, consider what would happen if you’re writing a package and want to support and test on Python 3.4 - 3.7.
What would happen on your system when you type python3? How would you switch quickly between the different versions? You can certainly do it, but it is tedious and prone to error. Nevermind the fact that if you want PyPy, Jython, or Miniconda, then you’re probably just out of luck with your package manager.
With these constraints in mind, let’s recap the criteria that would let you install and manage Python versions easily and flexibly:
- Install Python in your user space
- Install multiple versions of Python
- Specify the exact Python version you want
- Switch between the installed versions
pyenv lets you do all of these things and more.
Installing pyenv
Before you install pyenv itself, you’re going to need some OS-specific dependencies. These dependencies are mostly development utilities written in C and are required because pyenv installs Python by building from source. For a more detailed breakdown and explanation of the build dependencies, you can check out the official docs. In this tutorial, you’ll see the most common ways to install these dependencies.
Note: pyenv did not originally support Windows. However, there appears to be some basic support with the pyenv-win project that recently became active. If you use Windows, feel free to check it out.
Build Dependencies
pyenv builds Python from source, which means you’ll need build dependencies to actually use pyenv. The build dependencies vary by platform. If you are on Ubuntu/Debian and want to install the build dependencies, you could use the following:
$ sudo apt-get install -y make build-essential libssl-dev zlib1g-dev \
libbz2-dev libreadline-dev libsqlite3-dev wget curl llvm libncurses5-dev \
libncursesw5-dev xz-utils tk-dev libffi-dev liblzma-dev python-openssl
This uses Apt to install all the build dependencies. Let this run, and you’ll be ready to go for Debian systems.
If you use Fedora/CentOS/RHEL, you could use yum to install your build dependencies:
$ sudo yum install gcc zlib-devel bzip2 bzip2-devel readline-devel sqlite \
sqlite-devel openssl-devel xz xz-devel libffi-devel
This command will install all the build dependencies for Python using yum.
macOS users can use the following command:
$ brew install openssl readline sqlite3 xz zlib
This command relies on Homebrew and installs the few dependencies for macOS users.
Tip: When running Mojave or higher (10.14+) you will also need to install the additional SDK headers:
$ sudo installer -pkg /Library/Developer/CommandLineTools/Packages/macOS_SDK_headers_for_macOS_10.14.pkg -target /
Thanks to Rodrigo Viera for the update.
If you’re instead using openSUSE then you would run the following:
$ zypper in zlib-devel bzip2 libbz2-devel libffi-devel \
libopenssl-devel readline-devel sqlite3 sqlite3-devel xz xz-devel
Once again, this command installs all the Python build dependencies for your system.
Finally, for Alpine users, you can use this:
$ apk add libffi-dev ncurses-dev openssl-dev readline-dev \
tk-dev xz-dev zlib-dev
This command uses apk as the package manager and will install all build dependencies for Python on Alpine.
Using the pyenv-installer
After you’ve installed the build dependencies, you’re ready to install pyenv itself. I recommend using the pyenv-installer project:
$ curl https://pyenv.run | bash
This will install pyenv along with a few plugins that are useful:
pyenv: The actualpyenvapplicationpyenv-virtualenv: Plugin forpyenvand virtual environmentspyenv-update: Plugin for updatingpyenvpyenv-doctor: Plugin to verify thatpyenvand build dependencies are installedpyenv-which-ext: Plugin to automatically lookup system commands
Note: The above command is the same as downloading the pyenv-installer script and running it locally. So if you’d like to see exactly what you’re running, you can view the file yourself. Alternatively, if you really don’t want to run a script, you can checkout the manual installation instructions.
At the end of the run, you should see something like this:
WARNING: seems you still have not added 'pyenv' to the load path.

Load pyenv automatically by adding
the following to ~/.bashrc:

export PATH="$HOME/.pyenv/bin:$PATH"
eval "$(pyenv init -)"
eval "$(pyenv virtualenv-init -)"
The output will be based on your shell. But you should follow the instructions to add pyenv to your path and to initialize pyenv/pyenv-virtualenv auto completion. Once you’ve done this, you need to reload your shell:
$ exec "$SHELL" # Or just restart your terminal
That’s it. You now have pyenv and four useful plugins installed.
Using pyenv to Install Python
Now that you have pyenv installed, installing Python is the next step. You have many versions of Python to choose from. If you wanted to see all the available CPython 3.6 through 3.8, you can do this:
$ pyenv install --list | grep " 3\.[678]"
  3.6.0
  3.6-dev
  3.6.1
  3.6.2
  3.6.3
  3.6.4
  3.6.5
  3.6.6
  3.6.7
  3.6.8
  3.7.0
  3.7-dev
  3.7.1
  3.7.2
  3.8-dev
The above shows all the Python versions that pyenv knows about that match the regular expression. In this case, that is all available CPython versions 3.6 through 3.8. Likewise, if you wanted to see all the Jython versions, you could do this:
$ pyenv install --list | grep "jython"
  jython-dev
  jython-2.5.0
  jython-2.5-dev
  jython-2.5.1
  jython-2.5.2
  jython-2.5.3
  jython-2.5.4-rc1
  jython-2.7.0
  jython-2.7.1
Again, you can see all the Jython versions that pyenv has to offer. If you want to see all the versions, you can do the following:
$ pyenv install --list
...
# There are a lot
Once you find the version you want, you can install it with a single command:
$ pyenv install -v 3.7.2
/tmp/python-build.20190208022403.30568 ~
Downloading Python-3.7.2.tar.xz...
-> https://www.python.org/ftp/python/3.7.2/Python-3.7.2.tar.xz
Installing Python-3.7.2...
/tmp/python-build.20190208022403.30568/Python-3.7.2 /tmp/python-build.20190208022403.30568 ~
[...]
Installing collected packages: setuptools, pip
Successfully installed pip-18.1 setuptools-40.6.2
Installed Python-3.7.2 to /home/realpython/.pyenv/versions/3.7.2
Having Problems? The pyenv documentation has great installation notes as well as a useful FAQ along with common build problems.
This will take a while because pyenv is building Python from source, but once it’s done, you’ll have Python 3.7.2 available on your local machine. If you don’t want to see all the output, just remove the -v flag. Even development versions of CPython can be installed:
$ pyenv install 3.8-dev
Pro Tip: If you’ve been using pyenv for a while and don’t see the version you’re looking for, you may need to run pyenv update to update the tool and make sure you have access to the latest versions.
For the rest of the tutorial, the examples assume you’ve installed 3.6.8 and 2.7.15, but you’re free to substitute these values for the Python versions you actually installed. Also note that the system Python version in the examples is 2.7.12.
Installation Location
As mentioned before, pyenv works by building Python from source. Each version that you have installed is located nicely in your pyenv root directory:
$ ls ~/.pyenv/versions/
2.7.15  3.6.8  3.8-dev
All of your versions will be located here. This is handy because removing these versions is trivial:
$ rm -rf ~/.pyenv/versions/2.7.15
Of course pyenv also provides a command to uninstall a particular Python version:
$ pyenv uninstall 2.7.15
Using Your New Python
Now that you’ve installed a couple of different Python versions, let’s see some basics on how to use them. First, check what versions of Python you have available:
$ pyenv versions
* system (set by /home/realpython/.pyenv/version)
  2.7.15
  3.6.8
  3.8-dev
The * indicates that the system Python version is active currently. You’ll also notice that this is set by a file in your root pyenv directory. This means that, by default, you are still using your system Python:
$ python -V
Python 2.7.12
If you try to confirm this using which, you’ll see this:
$ which python
/home/realpython/.pyenv/shims/python
This might be surprising, but this is how pyenv works. pyenv inserts itself into your PATH and from your OS’s perspective is the executable that is getting called. If you want to see the actual path, you can run the following:
$ pyenv which python
/usr/bin/python
If, for example, you wanted to use version 2.7.15, then you can use the global command:
$ pyenv global 2.7.15
$ python -V
Python 2.7.15

$ pyenv versions
  system
* 2.7.15 (set by /home/realpython/.pyenv/version)
  3.6.8
  3.8-dev
Pro Tip: A great way to get peace of mind that the version of Python you just installed is working properly is to run the built-in test suite:
$ pyenv global 3.8-dev
$ python -m test
This will kick off lots of internal Python tests that will verify your installation. You can just kick back and watch the tests pass.
If you ever want to go back to the system version of Python as the default, you can run this:
$ pyenv global system
$ python -V
Python 2.7.12
You can now switch between different versions of Python with ease. This is just the beginning. If you have many versions that you want to switch between, typing these commands consistently is tedious. This section goes over the basics, but a better workflow is described in working with multiple environments.
Exploring pyenv Commands
pyenv offers many commands. You can see a complete list of all available commands with this:
$ pyenv commands
activate
commands
completions
deactivate
...
virtualenvs
whence
which
This outputs all command names. Each command has a --help flag that will give you more detailed information. For example, if you wanted to see more information on the shims command you could run the following:
$ pyenv shims --help
Usage: pyenv shims [--short]

List existing pyenv shims
The help message describes what the command is used for and any options you can use in conjunction with the command. In the following sections, you’ll find a quick, high-level overview of the most used commands.
install
You’ve already seen the install command above. This command can be used to install a specific version of Python. For example, if you wanted to install 3.6.8 you would use this:
$ pyenv install 3.6.8
The output shows us pyenv downloading and installing Python. Some of the common flags you may want to use are the following:
| Flag | Description |
|---|---|
-l/--list |
Lists all available Python versions for installation |
-g/--debug |
Builds a debug version of Python |
-v/--verbose |
Verbose mode: print compilation status to stdout |
versions
The versions command displays all currently installed Python versions:
$ pyenv versions
* system (set by /home/realpython/.pyenv/version)
  2.7.15
  3.6.8
  3.8-dev
This output shows not only that 2.7.15, 3.6.8, 3.8-dev, and your system Python are installed, but also shows you that the system Python is active. If you only care about the current active version, you can use the following command:
$ pyenv version
system (set by /home/realpython/.pyenv/version)
This command is similar to versions but only shows you the current active Python version.
which
The which command is helpful for determining the full path to a system executable. Because pyenv works by using shims, this command allows you to see the full path to the executable pyenv is running. For example, if you wanted to see where pip is installed, you could run this:
$ pyenv which pip
/home/realpython/.pyenv/versions/3.6.8/bin/pip
The output displays the full system path for pip. This can be helpful when you’ve installed command-line applications.
global
The global command sets the global Python version. This can be overridden with other commands, but is useful for ensuring you use a particular Python version by default. If you wanted to use 3.6.8 by default, then you could run this:
$ pyenv global 3.6.8
This command sets the ~/.pyenv/version to 3.6.8. For more information, see the section on specifying your Python version.
local
The local command is often used to set an application-specific Python version. You could use it to set the version to 2.7.15:
$ pyenv local 2.7.15
This command creates a .python-version file in your current directory. If you have pyenv active in your environment, this file will automatically activate this version for you.
shell
The shell command is used to set a shell-specific Python version. For example, if you wanted to test out the 3.8-dev version of Python, you can do this:
$ pyenv shell 3.8-dev
This command activates the version specified by setting the PYENV_VERSION environment variable. This command overwrites any applications or global settings you may have. If you want to deactivate the version, you can use the --unset flag.
Specifying Your Python Version
One of the more confusing parts of pyenv is how exactly the python command gets resolved and what commands can be used to modify it. As mentioned in the commands, there are 3 ways to modify which version of python you’re using. So how do all these commands interact with one another? The resolution order looks a little something like this:
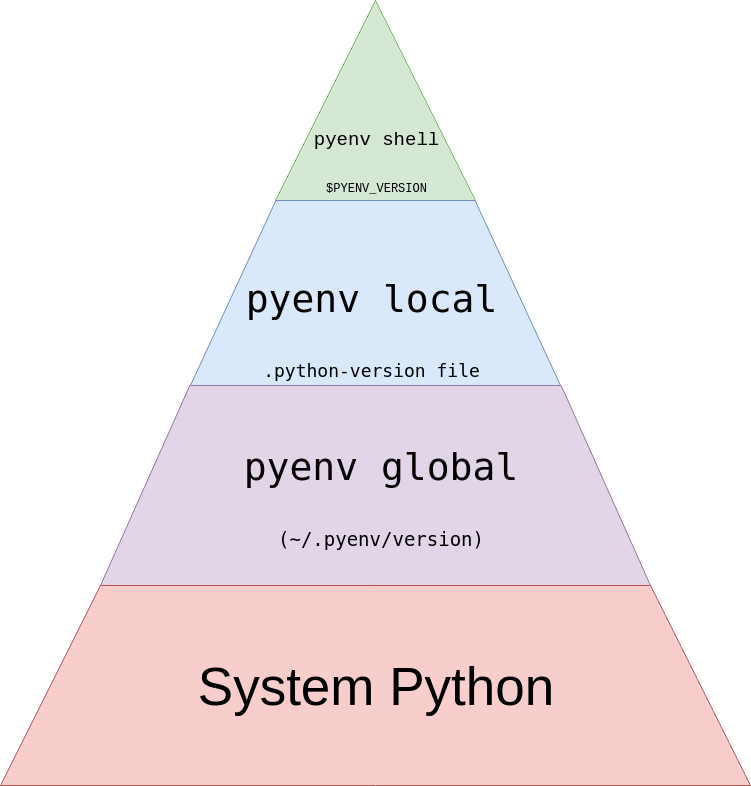
This pyramid is meant to be read from top to bottom. The first of these options that pyenv can find is the option it will use. Let’s see a quick example:
$ pyenv versions
* system (set by /home/realpython/.pyenv/version)
  2.7.15
  3.6.8
  3.8-dev
Here, your system Python is being used as denoted by the *. To exercise the next most global setting, you use global:
$ pyenv global 3.6.8
$ pyenv versions
  system
  2.7.15
* 3.6.8 (set by /home/realpython/.pyenv/version)
  3.8-dev
You can see that now pyenv wants to use 3.6.8 as our Python version. It even indicates the location of the file it found. That file does indeed exist, and you can list its contents:
$ cat ~/.pyenv/version
3.6.8
Now, let’s create a .python-version file with local:
$ pyenv local 2.7.15
$ pyenv versions
  system
* 2.7.15 (set by /home/realpython/.python-version)
  3.6.8
  3.8-dev
$ ls -a
.  ..  .python-version
$ cat .python-version
2.7.15
Here again, pyenv indicates how it would resolve our python command. This time it comes from ~/.python-version. Note that the searching for .python-version is recursive:
$ mkdir subdirectory
$ cd subdirectory
$ ls -la # Notice no .python-version file
. ..
$ pyenv versions
  system
* 2.7.15 (set by /home/realpython/.python-version)
  3.6.8
  3.8-dev
Even though there isn’t a .python-version in subdirectory, the version is still set to 2.7.15 because .python-version exists in a parent directory.
Finally, you can set the Python version with shell:
$ pyenv shell 3.8-dev
$ pyenv versions
  system
  2.7.15
  3.6.8
* 3.8-dev (set by PYENV_VERSION environment variable)
All this did is set the $PYENV_VERSION environment variable:
$ echo $PYENV_VERSION
3.8-dev
If you’re feeling overwhelmed by the options, the section on working with multiple environments goes over an opinionated process for managing these files, mostly using local.
Virtual Environments and pyenv
Virtual environments are a big part of managing Python installations and applications. If you haven’t heard of virtual environments before, you can check out Python Virtual Environments: A Primer.
Virtual environments and pyenv are a match made in heaven. pyenv has a wonderful plugin called pyenv-virtualenv that makes working with multiple Python version and multiple virtual environments a breeze. If you’re wondering what the difference is between pyenv, pyenv-virtualenv, and tools like virtualenv or venv, then don’t worry. You’re not alone.
Here’s what you need to know:
- pyenv manages multiple versions of Python itself.
- virtualenv/venv manages virtual environments for a specific Python version.
- pyenv-virtualenv manages virtual environments for across varying versions of Python.
If you’re a die-hard virtualenv or venv user, don’t worry: pyenv plays nicely with either. In fact, you can keep the same workflow you’ve had if you’d prefer, though I think pyenv-virtualenv makes for a nicer experience when you’re switching between multiple environments that require different Python versions.
The good news is that since you used the pyenv-installer script to install pyenv, you already have pyenv-virtualenv installed and ready to go.
Creating Virtual Environments
Creating a virtual environment is a single command:
$ pyenv virtualenv <python_version> <environment_name>
Technically, the <python_version> is optional, but you should consider always specifying it so that you’re certain of what Python version you’re using.
The <environment_name> is just a name for you to help keep your environments separate. A good practice is to name your environments the same name as your project. For example, if you were working on myproject and wanted to develop against Python 3.6.8, you would run this:
$ pyenv virtualenv 3.6.8 myproject
The output includes messages that show a couple of extra Python packages getting installed, namely wheel, pip, and setuptools. This is strictly for convenience and just sets up a more full featured environment for each of your virtual environments.
Activating Your Versions
Now that you’ve created your virtual environment, using it is the next step. Normally, you should activate your environments by running the following:
$ pyenv local myproject
You’ve seen the pyenv local command before, but this time, instead of specifying a Python version, you specify an environment. This creates a .python-version file in your current working directory and because you ran eval "$(pyenv virtualenv-init -)" in your environment, the environment will automatically be activated.
You can verify this by running the following:
$ pyenv which python
/home/realpython/.pyenv/versions/myproject/bin/python
You can see a new version has been created called myproject and the python executable is pointing to that version. If you look at any executable this environment provides, you will see the same thing. Take, for example, pip:
$ pyenv which pip
/home/realpython/.pyenv/versions/myproject/bin/pip
If you did not configure eval "$(pyenv virtualenv-init -)" to run in your shell, you can manually activate/deactivate your Python versions with this:
$ pyenv activate <environment_name>
$ pyenv deactivate
The above is what pyenv-virtualenv is doing when it enters or exits a directory with a .python-version file in it.
Working With Multiple Environments
Putting everything you’ve learned together, you can work effectively with multiple environments. Let’s assume you have the following versions installed:
$ pyenv versions
* system (set by /home/realpython/.pyenv/version)
  2.7.15
  3.6.8
  3.8-dev
Now you want to work on two different, aptly named, projects:
- project1 supports Python 2.7 and 3.6.
- project2 supports Python 3.6 and experiments with 3.8-dev.
You can see that, by default, you are using the system Python, which is indicated by the * in the pyenv versions output. First, create a virtual environment for the first project:
$ cd project1/
$ pyenv which python
/usr/bin/python
$ pyenv virtualenv 3.6.8 project1
...
$ pyenv local project1
$ python -V
/home/realpython/.pyenv/versions/project1/bin/python
Finally, notice that when you cd out of the directory, you default back to the system Python:
$ cd $HOME
$ pyenv which python
/usr/bin/python
You can follow the above steps and create a virtual environment for project2:
$ cd project2/
$ pyenv which python
/usr/bin/python
$ pyenv virtualenv 3.8-dev project2
...
$ pyenv local 3.8-dev
$ pyenv which python
/home/realpython/.pyenv/versions/3.8-dev/bin/python
These are one time steps for your projects. Now, as you cd between the projects, your environments will automatically activate:
$ cd project2/
$ python -V
Python 3.8.0a0
$ cd ../project1
$ python -V
Python 3.6.8
No more remembering to activate environments: you can switch between all your projects, and pyenv will take care of automatically activating the correct Python versions and the correct virtual environments.
Activating Multiple Versions Simultaneously
As described in the example above, project2 uses experimental features in 3.8. Suppose you wanted to ensure that your code still works on Python 3.6. If you try running python3.6, you’ll get this:
$ cd project2/
$ python3.6 -V
pyenv: python3.6: command not found

The `python3.6' command exists in these Python versions:
  3.6.8
  3.6.8/envs/project1
  project1
pyenv informs you that, while Python 3.6 is not available in the current active environment, it is available in other environments. pyenv gives you a way to activate multiple environments at once using a familiar command:
$ pyenv local project2 3.6.8
This indicates to pyenv that you would like to use the virtual environment project2 as the first option. So if a command, for example python, can be resolved in both environments, it will pick project2 before 3.6.8. Let’s see what happens if you run this:
$ python3.6 -V
Python 3.6.8
Here, pyenv attempts to find the python3.6 command, and because it finds it in an environment that is active, it allows the command to execute. This is extremely useful for tools like tox that require multiple versions of Python to be available on your PATH in order to execute.
Pro Tip: If you’re using tox and pyenv, you should checkout the tox-pyenv package.
Suppose that in the above example, you’ve found a compatibility problem with your library and would like to do some local testing. The testing requires that you install all the dependencies. You should follow the steps to create a new environment:
$ pyenv virtualenv 3.6.8 project2-tmp
$ pyenv local project2-tmp
Once you’re satisfied with your local testing, you can easily switch back to your default environment:
$ pyenv local project2 3.6.8
Conclusion
You can now more easily contribute to a project that wants to support multiple environments. You can also more easily test out the latest and greatest Python versions without having to worry about messing up your development machine, all with a wonderful tool: pyenv.
You’ve seen how pyenv can help you:
- Install multiple versions of Python
- Switch between the installed versions
- Use virtual environments with
pyenv - Activate different Python versions and virtual environments automatically
If you still have questions, feel free to reach out either in the comments section or on Twitter. Additionally, the pyenv documentation is a great resource.
Bonus: Displaying Your Environment Name in Your Command Prompt
If you’re like me and constantly switching between various virtual environments and Python versions, it’s easy to get confused about which version is currently active. I use oh-my-zsh and the agnoster theme, which by default makes my prompt look like this:
At a glance, I don’t know which Python version is active. To figure it out, I would have to run python -V or pyenv version. To help reduce my time spent on figuring out my active Python environment, I add the pyenv virtual environment I’m using to my prompt:
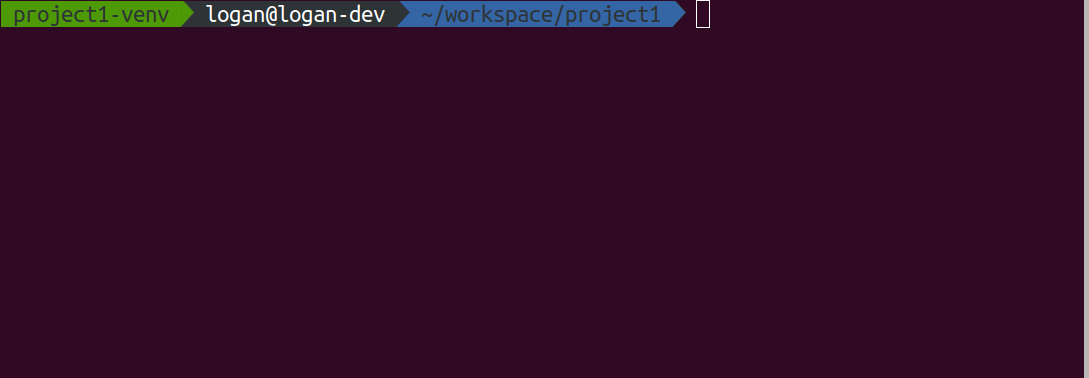
My Python version in this case is project1-venv and is displayed immediately at the beginning of the prompt. This allows me to quickly see what version of Python I’m using right away. If you’d like to use this too, you can use my agnoster-pyenv theme.
Take the Quiz: Test your knowledge with our interactive “Managing Multiple Python Versions With pyenv” quiz. You’ll receive a score upon completion to help you track your learning progress:
Interactive Quiz
Managing Multiple Python Versions With pyenvIn this quiz, you'll test your understanding of how to use pyenv to manage multiple versions of Python. Pyenv allows you to try out new Python features without disrupting your development environment, and quickly switch between different Python versions.
Watch Now This tutorial has a related video course created by the Real Python team. Watch it together with the written tutorial to deepen your understanding: Start Managing Multiple Python Versions With pyenv