Watch Now This tutorial has a related video course created by the Real Python team. Watch it together with the written tutorial to deepen your understanding: Getting Started With MicroPython
Are you interested in the Internet of Things, home automation, and connected devices? Have you ever wondered what it would be like to build a blaster, a laser sword, or even your own robot? If so, then you’re in luck! MicroPython can help you do all of those things and more.
In this tutorial, you’ll learn about:
- The history of MicroPython
- The differences between MicroPython and other programming languages
- The hardware you’ll use to build devices
- The process to set up, code, and deploy your own MicroPython project
Free Bonus: 5 Thoughts On Python Mastery, a free course for Python developers that shows you the roadmap and the mindset you’ll need to take your Python skills to the next level.
Everything’s Coming Up Python
Python’s popularity has skyrocketed in recent years. These days, it’s used everywhere from DevOps to statistical analysis, and even in desktop software. But for a long time, there was one field where Python use was conspicuously missing. Developers working with microcontrollers had not yet adopted the language.
All of that changed in 2013 when Damien George launched a Kickstarter campaign. Damien, an undergraduate at Cambridge University, was an avid robot programmer. He wanted to move the Python world from machines that worked with capacities in the gigabytes down to the kilobytes. His Kickstarter campaign was an attempt to back his development while he turned his proof of concept into a finished implementation.
Many developers jumped at the chance, not only to use Python on microcontrollers but also to get an early version of Damien’s own reference hardware, which was built especially for the task! In fact, by the end of the campaign, Damien had blown past his £15,000 goal. Thanks to over 1,900 backers, he reached just shy of £100,000.
Python Beyond the Desktop
Finally, Python had moved off of desktops and servers and into the world of sensors, actuators, motors, LCD displays, buttons, and circuits. While this presented many challenges, there were also copious opportunities. Desktop and server hardware requires gigahertz processors, gigabytes of RAM, and terabytes of storage. They also need fully-fledged operating systems, device drivers, and true multitasking.
In the microcontroller world, however, MicroPython is the operating system. Essentially, it sits on top of the processors with clock speeds harking back to the 1980s and 90s. MicroPython has no help to deal with all the intricacies of code execution, IO, storage, booting, and so on. If you want to interface with hardware, then you need all code to enable that.
Yet somehow, Damien managed to squeeze a powerful, high-performing, compact Python implementation down into these miniature computers. That opened up a whole new world of potential. If you’re interested to learn more about the differences between CPython and MicroPython, then you can check out a full breakdown on the official GitHub repo.
Electronics as a Hobby and a Career Path
MicroPython is supported by a diverse community of Pythonistas who have a deep interest in seeing the project succeed. Along with testing and supporting the codebase itself, developers contribute tutorials, code libraries, and hardware ports, taking the project far beyond what Damien could have achieved alone.
Over the years, MicroPython has attracted professionals and hobbyists from other platforms who see the potential and convenience of the language. These developers may have come from more mature platforms, like Arduino or PIC. Many came to realize the benefits of using MicroPython, as well as specifying Python and MicroPython together, not least for rapid prototyping and faster time-to-market.
So, is MicroPython ready for serious, mission-critical work? ESA, the European Space Agency, seems to think so! They helped fund Damien’s work on MicroPython because they wanted to use Python in space. You’ll increasingly see a critical mass of hobbyists and learners move into academia, and from there into the professional world of electronics. At that point, MicroPython will truly take off.
Python and STEM
STEM subjects have been under the education microscope for several years, which has led to an explosion of projects and products targeting the classroom. Python and MicroPython are both well-placed for teachers and students alike. The basic syntax and bundled interpreter lend these languages to an effective learning environment. The fact that no development environment is required is only an added bonus!
A few years ago, the BBC launched its Micro:Bit project to get more kids into computing beyond office-style applications. Their goal was to get a microcontroller board into the hands of every school student in the UK. Damien, through his neighbor, acquired one of these boards and quickly got his code running. Thousands of classrooms suddenly had the option to run Python in their lessons!
Most recently, Edublocks has taken the Micro:Bit and enabled a Scratch-like drag-and-drop Python experience. This allowed even more kids to experience microcontrollers and robotics programming for the first time. Patreon donations support the project’s continued growth.
Physical Computing
When it comes to MicroPython, what does physical computing mean? Usually, your project will consist of three elements:
- Input: A button, signal, internet event, or sensor reading takes in data.
- Processing: A microcontroller processes the input and updates the output.
- Output: This can be sent in the form of a motor spinning, an LED lighting up, a counter changing, a message sending, or some similar event.
These elements will usually be connected by wires and powered by some power source.
What Is a Microcontroller?
You may know that a microcontroller is small and not as powerful as the computer on your desktop or in your server rack. What you may not know is that microcontrollers are all around you, adding intelligence and control to your devices. They’re embedded in everything from appliances and home security setups to pacemakers, to HVAC systems and more.
Microcontrollers do relatively simple things day after day, reliably, and in a compact package. They compress a CPU, memory, and IO into one general-purpose chip, rather than requiring a whole board of chips that team up to perform a task. The code that they run is called firmware, which is flashed or burned onto writeable memory before executing.
While those who grew up with early microcomputers (like the ZX81 and Commodore Vic20) may find these chips unbelievably powerful, technically, you have way more power available in your smartwatch. Still, microcontrollers are extremely useful, even if their processing power and memory capabilities are limited. A great deal can be done with these little guys!
Why MicroPython?
If these microcontrollers were proliferating long before MicroPython was dreamed of, then what benefits does MicroPython afford you over traditional practices?
First, the language is more accessible to beginners than competing languages, while still being powerful enough for industrial use cases. You can go from learning the basics to doing real work, and quickly.
Second, Python allows for rapid feedback. This is because you can interactively enter commands and get a response using the REPL. You could even tweak your code and run it right away, rather than iterating through code-compile-upload-execute cycles.
Last, the wealth of Python code and experience out there means that you can do some things more quickly and easily as a Python programmer. I find the Python requests library, string handling, and tools for dealing with JSON much easier to use in the MicroPython world than C++, for example.
What About C++?
C++ is fast, compact, and available everywhere. There are tons of C++ programmers out there, and a rich community of Arduino and PIC developers ready to help you. Isn’t C++, therefore, a better choice?
In my opinion, MicroPython beats C++ in ease of use and convenience. C++ syntax is not as easy to understand right away. What’s more, the code needs to be compiled and then transferred to your board before you can get a result, so you need a compiler handy.
Now, obviously, the tools are getting better, but MicroPython still has the advantage. While C++ may have a speed advantage, MicroPython is fast enough for most purposes. Besides, if you really need C++, then you can even call your C++ code from MicroPython!
What About Assembler?
For raw performance, there is no beating Assembler. However, that doesn’t rule out MicroPython either.
Again, MicroPython tends to be plenty fast enough. If you do need that lowest-level power, then you can add inline assemblers to your MicroPython projects.
What About BASIC?
If you were to switch on one of those old microcomputers from back in the day, then they would almost certainly have booted into BASIC. At the very least, they would have had a dialect of BASIC on hand. This language served as an introduction to programming for a whole generation. This includes Elon Musk, who apparently learned to code on a Vic 20.
Today, the shine of BASIC has dulled somewhat. Python and other block-based languages have replaced it in educational spaces, and it hardly makes a dent in the tech industry. Python has all the advantages of BASIC, with none of the limitations.
What About Raspberry Pi?
Raspberry Pi, which runs Python, is also heavily present in education. It’s found a niche in electronics and physical computing thanks to its general-purpose IO pins. The Raspberry Pi is also a fully-fledged general-purpose Linux desktop computer. It has lots of processor power, memory, and storage capacity, and it even has a GPU.
However, that last aspect can actually be a reason not to choose the Pi and go for a microcontroller board instead! The ability to run desktop applications and multimedia is fantastic, especially when your projects might need that raw power. This might be the case for AI, video streams, and database projects, for example.
But this can cause problems when your use case requires real-time processing. If you need very precise timing, then you don’t want your code to wait while it catches up with dozens of different processes that all want to execute at the same time.
If you want analog input, then the Pi would require additional hardware. In contrast, most microcontrollers capable of running MicroPython have at least one analog input, and maybe even more. In addition, the Pi is not quite as robust, and it can be more expensive. Because of this, it might make more financial sense to leave a microcontroller in your project, rather than a whole Pi.
You don’t have to choose one or the other. Perhaps pairing a Raspberry Pi with a microcontroller is the best solution for your project. For instance, you could use the Pi for processing power and the microcontroller to interface with hardware.
MicroPython Hardware
If you’re interested in giving MicroPython a try, then that’s great! You’ll need some compatible hardware to install MicroPython onto. Fortunately, there are many options, ranging from affordable to premium products. There’s something for every wallet and use case, so take some time to choose the solution that’s right for you.
Built for Python
The Kickstarter that kicked off MicroPython also launched its associated hardware. The MicroPython Pyboard is now up to v1.1.
The Pyboard is one of the most well-specified boards. It’s based on the STM32 and has lots of GPIO. There’s also an SD slot, an accelerometer, and RTC, with a capability of 168 MHzf. If you can find it in stock, then it’ll cost you around $40 USD.
ESP8266 or ESP32
At the other end of the price scale are boards based on the ESP8266. These boards only have one analog input, and there aren’t as many pins as the Pyboard. However, they do have WiFi capability. You can find them in breadboard-friendly boards (such as the NodeMCU) for $10 or less.
The ESP32 is the big brother to the ESP8266. It increases the power and capabilities while adding Bluetooth to the feature set, for a small additional cost. One of the best versions of these boards is the M5 Stack. This unit comes with a peizo speaker, a battery, a card reader, and a color screen.
BBC Micro:Bit
The Micro:Bit is a compact board based around the Nordic nRF51822 microcontroller. It has built-in Bluetooth LE and temperature sensing, plus an accelerometer, a couple of action buttons, and a 5x5 LED grid.
If you’re in the UK, then you might already have one of these boards. They were distributed to schoolchildren in the hopes of inspiring a new generation of coders. Lots of boards inspired by the Micro:Bit are beginning to appear, so it’s bound to increase in popularity!
Adafruit and CircuitPython-Powered Boards
Soon after MicroPython started picking up the pace, Adafruit produced a fork they call CircuitPython. However, there are a few main differences between the two.
One is that CircuitPython offers support for the Adafruit range of hardware. Another difference is the fact that most Adafruit implementations feature the board appearing as a USB-connected drive. In these cases, adding your code is as simple as dragging it to the disk.
The most feature-rich board of the Adafruit premium line-up is the CircuitPlayground Express, with an optional Crickit add-on. When you combine these two boards, you’ll have pins, sensors, motor drivers, RGB LEDs, and more. If you’re looking for an all-in-one solution, then this is the one to check out.
Unfortunately, Adafruit has dropped compatibility with the ESP8266, even for their own ESP8266-based Feather board. Instead, they’ve chosen to go with the ESP32 purely as a WiFi co-processor in future releases.
MicroPython Workflow
If you’re familiar with Arduino or PIC programming, then you might expect to talk first about compilers, development environments, and the toolchain. However, MicroPython is a little different at first glance.
REPL
With MicroPython, as with Python, the language may have come with your hardware, and you have the option of working with it interactively. There are two ways to get an interactive session:
- Use a serial terminal connection: This is often done through the command line, or perhaps an IDE.
- Use the WebREPL: This is an option for boards with WiFi.
To get a serial REPL on a Mac, for example, you can run the included terminal program Screen and specify your device and the baud rate:
$ screen /dev/tty.wchusbserial1430 115200
You can find your device by listing the attached serial connections:
$ ls /dev/tty.*
The process is similar to what you would do in the Linux terminal.
On Windows, PuTTY is a popular terminal app. There’s also one called Tera Term. Either way, simply connect to the COM port that appears when you attach your device and select 115,200 as your baud rate.
Once you have a REPL connection, you can enter commands just like you would from your Python interactive session. In MicroPython, this interface is also where you might want to do simple OS-style work, such as deleting files or creating folders.
Command-Line Tools
Dave Hyland’s RShell is a well-featured toolset for working with your MicroPython projects.
There’s another great command-line tool for interacting with MicroPython boards called Ampy. This was initially developed by Adafruit but has now been taken on by a community member, since Adafruit is focusing solely on their own hardware.
MicroPython IDEs
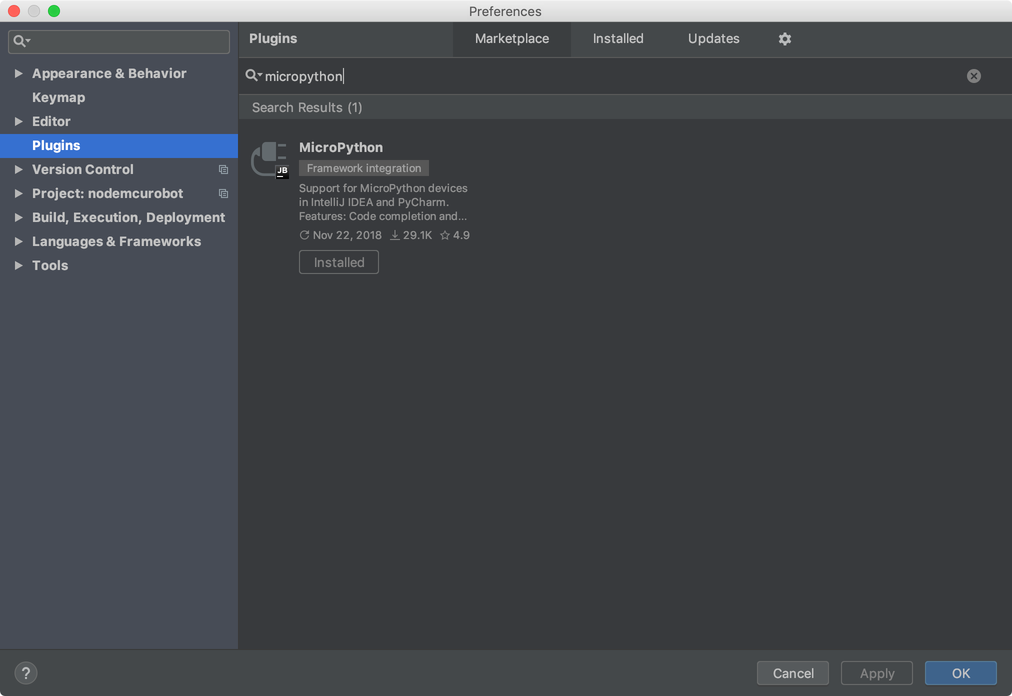
There’s a PyCharm plugin that adds MicroPython support to your IDE. It’s available right in the plugin marketplace:
For the Micro:Bit and CircuitPython boards, the best editor right now is the Mu Editor from Nicholas Tollervey. Otherwise, keep an eye on uPyCraft, which looks to have a lot of promise and is already pretty useful.
Once you have connected the correct serial port and selected your device type, you’ll be able to browse the device:
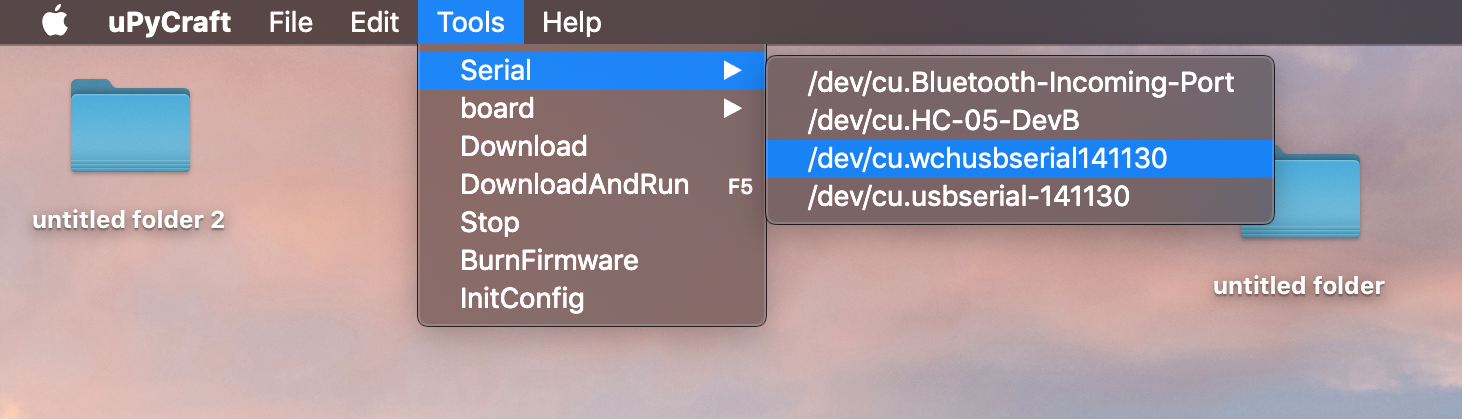
Your device type will either be ESP8266, ESP32, or Micro:Bit. Now you can interact in the REPL!
Setting Up MicroPython on Your Board
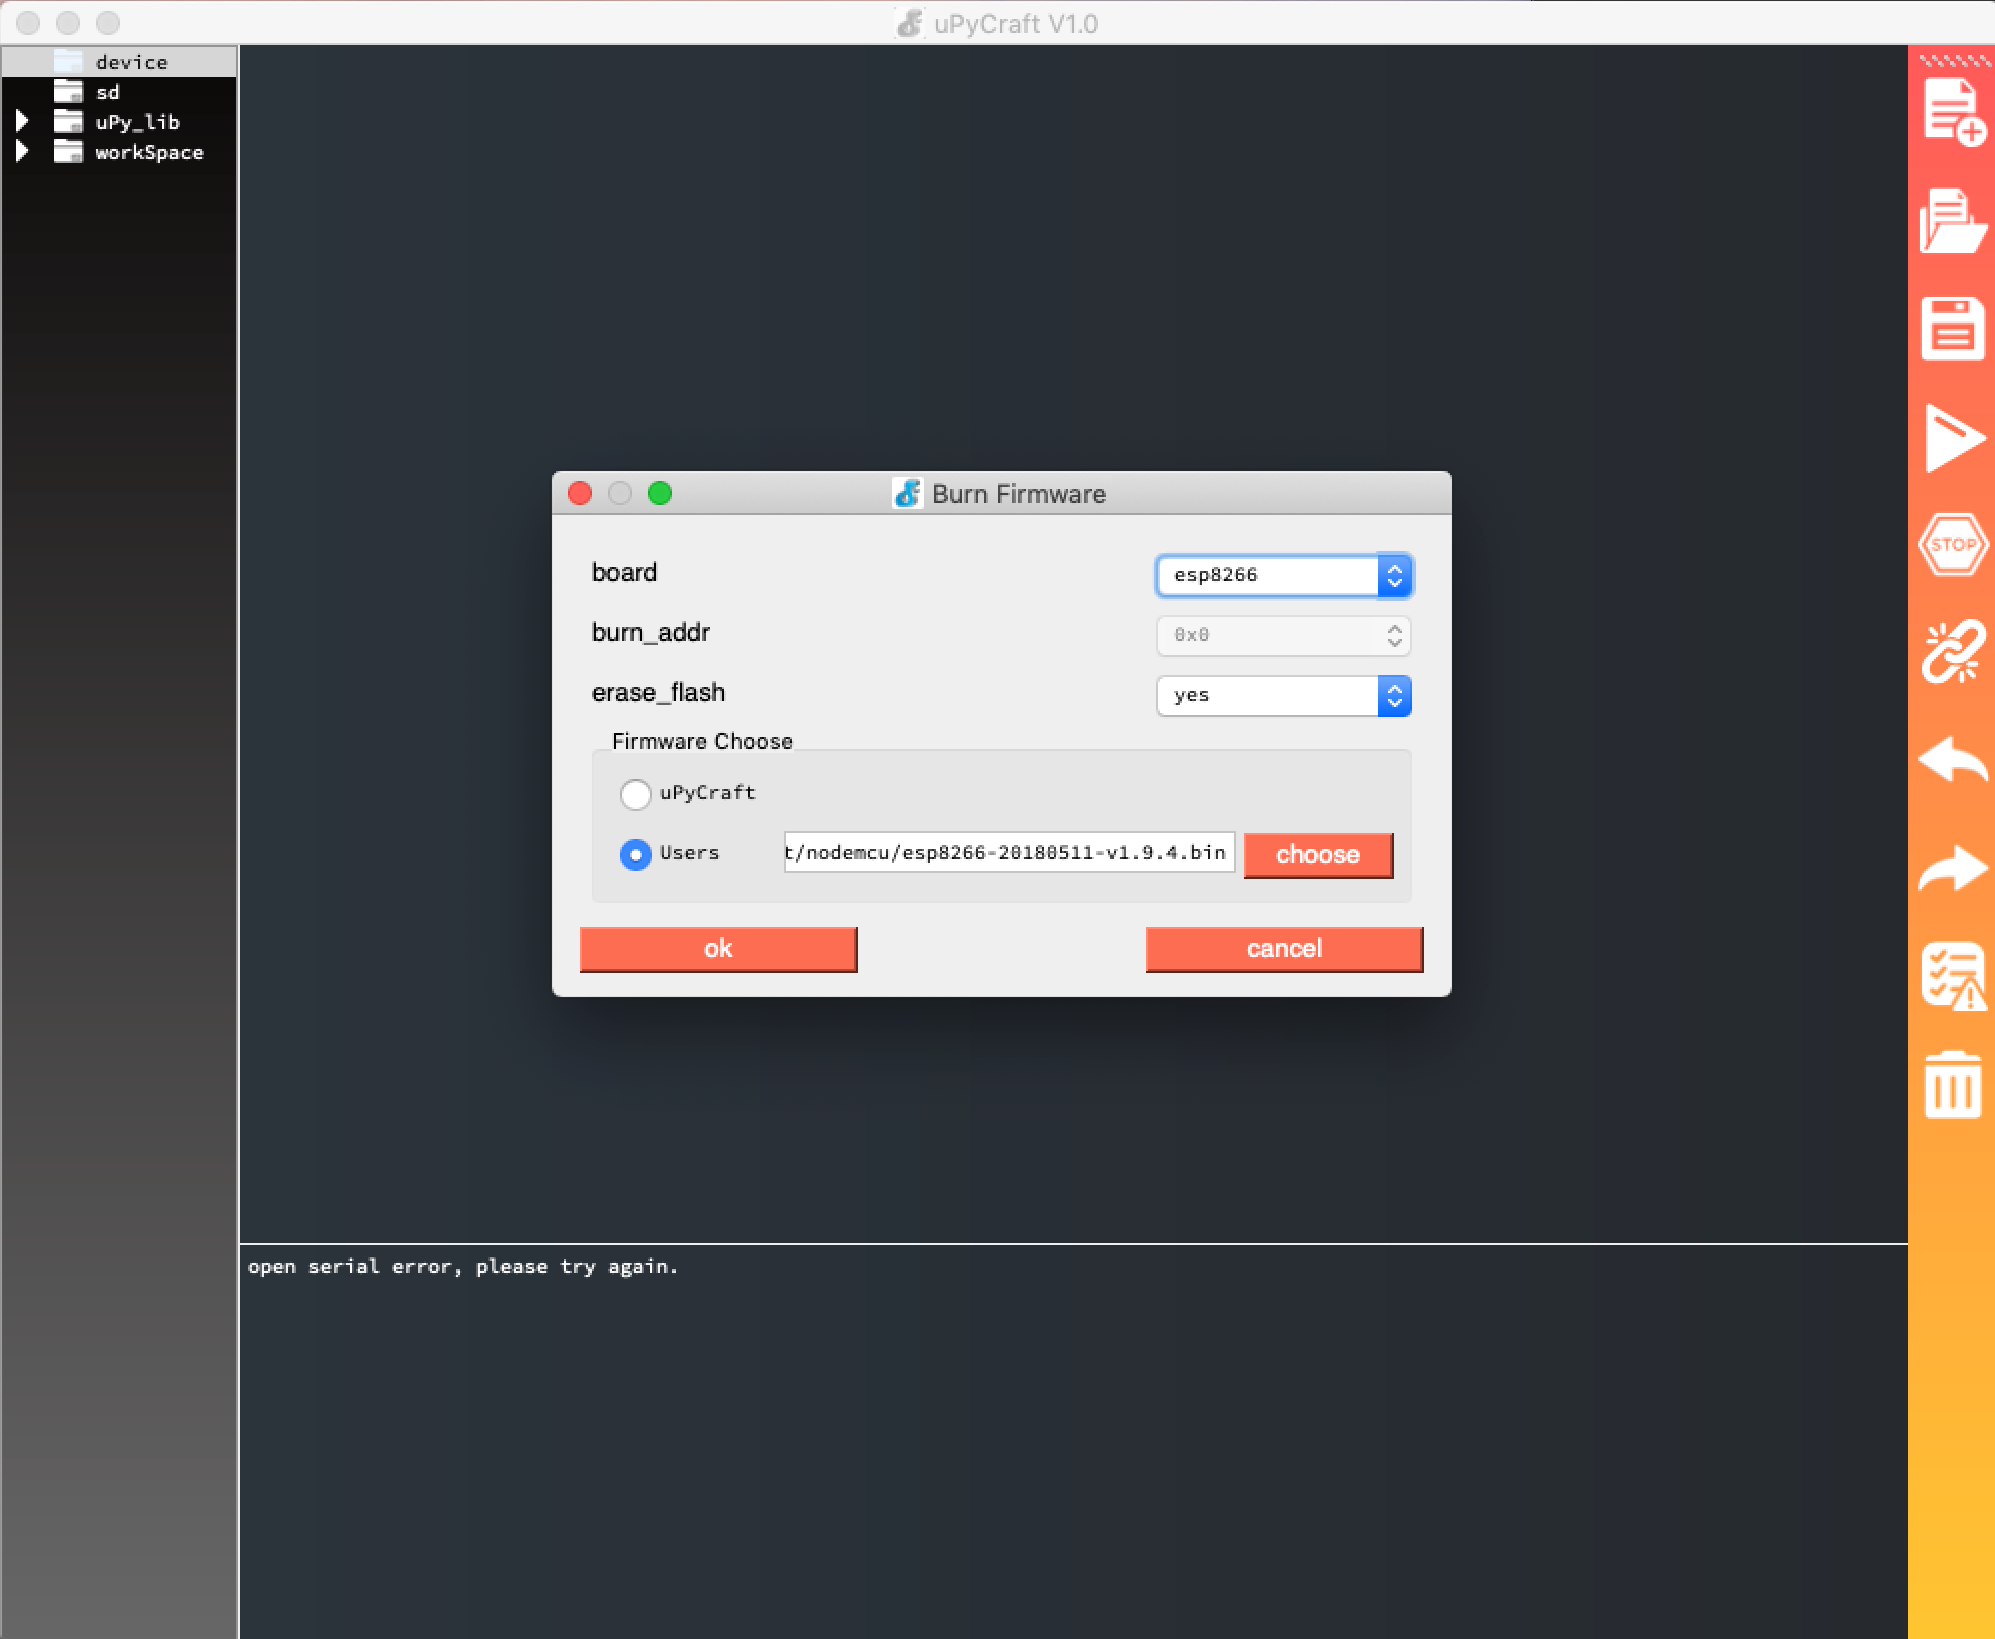
There’s one benefit to choosing uPyCraft, and that’s the option to easily burn the MicroPython firmware to your board without having to use command-line tools. You can choose the uPyCraft default firmware, or a firmware you have downloaded:
The BBC Micro:Bit shows up as a disk drive. When you use Mu or the web-based editor, they’ll produce files that you can drop straight onto that disk. If you’re using an ESP8266 or ESP32 board with uPyCraft, then you can also install the Python ESPTool with pip and set up your board’s firmware using that.
Other boards might come with MicroPython or CircuitPython installed, or even use a drag-and-drop installer. However, those kinds of boards can get corrupted or go into infinite loops. Be sure you take the time to look into your board’s documentation for how to replace the firmware.
Creating and Deploying Your Code
To execute your code, in most cases you’re going to create .py text files and execute them on your MicroPython device. This process is similar to what you would do with CPython. You’ll transfer the files to your board in one of two ways:
- Use your IDE. This can be Mu, uPyCraft, or something similar.
- Use a command-line tool. This can be RShell, Ampy, or something similar.
When devices that are running MicroPython boot up, they’ll look for a file called boot.py. If that file is found, then the device will execute it automatically. You can also execute .py files from a REPL prompt:
exec(open('my-program.py').read())
In fact, this is similar to what uPyCraft does when you run your edited Python. It transfers the file to your board and then executes it through the REPL.
Writing Your MicroPython Code
You’ll start with a traditional “Hello, World!” project. You can do this in the REPL by connecting to the correct serial port, and entering the following:
print("Hello World!")
You should see the following output:
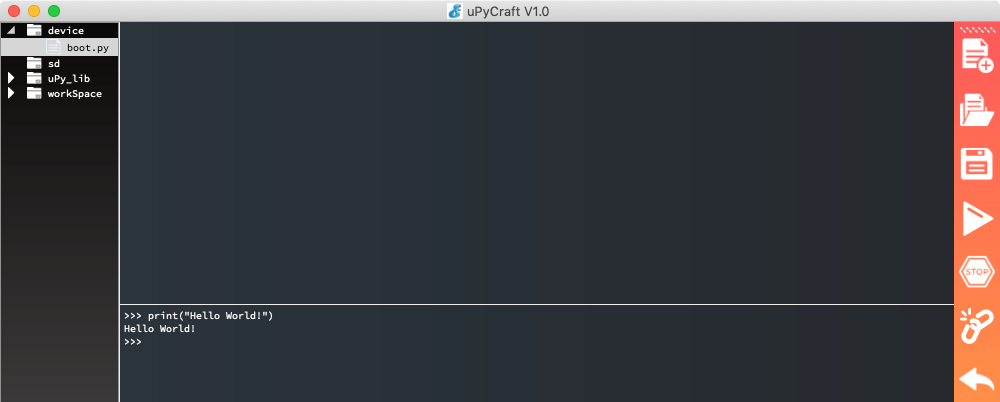
You’ve confirmed that your setup is working.
Creating Digital Output
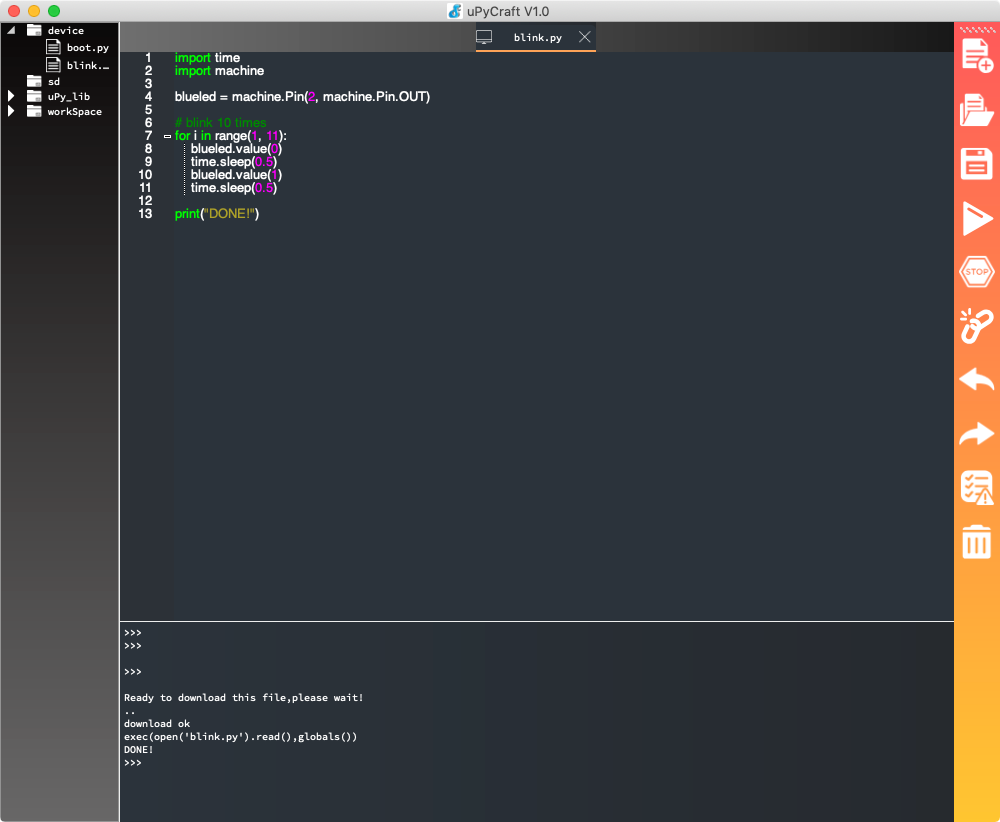
Now, let’s change the output type. Using the following code, you can make the onboard LED blink:
import time
import machine
blueled = machine.Pin(2, machine.Pin.OUT)

# Blink 10 times
for i in range(1,11):
    blueled.value(0)
    time.sleep(0.5)
    blueled.value(1)
    time.sleep(0.5)

print("DONE!")
You import time, which lets you insert time delays. You also import machine, a module that gives you easy access to the IO pins on your board. You use this module to set up an object called blueled, which you define as being Pin 2. (On other boards, it may be possibly Pin 16). Then, you set it as an output pin. You should see the following output:
You may notice that on the ESP8266, the LED lights up when it’s off and turns off when it’s given a positive value. Odd, but true!
Note: Most boards will have one or more built-in LEDs. Check out the documentation for your specific board for more information.
What if you don’t have a built-in LED, or you want to light up an LED that’s not on your board? You’ll need a suitably-sized resistor, such as a 220ohm resistor. You’ll need to connect that to the ground and to the short leg of your LED. The positive, long leg of your LED will connect to the GPIO pin 2. On the Wemos D1 Uno board, GPIO 2 is called Digital Pin 9 on the front face of the board. It has the GPIO number underneath.
In the case of an external LED, it will light up when the value is 1 or on:
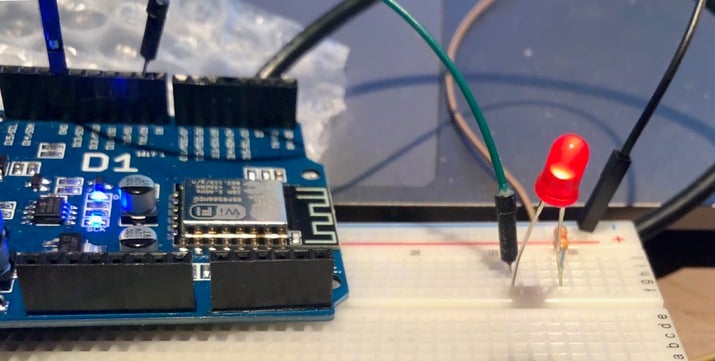
You can see the pin has been lit up.
Fading LEDs
In the previous example, you used a for loop, but your hardware can actually blink the LED itself. To do this, set the pin output as PWM, which stands for Pulse Width Modulation (PWM).
This allows you to create a signal of on and off pulses. When you turn an LED on and off very quickly many times a second, it appears that the LED is set to a certain brightness due to how our eyes work. Here’s how your code would look:
from machine import Pin
from machine import PWM
import time

# Set our pin 2 to PWM
pwm = PWM(Pin(2))

# Brightness between 0 and 1023
pwm.duty(700)

# Frequency in Hertz
pwm.freq(1)
In this new code, you set the brightness and the blink frequency in Hertz, and then let the hardware take over.
You can also use PWM to fade the LED in and out:
from machine import Pin
from machine import PWM
import time

# Set our pin 2 to PWM
pwm = PWM(Pin(2))

# Frequency = 100hz
pwm.freq(100)

while 1:
  # Brightness between 0 and 1023
  for brightness in range (0, 1023, 100):
    pwm.duty(brightness)
    print(brightness)
    time.sleep(0.1)

  # Brightness between 1023 and 0
  for brightness in range (1023, 0, -100):
    pwm.duty(brightness)
    print(brightness)
    time.sleep(0.1)
This code gives a pleasing, soft effect:
If you’re using the onboard LED, then the light might instead fade out and then in.
Conclusion
It’s never been more accessible for you to program robots, microcontrollers, electronics, and other hardware. Traditionally, to program these devices, you had to use low-level languages like assembler or C++, and sacrifice a lot of functionality. That all changed with the introduction of MicroPython, a version of Python 3 crammed into the tiny capacity of smaller physical computing devices!
In this tutorial, you dove into MicroPython and the world of electronics hardware. You’ve learned about the history of MicroPython and how it compares to other platforms. You also went through the MicroPython workflow, deployed code to your own board, and brought about a real-world effect.
MicroPython is continuing to grow. Developers in the community are always adding new code, tools, projects, and tutorials. There’s never been a more exciting time to be a MicroPython developer!
Watch Now This tutorial has a related video course created by the Real Python team. Watch it together with the written tutorial to deepen your understanding: Getting Started With MicroPython