Watch Now This tutorial has a related video course created by the Real Python team. Watch it together with the written tutorial to deepen your understanding: Publishing Python Packages to PyPI
Python is famous for coming with batteries included, and many sophisticated capabilities are available in the standard library. However, to unlock the full potential of the language, you should also take advantage of the community contributions at PyPI: the Python Packaging Index.
PyPI, typically pronounced pie-pee-eye, is a repository containing several hundred thousand packages. These range from trivial Hello, World implementations to advanced deep learning libraries. In this tutorial, you’ll learn how to upload your own package to PyPI. Publishing your project is easier than it used to be. Yet, there are still a few steps involved.
In this tutorial, you’ll learn how to:
- Prepare your Python package for publication
- Handle versioning of your package
- Build your package and upload it to PyPI
- Understand and use different build systems
Throughout this tutorial, you’ll work with an example project: a reader package that can be used to read Real Python tutorials in your console. You’ll get a quick introduction to the project before going in depth about how to publish this package. Click the link below to access the GitHub repository containing the full source code of reader:
Get Source Code: Click here to get access to the source code for the Real Python Feed Reader that you’ll use to publish an open-source package to PyPI.
Get to Know Python Packaging
Packaging in Python can seem complicated and confusing for both newcomers and seasoned veterans. You’ll find conflicting advice across the Internet, and what was once considered good practice may now be frowned upon.
The main reason for this situation is that Python is a fairly old programming language. Indeed, the first version of Python was released in 1991, before the World Wide Web became available to the general public. Naturally, a modern, web-based system for distribution of packages wasn’t included or even planned for in the earliest versions of Python.
Note: For a detailed discussion of Python packaging, check out episode 156 of the Real Python Podcast.
Instead, Python’s packaging ecosystem has evolved organically over the decades as user needs became clear and technology offered new possibilities. The first packaging support came in the fall of 2000, with the distutils library being included in Python 1.6 and 2.0. The Python Packaging Index (PyPI) came online in 2003, originally as a pure index of existing packages, without any hosting capabilities.
Note: PyPI is often referred to as the Python Cheese Shop in reference to Monty Python’s famous Cheese Shop sketch. To this day, cheeseshop.python.org redirects to PyPI.
Over the last decade, many initiatives have improved the packaging landscape, bringing it from the Wild West and into a fairly modern and capable system. This is mainly done through Python Enhancement Proposals (PEPs) that are reviewed and implemented by the Python Packaging Authority (PyPA) working group.
The most important documents that define how Python packaging works are the following PEPs:
- PEP 427 describes how wheels should be packaged.
- PEP 440 describes how version numbers should be parsed.
- PEP 508 describes how dependencies should be specified.
- PEP 517 describes how a build backend should work.
- PEP 518 describes how a build system should be specified.
- PEP 621 describes how project metadata should be written.
- PEP 660 describes how editable installs should be performed.
You don’t need to study these technical documents. In this tutorial, you’ll learn how all these specifications come together in practice as you go through the process of publishing your own package.
For a nice overview of the history of Python packaging, check out Thomas Kluyver’s presentation at PyCon UK 2019: Python packaging: How did we get here, and where are we going? You can also find more presentations at the PyPA website.
Create a Small Python Package
In this section, you’ll get to know a small Python package that you can use as an example that can be published to PyPI. If you already have your own package that you’re looking to publish, then feel free to skim this section and join up again at the next section.
The package that you’ll see here is called reader. It can be used both as a library for downloading Real Python tutorials in your own code and as an application for reading tutorials in your console.
Note: The source code as shown and explained in this section is a simplified—but fully functional—version of the Real Python feed reader. Compared to the version currently published on PyPI, this version lacks some error handling and extra options.
First, have a look at the directory structure of reader. The package lives completely inside a directory that can be named anything. In this case, it’s named realpython-reader/. The source code is wrapped inside an src/ directory. This isn’t strictly necessary, but it’s usually a good idea.
Note: The use of an extra src/ directory when structuring packages has been a point of discussion in the Python community for years. In general, a flat directory structure is slightly easier to get started with, but the src/-structure provides several advantages as your project grows.
The inner src/reader/ directory contains all your source code:
realpython-reader/
│
├── src/
│   └── reader/
│       ├── __init__.py
│       ├── __main__.py
│       ├── config.toml
│       ├── feed.py
│       └── viewer.py
│
├── tests/
│   ├── test_feed.py
│   └── test_viewer.py
│
├── LICENSE
├── MANIFEST.in
├── README.md
└── pyproject.toml
The source code of the package is in an src/ subdirectory together with a configuration file. There are a few tests in a separate tests/ subdirectory. The tests themselves won’t be covered in this tutorial, but you’ll learn how to treat test directories later. You can learn more about testing in general in Getting Started With Testing in Python and Effective Python Testing With Pytest.
If you’re working with your own package, then you may use a different structure or have other files in your package directory. Python Application Layouts discusses several different options. The steps below for publishing to PyPI will work independently of the layout you use.
In the rest of this section, you’ll see how the reader package works. In the next section, you’ll learn more about the special files like LICENSE, MANIFEST.in, README.md, and pyproject.toml that you’ll need to publish your package.
Use the Real Python Reader
reader is a basic web feed reader that can download the latest Real Python tutorials from the Real Python feed.
In this section, you’ll first see a few examples of the output that you can expect from reader. You can’t run these examples yourself yet, but they should give you some idea of how the tool works.
Note: If you’ve downloaded the source code of reader, then you can follow along by first creating a virtual environment and then installing the package locally inside that virtual environment:
(venv) $ python -m pip install -e .
Throughout the tutorial, you’ll learn more about what happens under the hood when you run this command.
The first example uses the reader to get a list of the latest articles:
$ python -m reader
The latest tutorials from Real Python (https://realpython.com/)
  0 How to Publish an Open-Source Python Package to PyPI
  1 The Real Python Podcast – Episode #110
  2 Build a URL Shortener With FastAPI and Python
  3 Using Python Class Constructors
  4 Linear Regression in Python
  5 The Real Python Podcast – Episode #109
  6 pandas GroupBy: Your Guide to Grouping Data in Python
  7 Deploying a Flask Application Using Heroku
  8 Python News: What's New From April 2022
  9 The Real Python Podcast – Episode #108
 10 Top Python Game Engines
 11 Testing Your Code With pytest
 12 Python's min() and max(): Find Smallest and Largest Values
 13 Real Python at PyCon US 2022
 14 Why Is It Important to Close Files in Python?
 15 Combining Data in Pandas With merge(), .join(), and concat()
 16 The Real Python Podcast – Episode #107
 17 Python 3.11 Preview: Task and Exception Groups
 18 Building a Django User Management System
 19 How to Get the Most Out of PyCon US
This list shows the most recent tutorials, so your list may be different from what you see above. Still, notice that each article is numbered. To read one particular tutorial, you use the same command but include the number of the tutorial as well.
Note: The Real Python feed contains limited previews of articles. Therefore, you won’t be able to read the full tutorials with reader.
In this case, to read How to Publish an Open-Source Python Package to PyPI, you add 0 to the command:
$ python -m reader 0
How to Publish an Open-Source Python Package to PyPI

Python is famous for coming with batteries included, and many sophisticated
capabilities are available in the standard library. However, to unlock the
full potential of the language, you should also take advantage of the
community contributions at PyPI: the Python Packaging Index.

PyPI, typically pronounced pie-pee-eye, is a repository containing several
hundred thousand packages. These range from trivial Hello, World
implementations to advanced deep learning libraries. In this tutorial,
you'll learn how to upload your own package to PyPI. Publishing your
project is easier than it used to be. Yet, there are still a few
steps involved.

[...]
This prints the article to the console using the Markdown format.
Note: python -m is used to execute a module or a package. It works similarly to python for modules and regular scripts. For example python module.py and python -m module are mostly equivalent.
When you run a package with -m, the file __main__.py within the package is executed. See Call the Reader for more information.
For now, you’ll need to run the python -m reader command from inside the src/ directory. Later, you’ll learn how you can run the command from any working directory.
By changing the number on the command line, you can read any of the available tutorials.
Understand the Reader Code
The details of how reader works aren’t important for the purpose of this tutorial. However, if you’re interested in learning more about the implementation, then you can expand the sections below. The package consists of five files:
config.toml is a configuration file used to specify the URL of the feed of Real Python tutorials. It’s a text file that can be read by the tomli third-party library:
# config.toml

[feed]
url = "https://realpython.com/atom.xml"
In general, TOML files contain key-value pairs separated into sections, or tables. This particular file contains only one section, feed, with one key, url.
Note: A configuration file might be overkill for this simple package. You could instead define the URL as a module level constant directly in your source code. The configuration file is included here to demonstrate how to work with non-code files.
TOML is a configuration file format that has gained popularity lately. Python uses it for the pyproject.toml file that you’ll learn about later. To dive deeper into TOML, check out Python and TOML: New Best Friends.
Support for reading TOML files will be added to the standard library in Python 3.11 with a new tomllib library. Until then, you can use the third-party tomli package.
The first source code file that you’ll have a look at is __main__.py. The double underscores indicate that this file has a special meaning in Python. Indeed, when executing a package with python -m as you did earlier, Python runs the contents of __main__.py.
In other words, __main__.py acts as the entry point of your program and takes care of the main flow, calling other parts as needed:
 1# __main__.py
 2
 3import sys
 4
 5from reader import feed, viewer
 6
 7def main():
 8    """Read the Real Python article feed"""
 9
10    # If an article ID is given, then show the article
11    if len(sys.argv) > 1:
12        article = feed.get_article(sys.argv[1])
13        viewer.show(article)
14
15    # If no ID is given, then show a list of all articles
16    else:
17        site = feed.get_site()
18        titles = feed.get_titles()
19        viewer.show_list(site, titles)
20
21if __name__ == "__main__":
22    main()
Notice that main() is called on the last line. If you don’t call main(), then the program won’t do anything. As you saw earlier, the program can either list all tutorials or print one specific tutorial. This is handled by the if … else block on lines 11 to 19.
The next file is __init__.py. Again, the double underscores in the filename tell you that this is a special file. __init__.py represents the root of your package. It should usually be kept quite simple, but it’s a good place to put package constants, documentation, and so on:
# __init__.py

from importlib import resources
try:
    import tomllib
except ModuleNotFoundError:
    import tomli as tomllib

# Version of the realpython-reader package
__version__ = "1.0.0"

# Read URL of the Real Python feed from config file
_cfg = tomllib.loads(resources.read_text("reader", "config.toml"))
URL = _cfg["feed"]["url"]
The special variable __version__ is a convention in Python for adding version numbers to your package. It was introduced in PEP 396. You’ll learn more about versioning later.
Note: You can use importlib.metadata to inspect the version of any package that you’ve installed:
>>> from importlib import metadata
>>> metadata.version("realpython-reader")
'1.0.0'
importlib.metadata identifies packages by their PyPI names, which is why you look up realpython-reader and not reader. You’ll learn more about different names for your project later.
Specifying __version__ is—strictly speaking—not necessary. The importlib.metadata machinery uses project metadata to find version numbers. However, it’s still a useful convention to follow, and tools like Setuptools and Flit can use it to automatically update your package metadata.
To read the URL to the feed from the configuration file, you use tomllib or tomli for TOML support. Using try … except as above ensures that you use tomllib if it’s available and that you fall back to tomli if it’s not.
importlib.resources is used to import non-code or resource files from a package without having to figure out their full file paths. This is especially helpful when you publish your package to PyPI and don’t have full control over where your package is installed and how it’s used. Resource files might even end up inside zip archives.
importlib.resources became a part of Python’s standard library in Python 3.7. See Barry Warsaw’s presentaion at PyCon 2018 for more information.
Variables defined in __init__.py become available as variables in the package namespace:
>>> import reader
>>> reader.__version__
'1.0.0'

>>> reader.URL
'https://realpython.com/atom.xml'
You can access the package constants as attributes directly on reader.
In __main__.py, you import two modules, feed and viewer and use those to read from the feed and show the results. Those modules do most of the actual work.
First consider feed.py. This file contains functions for reading from a web feed and parsing the result. Luckily, there are already great libraries available to do this. feed.py depends on two modules that are already available on PyPI: feedparser and html2text.
feed.py consists of several functions. You’ll look at them one at a time.
Reading a web feed can potentially take a bit of time. To avoid reading from the web feed more than necessary, you use @cache to cache the feed the first time it’s read:
# feed.py

from functools import cache

import feedparser
import html2text

import reader

@cache
def _get_feed(url=reader.URL):
    """Read the web feed, use caching to only read it once"""
    return feedparser.parse(url)
feedparser.parse() reads a feed from the web and returns it in a structure that looks like a dictionary. To avoid downloading the feed more than once, the function is decorated with @cache, which remembers the value returned by _get_feed() and reuses it on later invocations.
Note: The @cache decorator was introduced to functools in Python 3.9. On older versions of Python, you can use @lru_cache instead.
You prefix _get_feed() with an underscore to indicate that it’s a support function and isn’t meant to be used directly by users of your package.
You can get some basic information about the feed by looking in the .feed metadata. The following function picks out the title and link to the website containing the feed:
# feed.py

# ...

def get_site(url=reader.URL):
    """Get name and link to website of the feed"""
    feed = _get_feed(url).feed
    return f"{feed.title} ({feed.link})"
In addition to .title and .link, attributes like .subtitle, .updated, and .id are also available.
The articles available in the feed can be found inside the .entries list. Article titles can be found with a list comprehension:
# feed.py

# ...

def get_titles(url=reader.URL):
    """List titles in the feed"""
    articles = _get_feed(url).entries
    return [a.title for a in articles]
.entries lists the articles in the feed sorted chronologically, so that the newest article is .entries[0].
In order to get the contents of one specific article, you use its index in .entries as an article ID:
# feed.py

# ...

def get_article(article_id, url=reader.URL):
    """Get article from feed with the given ID"""
    articles = _get_feed(url).entries
    article = articles[int(article_id)]
    html = article.content[0].value
    text = html2text.html2text(html)
    return f"# {article.title}\n\n{text}"
After picking the correct article from .entries, you find the text of the article in HTML format and store it as article. Next, html2text does a decent job of translating the HTML into more readable Markdown text. The HTML doesn’t contain the article title, so the title is added before the article text is returned.
The final module is viewer.py. It consists of two small functions. In practice, you could’ve used print() directly in __main__.py instead of calling viewer functions. However, having the functionality split off makes it more straightforward to replace it with something more advanced later.
Here, you use plain print() statements to show contents to the user. As an improvement, maybe you’d want to add richer formatting or a GUI interface to your reader. To do so, you’d only need to replace the following two functions:
# viewer.py

def show(article):
    """Show one article"""
    print(article)

def show_list(site, titles):
    """Show list of article titles"""
    print(f"The latest tutorials from {site}")
    for article_id, title in enumerate(titles):
        print(f"{article_id:>3} {title}")
show() prints one article to the console, while show_list() prints a list of titles. The latter also creates article IDs that are used when choosing to read one particular article.
In addition to these source code files, you need to add some special files before you can publish your package. You’ll cover those files in later sections.
Call the Reader
One challenge when your project grows in complexity is letting your users know how they can use your project. Since reader consists of four different source code files, how does the user know which file to execute in order to use the application?
Note: A single Python file is typically referred to as a script or a module. You can think of a package as a collection of modules.
Most commonly, you run a Python script by providing its filename. For instance, if you have a script called hello.py, then you can run it as follows:
$ python hello.py
Hi there!
This hypothetical script prints Hi there! to your console when you run it. Equivalently, you can use the -m option of the python interpreter program to run a script by specifying its module name instead of the filename:
$ python -m hello
Hi there!
For modules in your current directory, the module name is the same as the filename except that the .py-suffix is left out.
One advantage of using -m is that it allows you to call all modules that are in your Python path, including those that are built into Python. One example is calling antigravity:
$ python -m antigravity
Created new window in existing browser session.
If you want to run a built-in module without -m, then you’ll need to first look up where it’s stored on your system and then call it with its full path.
Another advantage of using -m is that it works for packages as well as modules. As you learned earlier, you can call the reader package with -m as long as the reader/ directory is available in your working directory:
$ cd src/
$ python -m reader
Because reader is a package, the name only refers to a directory. How does Python decide which code inside that directory to run? It looks for a file named __main__.py. If such a file exists, then it’s executed. If it doesn’t exist, then an error message is printed:
$ python -m urllib
python: No module named urllib.__main__; 'urllib' is a package and
        cannot be directly executed
The error message says that the standard library’s urllib package hasn’t defined a __main__.py file.
If you’re creating a package that’s supposed to be executed, then you should include a __main__.py file. You can also follow Rich’s great example of using python -m rich to demonstrate the capabilities of your package.
Later, you’ll see how you can also create entry points to your package that behave like regular command-line programs. These will be even easier for your end users to use.
Prepare Your Package for Publication
You’ve got a package that you want to publish. Maybe you’ve copied reader, or maybe you have your own package. In this section, you’ll see which steps you need to take before you upload your package to PyPI.
Name Your Package
The first—and possibly the hardest—step is to come up with a good name for your package. All packages on PyPI need to have unique names. There are now several hundred thousand packages on PyPI, so chances are that your favorite name is already taken.
As a case in point, there’s already a package on PyPI named reader. One way to make a package name unique is to add a recognizable prefix to the name. In this example, you’ll use realpython-reader as the PyPI name for the reader package.
Whichever PyPI name you choose for your package, that’s the one you’ll use when you install it with pip:
$ python -m pip install realpython-reader
Note that the PyPI name does not need to match the package name. Here, the package is still named reader, and that’s the name you need to use when importing the package:
>>> import reader
>>> reader.__version__
'1.0.0'

>>> from reader import feed
>>> feed.get_titles()
['How to Publish an Open-Source Python Package to PyPI', ...]
Sometimes you need to use different names for your package. However, you’re keeping things simpler for your users if the package name and the PyPI name are the same.
Be aware that even though the package name doesn’t need to be globally unique like the PyPI name, it does need to be unique across the environment that you’re running it in.
If you install two packages with the same package name, for example reader and realpython-reader, then a statement like import reader is ambigous. Python resolves this by importing the package that it finds first in the import path. Often, this will be the first package when sorting the names alphabetically. However, you shouldn’t depend on this behavior.
Usually, you’d want your package names to be as unique as possible as well, while balancing this with the convenience of a short and succinct name. The realpython-reader is a specialized feed reader, while reader on PyPI is more general. For the purposes of this tutorial, there’s no reason to need both, so the compromise with the non-unique name might be worth it.
Configure Your Package
In order to prepare your package for publication on PyPI, you need to provide some information about it. In general, you need to specify two kinds of information:
- Configuration of your build system
- Configuration of your package
A build system is responsible for creating the actual files that you’ll upload to PyPI, typically in the wheel or the source distribution (sdist) format. For a long time, this was done by distutils or setuptools. However, PEP 517 and PEP 518 introduced a way to specify custom build systems.
Note: You can choose which build system you use in your projects. The main difference between different build systems is how you configure your package and which commands you run to build and upload your package.
This tutorial will focus on using setuptools as a build system. Still, later you’ll learn how to use alternatives like Flit and Poetry.
Each Python project should use a file named pyproject.toml to specify its build system. You can use setuptools by adding the following to pyproject.toml:
# pyproject.toml

[build-system]
requires = ["setuptools>=61.0.0", "wheel"]
build-backend = "setuptools.build_meta"
This specifies that you’re using setuptools as a build system as well as which dependencies Python must install in order to build your package. Typically, the documentation of your chosen build system will tell you how to write the build-system table in pyproject.toml.
The more interesting information that you need to provide concerns your package itself. PEP 621 defines how metadata about your package can also be included in pyproject.toml in a way that’s as uniform as possible across different build systems.
Note: Historically, Setuptools used setup.py to configure your package. Because this is an actual Python script that’s run at installation, it’s very powerful, and it may still be required when building complex packages.
However, it’s usually better to use a declarative configuration file to express how to build your package, as it’s more straightforward to reason about and comes with fewer pitfalls to worry about. Using setup.cfg is the most common way to configure Setuptools.
However, Setuptools is moving toward using pyproject.toml as specified in PEP 621. In this tutorial, you’ll be using pyproject.toml for all your package configuration.
A fairly minimal configuration of the reader package can look like this:
# pyproject.toml

[build-system]
requires      = ["setuptools>=61.0.0", "wheel"]
build-backend = "setuptools.build_meta"

[project]
name = "realpython-reader"
version = "1.0.0"
description = "Read the latest Real Python tutorials"
readme = "README.md"
authors = [{ name = "Real Python", email = "info@realpython.com" }]
license = { file = "LICENSE" }
classifiers = [
    "License :: OSI Approved :: MIT License",
    "Programming Language :: Python",
    "Programming Language :: Python :: 3",
]
keywords = ["feed", "reader", "tutorial"]
dependencies = [
    "feedparser >= 5.2.0",
    "html2text",
    'tomli; python_version < "3.11"',
]
requires-python = ">=3.9"

[project.optional-dependencies]
dev = ["black", "bumpver", "isort", "pip-tools", "pytest"]

[project.urls]
Homepage = "https://github.com/realpython/reader"

[project.scripts]
realpython = "reader.__main__:main"
Most of this information is optional, and there are other settings you can use that aren’t included in this example. Check out the documentation for all the details.
The minimal information that you must include in your pyproject.toml is the following:
namespecifies the name of your package as it will appear on PyPI.versionsets the current version of your package.
As the example above shows, you can include much more information. A few of the other keys in pyproject.toml are interpreted as follows:
classifiersdescribes your project using a list of classifiers. You should use these as they make your project more searchable.dependencieslists any dependencies your package has to third-party libraries.readerdepends onfeedparser,html2text, andtomli, so they’re listed here.project.urlsadds links that you can use to present additional information about your package to your users. You can include several links here.project.scriptscreates command-line scripts that call functions within your package. Here, the newrealpythoncommand callsmain()within thereader.__main__module.
The project.scripts table is one of three tables that can handle entry points. You can also include project.gui-scripts and project.entry-points, which specify GUI applications and plugins, respectively.
The purpose of all this information is to make your package attractive and findable on PyPI. Have a look at the realpython-reader project page on PyPI and compare the information with pyproject.toml above:
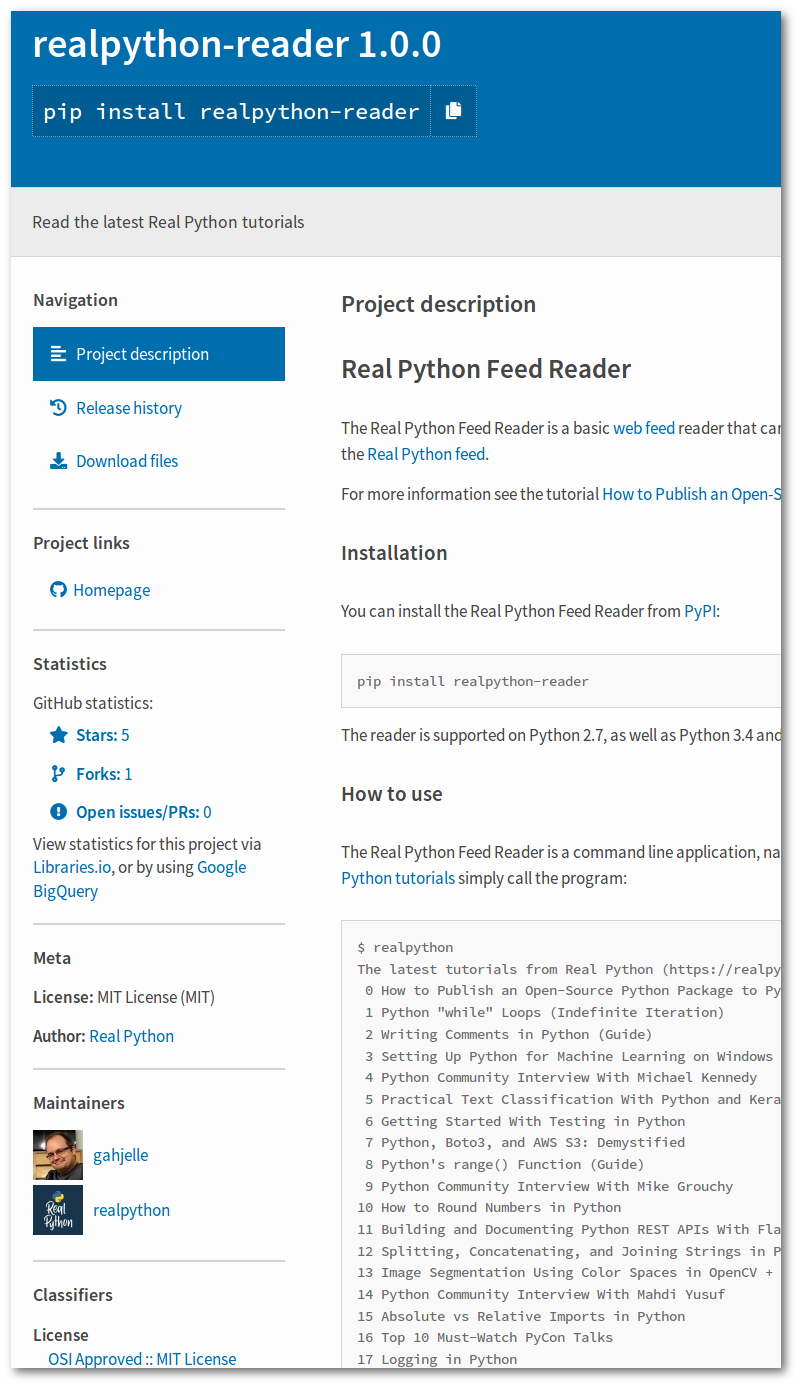
All the information on PyPI comes from pyproject.toml and README.md. For example, the version number is based on the line version = "1.0.0" in project.toml, while Read the latest Real Python tutorials is copied from description.
Furthermore, the project description is lifted from your README.md file. In the sidebar, you can find information from project.urls in the Project links section and from license and authors in the Meta section. The values you specified in classifiers are visible at the bottom of the sidebar.
See PEP 621 for details about all the keys. You’ll learn more about dependencies, as well as project.optional-dependencies, in the next subsection.
Specify Your Package Dependencies
Your package will likely depend on third-party libraries that aren’t part of the standard library. You should specify these in the dependencies list in pyproject.toml. In the example above, you did the following:
dependencies = [
    "feedparser >= 5.2.0",
    "html2text",
    'tomli; python_version < "3.11"',
]
This specifies that reader depends on feedparser, html2text, and tomli. Furthermore, it says the following:
feedparsermust be version 5.2.0 or later.html2textcan be any version.tomlican be any version, but is only required on Python 3.10 or earlier.
This shows a few possibilities that you can use when specifying dependencies, including version specifiers and environment markers. You can use the latter to account for different operating systems, Python versions, and so on.
Note, however, that you should strive to only specify the minimum requirements needed for your library or application to work. This list will be used by pip to resolve dependencies any time your package is installed. By keeping this list minimal, you ensure that your package is as compatible as possible.
You may have heard that you should pin your dependencies. That’s great advice! However, it doesn’t hold in this case. You pin your dependencies to make sure your environment is reproducible. Your package, on the other hand, should hopefully work across many different Python environments.
When adding packages to dependencies you should follow these rules of thumb:
- Only list your direct dependencies. For example,
readerimportsfeedparser,html2text, andtomli, so those are listed. On the other hand,feedparserdepends onsgmllib3k, butreaderdoesn’t use this library directly, so it’s not specified. - Never pin your dependencies to one particular version with
==. - Use
>=to add a lower bound if you depend on functionality that was added in a particular version of your dependency. - Use
<to add an upper bound if you worry that a dependency may break compatibility in a major version upgrade. In this case, you should diligently test such upgrades and remove or increase the upper bound if possible.
Note that these rules hold when you’re configuring a package that you’re making available for others. If you’re deploying your package, then you should pin your dependencies inside a virtual environment.
The pip-tools project is a great way to manage pinned dependencies. It comes with a pip-compile command that can create or update a complete list of dependencies.
As an example, say that you’re deploying reader into a virtual environment. You can then create a reproducible environment with pip-tools. In fact, pip-compile can work directly with your pyproject.toml file:
(venv) $ python -m pip install pip-tools
(venv) $ pip-compile pyproject.toml
feedparser==6.0.8
    via realpython-reader (pyproject.toml)
html2text==2020.1.16
    via realpython-reader (pyproject.toml)
sgmllib3k==1.0.0
    via feedparser
tomli==2.0.1 ; python_version < "3.11"
    via realpython-reader (pyproject.toml)
pip-compile creates a detailed requirements.txt file with contents similar to the output above. You can use pip install or pip-sync to install these dependencies into your environment:
(venv) $ pip-sync
Collecting feedparser==6.0.8
  ...
Installing collected packages: sgmllib3k, tomli, html2text, feedparser
Successfully installed feedparser-6.0.8 html2text-2020.1.16 sgmllib3k-1.0.0
                       tomli-2.0.1
See the pip-tools documentation for more information.
You’re also allowed to specify optional dependencies of your package in a separate table named project.optional-dependencies. Often you use this to specify dependencies that you use during development or testing. However, you can also specify extra dependencies that are used to support certain features in your package.
In the example above, you included the following section:
[project.optional-dependencies]
dev = ["black", "bumpver", "isort", "pip-tools", "pytest"]
This adds one group, dev, of optional dependencies. You can have several such groups, and you can name the groups however makes sense.
By default, optional dependencies aren’t included when a package is installed. However, by adding the group name in square brackets when running pip, you can manually specify that they should be installed. For example, you can install the extra dev dependencies of reader by doing the following:
(venv) $ python -m pip install realpython-reader[dev]
You can also include optional dependencies when pinning your dependencies with pip-compile by using the --extra command line option:
(venv) $ pip-compile --extra dev pyproject.toml
attrs==21.4.0
    via pytest
black==22.3.0
    via realpython-reader (pyproject.toml)
...
tomli==2.0.1 ; python_version < "3.11"
    via
      black
      pytest
      realpython-reader (pyproject.toml)
This creates a pinned requirements.txt file that includes both your regular and development dependencies.
Document Your Package
You should add some documentation before you release your package to the world. Depending on your project, your documentation can be as small as a single README file or as comprehensive as a full web page with tutorials, example galleries, and an API reference.
At a minimum, you should include a README file with your project. A good README should quickly describe your project, as well as explain how to install and use your package. Often, you want to reference your README in the readme key in pyproject.toml. This will display the information on the PyPI project page as well.
You can use Markdown or reStructuredText as formats for project descriptions. PyPI figures out which format you’re using based on the file extension. If you don’t need any of the advanced features of reStructuredText, then you’re usually better off using Markdown for your README. It’s simpler and has wider support outside of PyPI.
For bigger projects, you might want to offer more documentation than can reasonably fit in a single file. In that case, you can host your documentation on sites like GitHub or Read the Docs and link to it from the PyPI project page.
You can link to other URLs by specifying them in the project.urls table in pyproject.toml. In the example, the URLs section is used to link to the reader GitHub repository.
Test Your Package
Tests are useful when you’re developing your package, and you should include them. As noted, you won’t cover testing in this tutorial, but you can have a look at the tests of reader in the tests/ source code directory.
You can learn more about testing in Effective Python Testing With Pytest, and get some hands-on experience with test-driven development (TDD) in Build a Hash Table in Python With TDD and Python Practice Problems: Parsing CSV Files.
When preparing your package for publication, you should be conscious of the role that tests play. They’re typically only interesting for developers, so they should not be included in the package that you distribute through PyPI.
Later versions of Setuptools are quite good at code discovery and will normally include your source code in the package distribution but leave out your tests, documentation, and similar development artifacts.
You can control exactly what’s included in your package by using find directives in pyproject.toml. See the Setuptools documentation for more information.
Version Your Package
Your package needs to have a version. Furthermore, PyPI will only let you upload a particular version of your package once. In other words, if you want to update your package on PyPI, then you need to increase the version number first. This is a good thing because it helps guarantee reproducibility: two environments with the same version of a given package should behave the same.
There are many different versioning schemes that you can use. For Python projects, PEP 440 gives some recommendations. However, in order to be flexible, the description in that PEP is complicated. For a simple project, you should stick with a simple versioning scheme.
Semantic versioning is a good default scheme to use, although it’s not perfect. You specify the version as three numerical components, for instance 1.2.3. The components are called MAJOR, MINOR, and PATCH, respectively. The following are recommendations about when to increment each component:
- Increment the MAJOR version when you make incompatible API changes.
- Increment the MINOR version when you add functionality in a backwards compatible manner.
- Increment the PATCH version when you make backwards compatible bug fixes. (Source)
You should reset PATCH to 0 when you increment MINOR, and reset both PATCH and MINOR to 0 when you increment MAJOR.
Calendar versioning is an alternative to semantic versioning that’s gaining popularity and is used by projects like Ubuntu, Twisted, Black, and pip. Calendar versions also consist of several numerical components, but one or several of these are tied to the current year, month, or week.
Often, you want to specify the version number in different files within your project. For example, the version number is mentioned in both pyproject.toml and reader/__init__.py in the reader package. To help you make sure that version numbers stay consistent, you can use a tool like BumpVer.
BumpVer allows you to write version numbers directly into your files and then update these as necessary. As an example, you can install and integrate BumpVer into your project as follows:
(venv) $ python -m pip install bumpver
(venv) $ bumpver init
WARNING - Couldn't parse pyproject.toml: Missing version_pattern
Updated pyproject.toml
The bumpver init command creates a section in your pyproject.toml that allows you to configure the tool for your project. Depending on your needs, you may need to change many of the default settings. For reader, you may end up with something like the following:
[tool.bumpver]
current_version = "1.0.0"
version_pattern = "MAJOR.MINOR.PATCH"
commit_message  = "Bump version {old_version} -> {new_version}"
commit          = true
tag             = true
push            = false

[tool.bumpver.file_patterns]
"pyproject.toml" = ['current_version = "{version}"', 'version = "{version}"']
"src/reader/__init__.py" = ["{version}"]
For BumpVer to work properly, you must specify all files that contain your version number in the file_patterns subsection. Note that BumpVer plays well with Git and can automatically commit, tag, and push when you update the version numbers.
Note: BumpVer integrates with your version control system. It’ll refuse to update your files if you have uncommitted changes in your repository.
After you’ve set up the configuration, you can bump the version in all your files with a single command. For example, to increase the MINOR version of reader, you would do the following:
(venv) $ bumpver update --minor
INFO    - Old Version: 1.0.0
INFO    - New Version: 1.1.0
This changes the version number from 1.0.0 to 1.1.0 in both pyproject.toml and __init__.py. You can use the --dry flag to see which changes BumpVer would make, without actually executing them.
Add Resource Files to Your Package
Sometimes, you’ll have files inside your package that aren’t source code files. Examples include data files, binaries, documentation, and—as you have in this example—configuration files.
To make sure such files are included when your project is built, you use a manifest file. For many projects, you don’t need to worry about the manifest: by default, Setuptools includes all source code files and README files in the build.
If you have other resource files and need to update the manifest, then you need to create a file named MANIFEST.in next to pyproject.toml in your project’s base directory. This file specifies rules for which files to include and which files to exclude:
# MANIFEST.in

include src/reader/*.toml
This example will include all .toml files in the src/reader/ directory. In effect, this is the configuration file.
See the documentation for more information about setting up your manifest. The check-manifest tool can also be useful for working with MANIFEST.in.
License Your Package
If you’re sharing your package with others, then you need to add a license to your package that explains how others are allowed to use your package. For example, reader is distributed according to the MIT license.
Licenses are legal documents, and you typically don’t want to write your own. Instead, you should choose one of the many licenses already available.
You should add a file named LICENSE to your project that contains the text of the license you choose. You can then reference this file in pyproject.toml to make the license visible on PyPI.
Install Your Package Locally
You’ve done all the necessary setup and configuration for your package. In the next section, you’ll learn how to finally get your package on PyPI. First, though, you’ll learn about editable installs. This is a way of using pip to install your package locally in a way that lets you edit your code after it’s installed.
Note: Normally, pip does a regular install, which places a package into your site-packages/ folder. If you install your local project, then the source code will be copied to site-packages/.
The effect of this is that later changes that you make won’t take effect. You’ll need to reinstall your package first.
During development, this can be both ineffective and frustrating. Editable installs work around this by linking directly to your source code.
Editable installs have been formalized in PEP 660. These are useful when you’re developing your package, as you can test all the functionality of your package and update your source code without needing to do a reinstallation.
You use pip to install your package in editable mode by adding the -e or --editable flag:
(venv) $ python -m pip install -e .
Note the period (.) at the end of the command. It’s a necessary part of the command and tells pip that you want to install the package located in the current working directory. In general, this should be the path to the directory containing your pyproject.toml file.
Note: You may get an error message saying “Project file has a ‘pyproject.toml’ and its build backend is missing the ‘build_editable’ hook.” This is due to a limitation in Setuptools support for PEP 660. You can work around this by adding a file named setup.py with the following contents:
# setup.py

from setuptools import setup

setup()
This shim delegates the job of doing an editable install to Setuptools’ legacy mechanism until native support for PEP 660 is available.
Once you’ve successfully installed your project, it’s available inside your environment, independent of your current directory. Additionally, your scripts are set up so you can run them. Recall that reader defined a script named realpython:
(venv) $ realpython
The latest tutorials from Real Python (https://realpython.com/)
  0 How to Publish an Open-Source Python Package to PyPI
  [...]
You can also use python -m reader from any directory, or import your package from a REPL or another script:
>>> from reader import feed
>>> feed.get_titles()
['How to Publish an Open-Source Python Package to PyPI', ...]
Installing your package in editable mode during development makes your development experience much more pleasant. It’s also a good way of locating certain bugs where you may have unconsciously depended on files being available in your current working directory.
It’s taken some time, but this wraps up the preparations you need to do to your package. In the next section, you’ll learn how to actually publish it!
Publish Your Package to PyPI
Your package is finally ready to meet the world outside your computer! In this section, you’ll learn how to build your package and upload it to PyPI.
If you don’t already have an account on PyPI, then now is the time to register your account on PyPI. While you’re at it, you should also register an account on TestPyPI. TestPyPI is very useful! You can try out all the steps of publishing a package without any consequences if you mess up.
To build and upload your package to PyPI, you’ll use two tools called Build and Twine. You can install them using pip as usual:
(venv) $ python -m pip install build twine
You’ll learn how to use these tools in the upcoming subsections.
Build Your Package
Packages on PyPI aren’t distributed as plain source code. Instead, they’re wrapped into distribution packages. The most common formats for distribution packages are source archives and Python wheels.
Note: Wheels are named in reference to cheese wheels, which are the most important items in a cheese shop.
A source archive consists of your source code and any supporting files wrapped into one tar file. Similarly, a wheel is essentially a zip archive containing your code. You should provide both source archives and wheels for your package. Wheels are usually faster and more convenient for your end users, while source archives provide a flexible backup alternative.
To create a source archive and a wheel for your package, you use Build:
(venv) $ python -m build
[...]
Successfully built realpython-reader-1.0.0.tar.gz and
    realpython_reader-1.0.0-py3-none-any.whl
As the final line in the output says, this creates a source archive and a wheel. You can find them in a newly created dist directory:
realpython-reader/
│
└── dist/
    ├── realpython_reader-1.0.0-py3-none-any.whl
    └── realpython-reader-1.0.0.tar.gz
The .tar.gz file is your source archive, while the .whl file is your wheel. These are the files that you’ll upload to PyPI and that pip will download when it installs your package later.
Confirm Your Package Build
Before uploading your newly built distribution packages, you should check that they contain the files you expect. The wheel file is really a ZIP file with a different extension. You can unzip it and inspect its contents as follows:
You should see all your source code listed, as well as a few new files that have been created and contain information you provided in pyproject.toml. In particular, make sure that all subpackages and supporting files like config.toml are included.
You can also have a look inside the source archive as it’s packaged as a tar ball. However, if your wheel contains the files you expect, then the source archive should be fine as well.
Twine can also check that your package description will render properly on PyPI. You can run twine check on the files created in dist:
(venv) $ twine check dist/*
Checking distribution dist/realpython_reader-1.0.0-py3-none-any.whl: Passed
Checking distribution dist/realpython-reader-1.0.0.tar.gz: Passed
This won’t catch all the problems that you might run into, but it’s a good first line of defense.
Upload Your Package
Now you’re ready to actually upload your package to PyPI. For this, you’ll again use the Twine tool, telling it to upload the distribution packages that you have built.
First, you should upload to TestPyPI to make sure everything works as expected:
(venv) $ twine upload -r testpypi dist/*
Twine will ask you for your username and password.
Note: If you’ve followed the tutorial using the reader package as an example, then the previous command will probably fail with a message saying you aren’t allowed to upload to the realpython-reader project.
You can change name in pyproject.toml to something unique, for example test-<your-username>. Then build the project again and upload the newly built files to TestPyPI.
If the upload succeeds, then you can quickly head over to TestPyPI, scroll down, and look at your project being proudly displayed among the new releases! Click on your package and make sure everything looks okay.
If you’ve been following along using the reader package, then the tutorial ends here! While you can play with TestPyPI as much as you want, you shouldn’t upload sample packages to PyPI just for testing.
Note: TestPyPI is great for checking that your package uploads correctly and that your project page looks as you intended. You can also try to install your package from TestPyPI:
(venv) $ python -m pip install -i https://test.pypi.org/simple realpython-reader
However, note that this may fail because not all your dependencies are available on TestPyPI. This isn’t a problem. Your package should still work when you upload it to PyPI.
If you have your own package to publish, then the moment has finally arrived! With all the preparations taken care of, this final step is short:
(venv) $ twine upload dist/*
Provide your username and password when requested. That’s it!
Head over to PyPI and look up your package. You can find it either by searching, by looking at the Your projects page, or by going directly to the URL of your project: pypi.org/project/your-package-name/.
Congratulations! Your package is published on PyPI!
Install Your Package
Take a moment to bask in the blue glow of the PyPI web page and brag to your friends.
Then open up a terminal again. There’s one more great payoff!
With your package uploaded to PyPI, you can install it with pip as well. First, create a new virtual environment and activate it. Then run the following command:
(venv) $ python -m pip install your-package-name
Replace your-package-name with the name that you chose for your package. For instance, to install the reader package, you would do the following:
(venv) $ python -m pip install realpython-reader
Seeing your own code installed by pip—just like any other third-party library—is a wonderful feeling!
Explore Other Build Systems
In this tutorial, you’ve used Setuptools to build your package. Setuptools is, for better and worse, the long-term standard for creating packages. While it’s widespread and trusted, it also comes with a lot of features that may not be relevant to you.
There are several alternative build systems that you can use instead of Setuptools. Over the last few years, the Python community has done the important job of standardizing the Python packaging ecosystem. This makes it simpler to move between the different build systems and use the one that’s best for your workflow and packages.
In this section, you’ll briefly learn about two alternative build systems that you can use to create and publish your Python packages. In addition to Flit and Poetry, which you’ll learn about next, you can also check out pbr, enscons, and Hatchling. Additionally, the pep517 package provides support for creating your own build system.
Flit
Flit is a great little project that aims to “make the easy things easy” when it comes to packaging (source). Flit doesn’t support advanced packages like those creating C extensions, and in general, it doesn’t give you many choices when setting up your package. Instead, Flit subscribes to the philosophy that there should be one obvious workflow to publish a package.
Note: You can’t configure your package with both Setuptools and Flit at the same time. To test out the workflow in this section, you should safely store your Setuptools configuration in your version control system and then delete the build-system and project sections in pyproject.toml.
First install Flit with pip:
(venv) $ python -m pip install flit
As much as possible, Flit automates the preparations that you need to do with your package. To start configuring a new package, run flit init:
(venv) $ flit init
Module name [reader]:
Author: Real Python
Author email: info@realpython.com
Home page: https://github.com/realpython/reader
Choose a license (see http://choosealicense.com/ for more info)
1. MIT - simple and permissive
2. Apache - explicitly grants patent rights
3. GPL - ensures that code based on this is shared with the same terms
4. Skip - choose a license later
Enter 1-4: 1

Written pyproject.toml; edit that file to add optional extra info.
The flit init command will create a pyproject.toml file based on the answers that you give to a few questions. You might need to edit this file slightly before using it. For the reader project, the pyproject.toml file for Flit ends up looking as follows:
# pyproject.toml

[build-system]
requires = ["flit_core >=3.2,<4"]
build-backend = "flit_core.buildapi"

[project]
name = "realpython-reader"
authors = [{ name = "Real Python", email = "info@realpython.com" }]
readme = "README.md"
license = { file = "LICENSE" }
classifiers = [
    "License :: OSI Approved :: MIT License",
    "Programming Language :: Python :: 3",
]
dynamic = ["version", "description"]

[project.urls]
Home = "https://github.com/realpython/reader"

[project.scripts]
realpython = "reader.__main__:main"
Note that most of the project items are identical to your original pyproject.toml. One difference, though, is that version and description are specified in a dynamic field. Flit actually figures these out itself by using __version__ and the docstring defined in the __init__.py file. Flit’s documentation explains everything about the pyproject.toml file.
Flit can build your package and publish it to PyPI. You don’t need to use Build and Twine. To build your package, simply do the following:
(venv) $ flit build
This creates a source archive and a wheel, similar to what you did with python -m build earlier. You can also still use Build if you prefer.
To upload your package to PyPI, you can use Twine as you did earlier. However, you can also use Flit directly:
(venv) $ flit publish
The publish command will build your package if necessary, and then upload the files to PyPI, prompting you for your username and password.
To see an early but recognizable version of Flit in action, have a look at Thomas Kluyver’s lightning talk from EuroSciPy 2017. The demo shows how you configure your package, build it, and publish it to PyPI in the space of two minutes.
Poetry
Poetry is another tool that you can use to build and upload your package. Compared to Flit, Poetry has more features that can help you during the development of your packages, including powerful dependency management.
Before you use Poetry, you need to install it. It’s possible to install Poetry with pip. However, the maintainers recommend that you use a custom installation script to avoid potential dependency conflicts. See the documentation for instructions.
Note: You can’t configure your package with both Setuptools and Poetry at the same time. To test out the workflow in this section, you should safely store your Setuptools configuration in your version control system and then delete the build-system and project sections in pyproject.toml.
With Poetry installed, you start using it with an init command, similar to Flit:
(venv) $ poetry init

This command will guide you through creating your pyproject.toml config.

Package name [code]: realpython-reader
Version [0.1.0]: 1.0.0
Description []: Read the latest Real Python tutorials
...
This will create a pyproject.toml file based on your answers to questions about your package.
Note: Poetry does not currently support PEP 621, so the actual specifications inside the pyproject.toml currently differ between Poetry and the other tools.
For Poetry, the pyproject.toml file ends up looking like the following:
# pyproject.toml

[build-system]
requires = ["poetry-core>=1.0.0"]
build-backend = "poetry.core.masonry.api"

[tool.poetry]
name = "realpython-reader"
version = "1.0.0"
description = "Read the latest Real Python tutorials"
authors = ["Real Python <info@realpython.com>"]
readme = "README.md"
homepage = "https://github.com/realpython/reader"
license = "MIT"

[tool.poetry.dependencies]
python = ">=3.9"
feedparser = "^6.0.8"
html2text = "^2020.1.16"
tomli = "^2.0.1"

[tool.poetry.scripts]
realpython = "reader.__main__:main"
You should recognize all these items from the earlier discussion of pyproject.toml, even though the sections are named differently.
One thing to note is that Poetry will automatically add classifiers based on the license and the version of Python you specify. Poetry also requires you to be explicit about versions of your dependencies. In fact, dependency management is one of the strong points of Poetry.
Just like Flit, Poetry can build and upload packages to PyPI. The build command creates a source archive and a wheel:
(venv) $ poetry build
This will create the two usual files in the dist subdirectory, which you can upload using Twine as earlier. You can also use Poetry to publish to PyPI:
(venv) $ poetry publish
This will upload your package to PyPI. In addition to aiding in building and publishing, Poetry can help you earlier in the process. Poetry can help you start a new project with the new command. It also supports working with virtual environments. See Poetry’s documentation for all the details.
Apart from the slightly different configuration files, Flit and Poetry work very similarly. Poetry is broader in scope, as it also aims to help with dependency management, while Flit has been around a little longer.
Conclusion
You now know how to prepare your project and upload it to PyPI, so that it can be installed and used by other people. While there are a few steps that you need to go through, seeing your own package on PyPI is a great payoff. Having others find your project useful is even better!
In this tutorial, you’ve learned how to publish your own package by:
- Finding a good name for your package
- Configuring your package using
pyproject.toml - Building your package
- Uploading your package to PyPI
In addition, you’ve learned about the initiatives in the Python packaging community to standardize the tools and processes.
If you still have questions, then feel free to reach out in the comments section below. Also, the Python Packaging User Guide has a lot of information with more detail than what you’ve seen in this tutorial.
Get Source Code: Click here to get access to the source code for the Real Python Feed Reader that you’ll use to publish an open-source package to PyPI.
Watch Now This tutorial has a related video course created by the Real Python team. Watch it together with the written tutorial to deepen your understanding: Publishing Python Packages to PyPI