Watch Now This tutorial has a related video course created by the Real Python team. Watch it together with the written tutorial to deepen your understanding: Creating PyQt Layouts for GUI Applications
PyQt’s layout managers provide a user-friendly and productive way of arranging graphical components, or widgets, on a GUI. Laying out widgets properly will make your GUI applications look polished and professional. Learning to do so efficiently and effectively is a fundamental skill for you to get up and running with GUI application development using Python and PyQt.
In this tutorial, you’ll learn:
- What the benefits are of using PyQt’s layout managers
- How to programmatically lay out widgets on a GUI using PyQt’s layout managers
- How to select the right layout manager for your GUI application
- How to lay out widgets in main window–based and dialog-based applications
With this knowledge and skillset, you’ll be able to use Python and PyQt to create professional-looking GUI applications.
For a better understanding of how to use layout managers, some previous knowledge of how to create PyQt GUI applications and how to work with PyQt widgets would be helpful.
Free Bonus: 5 Thoughts On Python Mastery, a free course for Python developers that shows you the roadmap and the mindset you’ll need to take your Python skills to the next level.
Laying Out Graphical Elements on a GUI
When you’re creating graphical user interface (GUI) applications, a common issue is how to get your graphical components—buttons, menus, toolbars, labels, and so on—laid out coherently on your forms and windows. This process is known as GUI layout, and it’s an important step in creating GUI applications.
In the past, if you wanted to lay out graphical components, or widgets, on a window, then you would follow one of the following approaches:
- Decide on and manually set a static size and position for each widget on the window.
- Calculate and set the size and position of each widget dynamically.
The first approach is fairly direct, but it has at least the following drawbacks:
- Your windows will be non-resizable, which might cause problems when displaying them on different screen resolutions.
- Your labels might not support localization properly because the length of a given text changes between languages.
- Your widgets will display differently on different platforms, which makes it difficult to write multiplatform applications that look good.
The second approach is more flexible. However, it also has drawbacks:
- You have to do a lot of manual calculations to determine the right size and position of each widget.
- You have to do some extra calculations to respond correctly to window resizing.
- You have to redo all the calculations any time you modify the layout of your window.
Even though you can still use either of these two approaches to lay out your GUIs, most of the time you’ll want to use a third and more convenient approach implemented by most modern GUI frameworks or toolkits: layout managers.
Note: In some GUI frameworks, such as Tkinter, layout managers are also referred to as geometry managers.
Layout managers automatically arrange widgets on a GUI according to your specific needs. They avoid the compatibility drawbacks of the first approach as well as the annoying and complicated calculations of the second approach.
In the following sections, you’ll learn about PyQt’s built-in layout managers and how to use them to effectively lay out the graphical components of your GUI applications.
Getting Stocked With a Gallery of PyQt Layouts
In PyQt, widgets are graphical components that you use as building blocks for your GUI applications. When you place a bunch of widgets on a window to create a GUI, you need to give them some order. You need to set the widgets’ size and position on the window, and you also need to define their behavior for when the user resizes the underlying window.
Note: Unfortunately, PyQt5’s official documentation has some incomplete sections. To work around this, you can check out the PyQt4 documentation, the Qt for Python documentation, or the original Qt documentation.
In this tutorial, you’ll find that most links will take you to the original Qt documentation, which is a better source of information in most cases.
To arrange the widgets on windows or forms in PyQt, you can use the following techniques:
- Use
.resize()and.move()on your widgets to provide an absolute size and position. - Reimplement
.resizeEvent()and calculate your widgets’ size and position dynamically. - Use layout managers and let them do all the calculations and hard work for you.
These techniques generally correspond to the three different approaches for laying out a GUI that you saw in the previous section.
Again, calculating the size and position dynamically might be a good approach, but most of the time you’ll be better off using layout managers. In PyQt, layout managers are classes that provide the required functionality to automatically manage the size, position, and resizing behavior of the widgets in the layout.
With layout managers, you can automatically arrange child widgets within any parent, or container, widget. Using layout managers will ensure that you make good use of the available space on your GUI and also that your application remains usable when the user resizes the window.
Layout managers work as containers for both widgets and other layouts. To add widgets to a layout manager, you call .addWidget() on the layout at hand. To add a layout to another layout, you call .addLayout() on the layout at hand. You’ll dive deeper into nesting layouts in the section Nesting Layouts to Build Complex GUIs.
Once you’ve added all the required widgets to a layout manager, you set the layout manager on a given widget using .setLayout(). You can set a layout manager on any subclasses of QWidget, including windows or forms.
Note: QMainWindow is a PyQt class that you can use to create main window–style applications. This class has its own built-in layout manager. So, if you’re using QMainWindow, then you commonly won’t need to set a layout manager on your main window objects.
All the widgets in a layout are automatically set as children of the widget on which you install the layout, not of the layout itself. That’s because widgets can have only other widgets, not layouts, as their parent.
PyQt’s layout managers provide some cool features that make your life a lot easier when it comes to creating good-looking GUI applications:
- Handling the size and position of widgets without the need for any calculation
- Handling the resizing and repositioning of widget when the user resizes the underlying window
- Resizing labels to better support internationalization
- Providing a native window layout for multiplatform applications
Using layout managers will also dramatically increase your productivity and improve your code’s maintainability in the long term.
PyQt provides four general-purpose layout manager classes:
QHBoxLayoutarranges widgets in a horizontal box.QVBoxLayoutarranges widgets in a vertical box.QGridLayoutarranges widgets in a grid.QFormLayoutarranges widgets in two columns.
In the next few sections, you’ll learn the basics of how to use these general-purpose layout managers.
Using General-Purpose Layout Managers
When creating GUI applications with PyQt, you’ll often use one or more of the four general-purpose layouts that you saw at the end of the previous section to get your widget laid out on your windows and forms.
In the next few sections, you’ll learn how to create and use the four general-purpose layout managers with the help of some examples.
Building Horizontal Layouts: QHBoxLayout
Box layout managers take the space they get from their parent layout or widget, divide it up into a number of boxes, or cells, and make each widget in the layout fill one box.
QHBoxLayout is one of the two available box layouts in PyQt. This layout manager allows you to arrange widgets horizontally, one next to the other. The widgets are added to the layout from left to right. This means that the widget that you add first in your code will be the left-most widget in the layout.
To add widgets to a QHBoxLayout object, you call .addWidget(widget, stretch, alignment) on the layout object. This method takes one required argument and two optional arguments:
-
widgetis a required argument that holds the specific widget that you want to add to the layout. -
stretchis an optional argument that holds an integer number representing the stretch factor to apply towidget. Widgets with higher stretch factors grow more on window resizing. It defaults to0, which means that the widget has no stretch factor assigned. -
alignmentis an optional argument that holds horizontal and vertical flags. You can combine these flags to produce the desired alignment of the widget inside its containing cell. It defaults to0, which means that the widget will fill the entire cell.
Here’s a small application that shows how to create a horizontal layout using QHBoxLayout. In this example, you’ll use QPushButton objects to better visualize where each widget will be placed in the layout according to the order in which you add the widgets to your code:
 1import sys
 2
 3from PyQt5.QtWidgets import (
 4    QApplication,
 5    QHBoxLayout,
 6    QPushButton,
 7    QWidget,
 8)
 9
10class Window(QWidget):
11    def __init__(self):
12        super().__init__()
13        self.setWindowTitle("QHBoxLayout Example")
14        # Create a QHBoxLayout instance
15        layout = QHBoxLayout()
16        # Add widgets to the layout
17        layout.addWidget(QPushButton("Left-Most"))
18        layout.addWidget(QPushButton("Center"), 1)
19        layout.addWidget(QPushButton("Right-Most"), 2)
20        # Set the layout on the application's window
21        self.setLayout(layout)
22        print(self.children())
23
24if __name__ == "__main__":
25    app = QApplication(sys.argv)
26    window = Window()
27    window.show()
28    sys.exit(app.exec_())
On line 15, you create a QHBoxLayout object called layout. On lines 17 to 19, you add three buttons to layout using .addWidget(). Note that you pass 1 and 2 to the stretch parameter in the Center and Right-Most buttons, respectively. On line 21, you set layout as your window’s top-level layout using .setLayout().
Note: If you’re new to GUI programming with PyQt, then you can take a look at Python and PyQt: Building a GUI Desktop Calculator to get a better idea of how to create a GUI application with PyQt.
If you run this application, then you’ll get the following window on your screen:

This window contains three buttons arranged in a horizontal fashion. Note that the Left-Most button corresponds to the first button that you add in your code. So, buttons are shown in the same order (from left to right) that you add them in your code (from top to bottom).
The Center and Right-Most buttons have different stretch factors, so they expand in proportion to those factors when you resize the window.
Additionally, all the buttons in layout and the layout itself are set as children of Window. This is automatically done by the layout object, which internally calls .setParent() on each widget. The call to print() on line 22 prints a list of the children of Window on your terminal as evidence of this behavior.
Building Vertical Layouts: QVBoxLayout
QVBoxLayout arranges widgets vertically, one below the other. You can use this class to create vertical layouts and arrange your widgets from top to bottom. Since QVBoxLayout is another box layout, its .addWidget() method works the same as in QHBoxLayout.
Here’s a PyQt application that shows how to create and use a QVBoxLayout object for creating vertical arrangements of widgets in your GUIs:
 1import sys
 2
 3from PyQt5.QtWidgets import (
 4    QApplication,
 5    QPushButton,
 6    QVBoxLayout,
 7    QWidget,
 8)
 9
10class Window(QWidget):
11    def __init__(self):
12        super().__init__()
13        self.setWindowTitle("QVBoxLayout Example")
14        self.resize(270, 110)
15        # Create a QVBoxLayout instance
16        layout = QVBoxLayout()
17        # Add widgets to the layout
18        layout.addWidget(QPushButton("Top"))
19        layout.addWidget(QPushButton("Center"))
20        layout.addWidget(QPushButton("Bottom"))
21        # Set the layout on the application's window
22        self.setLayout(layout)
23
24if __name__ == "__main__":
25    app = QApplication(sys.argv)
26    window = Window()
27    window.show()
28    sys.exit(app.exec_())
On line 16, you create an instance of QVBoxLayout. On lines 18 to 20, you add three buttons to layout. Finally, you set layout as your window’s top-level layout.
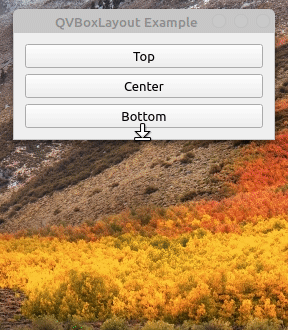
If you run this application, then you’ll get the following window:
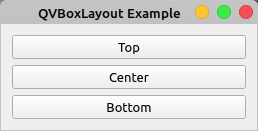
Your window shows three buttons in a vertical arrangement, one below the other. The buttons appear in the same order (from top to bottom) as you add them in your code (from top to bottom).
Arranging Widgets in a Grid: QGridLayout
You can use QGridLayout to arrange widgets in a grid of rows and columns. Each widget will have a relative position in the grid. To define a widget’s position, or cell in the grid, you use a pair of coordinates of the form (row, column). These coordinates should be zero-based integer numbers.
QGridLayout takes the available space on its parent, divides it into rows and columns, and places each widget into its own cell or box. QGridLayout automatically figures out how many rows and columns the final layout will have depending on the number of widgets and their coordinates. If you don’t add a widget to a given cell, then QGridLayout will leave that cell empty.
To add widgets to a grid layout, you call .addWidget() on the layout. This method has two different overloaded implementations:
addWidget(widget, row, column, alignment)addswidgetto the cell at (row,column).addWidget(widget, fromRow, fromColumn, rowSpan, columnSpan, alignment)addswidgetto the cell, spanning multiple rows, columns, or both.
The first implementation takes the following arguments:
widgetis a required argument that holds the specific widget that you need to add to the layout.rowis a required argument that holds an integer representing the coordinate of a row in the grid.columnis a required argument that holds an integer representing the coordinate of a column in the grid.alignmentis an optional argument that holds the alignment of the widget inside its containing cell. It defaults to0, which means that the widget will fill the entire cell.
Here’s an example of how to use QGridLayout to create a grid of widgets:
 1import sys
 2
 3from PyQt5.QtWidgets import (
 4    QApplication,
 5    QGridLayout,
 6    QPushButton,
 7    QWidget,
 8)
 9
10class Window(QWidget):
11    def __init__(self):
12        super().__init__()
13        self.setWindowTitle("QGridLayout Example")
14        # Create a QGridLayout instance
15        layout = QGridLayout()
16        # Add widgets to the layout
17        layout.addWidget(QPushButton("Button at (0, 0)"), 0, 0)
18        layout.addWidget(QPushButton("Button at (0, 1)"), 0, 1)
19        layout.addWidget(QPushButton("Button at (0, 2)"), 0, 2)
20        layout.addWidget(QPushButton("Button at (1, 0)"), 1, 0)
21        layout.addWidget(QPushButton("Button at (1, 1)"), 1, 1)
22        layout.addWidget(QPushButton("Button at (1, 2)"), 1, 2)
23        layout.addWidget(QPushButton("Button at (2, 0)"), 2, 0)
24        layout.addWidget(QPushButton("Button at (2, 1)"), 2, 1)
25        layout.addWidget(QPushButton("Button at (2, 2)"), 2, 2)
26        # Set the layout on the application's window
27        self.setLayout(layout)
28
29if __name__ == "__main__":
30    app = QApplication(sys.argv)
31    window = Window()
32    window.show()
33    sys.exit(app.exec_())
On line 15, you create the QGridLayout object. Then, on lines 17 to 25, you add widgets to the layout using .addWidget(). To see how grid layouts manage cells without an assigned widget, comment out one or more of these lines and run the application again.
If you run this code from your command line, then you’ll get a window like this:
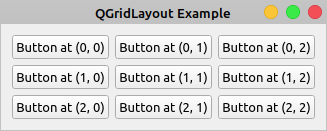
Each widget in the QGridLayout object occupies the cell defined by the pair of coordinates that you provide in .addWidget(). The text on each button reflects those coordinates. The coordinates are zero-based, so the first cell is at (0, 0).
In the second implementation of .addWidget(), the arguments widget and alignment stay the same, and you have four additional arguments that allow you to place the widget across several rows or columns:
fromRowtakes an integer number that represents the row in which the widget will start.fromColumntakes an integer number that represents the column in which the widget will start.rowSpantakes an integer number that represents the number of rows that the widget will occupy in the grid.columnSpantakes an integer number that represents the number of columns that the widget will occupy in the grid.
Here’s an application that shows how this variation of .addWidget() works:
 1import sys
 2
 3from PyQt5.QtWidgets import (
 4    QApplication,
 5    QGridLayout,
 6    QPushButton,
 7    QWidget,
 8)
 9
10class Window(QWidget):
11    def __init__(self):
12        super().__init__()
13        self.setWindowTitle("QGridLayout Example")
14        # Create a QGridLayout instance
15        layout = QGridLayout()
16        # Add widgets to the layout
17        layout.addWidget(QPushButton("Button at (0, 0)"), 0, 0)
18        layout.addWidget(QPushButton("Button at (0, 1)"), 0, 1)
19        layout.addWidget(QPushButton("Button Spans two Cols"), 1, 0, 1, 2)
20        # Set the layout on the application's window
21        self.setLayout(layout)
22
23if __name__ == "__main__":
24    app = QApplication(sys.argv)
25    window = Window()
26    window.show()
27    sys.exit(app.exec_())
On line 19, you use the second implementation of .addWidget() to add a button that occupies two columns in the grid. The button starts at the second row (fromRow=1) and at the first column (fromColumn=0). Finally, the button occupies one row (rowSpan=1) and two columns (columnSpan=2).
Note: Since PyQt is a Python binding for Qt, which is a set of C++ libraries, sometimes you can’t use keyword arguments when calling PyQt methods. The keyword arguments used in the above paragraph have the sole purpose of showing what value is assigned to each argument.
Here’s the window that you’ll see on your screen if you run this application:
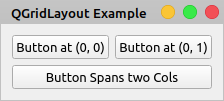
In this kind of layout, you can make a widget occupy more than one cell, just as you did with the Button Spans two Cols button.
Creating Forms Quickly: QFormLayout
If you’re constantly creating forms to perform actions like inputting data into a database, then QFormLayout is for you. This class arranges widgets in a two-column layout. The first column usually displays a label describing the intended input, and the second column generally contains input widgets such as QLineEdit, QComboBox, or QSpinBox that allow the user to enter or edit data.
To add widgets to a form layout, you use .addRow(). This method has several variations but, most of the time, you’ll choose from the following two:
-
.addRow(label, field)adds a new row to the bottom of a form layout. The row should contain aQLabelobject (label) and an input widget (field). -
.addRow(labelText, field)automatically creates and adds a newQLabelobject withlabelTextas its text.fieldholds an input widget.
Here’s a sample application that uses a QFormLayout object to arrange widgets:
 1import sys
 2
 3from PyQt5.QtWidgets import (
 4    QApplication,
 5    QFormLayout,
 6    QLabel,
 7    QLineEdit,
 8    QWidget,
 9)
10
11class Window(QWidget):
12    def __init__(self):
13        super().__init__()
14        self.setWindowTitle("QFormLayout Example")
15        self.resize(270, 110)
16        # Create a QFormLayout instance
17        layout = QFormLayout()
18        # Add widgets to the layout
19        layout.addRow("Name:", QLineEdit())
20        layout.addRow("Job:", QLineEdit())
21        emailLabel = QLabel("Email:")
22        layout.addRow(emailLabel, QLineEdit())
23        # Set the layout on the application's window
24        self.setLayout(layout)
25
26if __name__ == "__main__":
27    app = QApplication(sys.argv)
28    window = Window()
29    window.show()
30    sys.exit(app.exec_())
On line 17, you create a QFormLayout object. Then, on lines 19 to 22, you add some rows to the layout. Note that on lines 19 and 20, you use the second variation of the method, and on line 22, you use the first variation, passing a QLabel object as the first argument to .addRow().
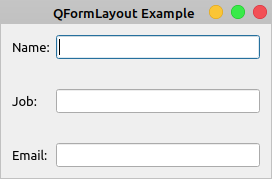
If you run this code, then you’ll get the following window on your screen:
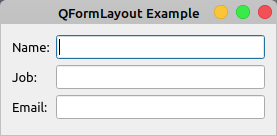
With a QFormLayout, you can organize your widgets in a two-column arrangement. The first column contains labels that ask the user for some information. The second column shows widgets that allow the user to input or edit that information.
Nesting Layouts to Build Complex GUIs
You can use nested layouts to create complex GUIs that would be difficult to create using one of the general-purpose PyQt’s layout managers. To do that, you need to call .addLayout() on an outer layout. This way, the inner layout becomes a child of the outer layout.
Suppose you need to create a dialog that shows a label and a line edit in a form layout, and below those widgets you want to place several checkboxes in a vertical layout. Here’s a mock-up of what your dialog should look like:

The blue rectangle represents your outer layout. The green rectangle is the form layout that will hold the label and line edit. The red rectangle is the vertical layout to hold the option checkboxes. Both the green layout and the red layout are nested into the blue one, which is a vertical layout.
Here’s an example of how to build this layout using PyQt:
 1import sys
 2
 3from PyQt5.QtWidgets import (
 4    QApplication,
 5    QCheckBox,
 6    QFormLayout,
 7    QLineEdit,
 8    QVBoxLayout,
 9    QWidget,
10)
11
12class Window(QWidget):
13    def __init__(self):
14        super().__init__()
15        self.setWindowTitle("Nested Layouts Example")
16        # Create an outer layout
17        outerLayout = QVBoxLayout()
18        # Create a form layout for the label and line edit
19        topLayout = QFormLayout()
20        # Add a label and a line edit to the form layout
21        topLayout.addRow("Some Text:", QLineEdit())
22        # Create a layout for the checkboxes
23        optionsLayout = QVBoxLayout()
24        # Add some checkboxes to the layout
25        optionsLayout.addWidget(QCheckBox("Option one"))
26        optionsLayout.addWidget(QCheckBox("Option two"))
27        optionsLayout.addWidget(QCheckBox("Option three"))
28        # Nest the inner layouts into the outer layout
29        outerLayout.addLayout(topLayout)
30        outerLayout.addLayout(optionsLayout)
31        # Set the window's main layout
32        self.setLayout(outerLayout)
33
34if __name__ == "__main__":
35    app = QApplication(sys.argv)
36    window = Window()
37    window.show()
38    sys.exit(app.exec_())
Here’s what you’re doing in this code:
- On line 17, you create the outer, or top-level, layout, which you’ll use as a parent layout and as the main layout of your window. In this case, you use
QVBoxLayoutbecause you want your widgets to be arranged vertically on your form. In your mock-up, this is the blue layout. - On line 19, you create a form layout to hold a label and a line edit.
- On line 21, you add the required widgets to the layout. This is equivalent to your green layout.
- On line 23, you create a vertical layout to hold the checkboxes.
- On lines 25 to 27, you add the required checkboxes. This is your red layout.
- On lines 29 and 30, you nest
topLayoutandoptionsLayoutunder theouterLayout.
That’s it! If you run the application, then you’ll see a window like the following:
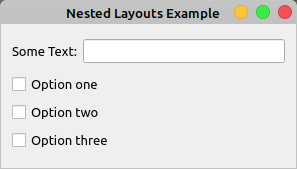
In this application, you nest two different layouts under an outer layout to create a general layout for your window. At the top of the window, you use a horizontal layout to place a label and a line edit. Then you place some checkboxes below that using a vertical layout.
Using Multipage Layouts and Widgets
So far, you’ve seen how to use traditional or general-purpose layout managers to arrange the widgets in your application’s windows. These layout managers will arrange widgets on a single-page layout. In other words, your GUI will always show the same set of widgets to the user.
Sometimes you need to create a layout that shows a different set of widgets in response to certain user actions on the GUI. For example, if you’re creating a preferences dialog for a given application, then you might want to present the user with a tab-based, or multipage, layout in which each tab or page contains a different set of closely related options. Every time the user clicks on a tab or page, the application shows a different set of widgets.
PyQt provides a built-in layout called QStackedLayout and some convenient widgets like QTabWidget that will allow you to create this kind of multipage layout. The next few sections will walk you through some of these tools.
Creating a Stack of Widgets
QStackedLayout provides a layout manager that will allow you to arrange your widgets on a stack, one on top of the other. In this kind of layout, only one widget is visible at a given time.
To populate a stacked layout with widgets, you need to call .addWidget() on the layout object. This will add each widget to the end of the layout’s internal list of widgets. You can also insert or remove a widget at a given position in the list of widgets using .insertWidget(index) or .removeWidget(widget), respectively.
Each widget in the list of widgets is displayed as an independent page. If you want to show several widgets on a page, then use a QWidget object for each page and set an appropriate layout of widgets to the page widget. If you need to get the total number of widgets (pages) in the layout, then you can call .count().
An important point to keep in mind when working with QStackedLayout objects is that you need to explicitly provide a mechanism to switch between pages. Otherwise, your layout will always show the same page to the user. To switch between pages, you need to call .setCurrentIndex() on the layout object.
Here’s an example that shows how to use a stacked layout with a combo box for switching between pages:
 1import sys
 2
 3from PyQt5.QtWidgets import (
 4    QApplication,
 5    QComboBox,
 6    QFormLayout,
 7    QLineEdit,
 8    QStackedLayout,
 9    QVBoxLayout,
10    QWidget,
11)
12
13class Window(QWidget):
14    def __init__(self):
15        super().__init__()
16        self.setWindowTitle("QStackedLayout Example")
17        # Create a top-level layout
18        layout = QVBoxLayout()
19        self.setLayout(layout)
20        # Create and connect the combo box to switch between pages
21        self.pageCombo = QComboBox()
22        self.pageCombo.addItems(["Page 1", "Page 2"])
23        self.pageCombo.activated.connect(self.switchPage)
24        # Create the stacked layout
25        self.stackedLayout = QStackedLayout()
26        # Create the first page
27        self.page1 = QWidget()
28        self.page1Layout = QFormLayout()
29        self.page1Layout.addRow("Name:", QLineEdit())
30        self.page1Layout.addRow("Address:", QLineEdit())
31        self.page1.setLayout(self.page1Layout)
32        self.stackedLayout.addWidget(self.page1)
33        # Create the second page
34        self.page2 = QWidget()
35        self.page2Layout = QFormLayout()
36        self.page2Layout.addRow("Job:", QLineEdit())
37        self.page2Layout.addRow("Department:", QLineEdit())
38        self.page2.setLayout(self.page2Layout)
39        self.stackedLayout.addWidget(self.page2)
40        # Add the combo box and the stacked layout to the top-level layout
41        layout.addWidget(self.pageCombo)
42        layout.addLayout(self.stackedLayout)
43
44    def switchPage(self):
45        self.stackedLayout.setCurrentIndex(self.pageCombo.currentIndex())
46
47if __name__ == "__main__":
48    app = QApplication(sys.argv)
49    window = Window()
50    window.show()
51    sys.exit(app.exec_())
On lines 21 to 23, you create a QComboBox object that will allow you to switch between the pages in the layout. Then you add two options to the combo box in a list and connect it to .switchPage(), which is intended to handle page switching.
Inside .switchPage(), you call .setCurrentIndex() on the layout object, passing the current index of the combo box as an argument. This way, when the user changes the option in the combo box, the page on the stacked layout will change accordingly.
On line 25, you create the QStackedLayout object. On lines 27 to 32, you add the first page to the layout, and on lines 34 to 39, you add the second page. Each page is represented by a QWidget object that contains several widgets in a convenient layout.
The final step to get everything working is to add the combo box and the layout to the application’s main layout.
Here’s how your application behaves now:
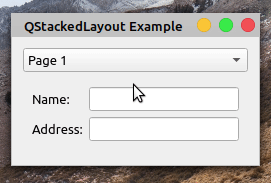
In this case, you have two pages in your application’s layout. Each page is represented by a QWidget object. When you select a new page in the combo box on the top of the window, the layout changes to show the selected page.
Note: PyQt provides a convenient class called QStackedWidget, which is built on top of QStackedLayout. You can also use this class to create multipage layouts.
This class provides a stack of widgets in which only one widget is visible at a time. Just like stacked layouts, QStackedWidget doesn’t provide an intrinsic mechanism for switching between pages.
Besides stacked layout and stacked widget, you can use QTabWidget to create a multipage user interface. You’ll learn how in the next section.
Using PyQt’s Tab Widgets
Another popular way of creating multipage arrangements in PyQt is by using a class called QTabWidget. This class provides a tab bar and a page area. You use the tab bar to switch between pages and the page area to display the page associated with the selected tab.
The tab bar is located at the top of the page area by default. However, you can change this behavior using .setTabPosition() and one of four possible tab positions:
| Tab Position | Tab Bar Location |
|---|---|
QTabWidget.North |
Top of the pages |
QTabWidget.South |
Bottom of the pages |
QTabWidget.West |
Left of the pages |
QTabWidget.East |
Right of the pages |
To add tabs to a tab widget, you use .addTab(). This method has two variations, or overloaded implementations:
.addTab(page, label).addTab(page, icon, label)
In both cases, the method adds a new tab, with label as the tab’s title. page needs to be a widget representing the page associated with the tab at hand.
In the second variation of the method, icon needs to be a QIcon object. If you pass an icon to .addTab(), then that icon will be shown to the left of the tab’s title.
A common practice when creating tab widgets is to use a QWidget object for each page. This way, you’ll be able to add extra widgets to the page using a layout containing the required widgets.
Most of the time, you’ll use tab widgets to create dialogs for your GUI applications. This kind of layout allows you to present the user with several options in a relatively small space. You can also take advantage of the tab system to organize your options according to some classification criteria.
Here’s a sample application that shows the basics of how to create and use a QTabWidget object:
 1import sys
 2
 3from PyQt5.QtWidgets import (
 4    QApplication,
 5    QCheckBox,
 6    QTabWidget,
 7    QVBoxLayout,
 8    QWidget,
 9)
10
11class Window(QWidget):
12    def __init__(self):
13        super().__init__()
14        self.setWindowTitle("QTabWidget Example")
15        self.resize(270, 110)
16        # Create a top-level layout
17        layout = QVBoxLayout()
18        self.setLayout(layout)
19        # Create the tab widget with two tabs
20        tabs = QTabWidget()
21        tabs.addTab(self.generalTabUI(), "General")
22        tabs.addTab(self.networkTabUI(), "Network")
23        layout.addWidget(tabs)
24
25    def generalTabUI(self):
26        """Create the General page UI."""
27        generalTab = QWidget()
28        layout = QVBoxLayout()
29        layout.addWidget(QCheckBox("General Option 1"))
30        layout.addWidget(QCheckBox("General Option 2"))
31        generalTab.setLayout(layout)
32        return generalTab
33
34    def networkTabUI(self):
35        """Create the Network page UI."""
36        networkTab = QWidget()
37        layout = QVBoxLayout()
38        layout.addWidget(QCheckBox("Network Option 1"))
39        layout.addWidget(QCheckBox("Network Option 2"))
40        networkTab.setLayout(layout)
41        return networkTab
42
43if __name__ == "__main__":
44    app = QApplication(sys.argv)
45    window = Window()
46    window.show()
47    sys.exit(app.exec_())
In this example, you use a tab widget to present the user with a concise dialog that shows options related to the General and Network sections of a hypothetical preferences menu. On line 20, you create the QTabWidget object. Then you add two tabs to the tab widget using .addTab().
In .generalTabUI() and networkTabUI(), you create the specific GUI for each tab. To do this, you use a QWidget object, a QVBoxLayout object, and some checkboxes to hold the options.
If you run the application now, then you’ll get the following dialog on your screen:
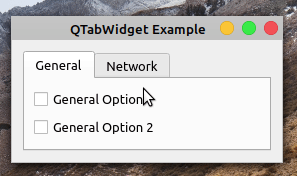
That’s it! You have a fully functional tab-based GUI. Note that to switch between pages, you just need to click the corresponding tab.
Laying Out the Application’s Main Window
If you’re using PyQt to create your GUI applications, then most of the time you’ll use QMainWindow to create a GUI on top of it. This class allows you to create main window–style applications. QMainWindow ships with its own predefined layout. This layout will allow you to add the following graphical components to your main window:
- A menu bar at the top of the window
- One or more toolbars at any of the four sides of the window
- A status bar at the bottom of the window
- One or more dock widgets at any of the four sides of the window (but without occupying the toolbars area)
- A central widget at the very center of the window
For most applications, all these graphical components are optional except for the central widget, which is required to make your application work.
Note: If you’re creating GUI applications using QMainWindow, then you must have a central widget, even if it’s just a placeholder.
Some applications use a unique and fully functional widget as their central widget. For example, if you’re coding a text editor, then you’ll likely use a QTextEdit object as your editor’s central widget.
Other kinds of GUI applications might require a more elaborate central widget. In that case, you can use a QWidget object as your central widget and then create a layout containing the specific widget arrangement that you need for your application’s GUI. The final step is to set that layout as your central widget’s layout.
Most of the time, the layout that QMainWindow offers is enough to create any kind of GUI application. This layout will effectively manage the behavior of the widgets on the window, so you don’t have to worry about that.
Laying Out the Application’s Dialogs
GUI applications are commonly built using a main window and one or more dialogs. Dialogs are small windows that allow you to communicate with your users. PyQt provides QDialog to handle the creation of dialogs.
Unlike QMainWindow, QDialog doesn’t have a predefined or default top-level layout. That’s because dialogs can be quite varied and include a wide range of widget arrangements and combinations.
Once you place all the widgets on a dialog’s GUI, you need to set a top-level layout on that dialog. To do this, you have to call .setLayout() on the dialog object just like you’d do with any other widget.
Here’s a dialog-style application that shows how to set a top-level layout to a QDialog object:
 1import sys
 2
 3from PyQt5.QtWidgets import (
 4    QApplication,
 5    QDialog,
 6    QDialogButtonBox,
 7    QFormLayout,
 8    QLineEdit,
 9    QVBoxLayout,
10)
11
12class Dialog(QDialog):
13    def __init__(self):
14        super().__init__()
15        self.setWindowTitle("QDialog's Top-Level Layout Example")
16        dlgLayout = QVBoxLayout()
17        # Create a form layout and add widgets
18        formLayout = QFormLayout()
19        formLayout.addRow("Name:", QLineEdit())
20        formLayout.addRow("Job:", QLineEdit())
21        formLayout.addRow("Email:", QLineEdit())
22        # Add a button box
23        btnBox = QDialogButtonBox()
24        btnBox.setStandardButtons(
25            QDialogButtonBox.Ok | QDialogButtonBox.Cancel
26        )
27        # Set the layout on the dialog
28        dlgLayout.addLayout(formLayout)
29        dlgLayout.addWidget(btnBox)
30        self.setLayout(dlgLayout)
31
32if __name__ == "__main__":
33    app = QApplication(sys.argv)
34    dlg = Dialog()
35    dlg.show()
36    sys.exit(app.exec_())
In this case, the application’s window inherits from QDialog, so you have a dialog-style application. On line 16, you create the layout that you’ll use as the dialog’s top-level layout. On lines 18 to 21, you create a form layout to arrange some widgets in a form.
On line 24, you add a QDialogButtonBox object. You’ll often use QDialogButtonBox to handle the buttons on a dialog. In this example, you use two buttons, an Ok button and a Cancel button. These buttons won’t have any functionality—they’re just intended to make the dialog more realistic.
Once you have all the widgets and layouts in place, you can add them to the top-level layout. That’s what you do on lines 28 and 29. The final step, on line 30, is to set the top-level layout as your dialog’s layout using .setLayout().
If you run this application, then you’ll see the following window on your screen:
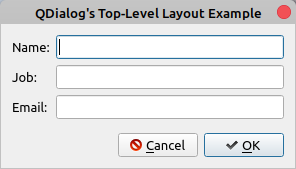
It’s a best practice to set a top-level layout for all your dialogs. This ensures that the dialog’s GUI will behave coherently when the user resizes the underlying window. Otherwise, your dialogs could appear disorganized and unpolished in the user’s eyes.
Managing Space in a PyQt Layout
When it comes to using PyQt’s layout managers to arrange the widgets on a window or form, managing space—empty space, space between widgets, and so on—is a common issue. Being able to manage this space is an important skill to have.
Internally, layouts manage the available space on a window using some of the following widget properties:
.sizeHint()contains the widget’s recommended size.minimumSizeHint()contains the smallest size the widget can have while remaining usable.sizePolicy()holds the default behavior of a widget in a layout
Layouts use these properties to automatically position and resize widgets, assigning a given amount of space to each widget according to the available space. This ensures that widgets are consistently arranged and remain usable.
In the next three sections, you’ll learn how the different types of layouts manage space in PyQt.
Managing Space in Box Layouts
Box layouts do a great job when it comes to distributing available space between widgets. However, sometime their default behavior isn’t enough, and you need to manually handle the available space. To help you out in this situation, PyQt provides QSpacerItem. This class allows you to add blank space (or empty boxes) to a box layout.
Normally, you don’t need to use QSpacerItem directly. Instead, you call some of the following methods on your box layout objects:
-
.addSpacing(i)adds a non-stretchable space (or empty box) of fixed sizeito the layout.imust be an integer representing the size of the space in pixels. -
.addStretch(i)adds a stretchable space with a minimum size of0and a stretch factorito a box layout.imust be an integer. -
.insertSpacing(index, size)inserts a non-stretchable space at positionindex, with sizesize. Ifindexis negative, then the space is added at the end of the box layout. -
insertStretch(index, stretch)inserts a stretchable space at positionindex, with a minimum size of0and a stretch factor ofstretch. Ifindexis negative, then the space is added at the end of the box layout.
Stretchable spacers will expand or shrink to fill empty space when the user resizes the underlying window. Non-stretchable spacers will remain the same size regardless of the changes in the size of the underlying window.
Go back to the example of how to use vertical layouts and run that application again. If you pull down the border of the window, then you’ll notice that more space appears between the buttons the further down you pull:
This happens because the layout handles the newly available space by automatically expanding its boxes. You can change this behavior by adding a stretchable QSpacerItem object to the end of the layout.
In your example’s code, update the initializer of Window as follows:
class Window(QWidget):
    def __init__(self):
        super().__init__()
        self.setWindowTitle("QVBoxLayout Example")
        self.resize(270, 110)
        # Create a QVBoxLayout instance
        layout = QVBoxLayout()
        # Add widgets to the layout
        layout.addWidget(QPushButton("Top"))
        layout.addWidget(QPushButton("Center"))
        layout.addWidget(QPushButton("Bottom"))
        layout.addStretch()
        # Set the layout on the application's window
        self.setLayout(layout)
In the highlighted line, you add a stretchable QSpacerItem object to the end of the layout by calling .addStretch() on the layout. If you run the application again, then you’ll get the following behavior:
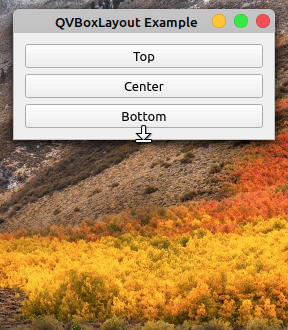
Now all the extra space is automatically assigned to the stretchable QSpacerItem object at the bottom of the layout without affecting the position or size of the rest of the widgets. You can use this and other space management techniques to make your GUI applications look good and polished.
Managing Space in Grid and Form Layouts
Grid and form layouts handle available space in a different way. In these types of layouts, you can handle only the vertical and horizontal space between widgets. These layouts provide three methods to manage these spaces:
setSpacing(spacing)sets both the vertical and the horizontal spacing between widgets tospacing.setVerticalSpacing(spacing)sets only the vertical spacing between widgets in the layout tospacing.setHorizontalSpacing(spacing)sets only the horizontal spacing between widgets in the layout tospacing.
In all cases, spacing is an integer representing pixels. Now go back to the example on how to create a form layout and update the initializer of Window like this:
class Window(QWidget):
    def __init__(self):
        super().__init__()
        self.setWindowTitle("QFormLayout Example")
        self.resize(270, 110)
        # Create a QHBoxLayout instance
        layout = QFormLayout()
        # Add widgets to the layout
        layout.setVerticalSpacing(30)
        layout.addRow("Name:", QLineEdit())
        layout.addRow("Job:", QLineEdit())
        emailLabel = QLabel("Email:")
        layout.addRow(emailLabel, QLineEdit())
        # Set the layout on the application's window
        self.setLayout(layout)
In the highlighted line, you set the vertical space between widgets to 30 pixels. If you run the application again, then you’ll see the following window:
Now there’s more space between the rows of widgets. You can also try modifying the example of how to use a grid layout by adding some vertical or horizontal space just to see how all these spacing mechanisms work.
Conclusion
Creating high-quality GUI applications requires laying out all the graphical components in a coherent and polished arrangement. In PyQt, an effective way of doing that is to use PyQt’s layout managers, which provide a user-friendly and productive way of approaching this task.
In this tutorial, you’ve learned:
- What the benefits are of properly laying out the widgets on a GUI
- How to programmatically arrange widgets using PyQt’s built-in layout managers
- Which layout manager to use for your specific use case
- How to lay out main window–style and dialog-style applications in PyQt
With this knowledge, you’ll be able to create good-looking and professional GUI applications using PyQt’s built-in layouts.
Watch Now This tutorial has a related video course created by the Real Python team. Watch it together with the written tutorial to deepen your understanding: Creating PyQt Layouts for GUI Applications