PyQt graphical user interface (GUI) applications have a main thread of execution that runs the event loop and GUI. If you launch a long-running task in this thread, then your GUI will freeze until the task terminates. During that time, the user won’t be able to interact with the application, resulting in a bad user experience. Luckily, PyQt’s QThread class allows you to work around this issue.
In this tutorial, you’ll learn how to:
- Use PyQt’s
QThreadto prevent freezing GUIs - Create reusable threads with
QThreadPoolandQRunnable - Manage interthread communication using signals and slots
- Safely use shared resources with PyQt’s locks
- Use best practices for developing GUI applications with PyQt’s thread support
For a better understanding of how to use PyQt’s threads, some previous knowledge of GUI programming with PyQt and Python multithreaded programming would be helpful.
Free Bonus: Get a sample chapter from Python Basics: A Practical Introduction to Python 3 to see how you can go from beginner to intermediate in Python with a complete curriculum, up to date for Python 3.9.
Freezing a GUI With Long-Running Tasks
Long-running tasks occupying the main thread of a GUI application and causing the application to freeze is a common issue in GUI programming that almost always results in a bad user experience. For example, consider the following GUI application:
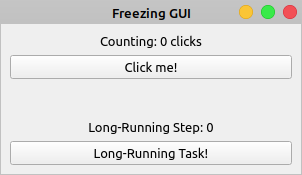
Say you need the Counting label to reflect the total number of clicks on the Click me! button. Clicking the Long-Running Task! button will launch a task that takes a lot of time to finish. Your long-running task could be a file download, a query to a large database, or any other resource-intensive operation.
Here’s a first approach to coding this application using PyQt and a single thread of execution:
import sys
from time import sleep

from PyQt5.QtCore import Qt
from PyQt5.QtWidgets import (
    QApplication,
    QLabel,
    QMainWindow,
    QPushButton,
    QVBoxLayout,
    QWidget,
)

class Window(QMainWindow):
    def __init__(self, parent=None):
        super().__init__(parent)
        self.clicksCount = 0
        self.setupUi()

    def setupUi(self):
        self.setWindowTitle("Freezing GUI")
        self.resize(300, 150)
        self.centralWidget = QWidget()
        self.setCentralWidget(self.centralWidget)
        # Create and connect widgets
        self.clicksLabel = QLabel("Counting: 0 clicks", self)
        self.clicksLabel.setAlignment(Qt.AlignHCenter | Qt.AlignVCenter)
        self.stepLabel = QLabel("Long-Running Step: 0")
        self.stepLabel.setAlignment(Qt.AlignHCenter | Qt.AlignVCenter)
        self.countBtn = QPushButton("Click me!", self)
        self.countBtn.clicked.connect(self.countClicks)
        self.longRunningBtn = QPushButton("Long-Running Task!", self)
        self.longRunningBtn.clicked.connect(self.runLongTask)
        # Set the layout
        layout = QVBoxLayout()
        layout.addWidget(self.clicksLabel)
        layout.addWidget(self.countBtn)
        layout.addStretch()
        layout.addWidget(self.stepLabel)
        layout.addWidget(self.longRunningBtn)
        self.centralWidget.setLayout(layout)

    def countClicks(self):
        self.clicksCount += 1
        self.clicksLabel.setText(f"Counting: {self.clicksCount} clicks")

    def reportProgress(self, n):
        self.stepLabel.setText(f"Long-Running Step: {n}")

    def runLongTask(self):
        """Long-running task in 5 steps."""
        for i in range(5):
            sleep(1)
            self.reportProgress(i + 1)

app = QApplication(sys.argv)
win = Window()
win.show()
sys.exit(app.exec())
In this Freezing GUI application, .setupUi() creates all the required graphical components for the GUI. A click on the Click me! button calls .countClicks(), which makes the text of the Counting label reflect the number of button clicks.
Note: PyQt was first developed to target Python 2, which has an exec keyword. To avoid a name conflict on those earlier versions of PyQt, an underscore was added to the end of .exec_().
Even though PyQt5 targets only Python 3, which doesn’t have an exec keyword, the library provides two methods to start an application’s event loop:
.exec_().exec()
Both variations of the method work the same, so you can use either one in your applications.
Clicking the Long-Running Task! button calls .runLongTask(), which performs a task that takes 5 seconds to complete. This is a hypothetical task that you coded using time.sleep(secs), which suspends the execution of the calling thread for the given number of seconds, secs.
In .runLongTask(), you also call .reportProgress() to make the Long-Running Step label reflect the progress of the operation.
Does this application work as you intend? Run the application and check out its behavior:
When you click the Click me! button, the label shows the number of clicks. However, if you click the Long-Running Task! button, then the application becomes frozen and unresponsive. The buttons no longer respond to clicks and the labels don’t reflect the application’s state.
After five seconds, the application’s GUI gets updated again. The Counting label shows ten clicks, reflecting five clicks that occurred while the GUI was frozen. The Long-Running Step label doesn’t reflect the progress of your long-running operation. It jumps from zero to five without showing the intermediate steps.
Note: Even though your application’s GUI freezes during the long-running task, the application still registers events such as clicks and keystrokes. It’s just unable to process them until the main thread gets released.
The application’s GUI freezes as a result of a blocked main thread. The main thread is busy processing a long-running task and doesn’t immediately respond to the user’s actions. This is an annoying behavior because the user doesn’t know for sure if the application is working correctly or if it’s crashed.
Fortunately, there are some techniques you can use to work around this issue. A commonly used solution is to run your long-running task outside of the application’s main thread using a worker thread.
In the sections below, you’ll learn how to use PyQt’s built-in thread support to solve the issue of unresponsive or frozen GUIs and provide the best possible user experience in your applications.
Multithreading: The Basics
Sometimes you can divide your programs into several smaller subprograms, or tasks, that you can run in several threads. This might make your programs faster, or it might help you improve the user experience by preventing your programs from freezing while executing long-running tasks.
A thread is a separate flow of execution. In most operating systems, a thread is a component of a process, and processes can have multiple threads executing concurrently. Each process represents an instance of a program or application that is currently running in a given computer system.
You can have as many threads as you need. The challenge is determining the right number of threads to use. If you’re working with I/O-bound threads, then the number of threads will be limited by your available system resources. On the other hand, if you’re working with CPU-bound threads, then you’ll benefit from having a number of threads that is equal to or less than the number of CPU cores in your system.
Building programs that are capable of running multiple tasks using different threads is a programming technique known as multithreaded programming. Ideally, with this technique, several tasks run independently at the same time. However, this isn’t always possible. There are at least two elements that can prevent a program from running several threads in parallel:
- The central processing unit (CPU)
- The programming language
For example, if you have a single-core CPU machine, then you can’t run multiple threads at the same time. However, some single-core CPUs can simulate parallel thread execution by allowing the operating system to schedule the processing time between multiple threads. This makes your threads appear to run in parallel even though they’re really running one at a time.
On the other hand, if you have a multi-core CPU machine or a computer cluster, then you might be able to run multiple threads at the same time. In this case, your programming language becomes an important factor.
Some programming languages have internal components that actually prohibit the real execution of multiple threads in parallel. In these cases, threads just appear to run in parallel because they take advantage of the task scheduling system.
Multithreaded programs are usually more difficult to write, maintain, and debug than single-threaded programs because of the complexity related to sharing resources between threads, synchronizing data access, and coordinating thread execution. This can cause several problems:
-
Race condition is when the application’s behavior becomes nondeterministic due to the unpredictable order of events. It’s often the result of two or more threads accessing a shared resource without proper synchronization. For example, reading and writing memory from different threads can lead to a race condition if the reading and writing operations are performed in the wrong order.
-
Deadlock happens when threads wait indefinitely for a locked resource to be freed. For example, if a thread locks a resource and doesn’t unlock it after use, then other threads won’t be able to use that resource and will wait indefinitely. Deadlocks can also happen if thread A is waiting for thread B to unlock a resource, and thread B is waiting for thread A to unlock a different resource. Both threads will end up waiting forever.
-
Livelock is a situation in which two or more threads repeatedly act in response to each other’s actions. Livelocked threads are unable to make further progress on their specific task because they’re too busy responding to each other. However, they’re not blocked or dead.
-
Starvation happens when a process never gains access to the resources it needs for finishing its work. For example, if you have a process that can’t gain CPU time access, then the process is starving for CPU time and can’t do its work.
When building multithreaded applications, you need to be careful to protect your resources from concurrent writing or state modification access. In other words, you need to prevent multiple threads from accessing a given resource at the same time.
A wide range of applications can benefit from using multithreaded programming in at least three ways:
- Making your applications faster by taking advantage of multi-core processors
- Simplifying the application structure by dividing it into smaller subtasks
- Keeping your application responsive and up to date by offloading long-running tasks to worker threads
In Python’s C implementation, also known as CPython, threads don’t run in parallel. CPython has a global interpreter lock (GIL), which is a lock that basically allows only one Python thread to run at a time.
This can negatively affect the performance of threaded Python applications because of the overhead that results from the context switching between threads. However, multithreading in Python can help you solve the problem of freezing or unresponsive applications while processing long-running tasks.
Multithreading in PyQt With QThread
Qt, and therefore PyQt, provides its own infrastructure to create multithreaded applications using QThread. PyQt applications can have two different kinds of threads:
- Main thread
- Worker threads
The application’s main thread always exists. This is where the application and its GUI run. On the other hand, the existence of worker threads depends on the application’s processing needs. For example, if your application commonly runs heavy tasks that take a lot of time to finish, then you might want to have worker threads to run those tasks and avoid freezing the application’s GUI.
The Main Thread
In PyQt applications, the main thread of execution is also known as the GUI thread because it handles all widgets and other GUI components. Python starts this thread when you run the application. The application’s event loop runs in this thread after you call .exec() on the QApplication object. This thread handles your windows, dialogs, and also the communication with the host operating system.
By default, any event or task that takes place in the application’s main thread, including the user’s events on the GUI itself, will run synchronously, or one task after another. So, if you start a long-running task in the main thread, then the application needs to wait for that task to finish, and the GUI becomes unresponsive.
It’s important to note that you must create and update all your widgets in the GUI thread. However, you can execute other long-running tasks in worker threads and use their results to feed the GUI components of your application. This means that GUI components will act as consumers that are fed information from the threads performing the actual work.
Worker Threads
You can create as many worker threads as you need in your PyQt applications. Worker threads are secondary threads of execution that you can use to offload long-running tasks from the main thread and prevent GUI freezing.
You can create worker threads using QThread. Each worker thread can have its own event loop and support PyQt’s signals and slots mechanism to communicate with the main thread. If you create an object from any class that inherits from QObject in a particular thread, then that object is said to belong to, or have an affinity to, that thread. Its children must also belong to the same thread.
QThread isn’t a thread itself. It’s a wrapper around an operating system thread. The real thread object is created when you call QThread.start().
QThread provides a high-level application programming interface (API) to manage threads. This API includes signals, such as .started() and .finished(), that are emitted when the thread starts and finishes. It also includes methods and slots, such as .start(), .wait(), .exit(), .quit(), .isFinished(), and .isRunning().
Like with any other threading solutions, with QThread you must protect your data and resources from concurrent, or simultaneous, access. Otherwise you’ll face a lot of problems, including deadlocks, data corruption, and so on.
Using QThread vs Python’s threading
When it comes to working with threads in Python, you’ll find that the Python standard library offers a consistent and robust solution with the threading module. This module provides a high-level API for doing multithreaded programming in Python.
Normally, you’ll use threading in your Python applications. However, if you’re using PyQt to build GUI applications with Python, then you have another option. PyQt provides a complete, fully integrated, high-level API for doing multithreading.
You might be wondering, What should I use in my PyQt applications, Python’s thread support or PyQt’s thread support? The answer is that it depends.
For example, if you’re building a GUI application that will also have a web version, then Python’s threads might make more sense because your back end won’t depend on PyQt at all. However, if you’re building bare PyQt applications, then PyQt’s threads are for you.
Using PyQt’s thread support provides the following benefits:
- Thread-related classes are fully integrated with the rest of PyQt infrastructure.
- Worker threads can have their own event loop, which enables event handling.
- Interthread communication is possible using signals and slots.
A rule of thumb might be to use PyQt’s thread support if you’re going to interact with the rest of the library, and use Python’s thread support otherwise.
Using QThread to Prevent Freezing GUIs
A common use for threads in a GUI application is to offload long-running tasks to worker threads so that the GUI remains responsive to the user’s interactions. In PyQt, you use QThread to create and manage worker threads.
According to Qt’s documentation, there are two main ways to create worker threads with QThread:
- Instantiate
QThreaddirectly and create a workerQObject, then call.moveToThread()on the worker using the thread as an argument. The worker must contain all the required functionality to execute a specific task. - Subclass
QThreadand reimplement.run(). The implementation of.run()must contain all the required functionality to execute a specific task.
Instantiating QThread provides a parallel event loop. An event loop allows objects owned by the thread to receive signals on their slots, and these slots will be executed within the thread.
On the other hand, subclassing QThread allows running parallel code without an event loop. With this approach, you can always create an event loop by calling exec() explicilty.
In this tutorial, you’ll use the first approach, which requires the following steps:
- Prepare a worker object by subclassing
QObjectand put your long-running task in it. - Create a new instance of the worker class.
- Create a new
QThreadinstance. - Move the worker object into the newly created thread by calling
.moveToThread(thread). - Connect the required signals and slots to guarantee interthread communication.
- Call
.start()on theQThreadobject.
You can turn your Freezing GUI application into a Responsive GUI application using these steps:
from PyQt5.QtCore import QObject, QThread, pyqtSignal
# Snip...

# Step 1: Create a worker class
class Worker(QObject):
    finished = pyqtSignal()
    progress = pyqtSignal(int)

    def run(self):
        """Long-running task."""
        for i in range(5):
            sleep(1)
            self.progress.emit(i + 1)
        self.finished.emit()

class Window(QMainWindow):
    # Snip...
    def runLongTask(self):
        # Step 2: Create a QThread object
        self.thread = QThread()
        # Step 3: Create a worker object
        self.worker = Worker()
        # Step 4: Move worker to the thread
        self.worker.moveToThread(self.thread)
        # Step 5: Connect signals and slots
        self.thread.started.connect(self.worker.run)
        self.worker.finished.connect(self.thread.quit)
        self.worker.finished.connect(self.worker.deleteLater)
        self.thread.finished.connect(self.thread.deleteLater)
        self.worker.progress.connect(self.reportProgress)
        # Step 6: Start the thread
        self.thread.start()

        # Final resets
        self.longRunningBtn.setEnabled(False)
        self.thread.finished.connect(
            lambda: self.longRunningBtn.setEnabled(True)
        )
        self.thread.finished.connect(
            lambda: self.stepLabel.setText("Long-Running Step: 0")
        )
First, you do some required imports. Then you run the steps that you saw before.
In step 1, you create Worker, a subclass of QObject. In Worker, you create two signals, finished and progress. Note that you must create signals as class attributes.
You also create a method called .runLongTask(), where you put all the required code to perform your long-running task. In this example, you simulate a long-running task using a for loop that iterates 5 times, with a one-second delay in each iteration. The loop also emits the progress signal, which indicates the operation’s progress. Finally, .runLongTask() emits the finished signal to point out that the processing has finished.
In steps 2 to 4, you create an instance of QThread, which will provide the space for running this task, as well as an instance of Worker. You move your worker object to the thread by calling .moveToThread() on worker, using thread as an argument.
In step 5, you connect the following signals and slots:
-
The thread’s
startedsignal to the worker’s.runLongTask()slot to ensure that when you start the thread,.runLongTask()will be called automatically -
The worker’s
finishedsignal to the thread’s.quit()slot to quitthreadwhenworkerfinishes its work -
The
finishedsignal to the.deleteLater()slot in both objects to delete the worker and the thread objects when the work is done
Finally, in step 6, you start the thread using .start().
Once you have the thread running, you do some resets to make the application behave coherently. You disable the Long-Running Task! button to prevent the user from clicking it while the task is running. You also connect the thread’s finished signal with a lambda function that enables the Long-Running Task! button when the thread finishes. Your final connection resets the text of the Long-Running Step label.
If you run this application, then you’ll get the following window on your screen:

Since you offloaded the long-running task to a worker thread, your application is now fully responsive. That’s it! You’ve successfully used PyQt’s QThread to solve the frozen GUI issue that you saw in previous sections.
Reusing Threads: QRunnable and QThreadPool
If your GUI applications rely heavily on multithreading, then you’ll face significant overhead related to creating and destroying threads. You’ll also have to consider how many threads you can start on a given system so that your applications remain efficient. Fortunately, PyQt’s thread support provides you with a solution to these issues, too.
Each application has a global thread pool. You can get a reference to it by calling QThreadPool.globalInstance().
Note: Even though using the default thread pool is a fairly common choice, you can also create your own thread pool by instantiating QThreadPool, which provides a collection of reusable threads.
The global thread pool maintains and manages a suggested number of threads generally based on the number of cores in your current CPU. It also handles the queuing and execution of tasks in your application’s threads. The threads in the pool are reusable, which prevents the overhead associated with creating and destroying threads.
To create tasks and run them in a thread pool, you use QRunnable. This class represents a task or piece of code that needs to be run. The process of creating and executing runnable tasks involves three steps:
- Subclass
QRunnableand reimplement.run()with the code for the task that you want to run. - Instantiate the subclass of
QRunnableto create a runnable task. - Call
QThreadPool.start()with the runnable task as an argument.
.run() must contain the required code for the task at hand. The call to .start() launches your task in one of the available threads in the pool. If there’s no available thread, then .start() puts the task in the pool’s run queue. When a thread becomes available, the code within .run() gets executed in that thread.
Here’s a GUI application that shows how you can implement this process in your code:
 1import logging
 2import random
 3import sys
 4import time
 5
 6from PyQt5.QtCore import QRunnable, Qt, QThreadPool
 7from PyQt5.QtWidgets import (
 8    QApplication,
 9    QLabel,
10    QMainWindow,
11    QPushButton,
12    QVBoxLayout,
13    QWidget,
14)
15
16logging.basicConfig(format="%(message)s", level=logging.INFO)
17
18# 1. Subclass QRunnable
19class Runnable(QRunnable):
20    def __init__(self, n):
21        super().__init__()
22        self.n = n
23
24    def run(self):
25        # Your long-running task goes here ...
26        for i in range(5):
27            logging.info(f"Working in thread {self.n}, step {i + 1}/5")
28            time.sleep(random.randint(700, 2500) / 1000)
29
30class Window(QMainWindow):
31    def __init__(self, parent=None):
32        super().__init__(parent)
33        self.setupUi()
34
35    def setupUi(self):
36        self.setWindowTitle("QThreadPool + QRunnable")
37        self.resize(250, 150)
38        self.centralWidget = QWidget()
39        self.setCentralWidget(self.centralWidget)
40        # Create and connect widgets
41        self.label = QLabel("Hello, World!")
42        self.label.setAlignment(Qt.AlignHCenter | Qt.AlignVCenter)
43        countBtn = QPushButton("Click me!")
44        countBtn.clicked.connect(self.runTasks)
45        # Set the layout
46        layout = QVBoxLayout()
47        layout.addWidget(self.label)
48        layout.addWidget(countBtn)
49        self.centralWidget.setLayout(layout)
50
51    def runTasks(self):
52        threadCount = QThreadPool.globalInstance().maxThreadCount()
53        self.label.setText(f"Running {threadCount} Threads")
54        pool = QThreadPool.globalInstance()
55        for i in range(threadCount):
56            # 2. Instantiate the subclass of QRunnable
57            runnable = Runnable(i)
58            # 3. Call start()
59            pool.start(runnable)
60
61app = QApplication(sys.argv)
62window = Window()
63window.show()
64sys.exit(app.exec())
Here’s how this code works:
- On lines 19 to 28, you subclass
QRunnableand reimplement.run()with the code you want to execute. In this case, you use the usual loop for simulating a long-running task. The call tologging.info()notifies you about the operation’s progress by printing a message to your terminal screen. - On line 52, you get the number of available threads. This number will depend on your specific hardware and is normally based on the cores of your CPU.
- On line 53, you update the text of the label to reflect how many threads you can run.
- On line 55, you start a
forloop that iterates over the available threads. - On line 57, you instantiate
Runnable, passing the loop variableias an argument to identify the current thread. Then you call.start()on the thread pool, using your runnable task as an argument.
It’s important to note that some of the examples in this tutorial use logging.info() with a basic configuration to print messages to the screen. You need to do this because print() isn’t a thread-safe function, so using it might cause a mess in your output. Fortunately, the functions in logging are thread safe, so you can use them in multithreaded applications.
If you run this application, then you’ll get the following behavior:
When you click the Click me! button, the application launches up to four threads. In the background terminal, the application reports the progress of each thread. If you close the application, then the threads will continue running until they finish their respective tasks.
There’s no way of stopping a QRunnable object from the outside in Python. To work around this, you can create a global Boolean variable and systematically check it from inside your QRunnable subclasses to terminate them when your variable becomes True.
Another drawback of using QThreadPool and QRunnable is that QRunnable doesn’t support signals and slots, so interthread communication can be challenging.
On the other hand, QThreadPool automatically manages a thread pool and handles the queuing and execution of runnable tasks in those threads. The threads in the pool are reusable, which helps reduce your application’s overhead.
Communicating With Worker QThreads
If you’re doing multithreaded programming with PyQt, then you might need to establish communication between your application’s main thread and your worker threads. This allows you to get feedback on the progress of worker threads and update the GUI accordingly, send data to your threads, allow the users to interrupt the execution, and so on.
PyQt’s signals and slots mechanism provides a robust and safe way of communicating with worker threads in a GUI application.
On the other hand, you might also need to establish communication between worker threads, such as sharing buffers of data or any other kind of resource. In this case, you need to make sure that you’re properly protecting your data and resources from concurrent access.
Using Signals and Slots
A thread-safe object is an object that can be accessed concurrently by multiple threads and is guaranteed to be in a valid state. PyQt’s signals and slots are thread safe, so you can use them to establish interthread communication as well as to share data between threads.
You can connect signals emitted from a thread to slots within the thread or within a different thread. This means that you can execute code in a thread as a response to a signal emitted in the same thread or in another thread. This establishes a safe bridge of communication between threads.
Signals can also contain data, so if you emit a signal that holds data, then you’ll receive that data in all the slots connected to the signal.
In the Responsive GUI application example, you used the signals and slots mechanism to establish communication between threads. For example, you connected the worker’s progress signal to the application’s .reportProgress() slot. progress holds an integer value indicating the long-running task’s progress, and .reportProgress() receives that value as an argument so it can update the Long-Running Step label.
Establishing connections between signals and slots in different threads is the foundation of interthread communication in PyQt. At this point, a good exercise for you to try might be to use a QToolBar object instead of the Long-Running Step label to show the progress of the operation in the Responsive GUI application using signals and slots.
Sharing Data Between Threads
Creating multithreaded applications often requires that multiple threads have access to the same data or resources. If multiple threads access the same data or resource concurrently, and at least one of them writes or modifies this shared resource, then you might face crashes, memory or data corruption, deadlocks, or other issues.
There are at least two approaches that allow you to protect your data and resources against concurrent access:
-
Avoid shared state with the following techniques:
-
Synchronize access to a shared state with the following techniques:
If you need to share resources, then you should use the second approach. Atomic operations are carried out in a single execution step, so they can’t be interrupted by other threads. They ensure that only one thread will modify a resource at a given time.
Note: For a reference on how CPython manages atomic operations, check out What kinds of global value mutation are thread-safe?
Note that other Python implementations may behave differently, so if you’re using a different implementation, then take a look at its documentation for further detail on atomic operations and thread safety.
Mutual exclusion is a common pattern in multithreaded programming. Access to data and resources is protected using locks, which are a synchronization mechanism that typically allows only one thread to access a resource at a given time.
For example, if thread A needs to update a global variable, then it can acquire a lock on that variable. This prevents thread B from accessing the variable at the same time. Once thread A finishes updating the variable, it releases the lock, and thread B can access the variable. This is based on the principle mutual exclusion, which enforces synchronized access by making threads wait for one another when accessing data and resources.
It’s important to mention that using locks has a significant cost and can reduce the overall performance of your application. Thread synchronization forces most threads to wait until a resource becomes available, so you won’t be taking advantage of parallel execution anymore.
PyQt provides a few convenient classes for protecting resources and data from concurrent access:
-
QMutexis a lock class that allows you to manage mutual exclusion. You can lock a mutex in a given thread to gain exclusive access to a shared resource. Once the mutex is unlocked, other threads can get access to the resource. -
QReadWriteLockis similar toQMutexbut distinguishes between reading and writing access. With this type of lock, you can allow multiple threads to have simultaneous read-only access to a shared resource. If a thread needs to write to the resource, then all other threads must be blocked until the writing is complete. -
QSemaphoreis a generalization ofQMutexthat protects a certain number of identical resources. If a semaphore is protecting n resources, and you try to lock n + 1 resources, then the semaphore gets blocked, preventing threads from accessing the resources.
With PyQt’s lock classes, you can secure your data and resources and prevent a lot of problems. The next section shows an example of how to use QMutex for these purposes.
Protecting Shared Data With QMutex
QMutex is commonly used in multithreaded PyQt applications to prevent multiple threads from accessing shared data and resources concurrently. In this section, you’ll code a GUI application that uses a QMutex object to protect a global variable from concurrent write access.
To learn how to use QMutex, you’ll code an example that manages a bank account from which two people can withdraw money at any time. In this case, you need to protect the account balance from parallel access. Otherwise, people could end up withdrawing more money than they have in the bank.
For example, suppose you have an account with $100. Two people check the available balance at the same time and see that the account has $100. They each think that they can withdraw $60 and leave $40 in the account, so they proceed with the transaction. The resulting balance in the account will be -$20, which might be a significant problem.
To code the example, you’ll start by importing the required modules, functions, and classes. You also add a basic logging configuration and define two global variables:
import logging
import random
import sys
from time import sleep

from PyQt5.QtCore import QMutex, QObject, QThread, pyqtSignal
from PyQt5.QtWidgets import (
    QApplication,
    QLabel,
    QMainWindow,
    QPushButton,
    QVBoxLayout,
    QWidget,
)

logging.basicConfig(format="%(message)s", level=logging.INFO)

balance = 100.00
mutex = QMutex()
balance is a global variable that you’ll use to store the current balance in the bank account. mutex is a QMutex object that you’ll use to protect balance from parallel access. In other words, with mutex, you’ll prevent multiple threads from accessing balance at the same time.
The next step is to create a subclass of QObject that holds the code for managing how to withdraw money from the bank account. You’ll call that class AccountManager:
class AccountManager(QObject):
    finished = pyqtSignal()
    updatedBalance = pyqtSignal()

    def withdraw(self, person, amount):
        logging.info("%s wants to withdraw $%.2f...", person, amount)
        global balance
        mutex.lock()
        if balance - amount >= 0:
            sleep(1)
            balance -= amount
            logging.info("-$%.2f accepted", amount)
        else:
            logging.info("-$%.2f rejected", amount)
        logging.info("===Balance===: $%.2f", balance)
        self.updatedBalance.emit()
        mutex.unlock()
        self.finished.emit()
In AccountManager, you first define two signals:
finishedindicates when the class processes its work.updatedBalanceindicates whenbalancegets updated.
Then you define .withdraw(). In this method, you do the following:
- Show a message that points out the person who wants to withdraw some money
- Use a
globalstatement to usebalancefrom within.withdraw() - Call
.lock()onmutexto acquire the lock and protect thebalancefrom parallel access - Check if the account balance allows withdrawing the amount at hand
- Call
sleep()to simulate that the operation takes some time to complete - Decrement the balance by the required amount of money
- Show messages to notify if the transaction was accepted or not
- Emit the
updatedBalancesignal to notify that the balance has been updated - Release the lock to allow other threads to access
balance - Emit the
finishedsignal to notify that the operation has finished
This application will show a window like this:
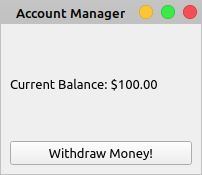
Here’s the required code for creating this GUI:
class Window(QMainWindow):
    def __init__(self, parent=None):
        super().__init__(parent)
        self.setupUi()

    def setupUi(self):
        self.setWindowTitle("Account Manager")
        self.resize(200, 150)
        self.centralWidget = QWidget()
        self.setCentralWidget(self.centralWidget)
        button = QPushButton("Withdraw Money!")
        button.clicked.connect(self.startThreads)
        self.balanceLabel = QLabel(f"Current Balance: ${balance:,.2f}")
        layout = QVBoxLayout()
        layout.addWidget(self.balanceLabel)
        layout.addWidget(button)
        self.centralWidget.setLayout(layout)
The Current Balance label shows the account’s available balance. If you click the Withdraw Money! button, then the application will simulate two people trying to withdraw money from the account at the same time. You’ll simulate these two people using threads:
class Window(QMainWindow):
    # Snip...
    def createThread(self, person, amount):
        thread = QThread()
        worker = AccountManager()
        worker.moveToThread(thread)
        thread.started.connect(lambda: worker.withdraw(person, amount))
        worker.updatedBalance.connect(self.updateBalance)
        worker.finished.connect(thread.quit)
        worker.finished.connect(worker.deleteLater)
        thread.finished.connect(thread.deleteLater)
        return thread
This method contains the required code for creating a thread for each person. In this example, you connect the thread’s started signal with the worker’s .withdraw(), so when the thread starts, this method will run automatically. You also connect the worker’s updatedBalance signal to a method called .updateBalance(). This method will update the Current Balance label with the current account balance.
Here’s the code for .updateBalance():
class Window(QMainWindow):
    # Snip...
    def updateBalance(self):
        self.balanceLabel.setText(f"Current Balance: ${balance:,.2f}")
Anytime a person withdraws money, the account’s balance gets reduced by the requested amount. This method updates the text of the Current Balance label to reflect the changes in the account balance.
To complete the application, you need to create the two people and start a thread for each of them:
class Window(QMainWindow):
    def __init__(self, parent=None):
        super().__init__(parent)
        self.setupUi()
        self.threads = []

    # Snip...
    def startThreads(self):
        self.threads.clear()
        people = {
            "Alice": random.randint(100, 10000) / 100,
            "Bob": random.randint(100, 10000) / 100,
        }
        self.threads = [
            self.createThread(person, amount)
            for person, amount in people.items()
        ]
        for thread in self.threads:
            thread.start()
First, you add .threads as an instance attribute to the initializer of your Window. This variable will hold a list of threads to prevent the threads from getting out of scope once .startThreads() returns. Then you define .startThreads() to create two people and a thread for each of them.
In .startThreads(), you perform the following operations:
- Clear the thread in
.threadsif any to remove threads that have been destroyed already - Create a dictionary containing two people,
AliceandBob. Each person will try to withdraw a random amount of money from the bank account - Create a thread for each person using a list comprehension and
.createThread() - Start the threads in a
forloop
With this last piece of code, you’re almost done. You just need to create the application and the window and then run the event loop:
app = QApplication(sys.argv)
window = Window()
window.show()
sys.exit(app.exec())
If you run this application from your command line, then you’ll get the following behavior:
The output in the background terminal shows that the threads work. Using a QMutex object in this example allows you to protect the bank account balance and synchronize the access to it. This prevents users from withdrawing an amount of money that exceeds the available balance.
Multithreading in PyQt: Best Practices
There are a few best practices that you can apply when building multithreaded applications in PyQt. Here’s a non-exhaustive list:
- Avoid launching long-running tasks in the main thread of a PyQt application.
- Use
QObject.moveToThread()andQThreadobjects to create worker threads. - Use
QThreadPoolandQRunnableif you need to manage a pool of worker threads. - Use signals and slots to establish safe interthread communication.
- Use
QMutex,QReadWriteLock, orQSemaphoreto prevent threads from accessing shared data and resources concurrently. - Make sure to unlock or release
QMutex,QReadWriteLock, orQSemaphorebefore finishing a thread. - Release the lock in all possible execution paths in functions with multiple
returnstatements. - Don’t try to create, access, or update GUI components or widgets from a worker thread.
- Don’t try to move a
QObjectwith a parent-child relationship to a different thread.
If you consistently apply these best practices when working with threads in PyQt, then your applications will be less error-prone and more accurate and robust. You’ll prevent problems like data corruption, deadlocks, race conditions, and others. You’ll also provide a better experience for your users.
Conclusion
Executing long-running tasks in a PyQt application’s main thread might cause the application’s GUI to freeze and becomes unresponsive. This is a common issue in GUI programming and can result in a bad user experience. Creating worker threads with PyQt’s QThread to offload long-running tasks effectively works around this issue in your GUI applications.
In this tutorial, you’ve learned how to:
- Use PyQt’s
QThreadto prevent GUI applications from freezing - Create reusable
QThreadobjects with PyQt’sQThreadPoolandQRunnable - Use signals and slots for interthread communication in PyQt
- Use shared resources safely with PyQt’s lock classes
You also learned some best practices that apply to multithreaded programming with PyQt and its built-in thread support.