
If you’ve ever wanted to simplify your command-line scripting or use Python alongside command-line applications—or any applications for that matter—then the Python subprocess module can help. From running shell commands and command-line applications to launching GUI applications, the Python subprocess module can help.
By the end of this tutorial, you’ll be able to:
- Understand how the Python
subprocessmodule interacts with the operating system - Issue shell commands like
lsordir - Feed input into a process and use its output.
- Handle errors when using
subprocess - Understand the use cases for
subprocessby considering practical examples
In this tutorial, you’ll get a high-level mental model for understanding processes, subprocesses, and Python before getting stuck into the subprocess module and experimenting with an example. After that, you’ll start exploring the shell and learn how you can leverage Python’s subprocess with Windows and UNIX-based shells and systems. Specifically, you’ll cover communication with processes, pipes and error handling.
Note: subprocess isn’t a GUI automation module or a way to achieve concurrency. For GUI automation, you might want to look at PyAutoGUI. For concurrency, take a look at this tutorial’s section on modules related to subprocess.
Once you have the basics down, you’ll be exploring some practical ideas for how to leverage Python’s subprocess. You’ll also dip your toes into advanced usage of Python’s subprocess by experimenting with the underlying Popen() constructor.
Source Code: Click here to download the free source code that you’ll use to get acquainted with the Python subprocess module.
Processes and Subprocesses
First off, you might be wondering why there’s a sub in the Python subprocess module name. And what exactly is a process, anyway? In this section, you’ll answer these questions. You’ll come away with a high-level mental model for thinking about processes. If you’re already familiar with processes, then you might want to skip directly to basic usage of the Python subprocess module.
Processes and the Operating System
Whenever you use a computer, you’ll always be interacting with programs. A process is the operating system’s abstraction of a running program. So, using a computer always involve processes. Start menus, app bars, command-line interpreters, text editors, browsers, and more—every application comprises one or more processes.
A typical operating system will report hundreds or even thousands of running processes, which you’ll get to explore shortly. However, central processing units (CPUs) typically only have a handful of cores, which means that they can only run a handful of instructions simultaneously. So, you may wonder how thousands of processes can appear to run at the same time.
In short, the operating system is a marvelous multitasker—as it has to be. The CPU is the brain of a computer, but it operates at the nanosecond timescale. Most other components of a computer are far slower than the CPU. For instance, a magnetic hard disk read takes thousands of times longer than a typical CPU operation.
If a process needs to write something to the hard drive, or wait for a response from a remote server, then the CPU would sit idle most of the time. Multitasking keeps the CPU busy.
Part of what makes the operating system so great at multitasking is that it’s fantastically organized too. The operating system keeps track of processes in a process table or process control block. In this table, you’ll find the process’s file handles, security context, references to its address spaces, and more.
The process table allows the operating system to abandon a particular process at will, because it has all the information it needs to come back and continue with the process at a later time. A process may be interrupted many thousands of times during execution, but the operating system always finds the exact point where it left off upon returning.
An operating system doesn’t boot up with thousands of processes, though. Many of the processes you’re familiar with are started by you. In the next section, you’ll look into the lifetime of a process.
Process Lifetime
Think of how you might start a Python application from the command line. This is an instance of your command-line process starting a Python process:
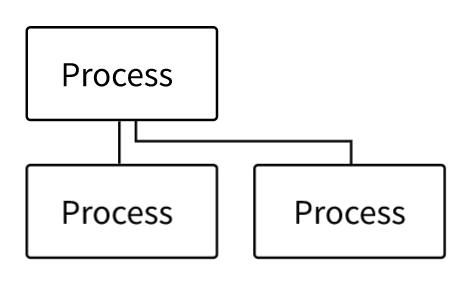
The process that starts another process is referred to as the parent, and the new process is referred to as the child. The parent and child processes run mostly independently. Sometimes the child inherits specific resources or contexts from the parent.
As you learned in Processes and the Operating System, information about processes is kept in a table. Each process keeps track of its parents, which allows the process hierarchy to be represented as a tree. You’ll be exploring your system’s process tree in the next section.
Note: The precise mechanism for creating processes differs depending on the operating system. For a brief overview, the Wikipedia article on process management has a short section on process creation.
For more details about the Windows mechanism, check out the win32 API documentation page on creating processes
On UNIX-based systems, processes are typically created by using fork() to copy the current process and then replacing the child process with one of the exec() family of functions.
The parent-child relationship between a process and its subprocess isn’t always the same. Sometimes the two processes will share specific resources, like inputs and outputs, but sometimes they won’t. Sometimes child processes live longer than the parent. A child outliving the parent can lead to orphaned or zombie processes, though more discussion about those is outside the scope of this tutorial.
When a process has finished running, it’ll usually end. Every process, on exit, should return an integer. This integer is referred to as the return code or exit status. Zero is synonymous with success, while any other value is considered a failure. Different integers can be used to indicate the reason why a process has failed.
In the same way that you can return a value from a function in Python, the operating system expects an integer return value from a process once it exits. This is why the canonical C main() function usually returns an integer:
// minimal_program.c

int main(){
    return 0;
}
This example shows a minimal amount of C code necessary for the file to compile with gcc without any warnings. It has a main() function that returns an integer. When this program runs, the operating system will interpret its execution as successful since it returns zero.
So, what processes are running on your system right now? In the next section, you’ll explore some of the tools that you can use to take a peek at your system’s process tree. Being able to see what processes are running and how they’re structured will come in handy when visualizing how the subprocess module works.
Active Processes on Your System
You may be curious to see what processes are running on your system right now. To do that, you can use platform-specific utilities to track them:
You can also explore the Python psutil library, which allows you to retrieve running process information on both Windows and UNIX-based systems.
One universal attribute of process tracking across systems is that each process has a process identification number, or PID, which is a unique integer to identify the process within the context of the operating system. You’ll see this number on most of the utilities listed above.
Along with the PID, it’s typical to see the resource usage, such as CPU percentage and amount of RAM that a particular process is using. This is the information that you look for if a program is hogging all your resources.
The resource utilization of processes can be useful for developing or debugging scripts that use the subprocess module, even though you don’t need the PID, or any information about what resources processes are using in the code itself. While playing with the examples that are coming up, consider leaving a representation of the process tree open to see the new processes pop up.
You now have a bird’s-eye view of processes. You’ll deepen your mental model throughout the tutorial, but now it’s time to see how to start your own processes with the Python subprocess module.
Overview of the Python subprocess Module
The Python subprocess module is for launching child processes. These processes can be anything from GUI applications to the shell. The parent-child relationship of processes is where the sub in the subprocess name comes from. When you use subprocess, Python is the parent that creates a new child process. What that new child process is, is up to you.
Python subprocess was originally proposed and accepted for Python 2.4 as an alternative to using the os module. Some documented changes have happened as late as 3.8. The examples in this article were tested with Python 3.10.4, but you only need 3.8+ to follow along with this tutorial.
Most of your interaction with the Python subprocess module will be via the run() function. This blocking function will start a process and wait until the new process exits before moving on.
The documentation recommends using run() for all cases that it can handle. For edge cases where you need more control, the Popen class can be used. Popen is the underlying class for the whole subprocess module. All functions in the subprocess module are convenience wrappers around the Popen() constructor and its instance methods. Near the end of this tutorial, you’ll dive into the Popen class.
Note: If you’re trying to decide whether you need subprocess or not, check out the section on deciding whether you need subprocess for your task.
You may come across other functions like call(), check_call(), and check_output(), but these belong to the older subprocess API from Python 3.5 and earlier. Everything these three functions do can be replicated with the newer run() function. The older API is mainly still there for backwards compatibility, and you won’t cover it in this tutorial.
There’s also a fair amount of redundancy in the subprocess module, meaning that there are various ways to achieve the same end goal. You won’t be exploring all variations in this tutorial. What you will find, though, are robust techniques that should keep you on the right path.
Basic Usage of the Python subprocess Module
In this section, you’ll take a look at some of the most basic examples demonstrating the usage of the subprocess module. You’ll start by exploring a bare-bones command-line timer program with the run() function.
If you want to follow along with the examples, then create a new folder. All the examples and programs can be saved in this folder. Navigate to this newly created folder on the command line in preparation for the examples coming up. All the code in this tutorial is standard library Python—with no external dependencies required—so a virtual environment isn’t necessary.
The Timer Example
To come to grips with the Python subprocess module, you’ll want a bare-bones program to run and experiment with. For this, you’ll use a program written in Python:
# timer.py

from argparse import ArgumentParser
from time import sleep

parser = ArgumentParser()
parser.add_argument("time", type=int)
args = parser.parse_args()
print(f"Starting timer of {args.time} seconds")
for _ in range(args.time):
    print(".", end="", flush=True)
    sleep(1)
print("Done!")
The timer program uses argparse to accept an integer as an argument. The integer represents the number of seconds that the timer should wait until exiting, which the program uses sleep() to achieve. It’ll play a small animation representing each passing second until it exits:
It’s not much, but the key is that it serves as a cross-platform process that runs for a few seconds and which you can easily tinker with. You’ll be calling it with subprocess as if it were a separate executable.
Note: Calling Python programs with the Python subprocess module doesn’t make much sense—there’s usually no need for other Python modules to be in separate processes since you can just import them.
The main reason you’ll be using Python programs for most of the examples in this tutorial is that they’re cross-platform, and you most likely already have Python installed!
You may be tempted to think that starting a new process could be a neat way to achieve concurrency, but that’s not the intended use case for the subprocess module. Maybe what you need are other Python modules dedicated to concurrency, covered in a later section.
The subprocess module is mainly for calling programs other than Python. But, as you can see, you can call Python too if you want! For more discussion on the use cases of subprocess, check out the section where this is discussed in more depth, or one of the later examples.
Okay, ready to get stuck in! Once you have the timer.py program ready, open a Python interactive session and call the timer with subprocess:
>>> import subprocess
>>> subprocess.run(["python", "timer.py", "5"])
Starting timer of 5 seconds
.....Done!
CompletedProcess(args=['python', 'timer.py', '5'], returncode=0)
With this code, you should’ve seen the animation playing right in the REPL. You imported subprocess and then called the run() function with a list of strings as the one and only argument. This is the args parameter of the run() function.
On executing run(), the timer process starts, and you can see its output in real time. Once it’s done, it returns an instance of the CompletedProcess class.
On the command line, you might be used to starting a program with a single string:
$ python timer.py 5
However, with run() you need to pass the command as a sequence, as shown in the run() example. Each item in the sequence represents a token which is used for a system call to start a new process.
Note: Calling run() isn’t the same as calling programs on the command line. The run() function makes a system call, foregoing the need for a shell. You’ll cover interaction with the shell in a later section.
Shells typically do their own tokenization, which is why you just write the commands as one long string on the command line. With the Python subprocess module, though, you have to break up the command into tokens manually. For instance, executable names, flags, and arguments will each be one token.
Note: You can use the shlex module to help you out if you need, just bear in mind that it’s designed for POSIX compliant systems and may not work well in Windows environments:
>>> import shlex
>>> shlex.split("python timer.py 5")
['python', 'timer.py', '5']

>>> subprocess.run(shlex.split("python timer.py 5"))
Starting timer of 5 seconds
.....Done!
CompletedProcess(args=['python', 'timer.py', '5'], returncode=0)
The split() function divides a typical command into the different tokens needed. The shlex module can come in handy when it may be not obvious how to divide up more complex commands that have special characters, like spaces:
>>> shlex.split("echo 'Hello, World!'")
['echo', 'Hello, World!']
You’ll note that the message, which contains spaces, is preserved as a single token, and the extra quotation marks are no longer needed. The extra quotation marks on the shell serve to group the token together, but since subprocess uses sequences, it’s always unambiguous which parts should be interpreted as one token.
Now that you’re familiar with some of the very basics of starting new processes with the Python subprocess module, coming up you’ll see that you can run any kind of process, not just Python or text-based programs.
The Use of subprocess to Run Any App
With subprocess, you aren’t limited to text-based applications like the shell. You can call any application that you can with the Start menu or app bar, as long as you know the precise name or path of the program that you want to run:
These commands should open up a text editor window. Usually CompletedProcess won’t get returned until you close the editor window. Yet in the case of macOS, since you need to run the launcher process open to launch TextEdit, the CompletedProcess gets returned straight away.
Launcher processes are in charge of launching a specific process and then ending. Sometimes programs, such as web browsers, have them built in. The mechanics of launcher processes is out of the scope of this tutorial, but suffice to say that they’re able to manipulate the operating system’s process tree to reassign parent-child relationships.
Note: There are many problems that you might initially reach for subprocess to solve, but then you’ll find a specific module or library that solves it for you. This tends to be a theme with subprocess since it is quite a low-level utility.
An example of something that you might want to do with subprocess is to open a web browser to a specific page. However, for that, it’s probably best to use the Python module webbrowser. The webbrowser module uses subprocess under the hood but handles all the finicky cross-platform and browser differences that you might encounter.
Then again, subprocess can be a remarkably useful tool to get something done quickly. If you don’t need a full-fledged library, then subprocess can be your Swiss Army knife. It all depends on your use case. More discussion on this topic will come later.
You’ve successfully started new processes using Python! That’s subprocess at its most basic. Next up, you’ll take a closer look at the CompletedProcess object that’s returned from run().
The CompletedProcess Object
When you use run(), the return value is an instance of the CompletedProcess class. As the name suggests, run() returns the object only once the child process has ended. It has various attributes that can be helpful, such as the args that were used for the process and the returncode.
To see this clearly, you can assign the result of run() to a variable, and then access its attributes such as .returncode:
>>> import subprocess
>>> completed_process = subprocess.run(["python", "timer.py"])
usage: timer.py [-h] time
timer.py: error: the following arguments are required: time

>>> completed_process.returncode
2
The process has a return code that indicates failure, but it doesn’t raise an exception. Typically, when a subprocess process fails, you’ll always want an exception to be raised, which you can do by passing in a check=True argument:
>>> completed_process = subprocess.run(
...     ["python", "timer.py"],
...     check=True
... )
...
usage: timer.py [-h] time
timer.py: error: the following arguments are required: time
Traceback (most recent call last):
  ...
subprocess.CalledProcessError: Command '['python', 'timer.py']' returned
                               non-zero exit status 2.
There are various ways to deal with failures, some of which will be covered in the next section. The important point to note for now is that run() won’t necessarily raise an exception if the process fails unless you’ve passed in a check=True argument.
The CompletedProcess also has a few attributes relating to input/output (I/O), which you’ll cover in more detail in the communicating with processes section. Before communicating with processes, though, you’ll learn how to handle errors when coding with subprocess.
subprocess Exceptions
As you saw earlier, even if a process exits with a return code that represents failure, Python won’t raise an exception. For most use cases of the subprocess module, this isn’t ideal. If a process fails, you’ll usually want to handle it somehow, not just carry on.
A lot of subprocess use cases involve short personal scripts that you might not spend much time on, or at least shouldn’t spend much time on. If you’re tinkering with a script like this, then you’ll want subprocess to fail early and loudly.
CalledProcessError for Non-Zero Exit Code
If a process returns an exit code that isn’t zero, you should interpret that as a failed process. Contrary to what you might expect, the Python subprocess module does not automatically raise an exception on a non-zero exit code. A failing process is typically not something you want your program to pass over silently, so you can pass a check=True argument to run() to raise an exception:
>>> completed_process = subprocess.run(
...     ["python", "timer.py"],
...     check=True
... )
...
usage: timer.py [-h] time
timer.py: error: the following arguments are required: time
Traceback (most recent call last):
  ...
subprocess.CalledProcessError: Command '['python', 'timer.py']' returned
                               non-zero exit status 2.
The CalledProcessError is raised as soon as the subprocess runs into a non-zero return code. If you’re developing a short personal script, then perhaps this is good enough for you. If you want to handle errors more gracefully, then read on to the section on exception handling.
One thing to bear in mind is that the CalledProcessError does not apply to processes that may hang and block your execution indefinitely. To guard against that, you’d want to take advantage of the timeout parameter.
TimeoutExpired for Processes That Take Too Long
Sometimes processes aren’t well behaved, and they might take too long or just hang indefinitely. To handle those situations, it’s always a good idea to use the timeout parameter of the run() function.
Passing a timeout=1 argument to run() will cause the function to shut down the process and raise a TimeoutExpired error after one second:
>>> import subprocess
>>> subprocess.run(["python", "timer.py", "5"], timeout=1)
Starting timer of 5 seconds
.Traceback (most recent call last):
  ...
subprocess.TimeoutExpired: Command '['python', 'timer.py', '5']' timed out
                           after 1.0 seconds
In this example, the first dot of the timer animation was output, but the subprocess was shut down before being able to complete.
The other type of error that might happen is if the program doesn’t exist on that particular system, which raises one final type of error.
FileNotFoundError for Programs That Don’t Exist
The final type of exception you’ll be looking at is the FileNotFoundError, which is raised if you try and call a program that doesn’t exist on the target system:
>>> import subprocess
>>> subprocess.run(["now_you_see_me"])
Traceback (most recent call last):
  ...
FileNotFoundError: The system cannot find the file specified
This type of error is raised no matter what, so you don’t need to pass in any arguments for the FileNotFoundError.
Those are the main exceptions that you’ll run into when using the Python subprocess module. For many use cases, knowing the exceptions and making sure that you use timeout and check arguments will be enough. That’s because if the subprocess fails, then that usually means that your script has failed.
However, if you have a more complex program, then you may want to handle errors more gracefully. For instance, you may need to call many processes over a long period of time. For this, you can use the try … except construct.
An Example of Exception Handling
Here’s a code snippet that shows the main exceptions that you’ll want to handle when using subprocess:
import subprocess

try:
    subprocess.run(
        ["python", "timer.py", "5"], timeout=10, check=True
    )
except FileNotFoundError as exc:
    print(f"Process failed because the executable could not be found.\n{exc}")
except subprocess.CalledProcessError as exc:
    print(
        f"Process failed because did not return a successful return code. "
        f"Returned {exc.returncode}\n{exc}"
    )
except subprocess.TimeoutExpired as exc:
    print(f"Process timed out.\n{exc}")
This snippet shows you an example of how you might handle the three main exceptions raised by the subprocess module.
Now that you’ve used subprocess in its basic form and handled some exceptions, it’s time to get familiar with what it takes to interact with the shell.
Introduction to the Shell and Text-Based Programs With subprocess
Some of the most popular use cases of the subprocess module are to interact with text-based programs, typically available on the shell. That’s why in this section, you’ll start to explore all the moving parts involved when interacting with text-based programs, and perhaps question if you need the shell at all!
The shell is typically synonymous with the command-line interface or CLI, but this terminology isn’t entirely accurate. There are actually two separate processes that make up the typical command-line experience:
- The interpreter, which is typically thought of as the whole CLI. Common interpreters are Bash on Linux, Zsh on macOS, or PowerShell on Windows. In this tutorial, the interpreter will be referred to as the shell.
- The interface, which displays the output of the interpreter in a window and sends user keystrokes to the interpreter. The interface is a separate process from the shell, sometimes called a terminal emulator.
When on the command line, it’s common to think that you’re interacting directly with the shell, but you’re really interacting with the interface. The interface takes care of sending your commands to the shell and displaying the shell’s output back to you.
With this important distinction in mind, it’s time to turn your attention to what run() is actually doing. It’s common to think that calling run() is somehow the same as typing a command in a terminal interface, but there are important differences.
While all new process are created with the same system calls, the context from which the system call is made is different. The run() function can make a system call directly and doesn’t need to go through the shell to do so:
In fact, many programs that are thought of as shell programs, such as Git, are really just text-based programs that don’t need a shell to run. This is especially true of UNIX environments, where all of the familiar utilities like ls, rm, grep, and cat are actually separate executables that can be called directly:
>>> # Linux or macOS
>>> import subprocess
>>> subprocess.run(["ls"])
timer.py
CompletedProcess(args=['ls'], returncode=0)
There are some tools that are specific to shells, though. Finding tools embedded within the shell is far more common on Windows shells like PowerShell, where commands like ls are part of the shell itself and not separate executables like they are in a UNIX environment:
>>> # Windows
>>> import subprocess
>>> subprocess.run(["ls"])
Traceback (most recent call last):
  ...
FileNotFoundError: [WinError 2] The system cannot find the file specified
In PowerShell, ls is the default alias for Get-ChildItem, but calling that won’t work either because Get-ChildItem isn’t a separate executable—it’s part of PowerShell itself.
The fact that many text-based programs can operate independently from the shell may make you wonder if you can cut out the middle process—namely, the shell—and use subprocess directly with the text-based programs typically associated with the shell.
Use Cases for the Shell and subprocess
There are a few common reasons why you might want to call the shell with the Python subprocess module:
- When you know certain commands are only available via the shell, which is more common in Windows
- When you’re experienced in writing shell scripts with a particular shell, so you want to leverage your ability there to do certain tasks while still working primarily in Python
- When you’ve inherited a large shell script that might do nothing that Python couldn’t do, but would take a long time to reimplement in Python
This isn’t an exhaustive list!
You might use the shell to wrap programs or to do some text processing. However, the syntax can be very cryptic when compared to Python. With Python, text processing workflows are easier to write, easier to maintain, generally more performant, and cross-platform to boot. So it’s well worth considering going without the shell.
What often happens, though, is that you just don’t have the time or it’s not worth the effort to reimplement existing shell scripts in Python. In those cases, using subprocess for some sloppy Python isn’t a bad thing!
Common reasons for using subprocess itself are similar in nature to using the shell with subprocess:
- When you have to use or analyze a black box, or even a white box
- When you want a wrapper for an application
- When you need to launch another application
- As an alternative to basic shell scripts
Note: A black box could be a program that can be freely used but whose source code isn’t available, so there’s no way to know exactly what it does and no way to modify its internals.
Similarly, a white box could be a program whose source code is available but can’t be changed. It could also be a program whose source code you could change, but its complexity means that it would take you a long time to get your head around it to be able to change it.
In these cases, you can use subprocess to wrap your boxes of varying opacity, bypassing any need to change or reimplement things in Python.
Often you’ll find that for subprocess use cases, there will be a dedicated library for that task. Later in the tutorial, you’ll examine a script that creates a Python project, complete with a virtual environment and a fully initialized Git repository. However, the Cookiecutter and Copier libraries already exist for that purpose.
Even though specific libraries might be able to do your task, it may still be worth doing things with subprocess. For one, it might be much faster for you to execute what you already know how to do, rather than learning a new library.
Additionally, if you’re sharing this script with friends or colleagues, it’s convenient if your script is pure Python without any other dependencies, especially if your script needs to go on minimal environments like servers or embedded systems.
However, if you’re using subprocess instead of pathlib to read and write a few files with Bash, you might want to consider learning how to read and write with Python. Learning how to read and write files doesn’t take long, and it’ll definitely be worth it for such a common task.
With that out of the way, it’s time to get familiar with the shell environments on both Windows and UNIX-based systems.
Basic Usage of subprocess With UNIX-Based Shells
To run a shell command using run(), the args should contain the shell that you want to use, the flag to indicate that you want it to run a specific command, and the command that you’re passing in:
>>> import subprocess
>>> subprocess.run(["bash", "-c", "ls /usr/bin | grep pycode"])
pycodestyle
pycodestyle-3
pycodestyle-3.10
CompletedProcess(args=['bash', '-c', 'ls /usr/bin | grep pycode'], returncode=0)
Here a common shell command is demonstrated. It uses ls piped into grep to filter some of the entries. The shell is handy for this kind of operation because you can take advantage of the pipe operator (|). You’ll cover pipes in more detail later.
You can replace bash with the shell of your choice. The -c flag stands for command, but may be different depending on the shell that you’re using. This is almost the exact equivalent of what happens when you add the shell=True argument:
>>> subprocess.run(["ls /usr/bin | grep pycode"], shell=True)
pycodestyle
pycodestyle-3
pycodestyle-3.10
CompletedProcess(args=['ls /usr/bin | grep pycode'], returncode=0)
The shell=True argument uses ["sh", "-c", ...] behind the scenes, so it’s almost the equivalent of the previous example.
Note: On UNIX-based systems, the sh shell was traditionally the Bourne shell. That said, the Bourne shell is now quite old, so many operating systems use sh as a link to Bash or Dash.
This can often be different from the shell used with the terminal interface that you interact with. For instance, since macOS Catalina, the default shell that you’ll find on the command-line app has changed from Bash to Zsh, yet sh often still points to Bash. Likewise, on Ubuntu, sh points to Dash, but the default that you typically interact with on the command-line application is still Bash.
So, calling sh on your system may result in a different shell than what is found in this tutorial. Nevertheless, the examples should all still work.
You’ll note that the token after "-c" should be one single token, with all the spaces included. Here you’re giving control to the shell to parse the command. If you were to include more tokens, this would be interpreted as more options to pass to the shell executable, not as additional commands to run inside the shell.
Basic Usage of subprocess With Windows Shells
In this section, you’ll cover basic use of the shell with subprocess in a Windows environment.
To run a shell command using run(), the args should contain the shell that you want to use, the flag to indicate that you want it to run a specific command, and the command that you’re passing in:
>>> import subprocess
>>> subprocess.run(["pwsh", "-Command", "ls C:\RealPython"])

    Directory: C:\RealPython

Mode                 LastWriteTime         Length Name
----                 -------------         ------ ----
-a---            09/05/22    10:41            237 basics.py
-a---            18/05/22    17:28            486 hello_world.py

CompletedProcess(args=['pwsh', '-Command', 'ls'], returncode=0)
Note that pwsh and pwsh.exe both work. If you don’t have PowerShell Core, then you can call powershell or powershell.exe.
You’ll note that the token after "-Command" should be one single token, with all the spaces included. Here you’re giving control to the shell to parse the command. If you were to include more tokens, this would be interpreted as more options to pass to the shell executable, not as additional commands to run inside the shell.
If you need the Command Prompt, then the executable is cmd or cmd.exe, and the flag to indicate that the following token is a command is /c:
>>> import subprocess
>>> subprocess.run(["cmd", "/c", "dir C:\RealPython"])
 Volume in drive C has no label.
 Volume Serial Number is 0000-0000

 Directory of C:\RealPython

30/03/22  23:01    <DIR>          .
30/03/22  23:01    <DIR>          ..
09/05/22  10:41               237 basics.py
18/05/22  17:28               486 hello_world.py
This last example is the exact equivalent of calling run() with shell=True. Said in another way, using the shell=True argument is like prepending "cmd" and "/c" to your argument list.
Note: Windows’ evolution has been very different from that of UNIX-based systems. The most widely known shell is the Windows Command Prompt which is by now a legacy shell. The Command Prompt was made to emulate the pre-Windows MS-DOS environment. Many shell scripts, or batch .bat scripts, were written for this environment which are still in use today.
The run() function with the Shell parameter will almost always end up using the Command Prompt. The subprocess module uses the Windows COMSPEC environment variable, which in almost all cases will point to cmd.exe, the Command Prompt. By now, there are so many programs that equate COMSPEC to cmd.exe that changing it would cause much breakage in unexpected places! So, changing COMSPEC is generally not advised.
At this point, you should know about an important security concern that you’ll want to be aware of if you have user-facing elements in your Python program, regardless of the operating system. It’s a vulnerability that’s not confined to subprocess. Rather, it can be exploited in many different areas.
A Security Warning
If at any point you plan to get user input and somehow translate that to a call to subprocess, then you have to be very careful of injection attacks. That is, take into account potential malicious actors. There are many ways to cause havoc if you just let people run code on your machine.
To use a very simplistic example, where you take user input and send it, unfiltered, to subprocess to run on the shell:
You can imagine the intended use case is to wrap ls and add something to it. So the expected user behavior is to provide a path like "/home/realpython/". However, if a malicious actor realized what was happening, they could execute almost any code they wanted. Take the following, for instance, but be careful with this:
Again, beware! These innocent-looking lines could try and delete everything on the system! In this case the malicious part is in quotes, so it won’t run, but if the quotes were not there, you’d be in trouble. The key part that does this is the call to rm with the relevant flags to recursively delete all files, folders, and subfolders, and it’ll work to force the deletion through. It can run the echo and potentially the rm as entirely separate commands by adding semicolons, which act as command separators allowing what would usually be multiple lines of code to run on one line.
Running these malicious commands would cause irreparable damage to the file system, and would require reinstalling the operating system. So, beware!
Luckily, the operating system wouldn’t let you do this to some particularly important files. The rm command would need to use sudo in UNIX-based systems, or be run as an administrator in Windows to be completely successful in its mayhem. The command would probably delete a lot of important stuff before stopping, though.
So, make sure that if you’re dynamically building user inputs to feed into a subprocess call, then you’re very careful! With that warning, coming up you’ll be covering using the outputs of commands and chaining commands together—in short, how to communicate with processes once they’ve started.
Communication With Processes
You’ve used the subprocess module to execute programs and send basic commands to the shell. But something important is still missing. For many tasks that you might want to use subprocess for, you might want to dynamically send inputs or use the outputs in your Python code later.
To communicate with your process, you first should understand a little bit about how processes communicate in general, and then you’ll take a look at two examples to come to grips with the concepts.
The Standard I/O Streams
A stream at its most basic represents a sequence of elements that aren’t available all at once. When you read characters and lines from a file, you’re working with a stream in the form of a file object, which at its most basic is a file descriptor. File descriptors are often used for streams. So, it’s not uncommon to see the terms stream, file, and file-like used interchangeably.
When processes are initialized, there are three special streams that a process makes use of. A process does the following:
- Reads
stdinfor input - Writes to
stdoutfor general output - Writes to
stderrfor error reporting
These are the standard streams—a cross-platform pattern for process communication.
Sometimes the child process inherits these streams from the parent. This is what’s happening when you use subprocess.run() in the REPL and are able to see the output of the command. The stdout of the Python interpreter is inherited by the subprocess.
When you’re in a REPL environment, you’re looking at a command-line interface process, complete with the three standard I/O streams. The interface has a shell process as a child process, which itself has a Python REPL as a child. In this situation, unless you specify otherwise, stdin comes from the keyboard, while stdout and stderr are displayed on-screen. The interface, the shell, and the REPL share the streams:
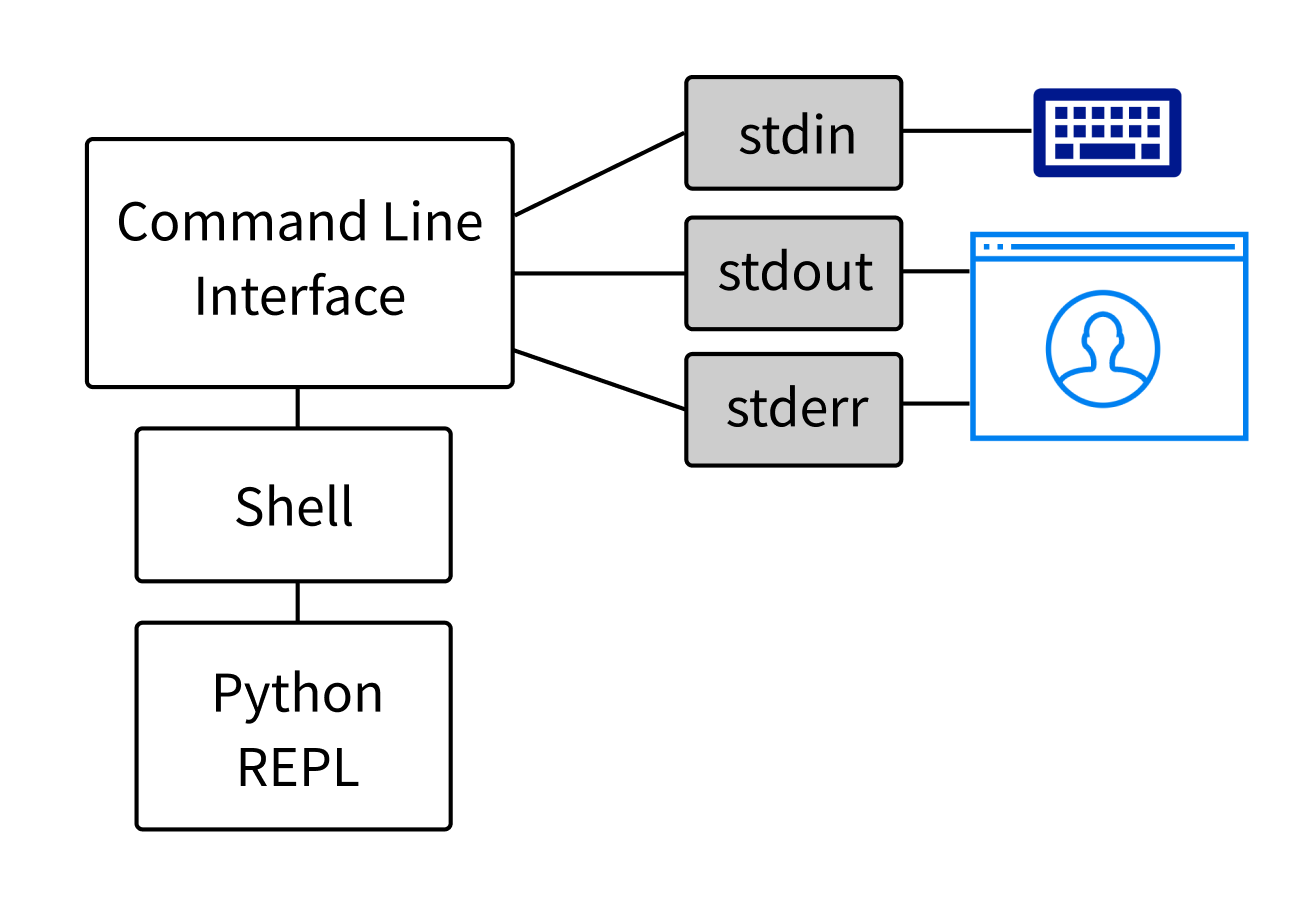
You can think of the standard I/O streams as byte dispensers. The subprocess fills up stdout and stderr, and you fill up stdin. Then you read the bytes in stdout and stderr, and the subprocess reads from stdin.
As with a dispenser, you can stock stdin before it gets linked up to a child process. The child process will then read from stdin as and when it needs to. Once a process has read from a stream, though, the bytes are dispensed. You can’t go back and read them again:
These three streams, or files, are the basis for communicating with your process. In the next section, you’ll start to see this in action by getting the output of a magic number generator program.
The Magic Number Generator Example
Often, when using the subprocess module, you’ll want to use the output for something and not just display the output as you have been doing so far. In this section, you’ll use a magic number generator that outputs, well, a magic number.
Imagine that the magic number generator is some obscure program, a black box, inherited across generations of sysadmins at your job. It outputs a magic number that you need for your secret calculations. You’ll read from the stdout of subprocess and use it in your wrapper Python program:
# magic_number.py

from random import randint

print(randint(0, 1000))
Okay, not really so magical. That said, it’s not the magic number generator that you’re interested in—it’s interacting with a hypothetical black box with subprocess that’s interesting. To grab the number generator’s output to use later, you can pass in a capture_output=True argument to run():
>>> import subprocess
>>> magic_number_process = subprocess.run(
...     ["python", "magic_number.py"], capture_output=True
... )
>>> magic_number_process.stdout
b'769\n'
Passing a capture_output argument of True to run() makes the output of the process available at the .stdout attribute of the completed process object. You’ll note that it’s returned as a bytes object, so you need to be mindful of encodings when reading it.
Also note that the .stdout attribute of the CompletedProcess is no longer a stream. The stream has been read, and it’s stored as a bytes object in the .stdout attribute.
With the output available, you can use more than one subprocess to grab values and operate on them in your code:
>>> import subprocess
>>> sum(
...     int(
...         subprocess.run(
...             ["python", "magic_number.py"], capture_output=True
...         ).stdout
...     )
...     for _ in range(2)
... )
1085
In this example, you start two magic number processes that fetch two magic numbers and then add them together. For now, you rely on the automatic decoding of the bytes object by the int() constructor. In the next section, though, you’ll learn how to decode and encode explicitly.
The Decoding of Standard Streams
Processes communicate in bytes, and you have a few different ways to deal with encoding and decoding these bytes. Beneath the surface, subprocess has a few ways of getting into text mode.
Text mode means that subprocess will try to take care of encoding itself. To do that, it needs to know what character encoding to use. Most of the options for doing this in subprocess will try to use the default encoding. However, you generally want to be explicit about what encoding to use to prevent a bug that would be hard to find in the future.
You can pass a text=True argument for Python to take care of encodings using the default encoding. But, as mentioned, it’s always safer to specify the encodings explicitly using the encoding argument, as not all systems work with the nearly universal UTF-8:
>>> magic_number_process = subprocess.run(
...     ["python", "magic_number.py"], capture_output=True, encoding="utf-8"
... )
...
>>> magic_number_process.stdout
'647\n'
If in text mode, the .stdout attribute on a CompletedProcess is now a string and not a bytes object.
You can also decode the bytes returned by calling the .decode() method on the stdout attribute directly, without requiring text mode at all:
>>> magic_number_process = subprocess.run(
...     ["python", "magic_number.py"], capture_output=True
... )
...
>>> magic_number_process.stdout.decode("utf-8")
'72\n'
There are other ways to put run() into text mode. You can also set a True value for errors or universal_newlines, which will also put run() into text mode. This may seem redundant, but much of this is kept for backwards compatibility, seeing as the subprocess module has changed over the years.
Now that you know how to read and decode the output of a process, it’s time to take a look at writing to the input of a process.
Reaction Game Example
In this section, you’ll use subprocess to interact with a command-line game. It’s a basic program that’s designed to test a human’s reaction time. With your knowledge of standard I/O streams, though, you’ll be able to hack it! The source code of the game makes use of the time and random module:
# reaction_game.py

from time import perf_counter, sleep
from random import random

print("Press enter to play")
input()
print("Ok, get ready!")
sleep(random() * 5 + 1)
print("go!")
start = perf_counter()
input()
end = perf_counter()
print(f"You reacted in {(end - start) * 1000:.0f} milliseconds!\nGoodbye!")
The program starts, asks for the user to press enter, and then after a random amount of time will ask the user to press enter again. It measures from the time the message appears to the time the user presses enter, or at least that’s what the game developer thinks:
The input() function will read from stdin until it reaches a newline, which means an Enter keystroke in this context. It returns everything it consumed from stdin except the newline. With that knowledge, you can use subprocess to interact with this game:
>>> import subprocess
>>> process = subprocess.run(
...     ["python", "reaction_game.py"], input="\n\n", encoding="utf-8"
... )
...
Press enter to play
Ok, get ready!
go!
You reacted in 0 milliseconds!
Goodbye!
A reaction time of 0 milliseconds! Not bad! Considering the average human reaction time is around 270 milliseconds, your program is definitely superhuman. Note that the game rounds its output, so 0 milliseconds doesn’t mean it’s instantaneous.
The input argument passed to run() is a string consisting of two newlines. The encoding parameter is set to utf-8, which puts run() into text mode. This sets up the process for it to receive the input you that give it.
Before the program starts, stdin is stocked, waiting for the program to consume the newlines it contains. One newline is consumed to start the game, and the next newline is consumed to react to go!.
Now that you know what’s happening—namely that stdin can be stocked, as it were—you can hack the program yourself without subprocess. If you start the game and then press Enter a few times, that’ll stock up stdin with a few newlines that the program will automatically consume once it gets to the input() line. So your reaction time is really only the time it takes for the reaction game to execute start = time() and consume an input:
The game developer gets wise to this, though, and vows to release another version, which will guard against this exploit. In the meantime, you’ll peek a bit further under the hood of subprocess and learn about how it wires up the standard I/O streams.
Pipes and the Shell
To really understand subprocesses and the redirection of streams, you really need to understand pipes and what they are. This is especially true if you want to wire up two processes together, feeding one stdout into another process’s stdin, for instance. In this section, you’ll be coming to grips with pipes and how to use them with the subprocess module.
Introduction to Pipes
A pipe, or pipeline, is a special stream that, instead of having one file handle as most files do, has two. One handle is read-only, and the other is write-only. The name is very descriptive—a pipe serves to pipe a byte stream from one process to another. It’s also buffered, so a process can write to it, and it’ll hold onto those bytes until it’s read, like a dispenser.
You may be used to seeing pipes on the command line, as you did in the section on shells:
$ ls /usr/bin | grep python
This command tells the shell to create an ls process to list all the files in /usr/bin. The pipe operator (|) tells the shell to create a pipe from the stdout of the ls process and feed it into the stdin of the grep process. The grep process filters out all the lines that don’t contain the string python.
Windows doesn’t have grep, but a rough equivalent of the same command would be as follows:
PS> ls "C:\Program Files" | Out-String -stream | Select-String windows
However, on Windows PowerShell, things work very differently. As you learned in the Windows shell section of this tutorial, the different commands are not separate executables. Therefore, PowerShell is internally redirecting the output of one command into another without starting new processes.
Note: If you don’t have access to a UNIX-based operating system but have Windows 10 or above, then you actually do have access to a UNIX-based operating system! Check out Windows Subsystem for Linux, which will give you access to a fully featured Linux shell.
You can use pipes for different processes on PowerShell, though getting into the intricacies of which ones is outside the scope of this tutorial. For more information on PowerShell pipes, check out the documentation. So, for the rest of the pipe examples, only UNIX-based examples will be used, as the basic mechanism is the same for both systems. They’re not nearly as common on Windows, anyway.
If you want to let the shell take care of piping processes into one another, then you can just pass the whole string as a command into subprocess:
>>> import subprocess
>>> subprocess.run(["sh" , "-c", "ls /usr/bin | grep python"])
python3
python3-config
python3.8
python3.8-config
...
CompletedProcess(...)
This way, you can let your chosen shell take care of piping one process into another, instead of trying to reimplement things in Python. This is a perfectly valid choice in certain situations.
Later in the tutorial, you’ll also come to see that you can’t pipe processes directly with run(). For that, you’ll need the more complicated Popen(). Actual piping is demonstrated in Connecting Two Porcesses Together With Pipes, near the end of the tutorial.
Whether you mean to pipe one process into another with the subprocess module or not, the subprocess module makes extensive use of pipes behind the scenes.
The Pipes of subprocess
The Python subprocess module uses pipes extensively to interact with the processes that it starts. In a previous example, you used the capture_output parameter to be able to access stdout:
>>> import subprocess
>>> magic_number_process = subprocess.run(
...     ["python", "magic_number.py"], capture_output=True
... )
>>> magic_number_process.stdout
b'769\n'
capture_output=True is equivalent to explicitly setting the stdout and stderr parameters to the subprocess.PIPE constant:
>>> import subprocess
>>> magic_number_process = subprocess.run(
...     ["python", "magic_number.py"],
...     stdout=subprocess.PIPE,
...     stderr=subprocess.PIPE
... )
...
>>> magic_number_process.stdout
b'769\n'
The PIPE constant is nothing special. It’s just a number that indicates to subprocess that a pipe should be created. The function then creates a pipe to link up to the stdout of the subprocess, which the function then reads into the CompletedProcess object’s stdout attribute. By the time it’s a CompletedProcess, it’s no longer a pipe, but a bytes object that can be accessed multiple times.
Note: Pipe buffers have a limited capacity. Depending on the system you are running on, you may easily run into that limit if you plan on holding large quantities of data in the buffer. To work around this limit, you can use normal files.
You can also pass a file object to any of the standard stream parameters:
>>> from tempfile import TemporaryFile
>>> with TemporaryFile() as f:
...     ls_process = subprocess.run(["python", "magic_number.py"], stdout=f)
...     f.seek(0)
...     print(f.read().decode("utf-8"))
...
0
554
You can’t pass a bytes object or a string directly to the stdin argument, though. It needs to be something file-like.
Note that the 0 that gets returned first is from the call to seek() which returns the new stream position, which in this case is the start of the stream.
The input parameter is similar to the capture_output parameter in that it’s a shortcut. Using the input parameter will create a buffer to store the contents of input, and then link the file up to the new process to serve as its stdin.
To actually link up two processes with a pipe from within subprocess is something that you can’t do with run(). Instead, you can delegate the plumbing to the shell, as you did earlier in the Introduction to the Shell and Text Based Programs with subprocess section.
If you needed to link up different processes without delegating any of the work to the shell, then you could do that with the underlying Popen() constructor. You’ll cover Popen() in a later section. In the next section, though, you’ll be simulating a pipe with run() because in most cases, it’s not vital for processes to be linked up directly.
Pipe Simulation With run()
Though you can’t actually link up two processes together with a pipe by using the run() function, at least not without delegating it to the shell, you can simulate piping by judicious use of the stdout attribute.
If you’re on a UNIX-based system where almost all typical shell commands are separate executables, then you can just set the input of the second process to the .stdout attribute of the first CompletedProcess:
>>> import subprocess
>>> ls_process = subprocess.run(["ls", "/usr/bin"], stdout=subprocess.PIPE)
>>> grep_process = subprocess.run(
...     ["grep", "python"], input=ls_process.stdout, stdout=subprocess.PIPE
... )
>>> print(grep_process.stdout.decode("utf-8"))
python3
python3-config
python3.8
python3.8-config
...
Here the .stdout attribute of the CompletedProcess object of ls is set to the input of the grep_process. It’s important that it’s set to input rather than stdin. This is because the .stdout attribute isn’t a file-like object. It’s a bytes object, so it can’t be used as an argument to stdin.
As an alternative, you can operate directly with files too, setting them to the standard stream parameters. When using files, you set the file object as the argument to stdin, instead of using the input parameter:
>>> import subprocess
>>> from tempfile import TemporaryFile
>>> with TemporaryFile() as f:
...     ls_process = subprocess.run(["ls", "/usr/bin"], stdout=f)
...     f.seek(0)
...     grep_process = subprocess.run(
...         ["grep", "python"], stdin=f, stdout=subprocess.PIPE
...     )
...
0 # from f.seek(0)
>>> print(grep_process.stdout.decode("utf-8"))
python3
python3-config
python3.8
python3.8-config
...
As you learned in the previous section, for Windows PowerShell, doing something like this doesn’t make a whole lot of sense because most of the time, these utilities are part of PowerShell itself. Because you aren’t dealing with separate executables, piping becomes less of a necessity. However, the pattern for piping is still the same if something like this needs to be done.
With most of the tools out the way, it’s now time to think about some practical applications for subprocess.
Practical Ideas
When you have an issue that you want to solve with Python, sometimes the subprocess module is the easiest way to go, even though it may not be the most correct.
Using subprocess is often tricky to get working across different platforms, and it has inherent dangers. But even though it may involve some sloppy Python, using subprocess can be a very quick and efficient way to solve a problem.
As mentioned, for most tasks you can imagine doing with subprocess, there’s usually a library out there that’s dedicated to that specific task. The library will almost certainly use subprocess, and the developers will have worked hard to make the code reliable and to cover all the corner cases that can make using subprocess difficult.
So, even though dedicated libraries exist, it can often be simpler to just use subprocess, especially if you’re in an environment where you need to limit your dependencies.
In the following sections, you’ll be exploring a couple of practical ideas.
Creating a New Project: An Example
Say you often need to create new local projects, each complete with a virtual environment and initialized as a Git repository. You could reach for the Cookiecutter library, which is dedicated to that task, and that wouldn’t be a bad idea.
However, using Cookiecutter would mean learning Cookiecutter. Imagine you didn’t have much time, and your environment was extremely minimal anyway—all you could really count on was Git and Python. In these cases, subprocess can quickly set up your project for you:
# create_project.py

from argparse import ArgumentParser
from pathlib import Path
import subprocess

def create_new_project(name):
    project_folder = Path.cwd().absolute() / name
    project_folder.mkdir()
    (project_folder / "README.md").touch()
    with open(project_folder / ".gitignore", mode="w") as f:
        f.write("\n".join(["venv", "__pycache__"]))
    commands = [
        [
            "python",
            "-m",
            "venv",
            f"{project_folder}/venv",
        ],
        ["git", "-C", project_folder, "init"],
        ["git", "-C", project_folder, "add", "."],
        ["git", "-C", project_folder, "commit", "-m", "Initial commit"],
    ]
    for command in commands:
        try:
            subprocess.run(command, check=True, timeout=60)
        except FileNotFoundError as exc:
            print(
                f"Command {command} failed because the process "
                f"could not be found.\n{exc}"
            )
        except subprocess.CalledProcessError as exc:
            print(
                f"Command {command} failed because the process "
                f"did not return a successful return code.\n{exc}"
            )
        except subprocess.TimeoutExpired as exc:
            print(f"Command {command} timed out.\n {exc}")


if __name__ == "__main__":
    parser = ArgumentParser()
    parser.add_argument("project_name", type=str)
    args = parser.parse_args()
    create_new_project(args.project_name)
This is a command-line tool that you can call to start a project. It’ll take care of creating a README.md file and a .gitignore file, and then it’ll run a few commands to create a virtual environment, initialize a git repository, and perform your first commit. It’s even cross-platform, opting to use pathlib to create the files and folders, which abstracts away the operating system differences.
Could this be done with Cookiecutter? Could you use GitPython for the git part? Could you use the venv module to create the virtual environment? Yes to all. But if you just need something quick and dirty, using commands you already know, then just using subprocess can be a great option.
Changing Extended Attributes
If you use Dropbox, you may not know that there’s a way to ignore files when syncing. For example, you can keep virtual environments in your project folder and use Dropbox to sync the code, but keep the virtual environment local.
That said, it’s not as easy as adding a .dropboxignore file. Rather, it involves adding special attributes to files, which can be done from the command line. These attributes are different between UNIX-like systems and Windows:
There are some UNIX-based projects, like dropboxignore, that use shell scripts to make it easier to ignore files and folders. The code is relatively complex, and it won’t work on Windows.
With the subprocess module, you can wrap the different shell commands quite easily to come up with your own utility:
# dropbox_ignore.py

import platform
from pathlib import Path
from subprocess import run, DEVNULL

def init_shell():
    print("initializing shell")
    system = platform.system()
    print(f"{system} detected")
    if system == "Linux":
        return Bash_shell()
    elif system == "Windows":
        return Pwsh_shell()
    elif system == "Darwin":
        raise NotImplementedError

class Pwsh_shell():
    def __init__(self) -> None:
        try:
            run(["pwsh", "-V"], stdout=DEVNULL, stderr=DEVNULL)
            self.shell = "pwsh"
        except FileNotFoundError as exc:
            print("Powershell Core not installed, falling back to PowerShell")
            self.shell = "powershell"

    @staticmethod
    def _make_string_path_list(paths: list[Path]) -> str:
        return "', '".join(str(path).replace("'", "`'") for path in paths)

    def ignore_folders(self, paths: list[Path]) -> None:
        path_list = self._make_string_path_list(paths)
        command = (
            f"Set-Content -Path '{path_list}' "
            f"-Stream com.dropbox.ignored -Value 1"
        )
        run([self.shell, "-NoProfile", "-Command", command], check=True)
        print("Done!")

class Bash_shell():
    @staticmethod
    def _make_string_path_list(paths: list[Path]) -> str:
        return "' '".join(str(path).replace("'", "\\'") for path in paths)

    def ignore_folders(self, paths: list[Path]) -> None:
        path_list = self._make_string_path_list(paths)
        command = (
            f"for f in '{path_list}'\n do\n "
            f"attr -s com.dropbox.ignored -V 1 $f\ndone"
        )
        run(["bash", "-c", command], check=True)
        print("Done!")
This is a simplified snippet from the author’s dotDropboxIgnore repository. The init_shell() function detects the operating system with the platform module and returns an object that’s an abstraction around the system-specific shell. The code hasn’t implemented the behavior on macOS, so it raises a NotImplementedError if it detects it’s running on macOS.
The shell object allows you to call an .ignore_folders() method with a list of pathlib Path objects to set Dropbox to ignore those files.
On the Pwsh_shell class, the constructor tests to see if PowerShell Core is available, and if not, will fall back to the older Windows PowerShell, which is installed by default on Windows 10.
In the next section, you’ll review some of the other modules that might be interesting to keep in mind when deciding whether to use subprocess.
Python Modules Associated With subprocess
When deciding whether a certain task is a good fit for subprocess, there are some associated modules that you may want to be aware of.
Before subprocess existed, you could use os.system() to run commands. However, as with many things that os was used for before, standard library modules have come to replace os, so it’s mostly used internally. There are hardly any use cases for using os yourself.
There’s an official documentation page where you can examine some of the old ways to accomplish tasks with os and learn how you might do the same with subprocess.
It might be tempting to think that subprocess can be used for concurrency, and in simple cases, it can be. But, in line with the sloppy Python philosophy, it’s probably only going to be to hack something together quickly. If you want something more robust, then you’ll probably want to start looking at the multiprocessing module.
Depending on the task that you’re attempting, you may be able to accomplish it with the asyncio or threading modules. If everything is written in Python, then these modules are likely your best bet.
The asyncio module has a high-level API to create and manage subprocesses too, so if you want more control over non-Python parallel processes, that might be one to check out.
Now it’s time to get deep into subprocess and explore the underlying Popen class and its constructor.
The Popen Class
As mentioned, the underlying class for the whole subprocess module is the Popen class and the Popen() constructor. Each function in subprocess calls the Popen() constructor under the hood. Using the Popen() constructor gives you lots of control over the newly started subprocesses.
As a quick summary, run() is basically the Popen() class constructor, some setup, and then a call to the .communicate() method on the newly initialized Popen object. The .communicate() method is a blocking method that returns the stdout and stderr data once the process has ended.
The name of Popen comes from a similar UNIX command that stands for pipe open. The command creates a pipe and then starts a new process that invokes the shell. The subprocess module, though, doesn’t automatically invoke the shell.
The run() function is a blocking function, which means that interacting dynamically with a process isn’t possible with it. However, the Popen() constructor starts a new process and continues, leaving the process running in parallel.
The developer of the reaction game that you were hacking earlier has released a new version of their game, one in which you can’t cheat by loading stdin with newlines:
# reaction_game_v2.py

from random import choice, random
from string import ascii_lowercase
from time import perf_counter, sleep

print(
    "A letter will appear on screen after a random amount of time,\n"
    "when it appears, type the letter as fast as possible "
    "and then press enter\n"
)
print("Press enter when you are ready")
input()
print("Ok, get ready!")
sleep(random() * 5 + 2)
target_letter = choice(ascii_lowercase)
print(f"=====\n= {target_letter} =\n=====\n")

start = perf_counter()
while True:
    if input() == target_letter:
        break
    else:
        print("Nope! Try again.")
end = perf_counter()

print(f"You reacted in {(end - start) * 1000:.0f} milliseconds!\nGoodbye!")
Now the program will display a random character, and you need to press that exact character to have the game register your reaction time:
What’s to be done? First, you’ll need to come to grips with using Popen() with basic commands, and then you’ll find another way to exploit the reaction game.
Using Popen()
Using the Popen() constructor is very similar in appearance to using run(). If there’s an argument that you can pass to run(), then you’ll generally be able to pass it to Popen(). The fundamental difference is that it’s not a blocking call—rather than waiting until the process is finished, it’ll run the process in parallel. So you need to take this non-blocking nature into account if you want to read the new process’s output:
# popen_timer.py

import subprocess
from time import sleep

with subprocess.Popen(
    ["python", "timer.py", "5"], stdout=subprocess.PIPE
) as process:

    def poll_and_read():
        print(f"Output from poll: {process.poll()}")
        print(f"Output from stdout: {process.stdout.read1().decode('utf-8')}")

    poll_and_read()
    sleep(3)
    poll_and_read()
    sleep(3)
    poll_and_read()
This program calls the timer process in a context manager and assigns stdout to a pipe. Then it runs the .poll() method on the Popen object and reads its stdout.
The .poll() method is a basic method to check if a process is still running. If it is, then .poll() returns None. Otherwise, it’ll return the process’s exit code.
Then the program uses .read1() to try and read as many bytes as are available at .stdout.
Note: If you put the Popen object into text mode and then called .read() on .stdout, the call to .read() would be blocking until it reached a newline. In this case, a newline would coincide with the end of the timer program. This behavior isn’t desired in this situation.
To read as many bytes as are available at that time, disregarding newlines, you need to read with .read1(). It’s important to note that .read1() is only available on byte streams, so you need to make sure to deal with encodings manually and not use text mode.
The output of this program first prints None because the process hasn’t yet finished. The program then prints what is available in stdout so far, which is the starting message and the first character of the animation.
After three seconds, the timer hasn’t finished, so you get None again, along with two more characters of the animation. After another three seconds, the process has ended, so .poll() produces 0, and you get the final characters of the animation and Done!:
Output from poll: None
Output from stdout: Starting timer of 5 seconds
.
Output from poll: None
Output from stdout: ..
Output from poll: 0
Output from stdout: ..Done!
In this example, you’ve seen how the Popen() constructor works very differently from run(). In most cases, you don’t need this kind of fine-grained control. That said, in the next sections, you’ll see how you can pipe one process into another, and how you can hack the new reaction game.
Connecting Two Processes Together With Pipes
As mentioned in a previous section, if you need to connect processes together with pipes, you need to use the Popen() constructor. This is mainly because run() is a blocking call, so by the time the next process starts, the first one has ended, meaning that you can’t directly link up to its stdout.
This procedure will only be demonstrated for UNIX systems, because piping in Windows is far less common, as mentioned in the simulating a pipe section:
# popen_pipe.py

import subprocess

ls_process = subprocess.Popen(["ls", "/usr/bin"], stdout=subprocess.PIPE)
grep_process = subprocess.Popen(
    ["grep", "python"], stdin=ls_process.stdout, stdout=subprocess.PIPE
)

for line in grep_process.stdout:
    print(line.decode("utf-8").strip())
In this example, the two processes are started in parallel. They are joined with a common pipe, and the for loop takes care of reading the pipe at stdout to output the lines.
A key point to note is that in contrast to run(), which returns a CompletedProcess object, the Popen() constructor returns a Popen object. The standard stream attributes of a CompletedProcess point to bytes objects or strings, but the same attributes of a Popen object point to the actual streams. This allows you to communicate with processes as they’re running.
Whether you really need to pipe processes into one another, though, is another matter. Ask yourself if there’s much to be lost by mediating the process with Python and using run() exclusively. There are some situations in which you really need Popen, though, such as hacking the new version of the reaction time game.
Interacting Dynamically With a Process
Now that you know you can use Popen() to interact with a process dynamically as it runs, it’s time to turn that knowledge toward exploiting the reaction time game again:
# reaction_game_v2_hack.py

import subprocess

def get_char(process):
    character = process.stdout.read1(1)
    print(
        character.decode("utf-8"),
        end="",
        flush=True,  # Unbuffered print
    )
    return character.decode("utf-8")

def search_for_output(strings, process):
    buffer = ""
    while not any(string in buffer for string in strings):
        buffer = buffer + get_char(process)

with subprocess.Popen(
    [
        "python",
        "-u",  # Unbuffered stdout and stderr
        "reaction_game_v2.py",
    ],
    stdin=subprocess.PIPE,
    stdout=subprocess.PIPE,
) as process:
    process.stdin.write(b"\n")
    process.stdin.flush()
    search_for_output(["==\n= ", "==\r\n= "], process)
    target_char = get_char(process)
    stdout, stderr = process.communicate(
        input=f"{target_char}\n".encode("utf-8"), timeout=10
    )
    print(stdout.decode("utf-8"))
With this script, you’re taking complete control of the buffering of a process, which is why you pass in arguments such as -u to the Python process and flush=True to print(). These arguments are to ensure that no extra buffering is taking place.
The script works by using a function that’ll search for one of a list of strings by grabbing one character at a time from the process’s stdout. As each character comes through, the script will search for the string.
Note: To make this work on both Windows and UNIX-based systems, two strings are searched for: either "==\n= " or "==\r\n= ". The Windows-style carriage return along with the typical newline is required on Windows systems.
After the script has found one of the target strings, which in this case is the sequence of characters before the target letter, it’ll then grab the next character and write that letter to the process’s stdin followed by a newline:
At one millisecond, it’s not quite as good as the original hack, but it’s still very much superhuman. Well done!
With all this fun aside, interacting with processes using Popen can be very tricky and is prone to errors. First, see if you can use run() exclusively before resorting to the Popen() constructor.
If you really need to interact with processes at this level, the asyncio module has a high-level API to create and manage subprocesses.
The asyncio subprocess functionality is intended for more complex uses of subprocess where you may need to orchestrate various processes. This might be the case if you’re performing complex processing of many image, video, or audio files, for example. If you’re using subprocess at this level, then you’re probably building a library.
Conclusion
You’ve completed your journey into the Python subprocess module. You should now be able to decide whether subprocess is a good fit for your problem. You should also be able to decide whether you need to invoke the shell. Aside from that, you should be able to run subprocesses and interact with their inputs and outputs.
You should also be able to start exploring the possibilities of process manipulation with the Popen() constructor.
Along the way, you’ve:
- Learned about processes in general
- Gone from basic to advanced usage of
subprocess - Understood how to raise and handle errors when using
run() - Gotten familiar with shells and their intricacies on both Windows and UNIX-like systems
- Explored the use cases for
subprocessthrough practical examples - Understood the standard I/O streams and how to interact with them
- Come to grips with pipes, both in the shell and with
subprocess - Looked at the
Popen()constructor and used it for some advanced process communication
You’re now ready to bring a variety of executables into your Pythonic sphere of influence!
Source Code: Click here to download the free source code that you’ll use to get acquainted with the Python subprocess module.