Watch Now This tutorial has a related video course created by the Real Python team. Watch it together with the written tutorial to deepen your understanding: Exercises Course: Introduction to Web Scraping With Python
Web scraping is the process of collecting and parsing raw data from the Web, and the Python community has come up with some pretty powerful web scraping tools.
The Internet hosts perhaps the greatest source of information on the planet. Many disciplines, such as data science, business intelligence, and investigative reporting, can benefit enormously from collecting and analyzing data from websites.
In this tutorial, you’ll learn how to:
- Parse website data using string methods and regular expressions
- Parse website data using an HTML parser
- Interact with forms and other website components
Note: This tutorial is adapted from the chapter “Interacting With the Web” in Python Basics: A Practical Introduction to Python 3.
The book uses Python’s built-in IDLE editor to create and edit Python files and interact with the Python shell, so you’ll see occasional references to IDLE throughout this tutorial. However, you should have no problems running the example code from the editor and environment of your choice.
Source Code: Click here to download the free source code that you’ll use to collect and parse data from the Web.
Take the Quiz: Test your knowledge with our interactive “A Practical Introduction to Web Scraping in Python” quiz. You’ll receive a score upon completion to help you track your learning progress:
Interactive Quiz
A Practical Introduction to Web Scraping in PythonIn this quiz, you'll test your understanding of web scraping in Python. Web scraping is a powerful tool for data collection and analysis. By working through this quiz, you'll revisit how to parse website data using string methods, regular expressions, and HTML parsers, as well as how to interact with forms and other website components.
Scrape and Parse Text From Websites
Collecting data from websites using an automated process is known as web scraping. Some websites explicitly forbid users from scraping their data with automated tools like the ones that you’ll create in this tutorial. Websites do this for two possible reasons:
- The site has a good reason to protect its data. For instance, Google Maps doesn’t let you request too many results too quickly.
- Making many repeated requests to a website’s server may use up bandwidth, slowing down the website for other users and potentially overloading the server such that the website stops responding entirely.
Before using your Python skills for web scraping, you should always check your target website’s acceptable use policy to see if accessing the website with automated tools is a violation of its terms of use. Legally, web scraping against the wishes of a website is very much a gray area.
Important: Please be aware that the following techniques may be illegal when used on websites that prohibit web scraping.
For this tutorial, you’ll use a page that’s hosted on Real Python’s server. The page that you’ll access has been set up for use with this tutorial.
Now that you’ve read the disclaimer, you can get to the fun stuff. In the next section, you’ll start grabbing all the HTML code from a single web page.
Build Your First Web Scraper
One useful package for web scraping that you can find in Python’s standard library is urllib, which contains tools for working with URLs. In particular, the urllib.request module contains a function called urlopen() that you can use to open a URL within a program.
In IDLE’s interactive window, type the following to import urlopen():
>>> from urllib.request import urlopen
The web page that you’ll open is at the following URL:
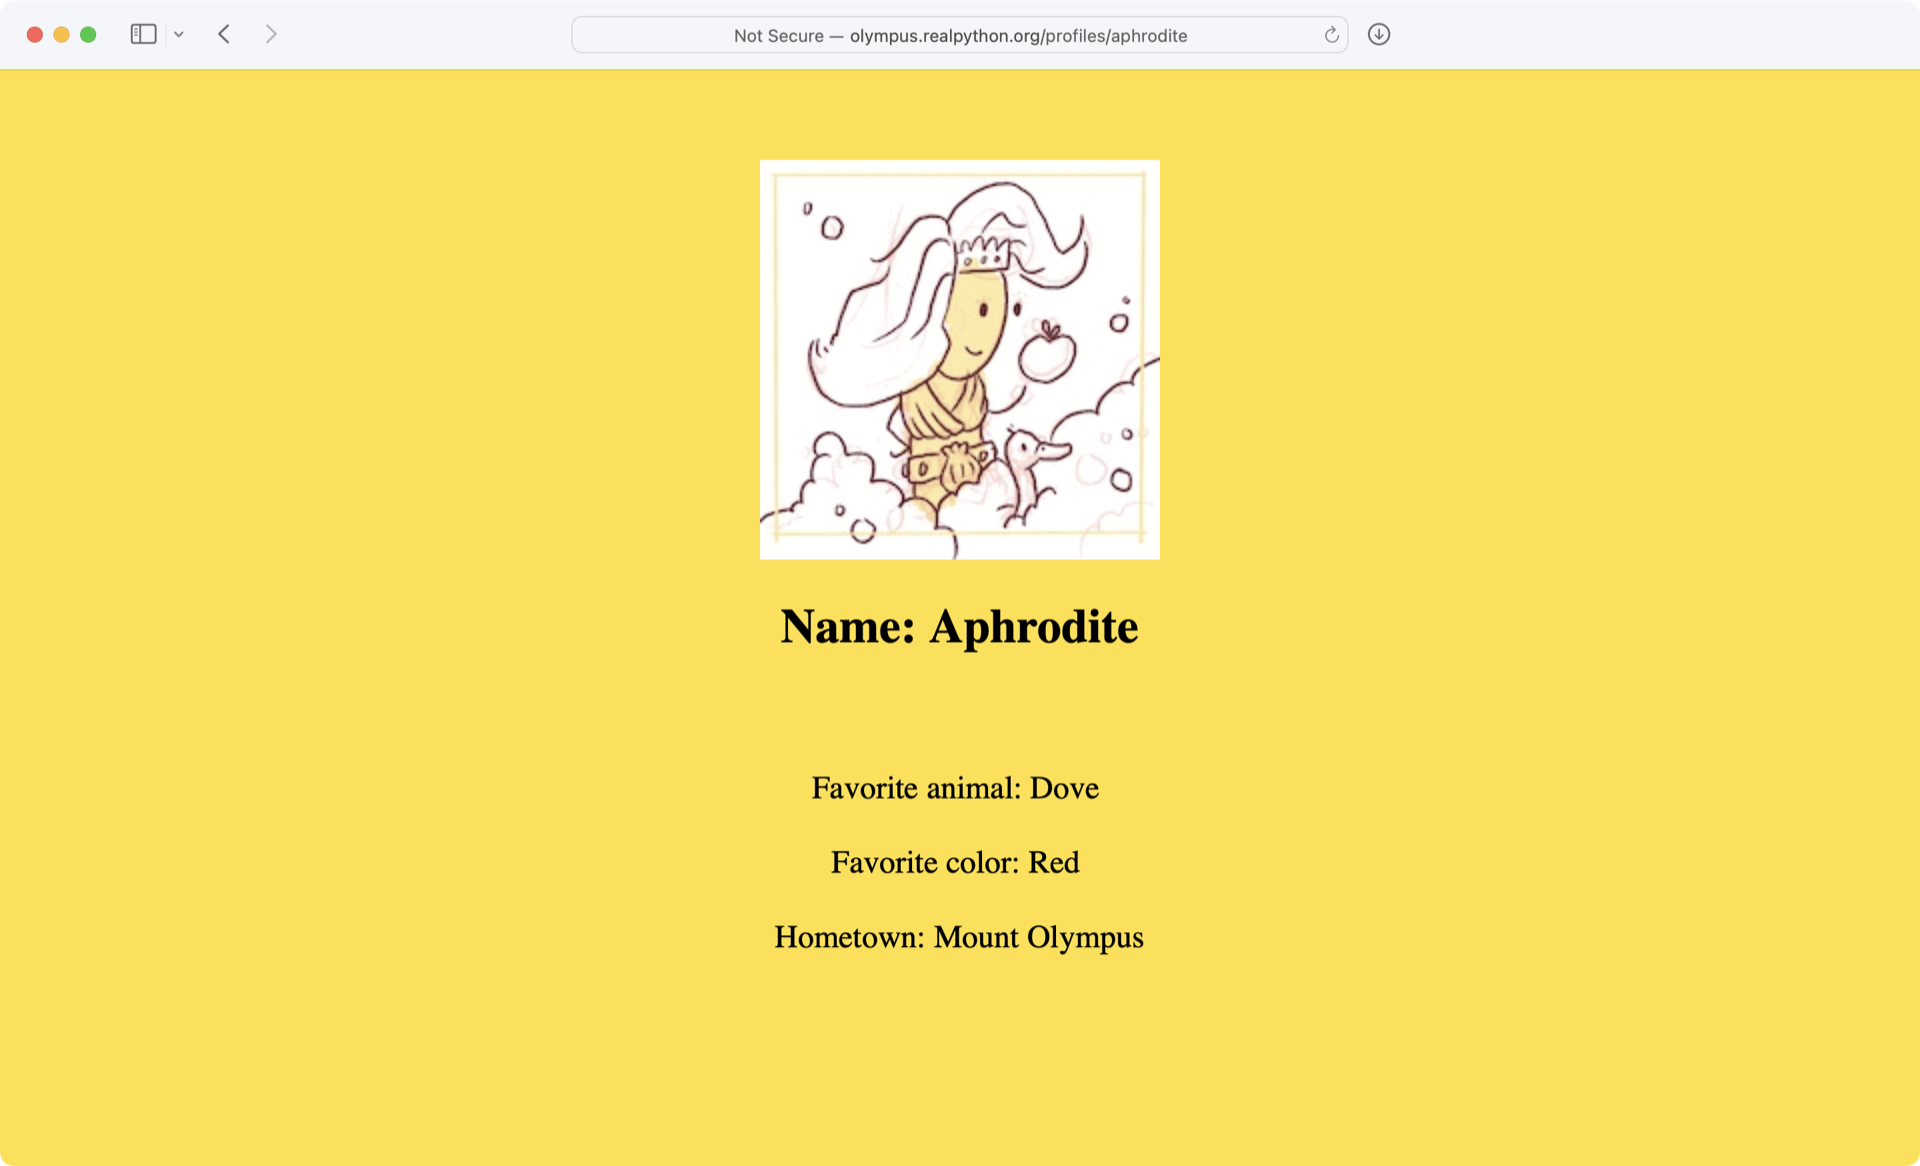
>>> url = "http://olympus.realpython.org/profiles/aphrodite"
To open the web page, pass url to urlopen():
>>> page = urlopen(url)
urlopen() returns an HTTPResponse object:
>>> page
<http.client.HTTPResponse object at 0x105fef820>
To extract the HTML from the page, first use the HTTPResponse object’s .read() method, which returns a sequence of bytes. Then use .decode() to decode the bytes to a string using UTF-8:
>>> html_bytes = page.read()
>>> html = html_bytes.decode("utf-8")
Now you can print the HTML to see the contents of the web page:
>>> print(html)
<html>
<head>
<title>Profile: Aphrodite</title>
</head>
<body bgcolor="yellow">
<center>
<br><br>
<img src="/static/aphrodite.gif" />
<h2>Name: Aphrodite</h2>
<br><br>
Favorite animal: Dove
<br><br>
Favorite color: Red
<br><br>
Hometown: Mount Olympus
</center>
</body>
</html>
The output that you’re seeing is the HTML code of the website, which your browser renders when you visit http://olympus.realpython.org/profiles/aphrodite:
With urllib, you accessed the website similarly to how you would in your browser. However, instead of rendering the content visually, you grabbed the source code as text. Now that you have the HTML as text, you can extract information from it in a couple of different ways.
Extract Text From HTML With String Methods
One way to extract information from a web page’s HTML is to use string methods. For instance, you can use .find() to search through the text of the HTML for the <title> tags and extract the title of the web page.
To start, you’ll extract the title of the web page that you requested in the previous example. If you know the index of the first character of the title and the index of the first character of the closing </title> tag, then you can use a string slice to extract the title.
Because .find() returns the index of the first occurrence of a substring, you can get the index of the opening <title> tag by passing the string "<title>" to .find():
>>> title_index = html.find("<title>")
>>> title_index
14
You don’t want the index of the <title> tag, though. You want the index of the title itself. To get the index of the first letter in the title, you can add the length of the string "<title>" to title_index:
>>> start_index = title_index + len("<title>")
>>> start_index
21
Now get the index of the closing </title> tag by passing the string "</title>" to .find():
>>> end_index = html.find("</title>")
>>> end_index
39
Finally, you can extract the title by slicing the html string:
>>> title = html[start_index:end_index]
>>> title
'Profile: Aphrodite'
Real-world HTML can be much more complicated and far less predictable than the HTML on the Aphrodite profile page. Here’s another profile page with some messier HTML that you can scrape:
>>> url = "http://olympus.realpython.org/profiles/poseidon"
Try extracting the title from this new URL using the same method as in the previous example:
>>> url = "http://olympus.realpython.org/profiles/poseidon"
>>> page = urlopen(url)
>>> html = page.read().decode("utf-8")
>>> start_index = html.find("<title>") + len("<title>")
>>> end_index = html.find("</title>")
>>> title = html[start_index:end_index]
>>> title
'\n<head>\n<title >Profile: Poseidon'
Whoops! There’s a bit of HTML mixed in with the title. Why’s that?
The HTML for the /profiles/poseidon page looks similar to the /profiles/aphrodite page, but there’s a small difference. The opening <title> tag has an extra space before the closing angle bracket (>), rendering it as <title >.
html.find("<title>") returns -1 because the exact substring "<title>" doesn’t exist. When -1 is added to len("<title>"), which is 7, the start_index variable is assigned the value 6.
The character at index 6 of the string html is a newline character (\n) right before the opening angle bracket (<) of the <head> tag. This means that html[start_index:end_index] returns all the HTML starting with that newline and ending just before the </title> tag.
These sorts of problems can occur in countless unpredictable ways. You need a more reliable way to extract text from HTML.
Get to Know Regular Expressions
Regular expressions—or regexes for short—are patterns that you can use to search for text within a string. Python supports regular expressions through the standard library’s re module.
Note: Regular expressions aren’t particular to Python. They’re a general programming concept and are supported in many programming languages.
To work with regular expressions, the first thing that you need to do is import the re module:
>>> import re
Regular expressions use special characters called metacharacters to denote different patterns. For instance, the asterisk character (*) stands for zero or more instances of whatever comes just before the asterisk.
In the following example, you use .findall() to find any text within a string that matches a given regular expression:
>>> re.findall("ab*c", "ac")
['ac']
The first argument of re.findall() is the regular expression that you want to match, and the second argument is the string to test. In the above example, you search for the pattern "ab*c" in the string "ac".
The regular expression "ab*c" matches any part of the string that begins with "a", ends with "c", and has zero or more instances of "b" between the two. re.findall() returns a list of all matches. The string "ac" matches this pattern, so it’s returned in the list.
Here’s the same pattern applied to different strings:
>>> re.findall("ab*c", "abcd")
['abc']

>>> re.findall("ab*c", "acc")
['ac']

>>> re.findall("ab*c", "abcac")
['abc', 'ac']

>>> re.findall("ab*c", "abdc")
[]
Notice that if no match is found, then .findall() returns an empty list.
Pattern matching is case sensitive. If you want to match this pattern regardless of the case, then you can pass a third argument with the value re.IGNORECASE:
>>> re.findall("ab*c", "ABC")
[]

>>> re.findall("ab*c", "ABC", re.IGNORECASE)
['ABC']
You can use a period (.) to stand for any single character in a regular expression. For instance, you could find all the strings that contain the letters "a" and "c" separated by a single character as follows:
>>> re.findall("a.c", "abc")
['abc']

>>> re.findall("a.c", "abbc")
[]

>>> re.findall("a.c", "ac")
[]

>>> re.findall("a.c", "acc")
['acc']
The pattern .* inside a regular expression stands for any character repeated any number of times. For instance, you can use "a.*c" to find every substring that starts with "a" and ends with "c", regardless of which letter—or letters—are in between:
>>> re.findall("a.*c", "abc")
['abc']

>>> re.findall("a.*c", "abbc")
['abbc']

>>> re.findall("a.*c", "ac")
['ac']

>>> re.findall("a.*c", "acc")
['acc']
Often, you use re.search() to search for a particular pattern inside a string. This function is somewhat more complicated than re.findall() because it returns an object called MatchObject that stores different groups of data. This is because there might be matches inside other matches, and re.search() returns every possible result.
The details of MatchObject are irrelevant here. For now, just know that calling .group() on MatchObject will return the first and most inclusive result, which in most cases is just what you want:
>>> match_results = re.search("ab*c", "ABC", re.IGNORECASE)
>>> match_results.group()
'ABC'
There’s one more function in the re module that’s useful for parsing out text. re.sub(), which is short for substitute, allows you to replace the text in a string that matches a regular expression with new text. It behaves sort of like the .replace() string method.
The arguments passed to re.sub() are the regular expression, followed by the replacement text, followed by the string. Here’s an example:
>>> string = "Everything is <replaced> if it's in <tags>."
>>> string = re.sub("<.*>", "ELEPHANTS", string)
>>> string
'Everything is ELEPHANTS.'
Perhaps that wasn’t quite what you expected to happen.
re.sub() uses the regular expression "<.*>" to find and replace everything between the first < and the last >, which spans from the beginning of <replaced> to the end of <tags>. This is because Python’s regular expressions are greedy, meaning they try to find the longest possible match when characters like * are used.
Alternatively, you can use the non-greedy matching pattern *?, which works the same way as * except that it matches the shortest possible string of text:
>>> string = "Everything is <replaced> if it's in <tags>."
>>> string = re.sub("<.*?>", "ELEPHANTS", string)
>>> string
"Everything is ELEPHANTS if it's in ELEPHANTS."
This time, re.sub() finds two matches, <replaced> and <tags>, and substitutes the string "ELEPHANTS" for both matches.
Extract Text From HTML With Regular Expressions
Equipped with all this knowledge, now try to parse out the title from another profile page, which includes this rather carelessly written line of HTML:
<TITLE >Profile: Dionysus</title / >
The .find() method would have a difficult time dealing with the inconsistencies here, but with the clever use of regular expressions, you can handle this code quickly and efficiently:
# regex_soup.py

import re
from urllib.request import urlopen

url = "http://olympus.realpython.org/profiles/dionysus"
page = urlopen(url)
html = page.read().decode("utf-8")

pattern = "<title.*?>.*?</title.*?>"
match_results = re.search(pattern, html, re.IGNORECASE)
title = match_results.group()
title = re.sub("<.*?>", "", title) # Remove HTML tags

print(title)
Take a closer look at the first regular expression in the pattern string by breaking it down into three parts:
-
<title.*?>matches the opening<TITLE >tag inhtml. The<titlepart of the pattern matches with<TITLEbecausere.search()is called withre.IGNORECASE, and.*?>matches any text after<TITLEup to the first instance of>. -
.*?non-greedily matches all text after the opening<TITLE >, stopping at the first match for</title.*?>. -
</title.*?>differs from the first pattern only in its use of the/character, so it matches the closing</title / >tag inhtml.
The second regular expression, the string "<.*?>", also uses the non-greedy .*? to match all the HTML tags in the title string. By replacing any matches with "", re.sub() removes all the tags and returns only the text.
Note: Web scraping in Python or any other language can be tedious. No two websites are organized the same way, and HTML is often messy. Moreover, websites change over time. Web scrapers that work today aren’t guaranteed to work next year—or next week, for that matter!
Regular expressions are a powerful tool when used correctly. In this introduction, you’ve barely scratched the surface. For more about regular expressions and how to use them, check out the two-part series Regular Expressions: Regexes in Python.
Check Your Understanding
Expand the block below to check your understanding.
Write a program that grabs the full HTML from the following URL:
>>> url = "http://olympus.realpython.org/profiles/dionysus"
Then use .find() to display the text following Name: and Favorite Color: (not including any leading spaces or trailing HTML tags that might appear on the same line).
You can expand the block below to see a solution.
First, import the urlopen function from the urlib.request module:
from urllib.request import urlopen
Then open the URL and use the .read() method of the HTTPResponse object returned by urlopen() to read the page’s HTML:
url = "http://olympus.realpython.org/profiles/dionysus"
html_page = urlopen(url)
html_text = html_page.read().decode("utf-8")
The .read() method returns a byte string, so you use .decode() to decode the bytes using the UTF-8 encoding.
Now that you have the HTML source of the web page as a string assigned to the html_text variable, you can extract Dionysus’s name and favorite color from his profile. The structure of the HTML for Dionysus’s profile is the same as for Aphrodite’s profile, which you saw earlier.
You can get the name by finding the string "Name:" in the text and extracting everything that comes after the first occurence of the string and before the next HTML tag. That is, you need to extract everything after the colon (:) and before the first angle bracket (<). You can use the same technique to extract the favorite color.
The following for loop extracts this text for both the name and favorite color:
for string in ["Name: ", "Favorite Color:"]:
    string_start_idx = html_text.find(string)
    text_start_idx = string_start_idx + len(string)

    next_html_tag_offset = html_text[text_start_idx:].find("<")
    text_end_idx = text_start_idx + next_html_tag_offset

    raw_text = html_text[text_start_idx : text_end_idx]
    clean_text = raw_text.strip(" \r\n\t")
    print(clean_text)
It looks like there’s a lot going on in this for loop, but it’s just a little bit of arithmetic to calculate the right indices for extracting the desired text. Go ahead and break it down:
-
You use
html_text.find()to find the starting index of the string, either"Name:"or"Favorite Color:", and then assign the index tostring_start_idx. -
Since the text to extract starts just after the colon in
"Name:"or"Favorite Color:", you get the index of the character immediately after the colon by adding the length of the string tostart_string_idx, and then assign the result totext_start_idx. -
You calculate the ending index of the text to extract by determining the index of the first angle bracket (
<) relative totext_start_idxand assign this value tonext_html_tag_offset. Then you add that value totext_start_idxand assign the result totext_end_idx. -
You extract the text by slicing
html_textfromtext_start_idxtotext_end_idxand assign this string toraw_text. -
You remove any whitespace from the beginning and end of
raw_textusing.strip()and assign the result toclean_text.
At the end of the loop, you use print() to display the extracted text. The final output looks like this:
Dionysus
Wine
This solution is one of many that solves this problem, so if you got the same output with a different solution, then you did great!
When you’re ready, you can move on to the next section.
Use an HTML Parser for Web Scraping in Python
Although regular expressions are great for pattern matching in general, sometimes it’s easier to use an HTML parser that’s explicitly designed for parsing out HTML pages. There are many Python tools written for this purpose, but the Beautiful Soup library is a good one to start with.
Install Beautiful Soup
To install Beautiful Soup, you can run the following in your terminal:
$ python -m pip install beautifulsoup4
With this command, you’re installing the latest version of Beautiful Soup into your global Python environment.
Create a BeautifulSoup Object
Type the following program into a new editor window:
# beauty_soup.py

from bs4 import BeautifulSoup
from urllib.request import urlopen

url = "http://olympus.realpython.org/profiles/dionysus"
page = urlopen(url)
html = page.read().decode("utf-8")
soup = BeautifulSoup(html, "html.parser")
This program does three things:
-
Opens the URL
http://olympus.realpython.org/profiles/dionysusby usingurlopen()from theurllib.requestmodule -
Reads the HTML from the page as a string and assigns it to the
htmlvariable -
Creates a
BeautifulSoupobject and assigns it to thesoupvariable
The BeautifulSoup object assigned to soup is created with two arguments. The first argument is the HTML to be parsed, and the second argument, the string "html.parser", tells the object which parser to use behind the scenes. "html.parser" represents Python’s built-in HTML parser.
Use a BeautifulSoup Object
Save and run the above program. When it’s finished running, you can use the soup variable in the interactive window to parse the content of html in various ways.
Note: If you’re not using IDLE, then you can run your program with the -i flag to enter interactive mode. Something like python -i beauty_soup.py will first run your program and then leave you in a REPL where you can explore your objects.
For example, BeautifulSoup objects have a .get_text() method that you can use to extract all the text from the document and automatically remove any HTML tags.
Type the following code into IDLE’s interactive window or at the end of the code in your editor:
>>> print(soup.get_text())


Profile: Dionysus


Name: Dionysus

Hometown: Mount Olympus

Favorite animal: Leopard

Favorite Color: Wine
There are a lot of blank lines in this output. These are the result of newline characters in the HTML document’s text. You can remove them with the .replace() string method if you need to.
Often, you need to get only specific text from an HTML document. Using Beautiful Soup first to extract the text and then using the .find() string method is sometimes easier than working with regular expressions.
However, other times the HTML tags themselves are the elements that point out the data you want to retrieve. For instance, perhaps you want to retrieve the URLs for all the images on the page. These links are contained in the src attribute of <img> HTML tags.
In this case, you can use find_all() to return a list of all instances of that particular tag:
>>> soup.find_all("img")
[<img src="/static/dionysus.jpg"/>, <img src="/static/grapes.png"/>]
This returns a list of all <img> tags in the HTML document. The objects in the list look like they might be strings representing the tags, but they’re actually instances of the Tag object provided by Beautiful Soup. Tag objects provide a simple interface for working with the information they contain.
You can explore this a little by first unpacking the Tag objects from the list:
>>> image1, image2 = soup.find_all("img")
Each Tag object has a .name property that returns a string containing the HTML tag type:
>>> image1.name
'img'
You can access the HTML attributes of the Tag object by putting their names between square brackets, just as if the attributes were keys in a dictionary.
For example, the <img src="/static/dionysus.jpg"/> tag has a single attribute, src, with the value "/static/dionysus.jpg". Likewise, an HTML tag such as the link <a href="https://realpython.com" target="_blank"> has two attributes, href and target.
To get the source of the images in the Dionysus profile page, you access the src attribute using the dictionary notation mentioned above:
>>> image1["src"]
'/static/dionysus.jpg'

>>> image2["src"]
'/static/grapes.png'
Certain tags in HTML documents can be accessed by properties of the Tag object. For example, to get the <title> tag in a document, you can use the .title property:
>>> soup.title
<title>Profile: Dionysus</title>
If you look at the source of the Dionysus profile by navigating to the profile page, right-clicking on the page, and selecting View page source, then you’ll notice that the <title> tag is written in all caps with spaces:
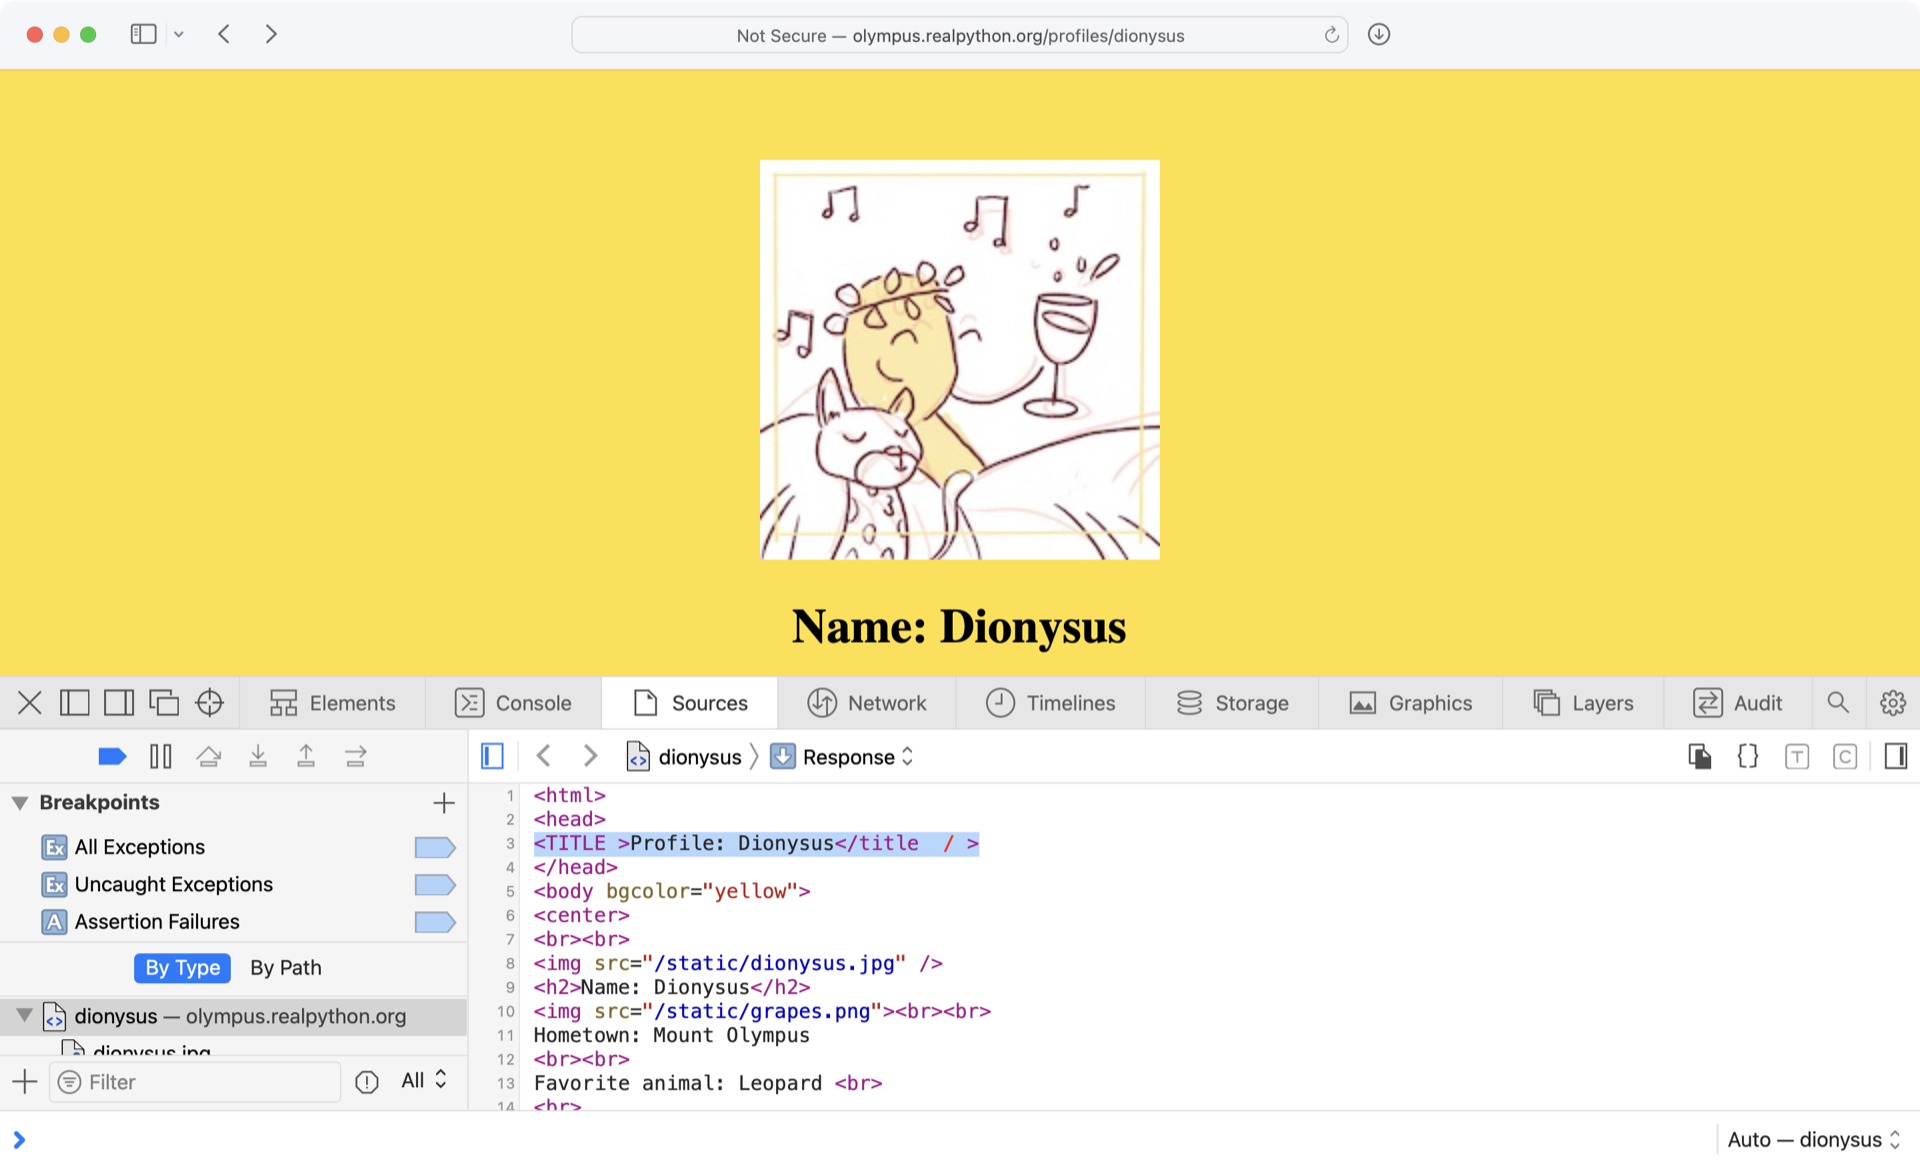
Beautiful Soup automatically cleans up the tags for you by removing the extra space in the opening tag and the extraneous forward slash (/) in the closing tag.
You can also retrieve just the string between the title tags with the .string property of the Tag object:
>>> soup.title.string
'Profile: Dionysus'
One of the features of Beautiful Soup is the ability to search for specific kinds of tags whose attributes match certain values. For example, if you want to find all the <img> tags that have a src attribute equal to the value /static/dionysus.jpg, then you can provide the following additional argument to .find_all():
>>> soup.find_all("img", src="/static/dionysus.jpg")
[<img src="/static/dionysus.jpg"/>]
This example is somewhat arbitrary, and the usefulness of this technique may not be apparent from the example. If you spend some time browsing various websites and viewing their page sources, then you’ll notice that many websites have extremely complicated HTML structures.
When scraping data from websites with Python, you’re often interested in particular parts of the page. By spending some time looking through the HTML document, you can identify tags with unique attributes that you can use to extract the data you need.
Then, instead of relying on complicated regular expressions or using .find() to search through the document, you can directly access the particular tag that you’re interested in and extract the data you need.
In some cases, you may find that Beautiful Soup doesn’t offer the functionality you need. The lxml library is somewhat trickier to get started with but offers far more flexibility than Beautiful Soup for parsing HTML documents. You may want to check it out once you’re comfortable using Beautiful Soup.
Note: HTML parsers like Beautiful Soup can save you a lot of time and effort when it comes to locating specific data in web pages. However, sometimes HTML is so poorly written and disorganized that even a sophisticated parser like Beautiful Soup can’t interpret the HTML tags properly.
In this case, you’re often left with using .find() and regular expression techniques to try to parse out the information that you need.
Beautiful Soup is great for scraping data from a website’s HTML, but it doesn’t provide any way to work with HTML forms. For example, if you need to search a website for some query and then scrape the results, then Beautiful Soup alone won’t get you very far.
Check Your Understanding
Expand the block below to check your understanding.
Write a program that grabs the full HTML from the page at the URL http://olympus.realpython.org/profiles.
Using Beautiful Soup, print out a list of all the links on the page by looking for HTML tags with the name a and retrieving the value taken on by the href attribute of each tag.
The final output should look like this:
http://olympus.realpython.org/profiles/aphrodite
http://olympus.realpython.org/profiles/poseidon
http://olympus.realpython.org/profiles/dionysus
Make sure that you only have one slash (/) between the base URL and the relative URL.
You can expand the block below to see a solution:
First, import the urlopen function from the urlib.request module and the BeautifulSoup class from the bs4 package:
from urllib.request import urlopen
from bs4 import BeautifulSoup
Each link URL on the /profiles page is a relative URL, so create a base_url variable with the base URL of the website:
base_url = "http://olympus.realpython.org"
You can build a full URL by concatenating base_url with a relative URL.
Now open the /profiles page with urlopen() and use .read() to get the HTML source:
html_page = urlopen(base_url + "/profiles")
html_text = html_page.read().decode("utf-8")
With the HTML source downloaded and decoded, you can create a new BeautifulSoup object to parse the HTML:
soup = BeautifulSoup(html_text, "html.parser")
soup.find_all("a") returns a list of all the links in the HTML source. You can loop over this list to print out all the links on the web page:
for link in soup.find_all("a"):
    link_url = base_url + link["href"]
    print(link_url)
You can access the relative URL for each link through the "href" subscript. Concatenate this value with base_url to create the full link_url.
When you’re ready, you can move on to the next section.
Interact With HTML Forms
The urllib module that you’ve been working with so far in this tutorial is well suited for requesting the contents of a web page. Sometimes, though, you need to interact with a web page to obtain the content you need. For example, you might need to submit a form or click a button to display hidden content.
Note: This tutorial is adapted from the chapter “Interacting With the Web” in Python Basics: A Practical Introduction to Python 3. If you enjoy what you’re reading, then be sure to check out the rest of the book.
The Python standard library doesn’t provide a built-in means for working with web pages interactively, but many third-party packages are available from PyPI. Among these, MechanicalSoup is a popular and relatively straightforward package to use.
In essence, MechanicalSoup installs what’s known as a headless browser, which is a web browser with no graphical user interface. This browser is controlled programmatically via a Python program.
Install MechanicalSoup
You can install MechanicalSoup with pip in your terminal:
$ python -m pip install MechanicalSoup
You’ll need to close and restart your IDLE session for MechanicalSoup to load and be recognized after it’s been installed.
Create a Browser Object
Type the following into IDLE’s interactive window:
>>> import mechanicalsoup
>>> browser = mechanicalsoup.Browser()
Browser objects represent the headless web browser. You can use them to request a page from the Internet by passing a URL to their .get() method:
>>> url = "http://olympus.realpython.org/login"
>>> page = browser.get(url)
page is a Response object that stores the response from requesting the URL from the browser:
>>> page
<Response [200]>
The number 200 represents the status code returned by the request. A status code of 200 means that the request was successful. An unsuccessful request might show a status code of 404 if the URL doesn’t exist or 500 if there’s a server error when making the request.
MechanicalSoup uses Beautiful Soup to parse the HTML from the request, and page has a .soup attribute that represents a BeautifulSoup object:
>>> type(page.soup)
<class 'bs4.BeautifulSoup'>
You can view the HTML by inspecting the .soup attribute:
>>> page.soup
<html>
<head>
<title>Log In</title>
</head>
<body bgcolor="yellow">
<center>
<br/><br/>
<h2>Please log in to access Mount Olympus:</h2>
<br/><br/>
<form action="/login" method="post" name="login">
Username: <input name="user" type="text"/><br/>
Password: <input name="pwd" type="password"/><br/><br/>
<input type="submit" value="Submit"/>
</form>
</center>
</body>
</html>
Notice this page has a <form> on it with <input> elements for a username and a password.
Submit a Form With MechanicalSoup
Open the /login page from the previous example in a browser and look at it yourself before moving on:
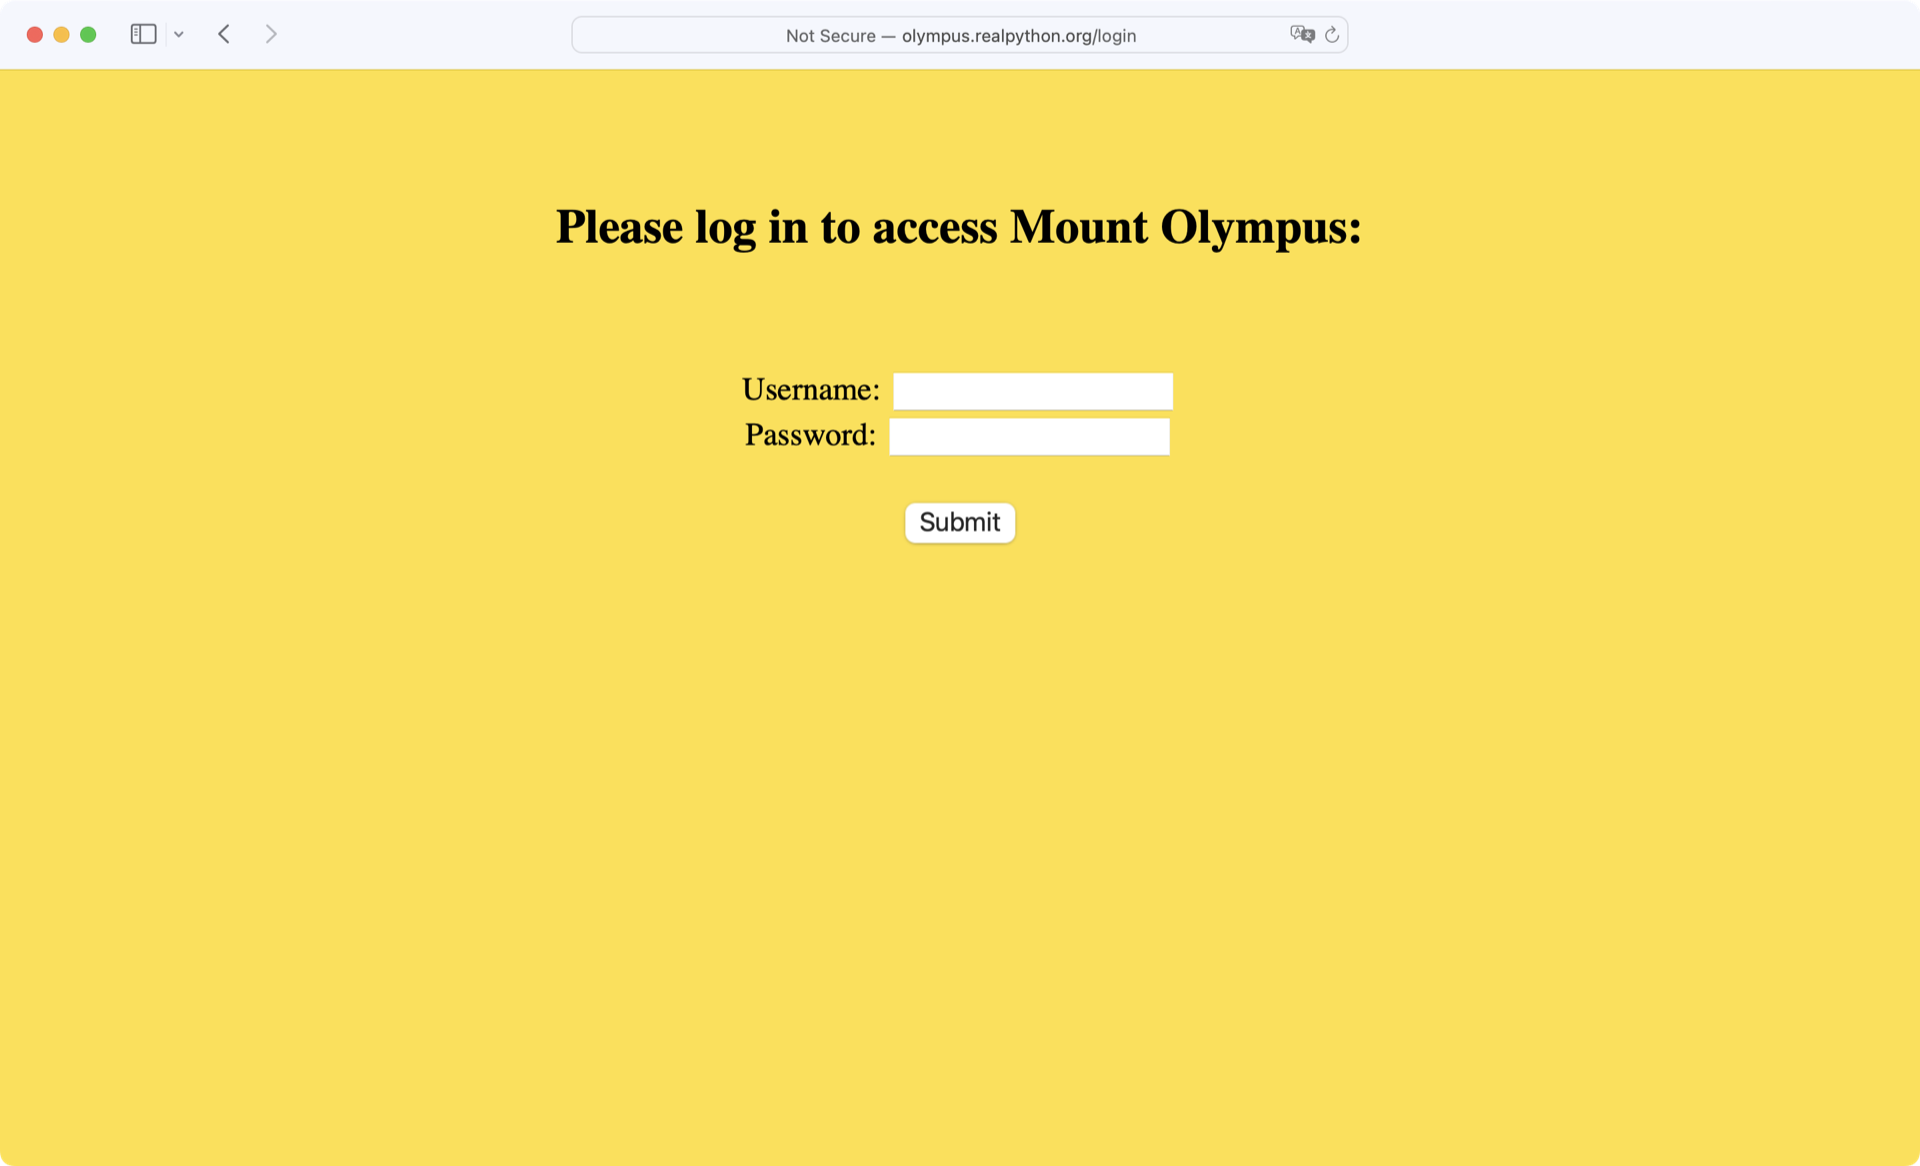
Try typing in a random username and password combination. If you guess incorrectly, then the message Wrong username or password! is displayed at the bottom of the page.
However, if you provide the correct login credentials, then you’re redirected to the /profiles page:
| Username | Password |
|---|---|
zeus |
ThunderDude |
In the next example, you’ll see how to use MechanicalSoup to fill out and submit this form using Python!
The important section of HTML code is the login form—that is, everything inside the <form> tags. The <form> on this page has the name attribute set to login. This form contains two <input> elements, one named user and the other named pwd. The third <input> element is the Submit button.
Now that you know the underlying structure of the login form, as well as the credentials needed to log in, take a look at a program that fills the form out and submits it.
In a new editor window, type in the following program:
import mechanicalsoup

# 1
browser = mechanicalsoup.Browser()
url = "http://olympus.realpython.org/login"
login_page = browser.get(url)
login_html = login_page.soup

# 2
form = login_html.select("form")[0]
form.select("input")[0]["value"] = "zeus"
form.select("input")[1]["value"] = "ThunderDude"

# 3
profiles_page = browser.submit(form, login_page.url)
Save the file and press F5 to run it. To confirm that you’ve successfully logged in, type the following into the interactive window:
>>> profiles_page.url
'http://olympus.realpython.org/profiles'
Now break down the above example:
-
You create a
Browserinstance and use it to request the URLhttp://olympus.realpython.org/login. You assign the HTML content of the page to thelogin_htmlvariable using the.soupproperty. -
login_html.select("form")returns a list of all<form>elements on the page. Because the page has only one<form>element, you can access the form by retrieving the element at index0of the list. When there is only one form on a page, you may also uselogin_html.form. The next two lines select the username and password inputs and set their value to"zeus"and"ThunderDude", respectively. -
You submit the form with
browser.submit(). Notice that you pass two arguments to this method, theformobject and the URL of thelogin_page, which you access vialogin_page.url.
In the interactive window, you confirm that the submission successfully redirected to the /profiles page. If something had gone wrong, then the value of profiles_page.url would still be "http://olympus.realpython.org/login".
Note: Hackers can use automated programs like the one above to brute force logins by rapidly trying many different usernames and passwords until they find a working combination.
Besides this being highly illegal, almost all websites these days lock you out and report your IP address if they see you making too many failed requests, so don’t try it!
Now that you have the profiles_page variable set, it’s time to programmatically obtain the URL for each link on the /profiles page.
To do this, you use .select() again, this time passing the string "a" to select all the <a> anchor elements on the page:
>>> links = profiles_page.soup.select("a")
Now you can iterate over each link and print the href attribute:
>>> for link in links:
...     address = link["href"]
...     text = link.text
...     print(f"{text}: {address}")
...
Aphrodite: /profiles/aphrodite
Poseidon: /profiles/poseidon
Dionysus: /profiles/dionysus
The URLs contained in each href attribute are relative URLs, which aren’t very helpful if you want to navigate to them later using MechanicalSoup. If you happen to know the full URL, then you can assign the portion needed to construct a full URL.
In this case, the base URL is just http://olympus.realpython.org. Then you can concatenate the base URL with the relative URLs found in the src attribute:
>>> base_url = "http://olympus.realpython.org"
>>> for link in links:
...     address = base_url + link["href"]
...     text = link.text
...     print(f"{text}: {address}")
...
Aphrodite: http://olympus.realpython.org/profiles/aphrodite
Poseidon: http://olympus.realpython.org/profiles/poseidon
Dionysus: http://olympus.realpython.org/profiles/dionysus
You can do a lot with just .get(), .select(), and .submit(). That said, MechanicalSoup is capable of much more. To learn more about MechanicalSoup, check out the official docs.
Check Your Understanding
Expand the block below to check your understanding
Use MechanicalSoup to provide the correct username (zeus) and password (ThunderDude) to the login form located at the URL http://olympus.realpython.org/login.
Once the form is submitted, display the title of the current page to determine that you’ve been redirected to the /profiles page.
Your program should print the text <title>All Profiles</title>.
You can expand the block below to see a solution.
First, import the mechanicalsoup package and create a Broswer object:
import mechanicalsoup

browser = mechanicalsoup.Browser()
Point the browser to the login page by passing the URL to browser.get() and grab the HTML with the .soup attribute:
login_url = "http://olympus.realpython.org/login"
login_page = browser.get(login_url)
login_html = login_page.soup
login_html is a BeautifulSoup instance. Because the page has only a single form on it, you can access the form via login_html.form. Using .select(), select the username and password inputs and fill them with the username "zeus" and the password "ThunderDude":
form = login_html.form
form.select("input")[0]["value"] = "zeus"
form.select("input")[1]["value"] = "ThunderDude"
Now that the form is filled out, you can submit it with browser.submit():
profiles_page = browser.submit(form, login_page.url)
If you filled the form with the correct username and password, then profiles_page should actually point to the /profiles page. You can confirm this by printing the title of the page assigned to profiles_page:
print(profiles_page.soup.title)
You should see the following text displayed:
<title>All Profiles</title>
If instead you see the text Log In or something else, then the form submission failed.
When you’re ready, you can move on to the next section.
Interact With Websites in Real Time
Sometimes you want to be able to fetch real-time data from a website that offers continually updated information.
In the dark days before you learned Python programming, you had to sit in front of a browser, clicking the Refresh button to reload the page each time you wanted to check if updated content was available. But now you can automate this process using the .get() method of the MechanicalSoup Browser object.
Open your browser of choice and navigate to the URL http://olympus.realpython.org/dice:
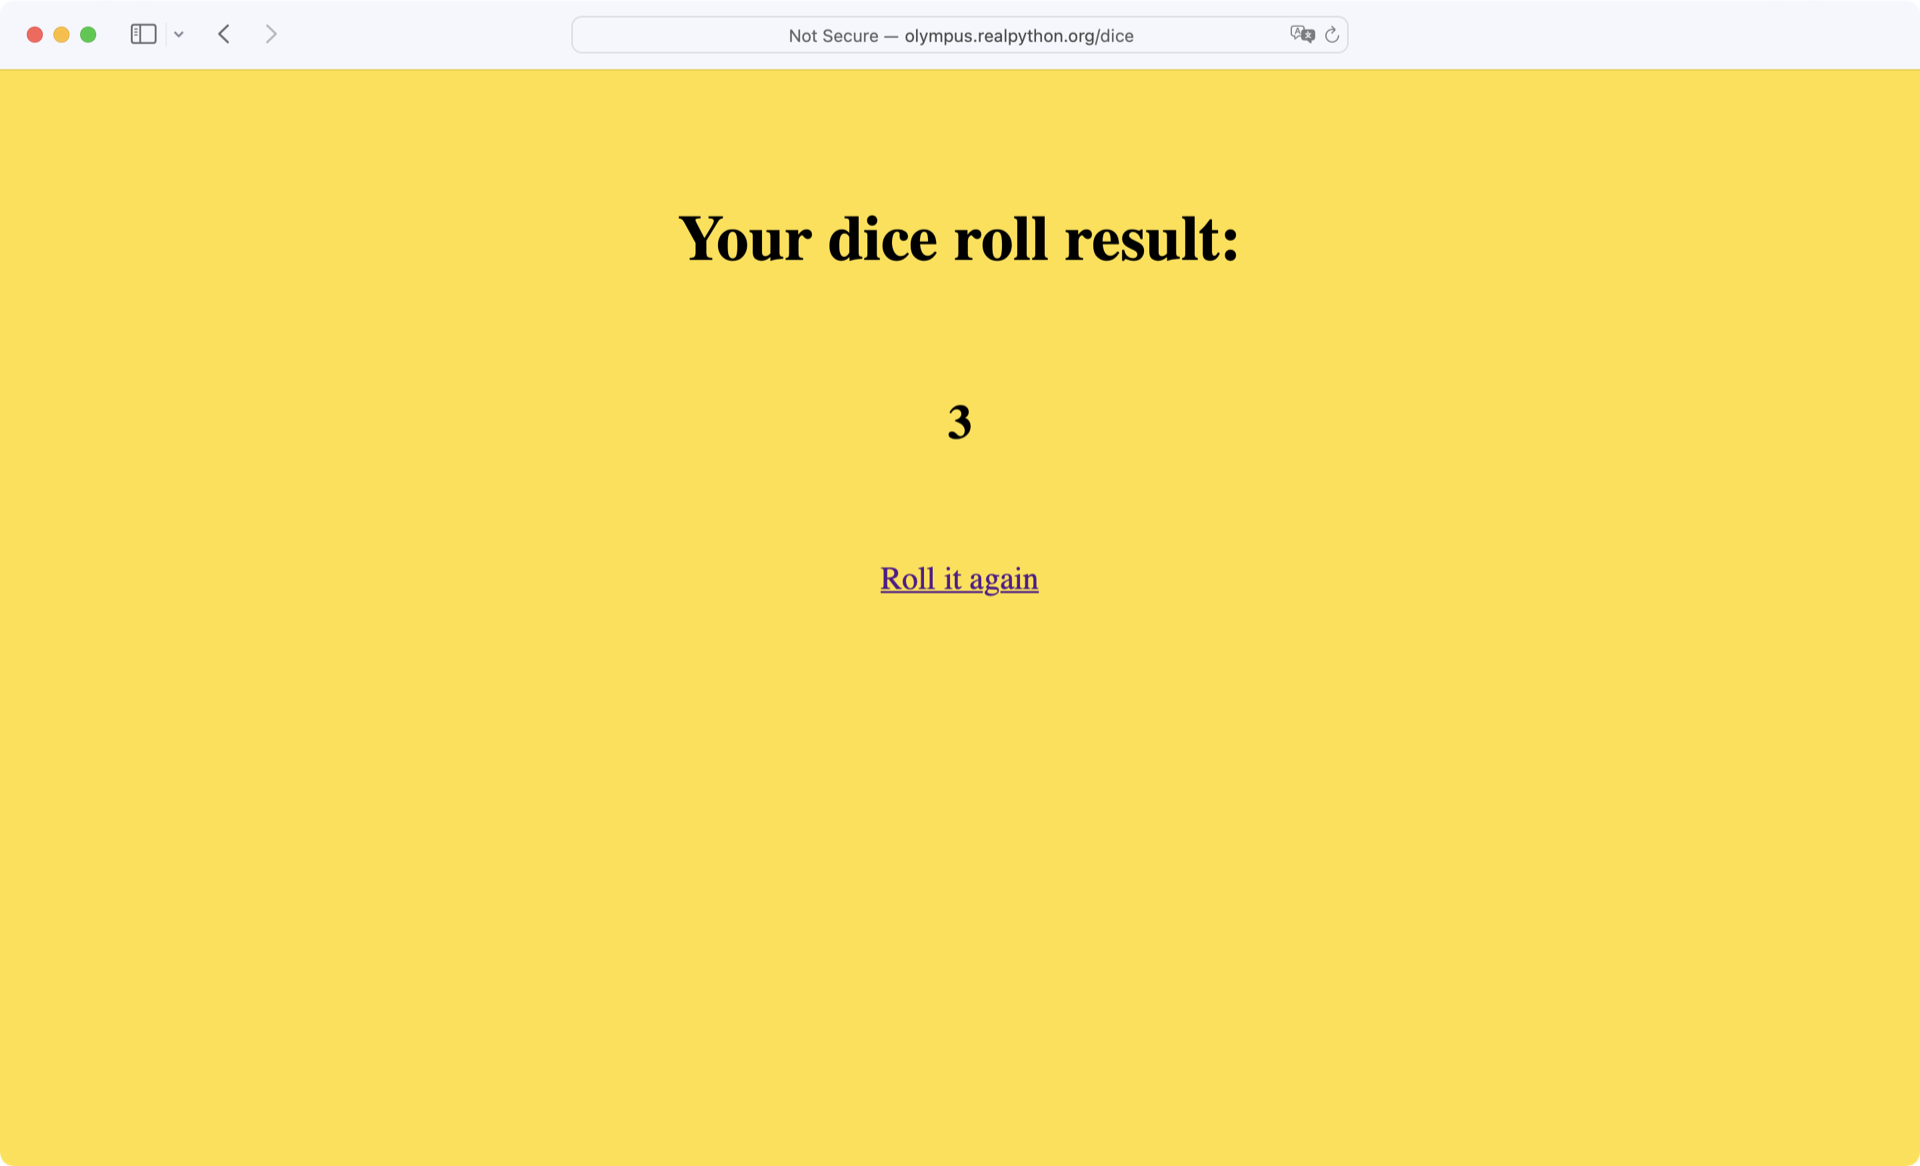
This /dice page simulates a roll of a six-sided die, updating the result each time you refresh the browser. Below, you’ll write a program that repeatedly scrapes the page for a new result.
The first thing you need to do is determine which element on the page contains the result of the die roll. Do this now by right-clicking anywhere on the page and selecting View page source. A little more than halfway down the HTML code is an <h2> tag that looks like this:
<h2 id="result">3</h2>
The text of the <h2> tag might be different for you, but this is the page element you need for scraping the result.
Note: For this example, you can easily check that there’s only one element on the page with id="result". Although the id attribute is supposed to be unique, in practice you should always check that the element you’re interested in is uniquely identified.
Now start by writing a simple program that opens the /dice page, scrapes the result, and prints it to the console:
# mech_soup.py

import mechanicalsoup

browser = mechanicalsoup.Browser()
page = browser.get("http://olympus.realpython.org/dice")
tag = page.soup.select("#result")[0]
result = tag.text

print(f"The result of your dice roll is: {result}")
This example uses the BeautifulSoup object’s .select() method to find the element with id=result. The string "#result", which you pass to .select(), uses the CSS ID selector # to indicate that result is an id value.
To periodically get a new result, you’ll need to create a loop that loads the page at each step. So everything below the line browser = mechanicalsoup.Browser() in the above code needs to go in the body of the loop.
For this example, you want four rolls of the dice at ten-second intervals. To do that, the last line of your code needs to tell Python to pause running for ten seconds. You can do this with .sleep() from Python’s time module. The .sleep() method takes a single argument that represents the amount of time to sleep in seconds.
Here’s an example that illustrates how sleep() works:
import time

print("I'm about to wait for five seconds...")
time.sleep(5)
print("Done waiting!")
When you run this code, you’ll see that the "Done waiting!" message isn’t displayed until five seconds have passed from when the first print() function was executed.
For the die roll example, you’ll need to pass the number 10 to sleep(). Here’s the updated program:
# mech_soup.py

import time
import mechanicalsoup

browser = mechanicalsoup.Browser()

for i in range(4):
    page = browser.get("http://olympus.realpython.org/dice")
    tag = page.soup.select("#result")[0]
    result = tag.text
    print(f"The result of your dice roll is: {result}")
    time.sleep(10)
When you run the program, you’ll immediately see the first result printed to the console. After ten seconds, the second result is displayed, then the third, and finally the fourth. What happens after the fourth result is printed?
The program continues running for another ten seconds before it finally stops. That’s kind of a waste of time! You can stop it from doing this by using an if statement to run time.sleep() for only the first three requests:
# mech_soup.py

import time
import mechanicalsoup

browser = mechanicalsoup.Browser()

for i in range(4):
    page = browser.get("http://olympus.realpython.org/dice")
    tag = page.soup.select("#result")[0]
    result = tag.text
    print(f"The result of your dice roll is: {result}")

    # Wait 10 seconds if this isn't the last request
    if i < 3:
        time.sleep(10)
With techniques like this, you can scrape data from websites that periodically update their data. However, you should be aware that requesting a page multiple times in rapid succession can be seen as suspicious, or even malicious, use of a website.
Important: Most websites publish a Terms of Use document. You can often find a link to it in the website’s footer.
Always read this document before attempting to scrape data from a website. If you can’t find the Terms of Use, then try to contact the website owner and ask them if they have any policies regarding request volume.
Failure to comply with the Terms of Use could result in your IP being blocked, so be careful!
It’s even possible to crash a server with an excessive number of requests, so you can imagine that many websites are concerned about the volume of requests to their server! Always check the Terms of Use and be respectful when sending multiple requests to a website.
Conclusion
Although it’s possible to parse data from the Web using tools in Python’s standard library, there are many tools on PyPI that can help simplify the process.
In this tutorial, you learned how to:
- Request a web page using Python’s built-in
urllibmodule - Parse HTML using Beautiful Soup
- Interact with web forms using MechanicalSoup
- Repeatedly request data from a website to check for updates
Writing automated web scraping programs is fun, and the Internet has no shortage of content that can lead to all sorts of exciting projects.
Just remember, not everyone wants you pulling data from their web servers. Always check a website’s Terms of Use before you start scraping, and be respectful about how you time your web requests so that you don’t flood a server with traffic.
Source Code: Click here to download the free source code that you’ll use to collect and parse data from the Web.
Additional Resources
For more information on web scraping with Python, check out the following resources:
- Beautiful Soup: Build a Web Scraper With Python
- API Integration in Python
- Python & APIs: A Winning Combo for Reading Public Data
Note: If you enjoyed what you learned in this sample from Python Basics: A Practical Introduction to Python 3, then be sure to check out the rest of the book.
Take the Quiz: Test your knowledge with our interactive “A Practical Introduction to Web Scraping in Python” quiz. You’ll receive a score upon completion to help you track your learning progress:
Interactive Quiz
A Practical Introduction to Web Scraping in PythonIn this quiz, you'll test your understanding of web scraping in Python. Web scraping is a powerful tool for data collection and analysis. By working through this quiz, you'll revisit how to parse website data using string methods, regular expressions, and HTML parsers, as well as how to interact with forms and other website components.
Watch Now This tutorial has a related video course created by the Real Python team. Watch it together with the written tutorial to deepen your understanding: Exercises Course: Introduction to Web Scraping With Python