To create a GUI for your windows and dialogs in PyQt, you can take two main paths: you can use Qt Designer, or you can hand code the GUI in plain Python code. The first path can dramatically improve your productivity, whereas the second path puts you in full control of your application’s code.
GUI applications often consist of a main window and several dialogs. If you’re looking to create these graphical components in an efficient and user-friendly way, then Qt Designer is the tool for you. In this tutorial, you’ll learn how to use Qt Designer to create your GUIs productively.
In this tutorial, you’ll learn:
- What Qt Designer is and how to install it on your system
- When to use Qt Designer vs hand coding for building your GUIs
- How to build and lay out the GUI of an application’s main window using Qt Designer
- How to create and lay out the GUI of your dialogs with Qt Designer
- How to use Qt Designer’s
.uifiles in your GUI applications
For a better understanding of the topics in this tutorial, you can check out the following resources:
- Python and PyQt: Building a GUI Desktop Calculator
- Python and PyQt: Creating Menus, Toolbars, and Status Bars
- PyQt Layouts: Create Professional-Looking GUI Applications
You’ll put all this knowledge together by using the GUIs that you’ll build with Qt Designer in a sample text editor application. You can get the code and all the required resources to build this application by clicking the link below:
Get the Source Code: Click here to get the source code you’ll use to learn about creating Python GUI applications with Qt Designer in this tutorial.
Getting Started With Qt Designer
Qt Designer is a Qt tool that provides you with a what-you-see-is-what-you-get (WYSIWYG) user interface to create GUIs for your PyQt applications productively and efficiently. With this tool, you create GUIs by dragging and dropping QWidget objects on an empty form. After that, you can arrange them into a coherent GUI using different layout managers.
Qt Designer also allows you to preview your GUIs using different styles and resolutions, connect signals and slots, create menus and toolbars, and more.
Qt Designer is platform and programming language independent. It doesn’t produce code in any particular programming language, but it creates .ui files. These files are XML files with detailed descriptions of how to generate Qt-based GUIs.
You can translate the content of .ui files into Python code with pyuic5, which is a command-line tool that comes with PyQt. Then you can use this Python code in your GUI applications. You can also read .ui files directly and load their content to generate the associated GUI.
Installing and Running Qt Designer
There are several ways to get and install Qt Designer depending on your current platform. If you use Windows or Linux, then you can run the following commands from your terminal or command line:
$ python3 -m venv ./venv
$ source venv/bin/activate
(venv) $ pip install pyqt5 pyqt5-tools
Here, you create a Python virtual environment, activate it, and install pyqt5 and pyqt5-tools. pyqt5 installs PyQt and a copy of the required Qt libraries, while pyqt5-tools installs a set of Qt tools that includes Qt Designer.
The installation will place the Qt Designer executable in a different directory according to your platform:
- Linux:
...lib/python3.x/site-packages/qt5_applications/Qt/bin/designer - Windows:
...Lib\site-packages\pyqt5_tools\designer.exe
On Linux systems, such as Debian and Ubuntu, you can also install Qt Designer by using the system package manager with the following command:
$ sudo apt install qttools5-dev-tools
This command downloads and installs Qt Designer and other Qt tools on your system. In other words, you’ll have a system-wide installation and you’ll be able to run Qt Designer by clicking its icon in a file manager or system menu.
On macOS, if you’ve installed Qt from Homebrew using the brew install qt command, then you should have Qt Designer already installed on your system.
Finally, you can download the Qt installer for your current platform from the official download site and then follow the on-screen instructions. In this case, to complete the installation process, you need to register a Qt account.
If you’ve already installed Qt Designer using one of the options discussed so far, then go ahead and launch the application. You should get the following two windows on your screen:
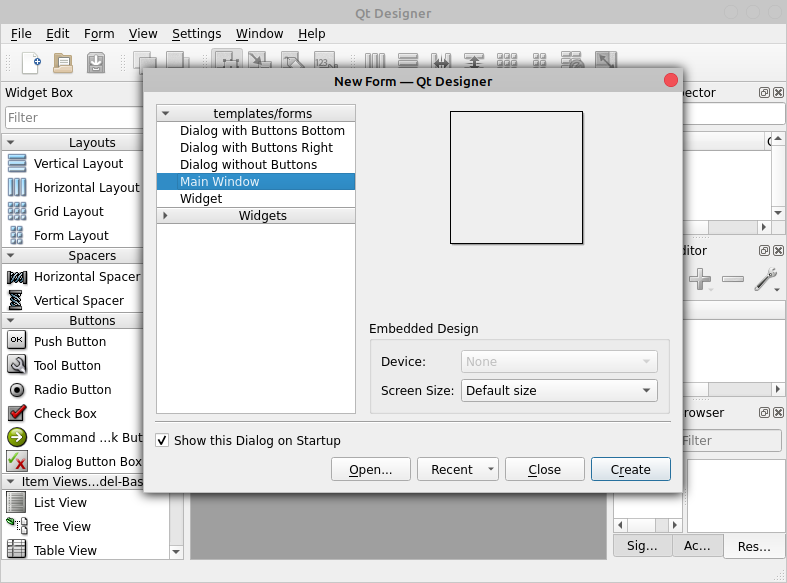
The window in the foreground is Qt Designer’s New Form dialog. The window in the background is Qt Designer’s main window. In the next two sections, you’ll learn the basics of how to use these components of the Qt Designer interface.
Using Qt Designer’s New Form Dialog
When you run Qt Designer, you’re presented with the application’s main window and the New Form dialog. In this dialog, you can select from five available GUI templates. These templates include options to create dialogs, main windows, and custom widgets:
| Template | Form Type | Widgets | Base Class |
|---|---|---|---|
| Dialog with Buttons Bottom | Dialog | OK and Cancel buttons laid out horizontally on the bottom-right corner | QDialog |
| Dialog with Buttons Right | Dialog | OK and Cancel buttons laid out vertically on the top-right corner | QDialog |
| Dialog without Buttons | Dialog | No | QDialog |
| Main Window | Main Window | A menu bar at the top and a status bar at the bottom | QMainWindow |
| Widget | Widget | No | QWidget |
By default, when you run Qt Designer, the New Form dialog appears in the foreground. If it doesn’t, then you can click New on Qt Designer’s toolbar. You can also click File → New in the main menu or press Ctrl+N on your keyboard.
In the New Form dialog, you can select the form template that you want to start with and then click Create to generate a new form:
To create a new and empty form using a Qt Designer template, you just need to select the desired template from the New Form dialog and then click Create or press Alt+R on your keyboard.
Note that the first two dialog templates have their own default buttons. These are standard buttons included in a QDialogButtonBox. This class automatically handles the position or order of buttons across different platforms.
For example, if you use a Cancel button and an OK button, then the standard on Linux and macOS is to display those buttons in this same order. But on Windows, the order of buttons will be swapped, with OK appearing first, followed by Cancel. QDialogButtonBox handles this issue for you automatically.
Working With Qt Designer’s Main Window
Qt Designer’s main window provides a menu bar with options for saving and managing forms, editing forms and changing the edit mode, laying out and previewing forms, and also for tuning the application’s settings and accessing its help documentation:
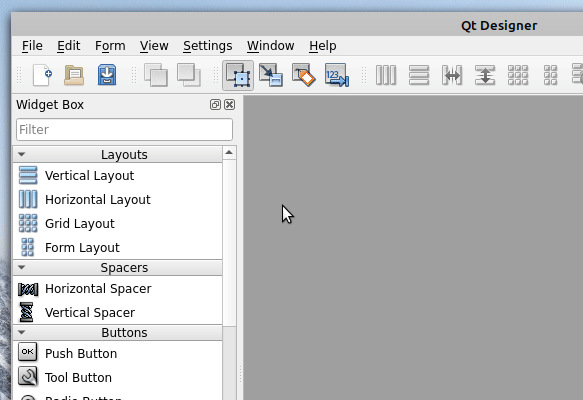
The main window also provides a toolbar that displays commonly used options. You’ll use most of these options when you’re editing and laying out your forms. These options are also available in the main menu, especially in the File, Edit, and Form menus:

Qt Designer’s main window also includes a few dock windows that provide a rich set of features and tools:
- Widget Box
- Object Inspector
- Property Editor
- Resource Browser
- Action Editor
- Signal/Slot Editor
The Widget Box provides a selection of layout managers, spacers, standard widgets, and other objects that you can use to create a GUI for your dialogs and windows:
The Widget Box provides a filter option at the top of the window. You can type the name of a given object or widget and get quick access to it. The objects are grouped into categories that reflect their specific use. You can show or hide all the available objects in a category by clicking the handle next to the category label.
When you’re creating your forms, you can take objects from the Widget Box with your mouse pointer and then drag and drop them onto the form to build its GUI.
The Widget Box also provides a Scratchpad section at the bottom of the window. In this section, you can group frequently used objects in a separate category. You can fill the Scratchpad category with any widget currently placed on a form by dragging and dropping them back onto the Widget Box. You can remove widgets from the Scratchpad category by right-clicking them and selecting Remove in the context menu.
The Object Inspector provides a tree view of all the objects on the current form. The Object Inspector also has a filter box at the top to allow you to find objects in the tree. You can use the Object Inspector to set the name and other properties of the form and its widgets. You can also right-click any widget to access a context menu with additional options:
With the Object Inspector, you can manage the widgets on your form. You can rename them, update some of their properties, remove them from the form, and so on. The tree view in the Object Inspector reflects the parent-child relationship of the widgets and objects on the current form.
The Property Editor is another dock window that appears in Qt Designer’s main window. This window holds a two-column table with the active object’s properties and their values. You can use the Property Editor to edit the value of an object’s properties, as the name implies:
The Property Editor provides a user-friendly way to access and edit the values of the active object’s properties, such as its name, size, font, icon, and so on. The properties listed on the editor will change depending on which object you select on your form.
The properties are listed from top to bottom according to class hierarchy. For example, if you select a QPushButton on the form, then the Property Editor shows the properties of QWidget, followed by the properties of QAbstractButton, and finally the properties of QPushButton itself. Note that the rows on the editor show different colors to visually differentiate the underlying class.
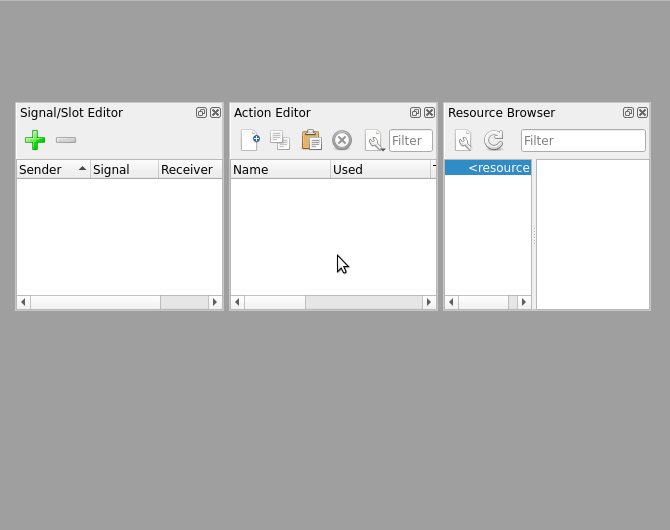
Finally, you have three dock windows that commonly appear as tabs in the bottom-right corner:
- Resource Browser provides a quick way of adding resources, such as icons, translation files, images, and other binary files to your applications.
- Action Editor provides a way to create actions and add them to your forms.
- Signal/Slot Editor provides a way to connect signals and slots in your forms.
Here are some of the options that these tools provide:
That’s it! These three dock windows round out the set of tools and options that Qt Designer provides for you to create and customize the GUIs for your dialogs and windows.
Using Qt Designer vs Hand Coding Your GUIs
With PyQt, you have at least two options for creating the GUI of a window or dialog: You can use Qt Designer, or you can hand code the GUI in plain Python code. Both options have their pros and cons. Sometimes it’s hard to decide when to use one or the other.
Qt Designer provides a user-friendly graphical interface that allows you to quickly create GUIs. This can boost your productivity as a developer and shorten your development cycles.
Hand coding your GUIs, on the other hand, can give you much more control over them. With this approach, adding new components and features doesn’t require any extra tools beyond your code editor or IDE, which can be quite convenient in some development environments.
Whether you use Qt Designer or hand code your GUIs is a personal decision. Here are some general considerations on both approaches:
| Feature | Qt Designer | Hand Coding |
|---|---|---|
| Developer’s productivity | High | High if you’re familiar with PyQt, but low otherwise |
| Separation of GUI logic from business logic | High | Low |
| Control over GUI components | Low | High |
| Capability for adding and removing widgets dynamically | Low | High |
| Flexibility for exploration, learning, prototyping, and sketching | High | Low |
| Flexibility for using custom widgets | Low | High |
| Amount of boilerplate code | High | Low |
Beyond these concerns, if you’re just starting with PyQt, then Qt Designer can help you discover available widgets, layout managers, base classes, properties and their typical values, and so on.
One last difference between using Qt Designer and hand coding a GUI is that you need to run an extra step when using Qt Designer: translating .ui files into Python code.
Building Main Windows With Qt Designer and Python
With PyQt, you can build main window–style and dialog-style applications. Main window–style applications often consist of a main window with a menu bar, one or more toolbars, a central widget, and a status bar. They can also include several dialogs, but those are independent of the main window.
Qt Designer enables you to quickly build the GUI of your main windows using the predefined Main Window template. Once you’ve created a form based on that template, you’ll have tools to perform the following actions:
- Creating a main menu
- Adding and populating toolbars
- Laying out widgets
Qt Designer’s Main Window template also provides a default central widget and a status bar at the bottom of the window:
Qt Designer saves its forms in .ui files. These are XML files that contain all the information you’ll need to later recreate the GUI in your applications.
To save your forms, go to File → Save, enter main_window.ui in the Save Form As dialog, select a directory to save the file in, and click Save. You can also get access to the Save Form As dialog by pressing Ctrl+S on your keyboard.
Don’t close your Qt Designer session—stay there to continue adding menus and toolbars to the main window you just created.
Creating the Main Menu
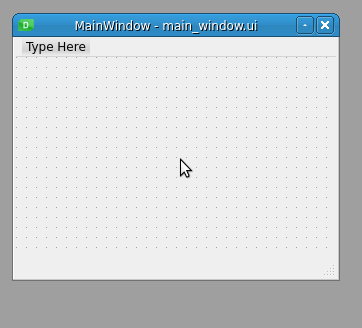
Qt Designer’s Main Window template provides an empty menu bar at the top of the form. You can add menus to that menu bar using the Menu Editor. Menus are pull-down lists of options that provide quick access to the application’s options. Go back to Qt Designer and your newly created main window. At the top of the form, you’ll see a menu bar with the placeholder text Type Here.
If you double-click or press Enter on this placeholder text, then you can type the name of your first menu. To confirm the menu name, just press Enter.
Say you want to create your own text editor. Typically, this kind of application has a File menu with at least some of the following options:
- New for creating a new document
- Open for opening an existing document
- Open Recent for opening recently viewed documents
- Save for saving a document
- Exit for exiting the application
Here’s how you can use Qt Designer to create this menu:
Qt Designer’s Menu Editor allows you to add menus to the menu bar in a user-friendly way. When you enter the name of a menu or menu option, you can use an ampersand symbol (&) before a given letter to provide a keyboard accelerator.
For example, if you add an ampersand before the F in the File menu, then you can access this menu by pressing Alt+F. Likewise, if you add an ampersand before the N in New, then once you’ve launched the File menu, you can access the New option by pressing N.
With the Menu Editor, you can also add separators to your menus. This is a good way to visually separate menu options and group them logically. To add a separator, double-click the Add Separator option at the end of the active menu in the Menu Editor. You can remove an existing separator by right-clicking it and then selecting Remove Separator in the context menu. This menu also allows you to add new separators.
If you need to move a separator to another place in a given menu, then you can drag the separator to the desired position and drop it there. A red line will indicate the position where the separator will be placed.
You can also add a submenu to a given menu option. To do this, click the icon on the right side of the menu option to which you want to attach the submenu, just like you did with the Open Recent option in the above example.
To run a preview of your form, go to Form → Preview, or hit the key combination Ctrl+R on your keyboard.
When you create a menu like the File menu in your sample text editor, a new QMenu object is automatically added to your menu bar. When you add a menu option to a given menu, you create an action. Qt Designer provides an Action Editor for creating, customizing, and managing actions. The tool provides a few handy options that you can use to fine-tune your actions:
With the Action Editor, you can fine-tune, update, or set the following options:
- The text of the action, which will be shown on menu options and toolbar buttons
- The object name, which you’ll use in your code to reference the action object
- The icons that will be shown on your menu options and toolbar buttons
- The checkable property of the action
- The keyboard shortcuts, which will provide the user with a quick way to access the action
The final ellipsis (...) in the text of your menu options is a widely used convention for naming options that don’t perform an immediate action but launch a pop-up dialog for performing further actions.
In the case of the icons, you need to pack those icons with your application as independent files, or you can create a resources file, also known as a .qrc file. For this example, you can download the required icons and other resources by clicking the link below:
Get the Source Code: Click here to get the source code you’ll use to learn about creating Python GUI applications with Qt Designer in this tutorial.
Once you’ve downloaded the icons, create a resources directory beside your main_window.ui file and copy the icons there. Then get back to the Action Editor and add icons to your actions like this:
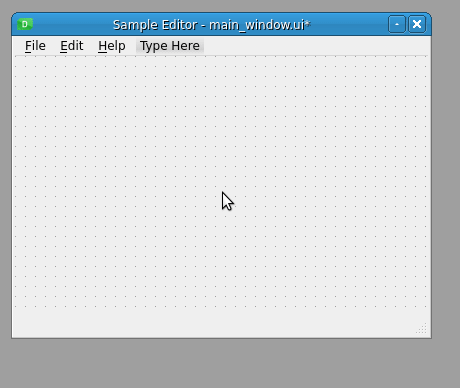
Note that your menu options now display an icon on the left margin. This provides extra visual information to your users and helps them find the desired option. Now go ahead and add an Edit menu with the following options:
- Copy for copying some text
- Paste for pasting some text
- Cut for cutting some text
- Find and Replace for finding and replacing text
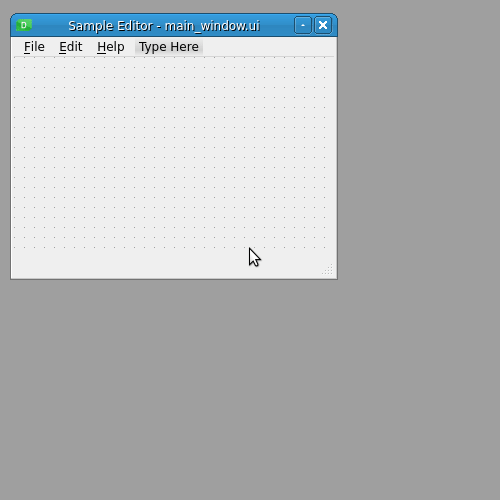
Next, add a Help menu with an About option for launching a dialog with general information about your text editor. Finally, go to the Property Editor and set the title of your window to Sample Editor. After these additions, your main window should look something like this:
With these additions, your sample text editor’s main menu is starting to look like the menu of a real text editor!
Creating a Toolbar
You can add as many toolbars as you need to your main window’s GUI using Qt Designer. To do that, right-click on the form and select Add Tool Bar from the context menu. This adds an empty toolbar at the top of the window. Alternatively, you can predefine the toolbar area where you want to place a given toolbar by selecting Add Tool Bar to Other Area:
Once you have your toolbars in place, you can populate them with buttons. To do this, you use actions rather than specific toolbar buttons from the Widget Box. To add actions to your toolbars, you can use the Action Editor:
Actions can be shared between menu options and toolbar buttons, so in this case, you reuse the actions that you created when you populated your menus in the preceding section. To populate the toolbar, click on an action on the Action Editor, then drag and drop it onto the toolbar. Note that by right-clicking on the toolbar, you can add separators to visually separate the tool buttons.
Laying Out a Single Central Widget
Qt Designer uses QMainWindow for building its Main Window template. This class provides a default layout that allows you to create a menu bar, one or more toolbars, one or more dock widgets, a status bar, and a central widget. By default, Qt Designer uses a QWidget object as the central widget on the Main Window template.
Using a bare-bones QWidget object as the central widget on a main window’s GUI is a good choice because, on top of that widget, you can place either a single widget or multiple widgets in a coherent layout.
For example, in your sample text editor, you might want to use a single widget that provides your users with a work area to type, copy, paste, and edit their text. For this purpose, you can use a QTextEdit object and then add a vertical (or horizontal) layout as the central widget’s layout:
In this example, you first drag a QTextEdit onto the form. Then you click on the form to select your central widget. Finally, you apply a vertical layout to your central widget by clicking Lay Out Vertically on Qt Designer’s toolbar.
Since the spacing around the QTextEdit doesn’t look right, you use the Object Inspector to change the margins of the layout from 9 pixels to 1 pixel.
With Qt Designer, you can use different layout managers to arrange your widgets quickly. Arguably, the most accessible way of laying out your GUIs with Qt Designer is using the layout-related section on the main toolbar:

From left to right, you’ll find the following options to create different types of layouts:
| Option | Widget Arrangement | Layout Class | Keyboard Shortcut |
|---|---|---|---|
| Lay Out Horizontally | Horizontally in one row and several columns | QHBoxLayout |
Ctrl+1 |
| Lay Out Vertically | Vertically in one column and several rows | QVBoxLayout |
Ctrl+2 |
| Lay Out Horizontally in Splitter | Horizontally in a resizable splitter | QSplitter |
Ctrl+3 |
| Lay Out Vertically in Splitter | Vertically in a resizable splitter | QSplitter |
Ctrl+4 |
| Lay Out in a Grid | Tabularly in a grid with several rows and columns | QGridLayout |
Ctrl+5 |
| Lay Out in a Form Layout | Tabularly in a two-column table | QFormLayout |
Ctrl+6 |
The last two options in the toolbar are related to layouts but don’t create them:
-
Break Layout allows you to break an existing layout. Once widgets are arranged in a layout, you can’t move or resize them individually because their geometry is controlled by the layout. To modify individual widgets, you might need to break the layout and redo it later. To access this option, you can press Ctrl+0 on your keyboard.
-
Adjust Size adjusts the size of the layout to accommodate contained widgets and to ensure that each has enough space to be visible. To access this option, you can press Ctrl+J on your keyboard.
You can also access all these layout-related options through Qt Designer’s main menu bar, under the Form menu:

In the Form menu, you have access to all the layout-related options, with a complete reference of the keyboard shortcuts to access them. You can also access these options through the form’s context menu, under the Lay Out option.
Laying Out a Compound Central Widget
When you’re creating your main windows, you might face situations in which you need to use multiple widgets in a given layout as your central widget. Since Qt Designer’s Main Window template ships with a QWidget object as its central widget, you can take advantage of this to create your own custom arrangement of widgets and then set it as the top-level layout of that central widget.
With Qt Designer, you can lay out your widgets using layout managers, as you already saw in the above section. If you need a compound layout of widgets for your main window’s GUI, then you can build it by running the following steps:
- Drag and drop the widgets onto your form and try to place them near their desired position.
- Select the widgets that should be managed together by a given layout.
- Apply the appropriate layout using Qt Designer’s toolbar or main menu, or with the form’s context menu.
Although you can drag layouts onto a form and then drag widgets onto the layouts, the best practice is to drag all the widgets and spacers first and then repeatedly select related widgets and spacers to apply layouts to them.
For example, suppose you’re building a calculator application. You need a QLineEdit object on the top of your form to display the operations and their results. Under the line edit, you need a few QPushButton objects for the numbers and operations. That gives you a window like this:
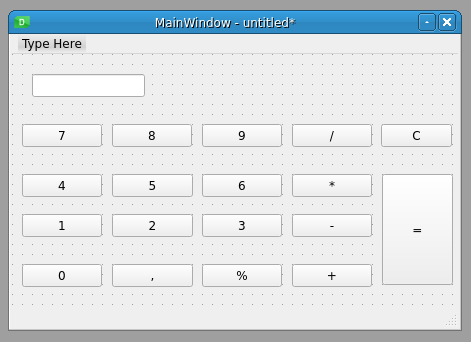
This looks something like a calculator, but the GUI is messy and cluttered. To arrange this into a more polished calculator GUI, you can use a grid layout for the buttons and a vertical box layout as the calculator’s top-level layout:
Your calculator still needs some extra polishing, but it looks a lot better now. To get a more finished version, you can use the Property Editor to tweak the values of some properties on your buttons, such as their maximum and minimum size. You can also set a fixed size for your calculator’s main window, and so on. Go ahead and give it a try!
Having a Status Bar
Qt Designer’s Main Window template provides a status bar by default. A status bar is a horizontal panel that’s usually placed at the bottom of the main window in a GUI application. Its primary purpose is to display information about the current status of the application.
You can divide a status bar into several sections and show different information on each section. The information on the status bar can be temporary or permanent, and most of the time it comes as text messages. The purpose of the information displayed on the status bar is to keep your users updated about what the application is currently doing and what its general status is at a given time.
You can also use the status bar to display help tips, which are short help messages that describe what a given button or menu option does. This kind of message appears on the status bar when the user hovers the mouse pointer over a toolbar button or menu option.
Creating a Dialog With Qt Designer and Python
Dialogs are small-sized windows that you commonly use to provide auxiliary functionalities, such as a Preferences dialog, or to communicate with your users by showing error messages or general information about a given operation. You can also use dialogs to ask the user for some required information or to confirm an operation that’s about to take place.
PyQt offers a rich set of built-in dialog that you can use in your applications directly. You just need to import them from PyQt5.QtWidgets. Here’s a summary:
| Dialog Class | Purpose |
|---|---|
QFontDialog |
Selecting and setting a font of a given text |
QPrintDialog |
Specifying the settings of a printer |
QProgressDialog |
Showing the progress of a long-running operation |
QColorDialog |
Selecting and setting colors |
QInputDialog |
Getting a single value from the user |
QFileDialog |
Selecting files and directories |
QMessageBox |
Displaying messages such as errors, general information, warnings, and questions |
QErrorMessage |
Displaying error message |
All these built-in dialogs are ready for you to use in your code directly. Most of them provide class methods to build specific types of dialogs depending on your needs. Along with these dialogs, PyQt provides the QDialog class. You can use this class to create your own dialogs in code, but you can also use Qt Designer to create your dialogs quickly.
In the next few sections, you’ll learn how to create, lay out, and customize your dialogs using Qt Designer and its dialog templates.
Creating a Dialog GUI
To create a custom dialog with Qt Designer, select the appropriate template for the dialog from the New Form dialog. Drag and drop the required widgets onto the form, lay out them correctly, and save the form in a .ui file for later use in your application.
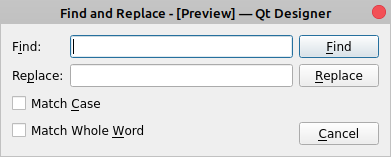
Go back to your sample text editor and suppose you want to add a Find and Replace dialog like this:
To create this dialog, start with the Dialog without Buttons template and add the required widgets to the form:
Here, you first create an empty dialog using the Dialog without Buttons template and set the window title to Find and Replace in the Object Inspector. Then you drag and drop two QLabel objects onto the form using the Widget Box. These labels ask the users for the words they need to find and replace. Those words will be entered in the corresponding QLineEdit objects near the labels.
Next, you drag and drop three QPushButton objects onto the form. These buttons will allow your users to find and replace words in their current document. Finally, you add two QCheckBox objects to provide Match Case and Match Whole Word options.
Once you have all the widgets on the form, make sure to place them in a position that’s similar to what you want to achieve in your final dialog. Now it’s time to lay out the widgets.
Laying Out the Dialog GUI
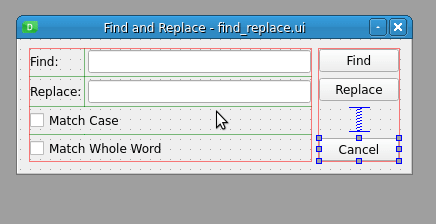
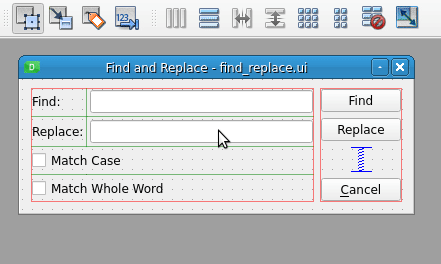
As you saw before, to arrange the widgets in a form, you can use several layout managers. To lay out your Find and Replace dialog, use a grid layout for the labels, line edits, and checkboxes. For the buttons, use a vertical layout. Finally, use a horizontal layout as your dialog’s top-level layout manager:
Here, you select the labels, line edits, and checkboxes with your mouse pointer and apply a grid layout to them. After that, you add a vertical spacer between the Replace and Cancel buttons to keep them visually separated.
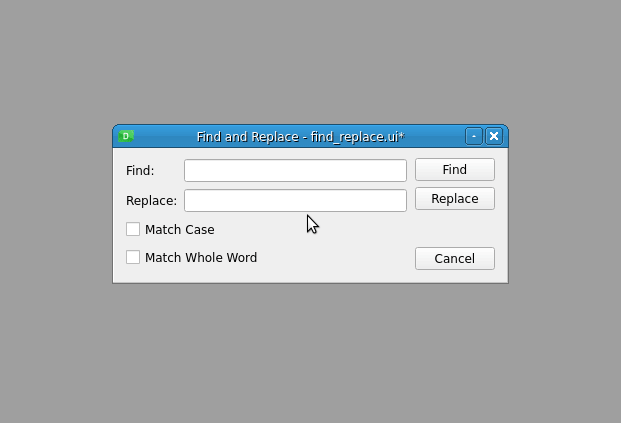
The final step is to set the dialog’s top-level layout. In this case, you use a horizontal layout manager. That’s it! You’ve built the GUI of your Find and Replace dialog with Qt Designer. Save it with the filename find_replace.ui.
There are a bunch of other properties and features that you can tweak in your dialogs using Qt Designer. For example, you can set the tab order of your input widget to improve the experience of users navigating your dialogs with their keyboard. You can also provide keyboard accelerators, connect signals and slots, and so on.
Connecting Signals and Slots
So far, you’ve used Qt Designer in the Edit Widgets mode, which is its default mode. In this mode, you can add widgets to your forms, edit widget’s properties, lay out the widgets on the form, and so on. However, Qt Designer has up to four different modes to allow you to work on different features of your forms:
| Mode | Purpose | Menu Option | Keyboard Shortcut |
|---|---|---|---|
| Edit Widgets | Editing widgets | Edit → Edit Widgets | F3 |
| Edit Signals/Slots | Connecting built-in signals and slots | Edit → Edit Signals/Slots | F4 |
| Edit Buddies | Setting up keyboard accelerators | Edit → Edit Buddies | No |
| Edit Tab Order | Setting up the tab order of widgets | Edit → Edit Tab Order | No |
You can also access these modes by clicking their corresponding buttons in the mode-related section of Qt Designer’s toolbar, which looks like this:

To be able to edit the built-in signals and slots of your widgets and forms, you first need to switch to the Edit Signals/Slots mode.
Note: In Qt, the term buddies refers to a special relationship between a label and a widget in which the label provides a keyboard accelerator or shortcut that allows you to access the buddy widget using your keyboard.
User actions on widgets and forms, such as a click or a keypress, are known as events in PyQt. When an event occurs, the widget at hand emits a signal. This mechanism allows you to run actions in response to events. These actions are known as slots, which are methods or functions.
To execute a slot in response to an event, you need to select one of the signals emitted by the widget in response to an event and connect it to the desired slot.
Most widgets, including dialogs and windows, implement built-in signals that are emitted when a given event occurs on the widget. Widgets also provide built-in slots that allow you to perform certain standardized actions.
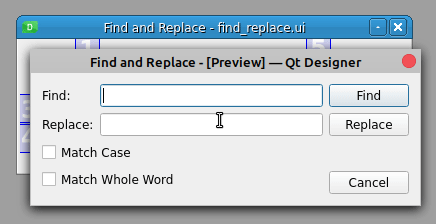
To establish a signal-and-slot connection between two widgets using Qt Designer, you need to select the signal-provider widget with your mouse and then drag and drop it over the slot-provider widget. This launches Qt Designer’s Configure Connection dialog. Now go back to the Find and Replace dialog and switch to Qt Designer’s Edit Signals/Slots mode. Then drag and drop the Cancel button onto the form:
The Configure Connection dialog has two panels. On the left panel, you can select a signal from the signal-provider widget, and on the right panel, you can select a slot from the slot-provider widget. To create the connection, press OK:
The connection appears as an arrow from the signal-provider widget to the slot-provider widget, indicating that the connection is established. You’ll also see the name of the signal and the slot that you just connected.
In this case, you connected the clicked() signal of the Cancel button with the reject() slot of the dialog. Now when you click Cancel, your action will be ignored, and the dialog will close.
To modify a connection, double-click the arrow or one of the labels. This displays the Configure Connection dialog, in which you can change the signal or the slot involved in the connection according to your needs.
To delete a connection, select the arrow that represents the connection or one of the labels that identify the signal and slot, then press Del.
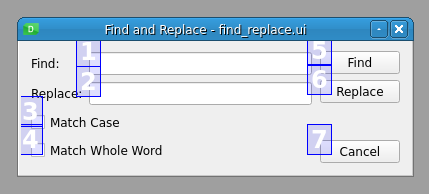
Setting the Tab Order of Widgets
To improve the usability of your dialogs, you can set a coherent tab order for your input widgets. The tab order is the order in which the widgets on your form come into focus when you press Tab or Shift+Tab on your keyboard.
If you’re using Qt Designer to create your forms, then the default tab order of your widgets is based on the order in which you place each widget on the form. Sometimes this order isn’t right, and when you hit Tab or Shift+Tab, the focus jumps to an unexpected widget. Take a look at the tab order behavior in your Find and Replace dialog:
The focus starts on the Find line edit, then it goes through the Replace line edit, then through the checkboxes, and finally through the buttons. What if you want the focus to jump from the Find line edit to the Replace line edit and then to the Find button? In this case, you can change the tab order of the input widgets on the dialog. Switch to Edit Tab Order mode in Qt Designer. You’ll see something like this:
In Edit Tab Order mode, each input widget in the form shows a number that identifies its position in the tab-order chain. You can change that order by clicking on the numbers in the desired order:
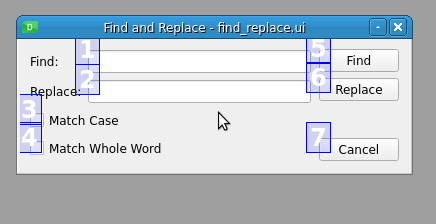
You change the tab order of the input widgets by clicking the numbers in the desired order. Note that when you select a number, it changes to red, indicating that this is the currently edited position in the tab-order chain. Numbers you haven’t set are shown in blue, and the numbers you have set are shown in green. If you make a mistake, then you can restart the ordering by choosing Restart from the form’s context menu.
Providing Keyboard Accelerators
A keyboard accelerator is a key combination that you can press on your keyboard to quickly move the focus onto a given widget on a dialog or window. Normally, keyboard accelerators consist of the Alt key and a letter that identifies the widget or option that you want to access. This can help you improve the usability of your applications.
To define a keyboard accelerator on a widget that includes a label, such as a button or a checkbox, you just need to place an ampersand symbol (&) before the letter in the label text that you want to use in the accelerator. For example, place an ampersand before the C on the Cancel button of your Find and Replace dialog, run a preview, and press Alt+C like in the following example:
By placing an ampersand before the letter C in the text of the Cancel button, you create a keyboard accelerator. If you press Alt+C on your keyboard, then the Cancel button is selected and the dialog closes.
To define a keyboard accelerator on a widget that doesn’t include a label, such as a line edit, you need to make that widget a buddy of a label object. There are four steps that you need to take if you want to create a buddy connection:
- Select a letter in the text of the label to identify the buddy connection and provide the keyboard accelerator.
- Place an ampersand (
&) before the selected letter in the text of the label. - Switch to Edit Buddies mode in Qt Designer.
- Drag and drop the label onto the buddy widget.
Here’s how you can create a buddy relationship between the Find label and its related line edit:
To create a buddy relationship between a label and a widget, select the label with your mouse and drag it onto the input widget that you want to set as its buddy. The label and the input widget will become buddies. From this point on, you can press Alt plus the selected letter in the label text to move the focus to the related widget.
It’s important to note that you shouldn’t have two widgets with the same keyboard accelerator in a given form. This means that you need to select a unique letter for each keyboard accelerator.
Go ahead and use Qt Designer to set keyboard accelerators for the widgets on your Find and Replace dialog. The final result should look like the dialog you saw at the beginning of the section Creating a Dialog GUI.
Integrating Windows and Dialogs in an Application
Up to this point, you’ve learned how to create a GUI for your main windows and dialogs with Qt Designer. In this section, you’ll learn how to integrate those GUIs into your Python code and build a real application. There are two main approaches to do that in PyQt:
- Translating the content of your
.uifiles into Python code usingpyuic5 - Loading the content of the
.uifiles dynamically usinguic.loadUi()
The first approach uses pyuic5, which is a tool included in the PyQt installation that allows you to translate the content of a .ui file into Python code. This approach is widely used because of its efficiency. However, it has one drawback: every time you modify the GUI with Qt Designer, you need to generate the code again.
The second approach takes advantage of uic.loadUi() to dynamically load the content of a .ui file into your application. This approach is suitable when you’re working with small GUIs that don’t involve substantial loading time.
Setting Up Windows and Dialogs for Use
Now it’s time to set up your windows and dialogs for use in a real application (in this case, a sample text editor). If you’ve been following this tutorial, then you should have at least two .ui files:
main_window.uiwith the GUI of a sample text editor applicationfind_replace.uiwith the GUI of a Find and Replace dialog
Go ahead and create a new directory called sample_editor/. Inside this directory, create another directory called ui/ and copy your .ui files into it. Also, copy the resources/ directory that contains the icons for your menu options and toolbar buttons to the sample_editor/ui/ directory. So far, the structure of your application should look like this:
sample_editor/
│
└── ui/
    ├── resources/
    │   ├── edit-copy.png
    │   ├── edit-cut.png
    │   ├── edit-paste.png
    │   ├── file-exit.png
    │   ├── file-new.png
    │   ├── file-open.png
    │   ├── file-save.png
    │   └── help-content.png
    │
    ├── find_replace.ui
    └── main_window.ui
Since the main-window GUI is relatively complex, you can use pyuic5 to translate the content of main_window.ui into Python code.
You can download all the required code and resources to build your sample text editor by clicking the link below:
Get the Source Code: Click here to get the source code you’ll use to learn about creating Python GUI applications with Qt Designer in this tutorial.
Now open a terminal and navigate to the sample_editor/ directory. Once you’re there, run the following command:
$ pyuic5 -o main_window_ui.py ui/main_window.ui
This command generates a Python module called main_window_ui.py from the ui/main_window.ui file and places it in your sample_editor/ directory. This module contains the Python code for your main window’s GUI. Here’s a small sample of the code:
# -*- coding: utf-8 -*-

# Form implementation generated from reading ui file 'ui/main_window.ui'
#
# Created by: PyQt5 UI code generator 5.15.1
#
# WARNING: Any manual changes made to this file will be lost when pyuic5 is
# run again.  Do not edit this file unless you know what you are doing.

from PyQt5 import QtCore, QtGui, QtWidgets

class Ui_MainWindow(object):
    def setupUi(self, MainWindow):
        MainWindow.setObjectName("MainWindow")
        MainWindow.resize(413, 299)
        self.centralwidget = QtWidgets.QWidget(MainWindow)
        # Snip...

    def retranslateUi(self, MainWindow):
        _translate = QtCore.QCoreApplication.translate
        MainWindow.setWindowTitle(_translate("MainWindow", "Sample Editor"))
        self.menu_File.setTitle(_translate("MainWindow", "&File"))
        # Snip...
Ui_MainWindow has all the code for generating the GUI of the sample editor’s main window. Note that .setupUi() contains the code to create all the required widgets and lay them out on the GUI. .retranslateUi() contains code for internationalization and localization, but this topic is beyond the scope of this tutorial.
Note: If pyuic5 doesn’t work for you, then you need to check out your current PyQt installation. If you installed PyQt in a Python virtual environment, then you might need to activate the environment. You can also move to your virtual environment directory and run pyuic5 from there. Typically, you’ll find the application under the bin/ directory.
If you have a system-wide installation of PyQt, then you should be able to run pyuic5 directly from your command line without needing to activate a virtual environment.
Now your working directory should look like this:
sample_editor/
│
├── ui/
│   ├── resources/
│   │   ├── edit-copy.png
│   │   ├── edit-cut.png
│   │   ├── edit-paste.png
│   │   ├── file-exit.png
│   │   ├── file-new.png
│   │   ├── file-open.png
│   │   ├── file-save.png
│   │   └── help-content.png
│   │
│   ├── find_replace.ui
│   └── main_window.ui
│
└── main_window_ui.py
Since your Find and Replace dialog is quite small, you can load its GUI directly from your .ui file using uic.loadUi(). This function takes a string with the path to a .ui file as an argument and returns a QWidget subclass that implements the GUI.
This way of loading .ui files dynamically is rarely used in practice. You can use it with small dialogs that don’t require too much effort to load. With this approach, you don’t need to generate the Python code for the dialog’s GUI every time you modify the .ui file with Qt Designer, which can be a productivity and maintainability win in some cases.
Now that you’ve chosen a strategy for building each of your GUIs, it’s time to put everything together in a real application.
Putting Everything Together in an Application
With all the pieces in place for your sample text editor, you can create the application and write the required code to use the main window and the Find and Replace dialog. Fire up your favorite code editor or IDE in your sample_editor/ directory and create a new file called app.py. Add the following code to it:
 1import sys
 2
 3from PyQt5.QtWidgets import (
 4    QApplication, QDialog, QMainWindow, QMessageBox
 5)
 6from PyQt5.uic import loadUi
 7
 8from main_window_ui import Ui_MainWindow
 9
10class Window(QMainWindow, Ui_MainWindow):
11    def __init__(self, parent=None):
12        super().__init__(parent)
13        self.setupUi(self)
14        self.connectSignalsSlots()
15
16    def connectSignalsSlots(self):
17        self.action_Exit.triggered.connect(self.close)
18        self.action_Find_Replace.triggered.connect(self.findAndReplace)
19        self.action_About.triggered.connect(self.about)
20
21    def findAndReplace(self):
22        dialog = FindReplaceDialog(self)
23        dialog.exec()
24
25    def about(self):
26        QMessageBox.about(
27            self,
28            "About Sample Editor",
29            "<p>A sample text editor app built with:</p>"
30            "<p>- PyQt</p>"
31            "<p>- Qt Designer</p>"
32            "<p>- Python</p>",
33        )
34
35class FindReplaceDialog(QDialog):
36    def __init__(self, parent=None):
37        super().__init__(parent)
38        loadUi("ui/find_replace.ui", self)
39
40if __name__ == "__main__":
41    app = QApplication(sys.argv)
42    win = Window()
43    win.show()
44    sys.exit(app.exec())
Here’s what this code does:
- Line 3 imports the required PyQt classes to build the application and the GUI.
- Line 6 imports
loadUi()from theuicmodule. This function provides a way of loading the content of a.uifile dynamically. - Line 8 imports
Ui_MainWindow, which contains the GUI for your main window. - Line 10 defines
Window, which will provide your application’s main window. In this case, the class uses multiple inheritance. It inherits the main window functionality fromQMainWindowand the GUI functionality fromUi_MainWindow. - Line 13 calls
.setupUi(), which creates the whole GUI for your main window. - Line 16 defines
.connectSignalsSlots(), which connects the required signals and slots. - Line 21 defines
.findAndReplace(). This method creates an instance of your Find and Replace dialog and execute it. - Line 25 defines
.about(), which creates and launches a small dialog to provide information about the application. In this case, you use a built-in dialog based onQMessageBox. - Line 35 defines
FindReplaceDialog, which provides the Find and Replace dialog. - Line 38 calls
loadUi()to load the dialog’s GUI from the filesui/find_replace.ui.
Finally, on lines 41 to 44, you create the application, create and show the main window, and run the application’s main loop by calling .exec() on the application object.
It’s important to note that Qt Designer can name your actions a bit differently from what you saw in the above code. For example, you might find the name .actionE_xit instead of .action_Exit to refer to the Exit action. So, for this example to work properly, you need to make sure you’re using the right names.
If you want to use your own names instead of the names that Qt Designer generates, then you can go to the Property Editor and change the .objectName property to the name that seems right for you.
Note: You can also create Window using composition instead of multiple inheritance.
For example, you can define Window and its initializer like this:
class Window(QMainWindow):
    def __init__(self, parent=None):
        super().__init__(parent)
        self.ui = Ui_MainWindow()
        self.ui.setupUi(self)
        self.connectSignalsSlots()

    def connectSignalsSlots(self):
        self.ui.action_Exit.triggered.connect(self.close)
        self.ui.action_Find_Replace.triggered.connect(
            self.findAndReplace
        )
        self.ui.action_About.triggered.connect(self.about)
    # Snip...
In this case, you create .ui, which is an instance of Ui_MainWindow. From this point on, you need to use .ui to access the widgets and objects on your main window’s GUI.
If you run this application, then you’ll get the following window on your screen:
That’s it! You’ve created a sample text editor with minimal functionality using Qt Designer. Note that to code this application, you wrote only forty-four lines of Python code, which is substantially less than what you’d need to write to hand code the GUI of an equivalent application from scratch.
Conclusion
When you create applications in PyQt, you commonly build a main window and several dialogs. Building the GUI of those windows and dialogs can take a lot of time if you hand code them. Luckily, Qt provides Qt Designer, which is a powerful tool intended to create GUIs fast and productively using a user-friendly graphical interface.
With Qt Designer, you can drag and drop all the required widgets onto an empty form, lay them out, and create your GUIs in almost no time. Those GUIs are saved in .ui files that you can translate into Python code and use in your applications.
In this tutorial, you learned how to:
- Install Qt Designer on your system
- Decide when to use Qt Designer vs hand code your GUIs
- Build the GUI of an application’s main window using Qt Designer
- Create and lay out the GUI of your dialogs with Qt Designer
- Use Qt Designer’s
.uifiles in your GUI applications
Finally, you put all this knowledge into action by using Qt Designer to create the GUIs of the windows and dialogs required to build a sample text editor application. You can get all the required code and resources to build this application by clicking the link below:
Get the Source Code: Click here to get the source code you’ll use to learn about creating Python GUI applications with Qt Designer in this tutorial.