Watch Now This tutorial has a related video course created by the Real Python team. Watch it together with the written tutorial to deepen your understanding: Using the Terminal on Windows
The terminal can be intimidating to work with when you’re used to working with graphical user interfaces (GUIs). However, it’s an important tool that you need to get used to in your journey as a Python developer. And once you level up your skill of using the terminal, it becomes an extremely powerful tool in your repertoire. With just a few commands in the terminal, you can do tasks that are impossible or at least very tedious to do in a GUI.
In this tutorial, you’ll learn how to:
- Find the terminal on your operating system
- Open the terminal for the first time
- Navigate your file system with basic commans
- Create files and folders with the terminal
- Manage packages with
pipcommands - Keep track of your files with Git in the terminal
If you’re new to working with the terminal, or you’re looking to expand your understanding of its capabilities, then this tutorial is a great starting point. In it, you’ll get an introduction to some of the basic commands and learn how to use pip and Git to manage your projects in the terminal.
Understanding how to integrate the terminal, pip, and Git into your workflows is essential for you as a Python developer.
However, it’s important to note that you’ll only scratch the surface of what the terminal can do, and there’s much more to learn as you continue to explore the terminal as an essential development tool.
Free Download: Click here to get a free cheat sheet of useful commands to get you started working with the terminal.
Install and Open the Terminal
Back in the day, the term terminal referred to some clunky hardware that you used to enter data into a computer. Nowadays, people are usually talking about a terminal emulator when they say terminal, and they mean some kind of terminal software that you can find on most modern computers.
Note: There are two other terms that you might hear now and then in combination with the terminal:
- A shell is the program that you interact with when running commands in a terminal.
- A command-line interface (CLI) is a program designed to run in a shell inside the terminal.
In other words, the shell provides the commands that you use in a command-line interface, and the terminal is the application that you run to access the shell.
If you’re using a Linux or macOS machine, then the terminal is already built in. You can start using it right away.
On Windows, you also have access to command-line applications like the Command Prompt. However, for this tutorial and terminal work in general, you should use the Windows terminal application instead.
Read on to learn how to install and open the terminal on Windows and how to find the terminal on Linux and macOS.
Windows
The Windows terminal is a modern and feature-rich application that gives you access to the command line, multiple shells, and advanced customization options. If you have Windows 11 or above, chances are that the Windows terminal is already present on your machine. Otherwise, you can download the application from the Microsoft Store or from the official GitHub repository.
Before continuing with this tutorial, you need to get the terminal working on your Windows computer. You can follow the Your Python Coding Environment on Windows: Setup Guide to learn how to install the Windows terminal.
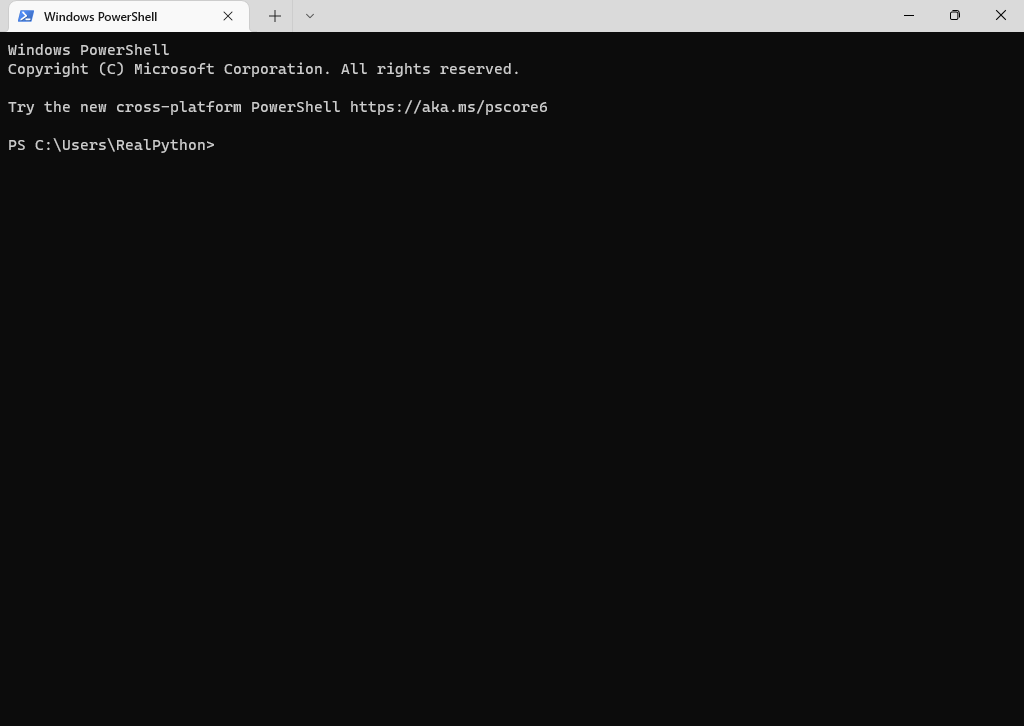
After you install the Windows terminal, you can find it in the Start menu under Terminal. When you start the application, you should see a window that looks like this:
It can be handy to create a desktop shortcut for the terminal or pin the application to your task bar for easier access.
Linux
You can find the terminal application in the application menu of your Linux distribution. Alternatively, you can press Ctrl+Alt+T on your keyboard or use the application launcher and search for the word Terminal.
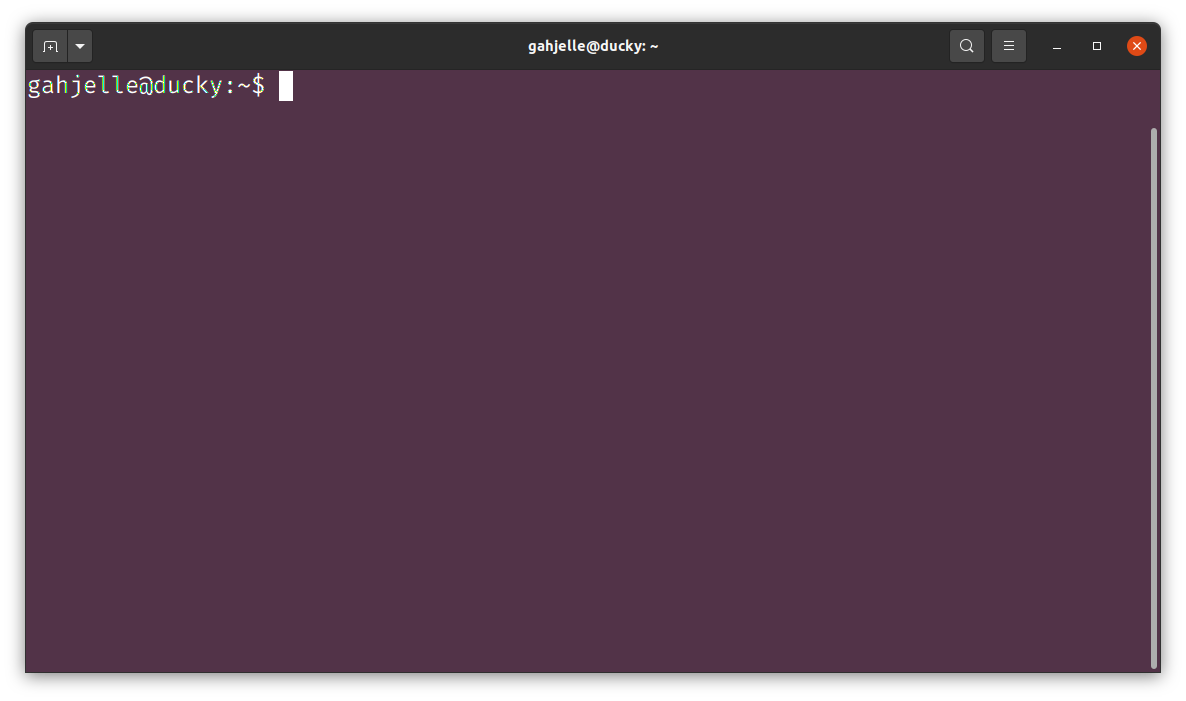
After opening the terminal, you should see a window similar to the screenshot below:
How you open the terminal may also depend on which Linux distribution you’re using. Each one has a different way of doing it. If you have trouble opening the terminal on Linux, then the Real Python community will help you out in the comments below.
macOS
A common way to open the terminal application on macOS is by opening the Spotlight Search and searching for Terminal. You can also find the terminal app in the application folder inside Finder.
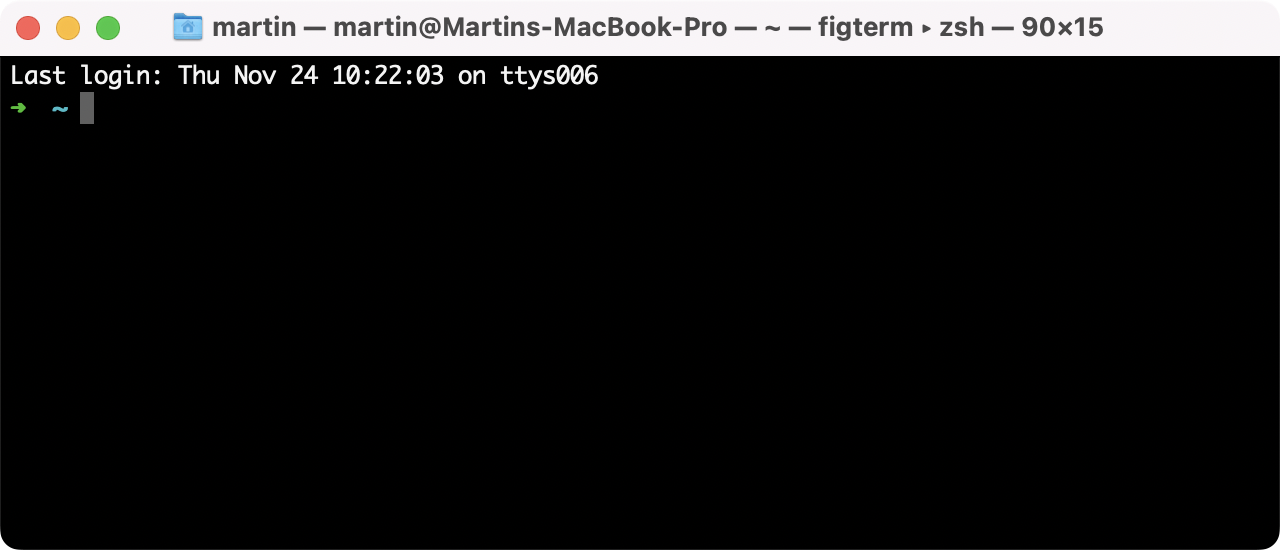
When you open the terminal, you see a window that looks similar to the image below:
After you launch the terminal application, you’ll see a window that waits for commands. That’s similar to when you’re interacting with a Python script that expects user input.
If you want to interact with the terminal, then you need to know which terminal commands you can enter to proceed. In the next section, you’ll learn about basic terminal commands that’ll help you get started.
Learn Basic Terminal Commands
To work with the terminal effectively, it’s important to understand some basic terminal commands and know how to use them. Terminal commands are the instructions that you type into the terminal to execute a specific task.
Depending on your operating system, you’ll run the terminal commands in a specific shell. For Linux, it’s most likely Bash, for newer macOS versions it’s Zsh, and for Windows it’s PowerShell. These shells differ in their features, but they share most of the basic commands.
Note: You can think of commands as little programs that are built into your shell or can be added by external applications. In PowerShell, commands are also known as cmdlets.
In this section, you’ll explore the most commonly used terminal commands. To see a preview of the commands, select your operating system from the platform switcher below:
You’ll learn how to navigate the file system and create, edit, and delete files and directories.
By the end of this section, you’ll have a solid foundation for working with the terminal and be able to perform many everyday tasks with confidence. You can take this confidence and use it to tackle other tasks in the terminal, such as using pip, interacting with Git, and building command-line interfaces with Python.
Navigate Your File System
The file system is the hierarchical structure of directories and files on a computer. It’s usually what you see when you open a GUI file system application like Windows Explorer or the macOS Finder. It also happens to be an excellent place to start your terminal journey, but again, you’re just dipping a toe into all the terminal’s capabilities here.
The folder that you have currently open in a file system is the current working directory (cwd). As you’ll notice, you use the working directory as a reference point for many file system operations. Understanding the file system and the current working directory as a state is important for effectively navigating and managing files and directories in the terminal.
After you’ve opened the terminal app, you usually start in the user folder of your operating system. You see a command prompt that’s waiting for your input. As you’ll learn, you can use a wide variety of commands as input. But some common commands are the ones to navigate the file system.
To get things started, find out what your current working directory is:
$ pwd
/Users/realpython
The pwd command stands for print working directory, which is the command that you use to determine your current location within the file system.
Here pwd shows that the current working directory is /Users/realpython.
The working directory is the current directory that you’re operating in. It’s where commands will be executed by default.
There are two terms that are worth exploring in the context of the current working directory:
- Environment Variables
- PATH
Environment variables are variables that store stateful information about the environment in which the terminal is running. They can be used to store information such as the current working directory, the location of installed software, or the user’s home directory. The terminal can access and use this information to determine how to operate and where to look for files.
PATH is an environment variable that stores a list of directories. To see what paths are in your PATH, call the following command:
When you enter a command in the terminal, the system will look for a program that matches the command in the directories listed in the PATH. The list visible after running the previous command is the list of locations that your system will look for when evaluating which program to run.
To see which files and folders the/Users/realpython directory contains, you can use ls, which is short for list:
$ ls
Applications          Movies
Desktop               Music
Documents             Pictures
Downloads             Public
Library
When you type ls and press Enter, you see a list of all the items in the current working directory.
In this case, the example shows the folders that you commonly find in the user directory on a macOS machine.
You can also use the -a flag with the ls command, which stands for all.
The -a flag shows you all the items in the current working directory, including the hidden items.
Another flag that you can use is -l, which stands for long.
When you use this flag along with ls, the command shows you detailed information about the items in the current working directory.
You can also combine these flags to show detailed information about all the items, including the hidden ones, by using ls -al:
$ ls -al
total 80
drwxr-xr-x+  25 realpython  staff    800 Nov 26 11:51 .
drwxr-xr-x    6 root        admin    192 Nov  7 13:22 ..
-rw-r--r--@   1 realpython  staff  14340 Nov  7 16:04 .DS_Store
drwx------  134 realpython  staff   4288 Nov  8 18:37 .Trash
drwx------@   3 realpython  staff     96 Dec  3  2021 Applications
drwx------@  22 realpython  staff    704 Nov  7 16:00 Desktop
drwx------+   4 realpython  staff    128 Nov 17  2021 Documents
drwx------+   3 realpython  staff     96 Nov  1  2021 Downloads
drwx------@  86 realpython  staff   2752 Nov  7 21:08 Library
drwx------    6 realpython  staff    192 Jul 12 14:53 Movies
drwx------+   4 realpython  staff    128 Nov 26  2021 Music
drwx------+   4 realpython  staff    128 Nov  1  2021 Pictures
drwxr-xr-x+   4 realpython  staff    128 Nov  1  2021 Public
The output will show the file type, permissions, owner, size, and timestamp of all the items in the current working directory, including the hidden files and folders.
Here, for example, the hidden items are .DS_Store and .Trash.
Note: You can recognize hidden items in the terminal by a dot (.) at the start of their name, but there are a couple of dot items that you shouldn’t confuse for hidden files. The single dot (.) in the list above represents the current directory, and the two dots (..) link to the parent directory. You’ll work with both of them later in this tutorial.
Hidden files and folders aren’t displayed by default. That’s okay for casual users. But for you as a developer, hidden items can be of interest. They often store configuration data or settings for various applications or the system itself.
The output above may be a bit overwhelming at first. Have a look at this line to understand the output better:
drwx------@ 22 realpython staff 704 Nov 7 16:00 Desktop
This line gives you valuable information about an item. There’s a directory named Desktop. The last modified date is November 7 at 16:00, and it has a size of 704 bytes.
Apart from that, you can see information about the owner and group permissions. If you want to learn more about the file system permission notation, then you can check out the notation of traditional Unix permissions.
Each folder in the output of ls represents a subfolder that’s inside your current working directory.
To change the current working directory into the Desktop/ subfolder, you use the change directory command, cd:
$ pwd
/Users/realpython
$ cd Desktop
$ pwd
/Users/realpython/Desktop
When you enter cd followed by a directory name, it’ll change the current working directory to the specified directory.
After you run the command cd Desktop, the current working directory changes to /Users/realpython/Desktop.
Note that you don’t specify a slash / or drive indicator like C:\ at the beginning of Desktop.
Calling a path like this indicates that you want to navigate into a path that’s relative to the directory that you’re in right now.
You used a relative path in the command above to navigate into a subfolder. Relative paths make it convenient to reference items in your file system because you don’t have to specify the complete path from the root directory. That being said, you can also change into any directory of your file system by using a complete or absolute path:
If you use cd with a path that doesn’t exist, then the terminal will print an error.
You’ll soon learn how to create new directories.
Before you do, make one last move in your file system.
To move one directory up, you usually don’t use the name of the parent folder but two dots:
$ cd ..
$ pwd
/Users/realpython
The two dots (..) represent the parent directory of the current directory.
Using cd .. moves you up one directory in the file system hierarchy.
In a GUI file system application like Windows Explorer or the macOS Finder, you’d click little folder icons with your mouse cursor.
In the terminal application, you use commands to perform tasks—for example, cd to move between folders and ls to get an overview of the items in a directory.
Create Files and Folders
In this section, you’ll learn how to create and manage files and folders directly from the terminal with some new commands.
Additionally, you’ll continue to list the contents of a directory with ls and move between folders with cd, just like you learned before.
With the knowledge from this section, you’ll be able to create and organize your projects from within the terminal.
Start by making sure that your current working directory is the Desktop.
Then, use mkdir to create a new folder named rp_terminal:
You use the mkdir command to create a new directory.
The command stands for make directory.
Here, you name the new directory rp_terminal.
Next, move into rp_terminal/ and create a new file named hello_terminal.py.
Select your operating system below and use your platform-specific command accordingly:
Use the long format of ls to verify that you created the file successfully:
$ ls -l
total 0
-rw-r--r--@ 1 realpython  staff  0 Nov 27 12:09 hello_terminal.py
The 0 between the group and the timestamp indicates that hello_terminal.py is currently empty.
You’ll use the echo command to add content to hello_terminal.py in a moment.
Before you do so, have a look at what echo does when you type the command followed by some text:
$ echo 'print("Hello, terminal!")'
print("Hello, terminal!")
As a Python developer, you know that the text you just provided to echo is a print() function call.
However, for the echo command, it’s a plain string, which it outputs back into the terminal.
More specifically, the echo command sends the string to the standard output stream (stdout).
The stdout is the default destination for data that a command-line program sends.
The data is displayed on the screen, but you can tell the terminal to redirect stdout to a file:
$ echo 'print("Hello, terminal!")' > hello_terminal.py
Again, you’re using echo to output a given string.
But this time, you use the caret symbol (>) to send the output into hello_terminal.py.
Note: Be careful when redirecting the stdout to existing files. Any content that the file contains will be overwritten without warning.
When you redirect the output of the echo command into a nonexistent file, then you’re creating the file in the same step.
One way to check if the command worked is to list the contents of your folder again:
$ ls -l
total 8
-rw-r--r--@ 1 realpython  staff  26 Nov 27 12:12 hello_terminal.py
Perfect, the size of hello_terminal.py is 26 bytes now.
To verify that it contains the print() function call, you can use the cat command:
$ cat hello_terminal.py
print("Hello, terminal!")
Disappointingly, the cat command doesn’t have to do anything with cats.
It’s short for concatenate.
When you use cat with multiple files as arguments, you can concatenate them and display the contents one after another.
If you use cat with only one file, then cat is a convenient way to display the contents of a file in the terminal.
Now that you know that hello_terminal.py contains valid Python code, you can run the Python script:
$ python hello_terminal.py
Hello, terminal!
When you’re using the python command, the terminal looks for the Python executable in your PATH.
If you run the python command without any arguments, then you’ll launch the interactive Python interpreter, also known as the REPL.
When you run the command with a script file as an argument, then Python runs the provided script.
In this case, you’re executing hello_terminal.py, and you see the output of your print() function directly in the terminal.
This works because Python’s print() uses stdout by default.
Note: When you run a Python script in the terminal, the script will output any error messages to the standard error stream (stderr). The standard error stream is a separate output channel that’s used specifically for error messages, warnings, and other diagnostic information.
With this separate output channel for error messages, you can redirect or filter regular output and diagnostic messages independently.
With the knowledge gained in this section, you can now create, edit, and inspect Python files within the terminal.
You’re now well equipped to move on to working with a command-line tool that’s essential on your journey as a Python developer.
It’s called pip, and it enables you to include external packages in your Python projects.
Manage Packages With pip
The pip package manager is an essential tool for managing Python packages.
To avoid installing packages directly into your system Python installation, you can use a virtual environment.
A virtual environment provides an isolated Python interpreter for your project. Any packages that you use inside this environment will be independent of your system interpreter. This means that you can keep your project’s dependencies separate from other projects and the system at large.
Create a Virtual Environment
Python has the built-in venv module for creating virtual environments.
This module helps you create virtual environments with an isolated Python installation.
Once you’ve activated the virtual environment, you can install packages into this environment.
The packages that you install into one virtual environment are isolated from all the other environments on your system.
You can follow these steps to create and activate a virtual environment named venv:
Note that the command prompt has changed. This is a reminder that you’re working within the indicated virtual environment.
Note: When you’re done working with this virtual environment, then you can deactivate it by running the deactivate command.
When you activate a virtual environment with Python’s venv module, you’re adding a new entry to the PATH environment variable.
The new entry points to the location of the virtual environment’s Python executable.
This ensures that when you run Python commands or scripts, they’ll use this specific Python executable instead of any other version of Python that may be installed on your system.
Install a Package
In this section, you’ll install the Rich library by Will McGugan, which enables you to create colorful text user interface (TUI) applications for the terminal.
Before you install rich, check which Python packages are currently installed in your virtual environment:
(venv) $ python -m pip list
Package    Version
---------- -------
pip        22.3
setuptools 65.5.0
Running python -m pip list lists all the packages installed in the current environment.
Both pip and setuptools are default packages that you’ll find when you start a new virtual environment.
To install rich, use the command below:
(venv) $ python -m pip install rich
Collecting rich
  ...
Installing collected packages: commonmark, pygments, rich
Successfully installed commonmark-0.9.1 pygments-2.14.0 rich-13.0.1
Besides rich, you also installed some other dependencies that you need when you want to use rich.
To check all the currently installed packages, you can run python -m pip list again:
(venv) $ python -m pip list
Package    Version
---------- -------
commonmark 0.9.1
pip        22.3
Pygments   2.14.0
rich       13.0.1
setuptools 65.5.0
To see the capabilities that rich offers, run rich without any arguments:
(venv) $ python -m rich
Depending on your terminal’s capabilities, you should see examples that look like this:
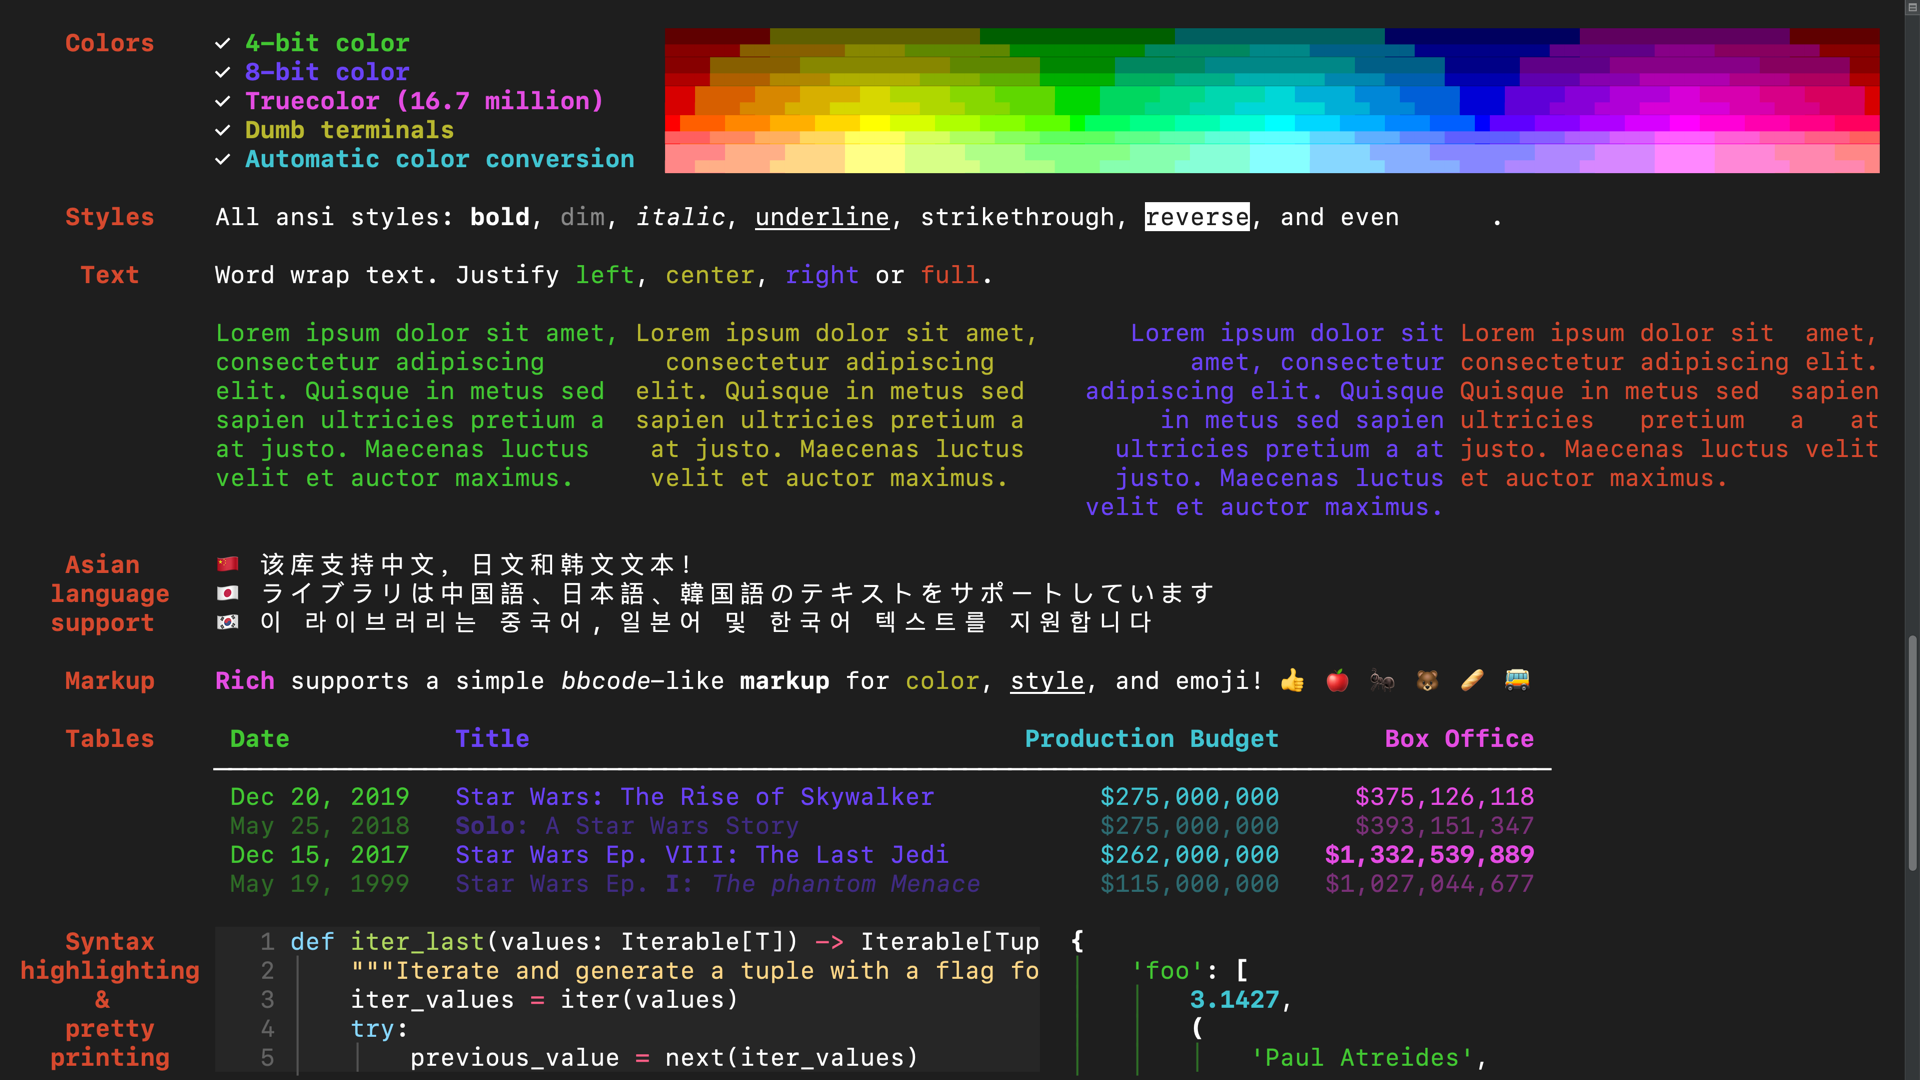
In the screenshot above, you can get an impression of what you can do with the rich library.
The terminal doesn’t have to be a dark place after all!
Now that your screen is filled from top to bottom, you may want to clear your terminal window again.
For this, you can use the clear command:
(venv) $ clear
You use the clear command to clear the terminal screen.
It removes all the text and content currently displayed on the terminal, leaving a blank screen.
For example, you might want to clear the terminal screen before you run new commands.
In some terminals, you can use Ctrl+L or Cmd+L as keyboard shortcuts to clear the screen.
You’ve learned how to use pip directly from the terminal in this section.
Knowing how to use pip in the terminal is crucial for any Python developer, as it allows you to effectively manage and update the packages that you use in your projects.
If you want to learn more about virtual environments and pip, then you can check out Real Python’s primer on Python virtual environments and tutorial on how to use Python’s pip to manage your projects’ dependencies.
Both are essential tools to make your life as a Python developer more convenient.
Another helpful tool to manage your projects is Git. Read on to learn how to improve your terminal skills and dive into the world of version control with Git.
Interact With Git
Git is a version control system that developers commonly use, no matter which programming language they’re writing their code in. A version control system tracks changes made to files over time and helps you revert code to a previous version if needed.
In this section, you’ll learn how to interact with Git directly from the terminal. You’ll initialize a Git repository, track files, and create commits.
There are a bunch of GUI clients for Git. They can be convenient to use and help you understand Git logic better by providing rich visual feedback.
However, it’s still a good idea to learn the basics of interacting with Git in the terminal. Learning the basic Git terminal commands can help you understand how Git works under the hood.
Initiate a Git Repository
The first step in using Git is to initialize a repository. A repository is a container that holds all your project files, folders, and metadata.
Create a new Git repository with the command below:
$ git init
Initialized empty Git repository in
⮑ /Users/realpython/Desktop/rp_terminal/.git/
When you run the git init command, Git creates an empty repository in the current working directory.
This creates a new subdirectory named .git/ that contains all of the necessary repository files.
Note: If you get an error when you use the git command, then you may need to download and install a current version of Git for your operating system.
After initializing the repository, you can check the status of your repository:
$ git status
On branch main

No commits yet

Untracked files:
  (use "git add <file>..." to include in what will be committed)
    hello_terminal.py
    venv/

nothing added to commit but untracked files present (use "git add" to track)
The git status command shows your repository’s current status.
It displays which branch you’re on and whether or not there are any commits.
A Git commit is a snapshot of the changes made to the files in a Git repository. When you make changes to your files and save them, you can take a snapshot of those changes by creating a commit on a branch. As you make new commits, the branch points to the latest commits.
In this case, you’re on the main branch, and there are no commits yet.
You can also create new branches to work on new features or bug fixes and then switch between branches as needed.
If you want to, then you can create multiple branches to work on various versions of your codebase simultaneously.
Additionally, git status shows you which files are untracked, meaning that Git isn’t tracking them.
You might want to ignore specific files and folders, such as the venv/ folder, so that Git won’t track them.
A general rule of thumb for ignoring files in a Git repository is to ignore any files that are specific to your local development environment or files that are generated by your build process. Some examples of files that should typically be ignored include:
- Files containing sensitive information, such as passwords or private keys
- Binary files that are generated by your build process, like compiled executables or object files
- Files specific to your local development environment, such as virtual environment files or user-specific editor configuration files
- Temporary files or files created by your operating system, such as
.DS_Storeon macOS orThumbs.dbon Windows - Log files or other files that your application generates at runtime
Check out GitHub’s collection of .gitignore templates to get an overview of common .gitignore files.
There you’ll also find a Python specific .gitignore example.
You can ignore files in Git by creating a .gitignore file and listing the files and folders that you want to ignore in that file:
$ echo "venv" > .gitignore
As you learned before, this command creates a new file named .gitignore and writes venv to it.
Verify the current items in your Git repository by leveraging another command that you already know:
$ ls -a
.          .git          hello_terminal.py
..         .gitignore    venv
You now have a .gitignore file next to your hello_terminal.py file, your venv/ folder, and the .git/ folder.
To check if Git ignores the venv/ folder, run git status again:
$ git status
On branch main

No commits yet

Untracked files:
  (use "git add <file>..." to include in what will be committed)
    .gitignore
    hello_terminal.py

nothing added to commit but untracked files present (use "git add" to track)
Perfect, Git now only shows .gitignore and hello_terminal.py as untracked files.
Git knows the files are there, but you haven’t yet added them to the repository.
Track Files With Git
When you start a new project, you’ll likely want to keep track of your changes over time.
In the previous section, you initialized a new repository with git init.
Now it’s time to start tracking files.
You use the git add command to tell Git which files you want to track:
$ git add .
Remember the dot . in the directory listing before? The dot refers to the current directory. Using . at the end of the git add command tells Git to track all the files in the current directory.
Once you’ve added files to the repository, you can check the status of your files using the git status command:
$ git status
On branch main

No commits yet

Changes to be committed:
  (use "git rm --cached <file>..." to unstage)
    new file:   .gitignore
    new file:   hello_terminal.py
You can see in the output that the files hello_terminal.py and .gitignore are added and ready to be committed:
$ git commit -m "Initiate git repository"
[main (root-commit) 7b20833] Initiate git repository
 2 files changed, 2 insertions(+)
 create mode 100644 .gitignore
 create mode 100644 hello_terminal.py
With the git commit command, you take a snapshot of the current state of your files and store it in the repository’s history.
The -m flag allows you to include a message describing your changes.
The output shows the branch that you’re on and the number of files changed.
After you commit any changes, it’s a good idea to check the status of your Git repository again:
$ git status
On branch main
nothing to commit, working tree clean
You can see in the output that there’s nothing to commit, meaning that all changes have been successfully committed.
The workflow that you used in this section is typical when you use Git in the terminal.
You use the git add command to tell Git which files to track.
Then you use git commit to take a snapshot of the current state of your files and save it to the repository’s history.
Additionally, it’s good practice to use git status often to check the current status of your repository.
While you’ve gotten an introduction to using Git in the terminal, there’s much more that Git has to offer you as a Python developer. If you’re interested in learning more about Git, then you can check out the introduction to Git and GitHub for Python developers and dive even deeper with advanced Git tips for Python developers.
Next Steps
The more you use the terminal, the more comfortable you’ll get. A fun way to introduce the terminal into your workflows as a Python developer is to create Python scripts with command-line interfaces. For example, you can build a:
- Quiz Application With Python
- Site Connectivity Checker in Python
- Command-Line To-Do App With Python and Typer
- Python Directory Tree Generator for the Command Line
- Weather CLI App With Python
- Wordle Clone With Python and Rich
Especially for a Python developer, knowing how to work with the terminal can be extremely useful for various reasons. Besides using pip and Git to manage your Python projects, there are even more examples of when the terminal comes in handy:
- Command-line interfaces: Many popular Python libraries and frameworks—such as Django, Flask, and Poetry—come with command-line interfaces that allow you to perform tasks such as creating new projects, running development servers, and managing databases.
- Automation and scripting: The terminal allows you to automate repetitive tasks and create scripts to manage your development workflow—for example, running tests or deploying your application.
- Debugging: The terminal can be useful for debugging your code. For instance, you can use
print()or logging in Python to show output in the terminal and understand what’s happening in your code. You can also use pdb for debugging your Python code. - Performance: Many command-line tools are faster than their GUI counterparts and ideal for working with large datasets or performing advanced tasks such as data processing and analysis.
Overall, the terminal is a powerful tool that can help you streamline your development workflow, automate tasks, debug your code, and access advanced features of libraries and frameworks. With practice, you’ll find the terminal an invaluable tool for your journey as a Python developer.
Conclusion
When you’re comfortable using the terminal, then you’ll probably be able to navigate your file system faster and with more control than when using your mouse and clicking buttons.
In this tutorial, you’ve learned how to:
- Find the terminal on your operating system
- Open the terminal for the first time
- Navigate your file system with basic commands
- Create files and folders with the terminal
- Manage packages with
pipcommands - Keep track of your files with Git in the terminal
You’ve boosted your programming skills by learning how to do three really important tasks in the terminal: navigate the file system, manage Python packages with pip, and make commits to Git. Learning terminal commands is a great investment for you as a Python developer. Just take your time and get to know this powerful tool step by step. Soon enough, it’ll be an important tool in your repertoire that you can’t live without.
How important is the terminal for your workflow as a Python developer? Are there any essential commands that you would add to the tutorial? Let the Real Python community know in the comments below!
Free Download: Click here to get a free cheat sheet of useful commands to get you started working with the terminal.
Watch Now This tutorial has a related video course created by the Real Python team. Watch it together with the written tutorial to deepen your understanding: Using the Terminal on Windows