Watch Now This tutorial has a related video course created by the Real Python team. Watch it together with the written tutorial to deepen your understanding: Deploy Your Python Script on the Web With Flask
You wrote a Python script that you’re proud of, and now you want to show it off to the world. But how? Most people won’t know what to do with your .py file. Converting your script into a Python web application is a great solution to make your code usable for a broad audience.
In this tutorial, you’ll learn how to go from a local Python script to a fully deployed Flask web application that you can share with the world.
By the end of this tutorial, you’ll know:
- What web applications are and how you can host them online
- How to convert a Python script into a Flask web application
- How to improve user experience by adding HTML to your Python code
- How to deploy your Python web application to Google App Engine
In addition to walking through an example project, you’ll find a number of exercises throughout the tutorial. They’ll give you a chance to solidify what you’re learning through extra practice. You can also download the source code that you’ll use to build your web application by clicking the link below:
Get Sample Code: Click here to get the sample code you’ll use to learn about creating Python web applications with Flask in this tutorial.
Brush Up on the Basics
In this section, you’ll get a theoretical footing in the different topics that you’ll work with during the practical part of this tutorial:
- What types of Python code distribution exist
- Why building a web application can be a good choice
- What a web application is
- How content gets delivered over the Internet
- What web hosting means
- Which hosting providers exist and which one to use
Brushing up on these topics can help you feel more confident when writing Python code for the Web. However, if you’re already familiar with them, then feel free to skip ahead, install the Google Cloud SDK, and start building your Python web app.
Distribute Your Python Code
Bringing your code to your users is called distribution. Traditionally, there are three different approaches you can use to distribute your code so that others can work with your programs:
- Python library
- Standalone program
- Python web application
You’ll take a closer look at each of these approaches below.
Python Library
If you’ve worked with Python’s extensive package ecosystem, then you’ve likely installed Python packages with pip. As a programmer, you might want to publish your Python package on PyPI to allow other users to access and use your code by installing it using pip:
$ python3 -m pip install <your-package-name>
After you’ve successfully published your code to PyPI, this command will install your package, including its dependencies, on any of your users’ computers, provided that they have an Internet connection.
If you don’t want to publish your code as a PyPI package, then you can still use Python’s built-in sdist command to create a source distribution or a Python wheel to create a built distribution to share with your users.
Distributing your code like this keeps it close to the original script you wrote and adds only what’s necessary for others to run it. However, using this approach also means that your users will need to run your code with Python. Many people who want to use your script’s functionality won’t have Python installed or won’t be familiar with the processes required to work directly with your code.
A more user-friendly way to present your code to potential users is to build a standalone program.
Standalone Program
Computer programs come in different shapes and forms, and there are multiple options for transforming your Python scripts into standalone programs. Below you’ll read about two possibilities:
- Packaging your code
- Building a GUI
Programs such as PyInstaller, py2app, py2exe, or Briefcase can help with packaging your code. They turn Python scripts into executable programs that can be used on different platforms without requiring your users to explicitly run the Python interpreter.
Note: To learn more about packaging your code, check out Using PyInstaller to Easily Distribute Python Applications or listen to the Real Python Podcast episode Options for Packaging Your Python Application.
While packaging your code can resolve dependency problems, your code still just runs on the command line. Most people are used to working with programs that provide a graphical user interface (GUI). You can make your Python code accessible to more people by building a GUI for it.
Note: There are different packages that can help you with building a GUI, including Tkinter, wxPython, and PySimpleGUI. If you want to build a native desktop-based app, then check out the learning path for Python GUI Programming.
While a standalone GUI desktop program can make your code accessible to a wider audience, it still presents a hurdle for people to get started. Before running your program, potential users have a few steps to get through. They need to find the right version for their operating system, download it, and successfully install it. Some may give up before they make it all the way.
It makes sense that many developers instead build web applications that can be accessed quickly and run on an Internet browser.
Python Web Application
The advantage of web applications is that they’re platform independent and can be run by anyone who has access to the Internet. Their code is implemented on a back-end server, where the program processes incoming requests and responds through a shared protocol that’s understood by all browsers.
Python powers many large web applications and is a common choice as a back-end language. Many Python-driven web applications are planned from the start as web applications and are built using Python web frameworks such as Flask, which you’ll use in this tutorial.
However, instead of the web-first approach described above, you’re going to take a different angle. After all, you weren’t planning to build a web application. You just created a useful Python script, and now you want to share with the world. To make it accessible to a broad range of users, you’ll refactor it into a web application and then deploy it to the Internet.
It’s time to go over what a web application is and how it’s different from other content on the Web.
Learn About Python Web Applications
Historically, websites had fixed content that was the same for every user who accessed that page. These web pages are called static because their content doesn’t change when you interact with them. When serving a static web page, a web server responds to your request by sending back the content of that page, regardless of who you are or what other actions you took.
You can browse an example of a static website at the first URL that ever went online, as well as the pages it links to:
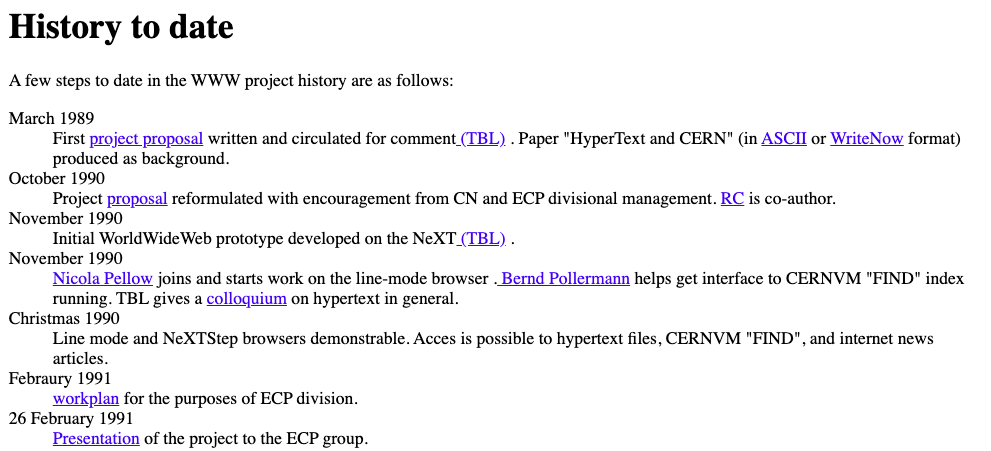
Such static websites aren’t considered applications since their content isn’t generated dynamically by code. While static sites used to make up all of the Internet, most websites today are true web applications, which offer dynamic web pages that can change the content they deliver.
For instance, a webmail application allows you to interact with it in many ways. Depending on your actions, it can display different types of information, often while staying in a single page:
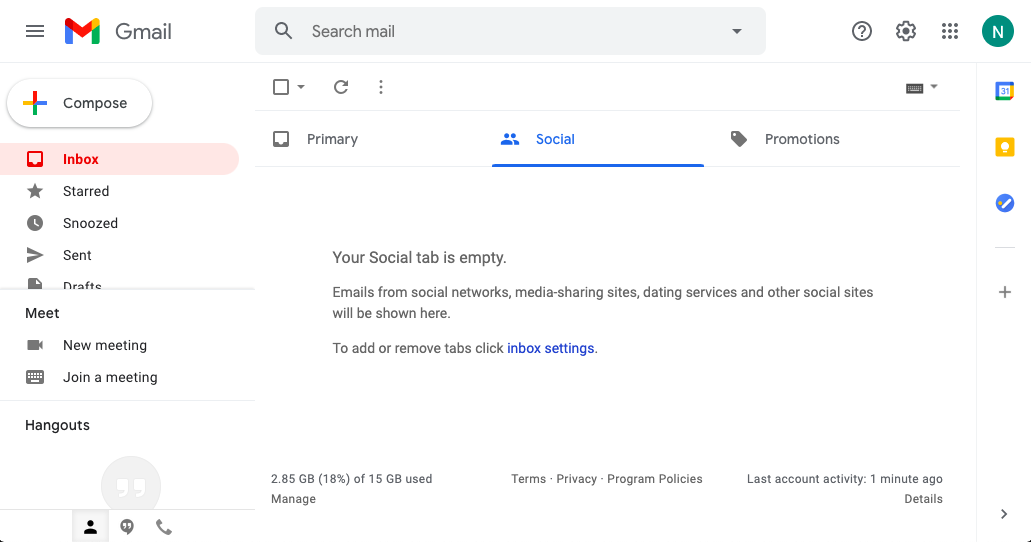
Python-driven web applications use Python code to determine what actions to take and what content to show. Your code is run by the web server that hosts your website, which means that your users don’t need to install anything. All they need to interact with your code is a browser and an Internet connection.
Getting Python to run on a website can be complicated, but there are a number of different web frameworks that automatically take care of the details. As mentioned above, you’ll build a basic Flask application in this tutorial.
In the upcoming section, you’ll get a high-level perspective on the main processes that need to happen to run your Python code on a server and deliver a response to your users.
Review the HTTP Request-Response Cycle
Serving dynamic content over the Internet involves a lot of different pieces, and they all have to communicate with one another to function correctly. Here’s a generalized overview of what takes place when a user interacts with a web application:
-
Sending: First, your user makes a request for a particular web page on your web app. They can do this, for example, by typing a URL into their browser.
-
Receiving: This request gets received by the web server that hosts your website.
-
Matching: Your web server now uses a program to match the user’s request to a particular portion of your Python script.
-
Running: The appropriate Python code is called up by that program. When your code runs, it writes out a web page as a response.
-
Delivering: The program then delivers this response back to your user through the web server.
-
Viewing: Finally, the user can view the web server’s response. For example, the resulting web page can be displayed in a browser.
This is a general process of how content is delivered over the Internet. The programming language used on the server, as well as the technologies used to establish that connection, can differ. However, the concept used to communicate across HTTP requests and responses remains the same and is called the HTTP Request-Response Cycle.
Note: Flask will handle most of this complexity for you, but it can help to keep a loose understanding of this process in mind.
To allow Flask to handle requests on the server side, you’ll need to find a place where your Python code can live online. Storing your code online to run a web application is called web hosting, and there are a number of providers offering both paid and free web hosting.
Choose a Hosting Provider: Google App Engine
When choosing a web hosting provider, you need to confirm that it supports running Python code. Many of them cost money, but this tutorial will stick with a free option that’s professional and highly scalable yet still reasonable to set up: Google App Engine.
Note: Google App Engine enforces daily quotas for each application. If your web application exceeds these quotas, then Google will start billing you. If you’re a new Google Cloud customer, then you can get a promotional free credit when signing up.
There are a number of other free options, such as PythonAnywhere, Repl.it, or Heroku that you can explore later on. Using Google App Engine will give you a good start in learning about deploying Python code to the web as it strikes a balance between abstracting away complexity and allowing you to customize the setup.
Google App Engine is part of the Google Cloud Platform (GCP), which is run by Google and represents one of the big cloud providers, along with Microsoft Azure and Amazon Web Services (AWS).
To get started with GCP, download and install the Google Cloud SDK for your operating system. For additional guidance beyond what you’ll find in this tutorial, you can consult Google App Engine’s documentation.
Note: You’ll be working with the Python 3 standard environment. Google App Engine’s standard environment supports Python 3 runtimes and offers a free tier.
The Google Cloud SDK installation also includes a command-line program called gcloud, which you’ll later use to deploy your web app. Once you’re done with the installation, you can verify that everything worked by typing the following command into your console:
$ gcloud --version
You should receive a text output in your terminal that looks similar to the one below:
app-engine-python 1.9.91
bq 2.0.62
cloud-datastore-emulator 2.1.0
core 2020.11.13
gsutil 4.55
Your version numbers will probably be different, but as long as the gcloud program is successfully found on your computer, your installation was successful.
With this high-level overview of concepts in mind and the Google Cloud SDK installed, you’re ready to set up a Python project that you’ll later deploy to the Internet.
Build a Basic Python Web Application
Google App Engine requires you to use a web framework for creating your web application in a Python 3 environment. Since you’re trying to use a minimal setup to get your local Python code up on the Internet, a microframework such as Flask is a good choice. A minimal implementation of Flask is so small that you might not even notice that you’re using a web framework.
Note: If you’ve previously worked with Google App Engine on a Python 2.7 environment, then you’ll notice that the process has changed significantly.
Two notable changes are that webapp2 has been retired and that you’re no longer able to specify URLs for dynamic content in the app.yaml file. The reason for both of these changes is that Google App Engine now requires you to use a Python web framework.
The application you’re going to create will rely on several different files, so the first thing you need to do is to create a project folder to hold all these files.
Set Up Your Project
Create a project folder and give it a name that’s descriptive of your project. For this practice project, call the folder hello-app. You’ll need three files inside this folder:
main.pycontains your Python code wrapped in a minimal implementation of the Flask web framework.requirements.txtlists all the dependencies your code needs to work properly.app.yamlhelps Google App Engine decide which settings to use on its server.
While three files might sound like a lot, you’ll see that this project uses fewer than ten lines of code across all three files. This represents the minimal setup you need to provide to Google App Engine for any Python project you may launch. The rest will be your own Python code. You can download the complete source code that you’ll use in this tutorial by clicking the link below:
Get Sample Code: Click here to get the sample code you’ll use to learn about creating Python web applications with Flask in this tutorial.
Next, you’ll take a look at the content of each of the files starting with the most complex one, main.py.
Create main.py
main.py is the file that Flask uses to deliver your content. At the top of the file, you import the Flask class on line 1, then you create an instance of a Flask app on line 3:
 1from flask import Flask
 2
 3app = Flask(__name__)
 4
 5@app.route("/")
 6def index():
 7    return "Congratulations, it's a web app!"
After you create the Flask app, you write a Python decorator on line 5 called @app.route that Flask uses to connect URL endpoints with code contained in functions. The argument to @app.route defines the URL’s path component, which is the root path ("/") in this case.
The code on lines 6 and 7 makes up index(), which is wrapped by the decorator. This function defines what should be executed if the defined URL endpoint is requested by a user. Its return value determines what a user will see when they load the page.
Note: The naming of index() is only a convention. It relates to how the main page of a website is often called index.html. You can choose a different function name if you want.
In other words, if a user types the base URL of your web app into their browser, then Flask runs index() and the user sees the returned text. In this case, that text is just one sentence: Congratulations, it's a web app!
You can render more complex content, and you can also create more than one function so that users can visit different URL endpoints in your app to receive different responses. However, for this initial implementation, it’s fine to stick with this short and encouraging success message.
Create requirements.txt
The next file to look at is requirements.txt. Since Flask is the only dependency of this project, that’s all you need to specify:
Flask==2.1.2
If your app has other dependencies, then you’ll need to add them to your requirements.txt file as well.
Google App Engine will use requirements.txt to install the necessary Python dependencies for your project when setting it up on the server. This is similar to what you would do after creating and activating a new virtual environment locally.
Create app.yaml
The third file, app.yaml, helps Google App Engine set up the right server environment for your code. This file requires only one line, which defines the Python runtime:
runtime: python38
The line shown above clarifies that the right runtime for your Python code is Python 3.8. This is enough for Google App Engine to do the necessary setup on its servers.
Note: Make sure that the Python 3 Runtime Environment you want to use is available on Google App Engine.
You can use Google App Engine’s app.yaml file for additional setup, such as adding environment variables to your application. You can also use it to define the path to static content for your app, such as images, CSS or JavaScript files. This tutorial won’t go into these additional settings, but you can consult Google App Engine’s documentation on the app.yaml Configuration File if you want to add such functionality.
These nine lines of code complete the necessary setup for this app. Your project is now ready for deployment.
However, it’s good practice to test your code before putting it into production so you can catch potential errors. Next, you’ll check whether everything works as expected locally before deploying your code to the Internet.
Test Locally
Flask comes packaged with a development web server. You can use this development server to double-check that your code works as expected. To be able to run the Flask development server locally, you need to complete two steps. Google App Engine will do the same steps on its servers once you deploy your code:
- Set up a virtual environment.
- Install the
flaskpackage.
To set up a Python 3 virtual environment, navigate to your project folder on your terminal and type the following command:
$ python3 -m venv venv
This will create a new virtual environment named venv using the version of Python 3 that you have installed on your system. Next, you need to activate the virtual environment by sourcing the activation script:
$ source venv/bin/activate
After executing this command, your prompt will change to indicate that you’re now operating from within the virtual environment. After you successfully set up and activate your virtual environment, you’re ready to install Flask:
$ python3 -m pip install -r requirements.txt
This command fetches all packages listed in requirements.txt from PyPI and installs them in your virtual environment. In this case, the only package installed will be Flask.
Wait for the installation to complete, then open up main.py and add the following two lines of code at the bottom of the file:
if __name__ == "__main__":
    app.run(host="127.0.0.1", port=8080, debug=True)
These two lines tell Python to start Flask’s development server when the script is executed from the command line. It’ll be used only when you run the script locally. When you deploy the code to Google App Engine, a professional web server process, such as Gunicorn, will serve the app instead. You won’t need to change anything to make this happen.
You can now start Flask’s development server and interact with your Python app in your browser. To do so, you need to run the Python script that starts the Flask app by typing the following command:
$ python3 main.py
Flask starts up the development server, and your terminal will display output similar to the text shown below:
 * Serving Flask app "main" (lazy loading)
 * Environment: production
   WARNING: This is a development server.
   Do not use it in a production deployment.
   Use a production WSGI server instead.
 * Debug mode: on
 * Running on http://127.0.0.1:8080/ (Press CTRL+C to quit)
 * Restarting with stat
 * Debugger is active!
 * Debugger PIN: 315-059-987
This output tells you three important pieces of information:
-
WARNING: This is Flask’s development server, which means you don’t want to use it to serve your code in production. Google App Engine will handle that for you instead. -
Running on http://127.0.0.1:8080/: This is the URL where you can find your app. It’s the URL for your localhost, which means the app is running on your own computer. Navigate to that URL in your browser to see your code live. -
Press CTRL+C to quit: The same line also tells you that you can exit the development server by pressing Ctrl+C on your keyboard.
Follow the instructions and open a browser tab at http://127.0.0.1:8080/. You should see a page displaying the text that your function returns: Congratulations, it's a web app!
Note: The URL 127.0.0.1 is also called the localhost, which means that it points to your own computer. The number 8080 that follows after the colon (:) is called the port number. The port can be thought of as a particular channel, similar to broadcasting a television or radio channel.
You’ve defined these values in app.run() in your main.py file. Running the application on port 8080 means that you can tune in to this port number and receive communication from the development server. Port 8080 is commonly used for local testing, but you could also use a different number.
You can use Flask’s development server to inspect any changes that you make to the code of your Python app. The server listens to changes you make in the code and will automatically reload to display them. If your app doesn’t render as you expect it to on the development server, then it won’t work in production either. So make sure that it looks good before you deploy it.
Also keep in mind that even if it works well locally, it might not work quite the same once deployed. This is because there are other factors involved when you deploy your code to Google App Engine. However, for a basic app such as the one you’re building in this tutorial, you can be confident that it’ll work in production if it works well locally.
Change the return value of index() and confirm that you can see the change reflected in your browser. Play around with it. What happens when you change the return value of index() to HTML code, such as <h1>Hello</h1>, instead of using a plain text string?
After having checked your setup and the code’s functionality on your local development server, you’re prepared to deploy it to Google App Engine.
Deploy Your Python Web Application
It’s finally time to bring your app online. But first, your code needs a place to live on Google’s servers, and you need to make sure that it gets there safely. In this section of the tutorial, you’ll work on completing the necessary deployment setups both in the cloud and locally.
Set Up on Google App Engine
Read through the setup process below step by step. You can compare what you see in your browser with the screenshots. The project name used in the example screenshots is hello-app.
Start by signing in to the Google Cloud Platform. Navigate to the dashboard view, where you’ll see a toolbar at the top of the window. Select the downward-facing arrow button toward the left side of the toolbar. This will pop up a modal containing a list of your Google projects:
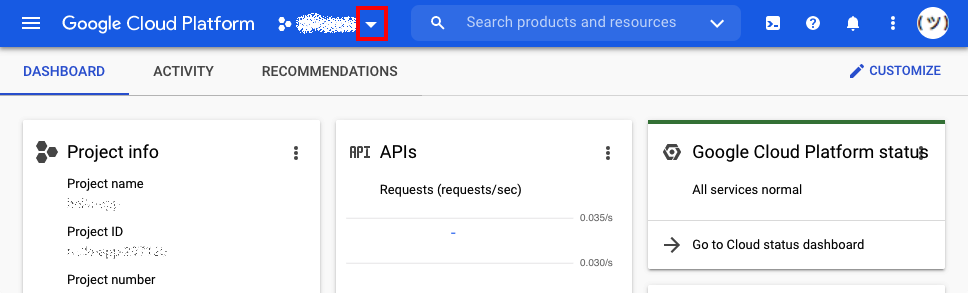
The modal displays a list of your projects. The list may be empty if you haven’t created any projects yet. On the top right of that modal, find the NEW PROJECT button and click it:

Clicking NEW PROJECT will redirect you to a new page where you can decide on a name for your project. This name will appear in the URL of your application, which will look similar to http://your-application-name.nw.r.appspot.com. Use hello-app as the name for this project to stay consistent with the tutorial:
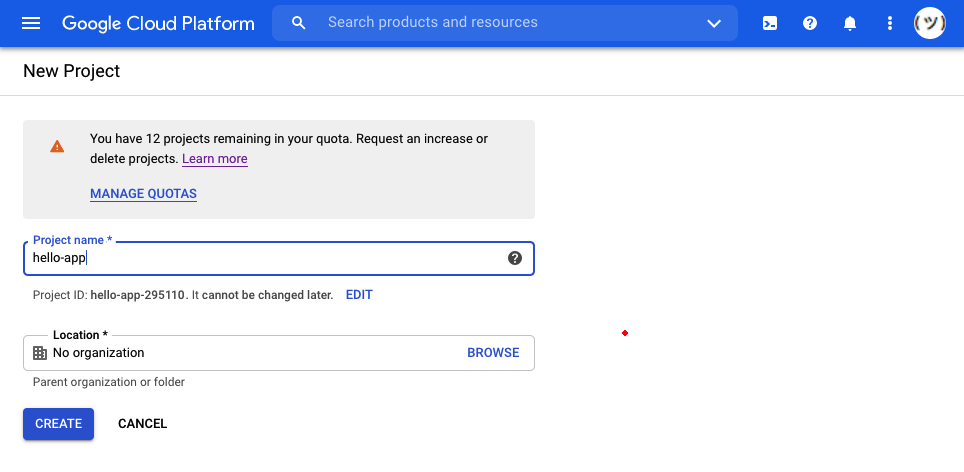
You can see your project ID below the Project name input field. The project ID consists of the name you entered and a number that Google App Engine adds. In the case of this tutorial, you can see that the project ID is hello-app-295110. Copy your personal project ID since you’ll need it later on for deploying.
Note: As the project ID needs to be unique, your number will be different than the one shown in this tutorial.
You can now click CREATE and wait for the project to be set up on Google App Engine’s side. Once that’s done, a notification will pop up telling you that a new project has been created. It also gives you the option to select it. Go ahead and do that by clicking SELECT PROJECT:

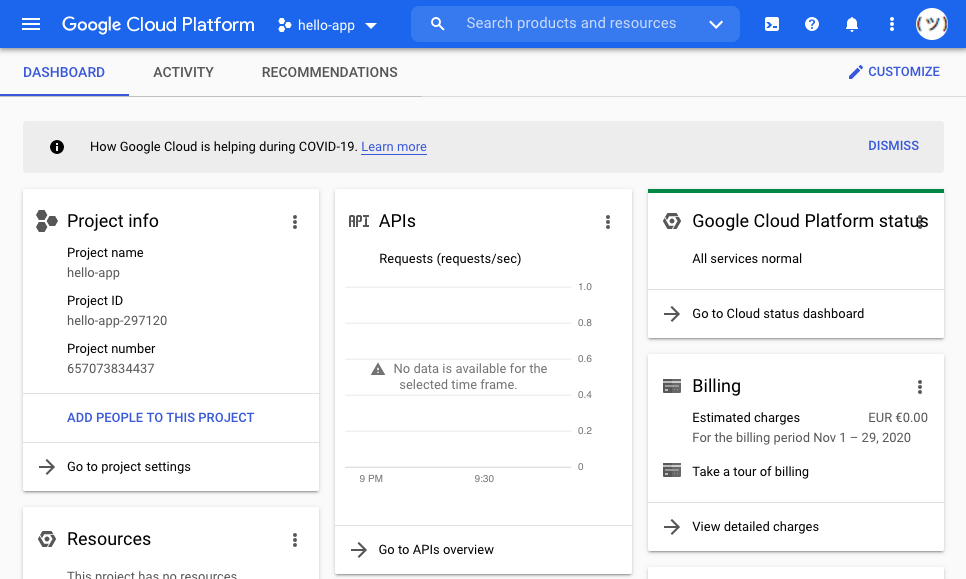
Clicking SELECT PROJECT will redirect you to the main page of your new Google Cloud Platform project. It looks like this:
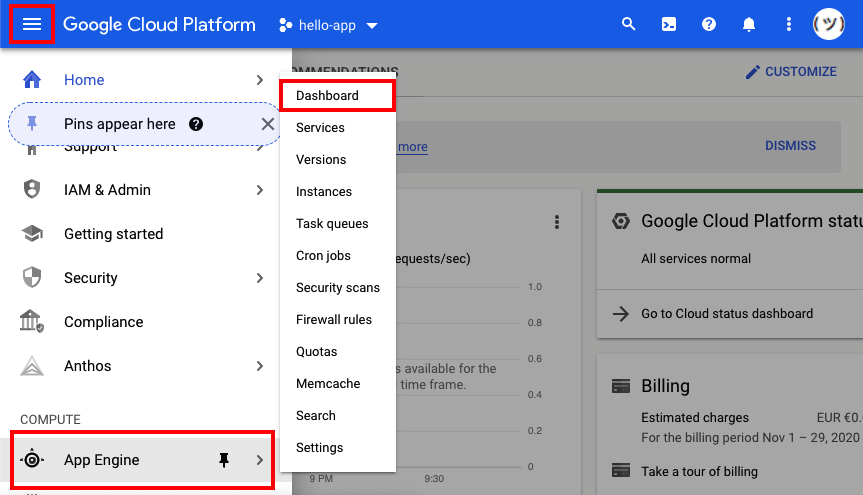
From here, you want to switch to the dashboard of Google App Engine. You can do that by clicking the hamburger menu on the top left, scrolling down to select App Engine in the first list, then selecting Dashboard on the top of the next pop-up list:
This will finally redirect you to the Google App Engine dashboard view of your new project. Since the project is empty so far, the page will look similar to this:
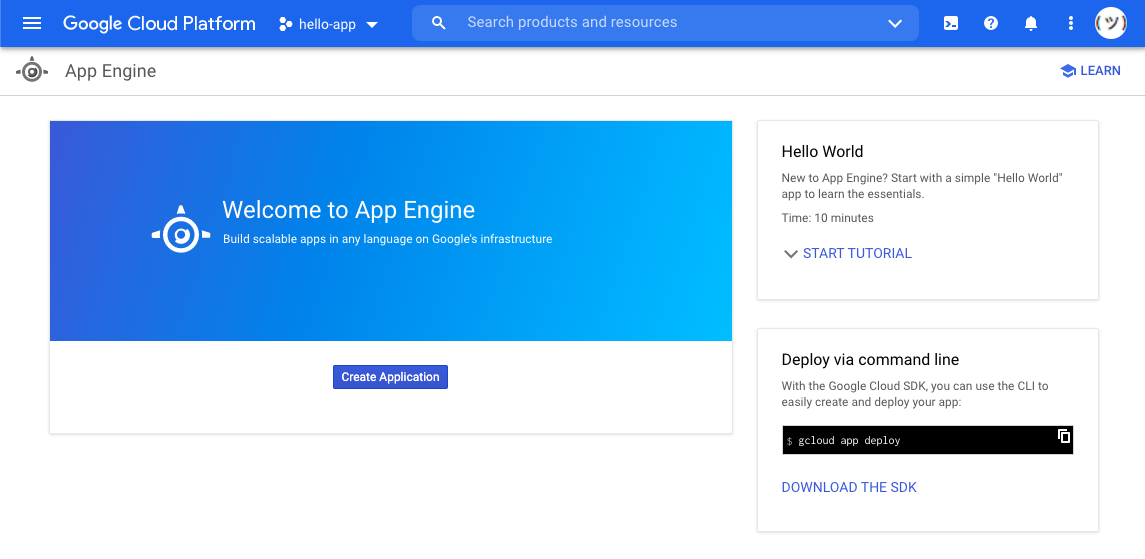
When you see this page, it means you have completed setting up a new project on Google App Engine. You’re now ready to head back to the terminal on your computer and complete the local steps necessary to deploy your app to this project.
Set Up Locally for Deployment
After successfully installing the Google Cloud SDK, you have access to the gcloud command-line interface. This program comes with helpful instructions that guide you through deploying your web app. Start by typing the command that was suggested to you when you created a new project on the Google App Engine website:
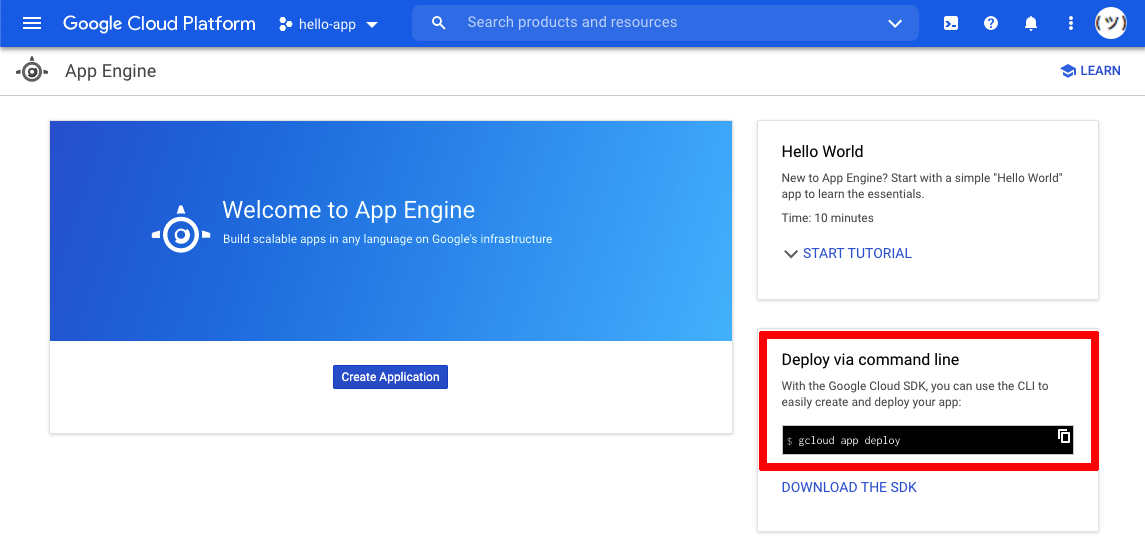
As you can see in the bottom-right corner of the page, Google App Engine suggests a terminal command to deploy your code to this project. Open up your terminal, navigate to your project folder, then run the suggested command:
$ gcloud app deploy
When you execute this command without any previous setup, the program will respond with an error message:
ERROR: (gcloud.app.deploy)
You do not currently have an active account selected.
Please run:

  $ gcloud auth login

to obtain new credentials.

If you have already logged in with a different account:

    $ gcloud config set account ACCOUNT

to select an already authenticated account to use.
You receive this error message because you can’t deploy any code to your Google App Engine account unless you prove to Google that you’re the owner of that account. You’ll need to authenticate with your Google App Engine account from your local computer.
The gcloud command-line app already provided you with the command that you need to run. Type it into your terminal:
$ gcloud auth login
This will start the authentication process by generating a validation URL and opening it up in your browser. Complete the process by selecting your Google account in the browser window and granting Google Cloud SDK the necessary privileges. After you do this, you can return to your terminal, where you’ll see some information about the authentication process:
Your browser has been opened to visit:

    https://accounts.google.com/o/oauth2/auth?client_id=<yourid>

You are now logged in as [<your@email.com>].
Your current project is [None].  You can change this setting by running:
  $ gcloud config set project PROJECT_ID
If you see this message, then the authentication was successful. You can also see that the command-line program again offers you helpful information about your next step.
It tells you that there is currently no project set, and that you can set one by running gcloud config set project PROJECT_ID. Now you’ll need the project ID that you noted earlier.
Note: You can always get your project ID by heading to the Google App Engine website and clicking the downward-facing arrow that brings up the modal showing all your Google projects. The project ID is listed to the right of your project’s name and usually consists of the project name and a six-digit number.
Be sure to replace hello-app-295110 with your own project ID when running the suggested command:
$ gcloud config set project hello-app-295110
Your terminal will print out a short feedback message that the project property has been updated. After successfully authenticating and setting the default project to your project ID, you have completed the necessary setup steps.
Run the Deployment Process
Now you’re ready to try the initial deployment command a second time:
$ gcloud app deploy
The gcloud app fetches your authentication credentials as well as the project ID information from the default configuration that you just set up and allows you to proceed. Next, you need to select a region where your application should be hosted:
You are creating an app for project [hello-app-295110].
WARNING: Creating an App Engine application for a project is
irreversible and the region cannot be changed.
More information about regions is at
<https://cloud.google.com/appengine/docs/locations>.

Please choose the region where you want your App Engine application
located:

 [1] asia-east2
 [2] asia-northeast1
 [3] asia-northeast2
 [4] asia-northeast3
 [5] asia-south1
 [6] asia-southeast2
 [7] australia-southeast1
 [8] europe-west
 [9] europe-west2
 [10] europe-west3
 [11] europe-west6
 [12] northamerica-northeast1
 [13] southamerica-east1
 [14] us-central
 [15] us-east1
 [16] us-east4
 [17] us-west2
 [18] us-west3
 [19] us-west4
 [20] cancel
Please enter your numeric choice:
Enter one of the numbers that are listed on the left side and press Enter.
Note: It doesn’t matter which region you choose for this app. However, if you’re building a large application that gets a significant amount of traffic, then you’ll want to deploy it to a server that’s physically close to where most of your users are.
After you enter a number, the CLI will continue with the setup process. Before deploying your code to Google App Engine, it’ll show you an overview of what the deployment will look like and ask you for a final confirmation:
Creating App Engine application in project [hello-app-295110]
and region [europe-west]....done.
Services to deploy:

descriptor:      [/Users/realpython/Documents/helloapp/app.yaml]
source:          [/Users/realpython/Documents/helloapp]
target project:  [hello-app-295110]
target service:  [default]
target version:  [20201109t112408]
target url:      [https://hello-app-295110.ew.r.appspot.com]


Do you want to continue (Y/n)?
After you confirm the setup by typing Y, your deployment will finally be on its way. Your terminal will show you some more information and a small loading animation while Google App Engine sets up your project on its servers:
Beginning deployment of service [default]...
Created .gcloudignore file. See `gcloud topic gcloudignore` for details.
╔════════════════════════════════════════════════════════════╗
╠═ Uploading 3 files to Google Cloud Storage                ═╣
╚════════════════════════════════════════════════════════════╝
File upload done.
Updating service [default]...⠼
Since this is the first deployment of your web app, it may take a few minutes to complete. Once the deployment is finished, you’ll see another helpful output in the console. It’ll look similar to the one below:
Deployed service [default] to [https://hello-app-295110.ew.r.appspot.com]

You can stream logs from the command line by running:
  $ gcloud app logs tail -s default

To view your application in the web browser run:
  $ gcloud app browse
You can now navigate to the mentioned URL in your browser, or type the suggested command gcloud app browse to access your live web app. You should see the same short text response that you saw earlier when running the app on your localhost: Congratulations, it's a web app!
Notice that this website has a URL that you can share with other people, and they’ll be able to access it. You now have a live Python web application!
Change the return value of index() again and deploy your app a second time using the gcloud app deploy command. Confirm that you can see the change reflected on the live website in your browser.
With this, you’ve completed the necessary steps to get your local Python code up on the web. However, the only functionality that you’ve put online so far is printing out a string of text.
Time to step it up! Following the same process, you’ll bring more interesting functionality online in the next section. You’ll refactor the code of a local temperature converter script into a Flask web app.
Convert a Script Into a Web Application
Since this tutorial is about creating and deploying Python web applications from code you already have, the Python code for the temperature converter script is provided for you here:
def fahrenheit_from(celsius):
    """Convert Celsius to Fahrenheit degrees."""
    try:
        fahrenheit = float(celsius) * 9 / 5 + 32
        fahrenheit = round(fahrenheit, 3)  # Round to three decimal places
        return str(fahrenheit)
    except ValueError:
        return "invalid input"

if __name__ == "__main__":
    celsius = input("Celsius: ")
    print("Fahrenheit:", fahrenheit_from(celsius))
This is a short script that allows a user to convert a Celsius temperature to the equivalent Fahrenheit temperature.
Save the code as a Python script and give it a spin. Make sure that it works as expected and that you understand what it does. Feel free to improve the code.
With this working script in hand, you’ll now need to change the code to integrate it into your Flask app. There are two main points to consider for doing that:
- Execution: How will the web app know when to run the code?
- User input: How will the web app collect user input?
You already learned how to tell Flask to execute a specific piece of code by adding the code to a function that you assign a route to. Start by tackling this task first.
Add Code as a Function
Flask separates different tasks into different functions that are each assigned a route through the @app.route decorator. When the user visits the specified route via its URL, the code inside the corresponding function gets executed.
Start by adding fahrenheit_from() to your main.py file and wrapping it with the @app.route decorator:
from flask import Flask

app = Flask(__name__)

@app.route("/")
def index():
    return "Congratulations, it's a web app!"

@app.route("/")
def fahrenheit_from(celsius):
    """Convert Celsius to Fahrenheit degrees."""
    try:
        fahrenheit = float(celsius) * 9 / 5 + 32
        fahrenheit = round(fahrenheit, 3)  # Round to three decimal places
        return str(fahrenheit)
    except ValueError:
        return "invalid input"

if __name__ == "__main__":
    app.run(host="127.0.0.1", port=8080, debug=True)
So far, you’ve only copied the code of your Python script into a function in your Flask app and added the @app.route decorator.
However, there’s already a problem with this setup. What happens when you run the code in your development server? Give it a try.
Currently, both of your functions are triggered by the same route ("/"). When a user visits that route, Flask picks the first function that matches it and executes that code. In your case, this means that fahrenheit_from() never gets executed because index() matches the same route and gets called first.
Your second function will need its own unique route to be accessible. Additionally, you still need to allow your users to provide input to your function.
Pass Values to Your Code
You can solve both of these tasks by telling Flask to treat any remaining part of the URL following the base URL as a value and pass it on to your function. This requires only a small change to the parameter of the @app.route decorator before fahrenheit_from():
@app.route("/<celsius>")
def fahrenheit_from(celsius):
    # -- snip --
The angle bracket syntax (<>) tells Flask to capture any text following the base URL ("/") and pass it on to the function the decorator wraps as the variable celsius. Note that fahrenheit_from() requires celsius as an input.
Note: Make sure that the URL path component you’re capturing has the same name as the parameter you’re passing to your function. Otherwise, Flask will be confused and will let you know about it by presenting you with an error message.
Head back to your web browser and try out the new functionality using Flask’s development server. You’re now able to access both of your functions through your web app using different URL endpoints:
- Index (
/): If you go to the base URL, then you’ll see the short encouraging message from before. - Celsius (
/42): If you add a number after the forward slash, then you’ll see the converted temperature appear in your browser.
Play around with it some more and try entering different inputs. Even the error handling from your script is still functional and displays a message when a user enters a nonnumeric input. Your web app handles the same functionality as your Python script did locally, only now you can deploy it to the Internet.
Refactor Your Code
Flask is a mature web framework that allows you to hand over a lot of tasks to its internals. For example, you can let Flask take care of type checking the input to your function and returning an error message if it doesn’t fit. All this can be done with a concise syntax inside of the parameter to @app.route. Add the following to your path capturer:
@app.route("/<int:celsius>")
Adding int: before the variable name tells Flask to check whether the input it receives from the URL can be converted to an integer. If it can, then the content is passed on to fahrenheit_from(). If it can’t, then Flask displays a Not Found error page.
Note: The Not Found error means that Flask attempted to match the path component it snipped off from the URL with any of the functions it knows about.
However, the only patterns it currently knows about are the empty base path (/) and the base path followed by a number, such as /42. Since a text like /hello doesn’t match any of these patterns, it tells you that the requested URL was not found on the server.
After applying Flask’s type check, you can now safely remove the try … except block in fahrenheit_from(). Only integers will ever be passed on to the function by Flask:
from flask import Flask

app = Flask(__name__)

@app.route("/")
def index():
    return "Congratulations, it's a web app!"

@app.route("/<int:celsius>")
def fahrenheit_from(celsius):
    """Convert Celsius to Fahrenheit degrees."""
    fahrenheit = float(celsius) * 9 / 5 + 32
    fahrenheit = round(fahrenheit, 3)  # Round to three decimal places
    return str(fahrenheit)

if __name__ == "__main__":
    app.run(host="127.0.0.1", port=8080, debug=True)
With this, you’ve completed converting your temperature conversion script into a web app. Confirm that everything works as expected locally, then deploy your app again to Google App Engine.
Refactor index(). It should return text that explains how to use the temperature converter web app. Keep in mind that you can use HTML tags in the return string. The HTML will render properly on your landing page.
After successfully deploying your temperature conversion web app to the Internet, you now have a link that you can share with other people and allow them to convert Celsius temperatures to Fahrenheit temperatures.
However, the interface still looks quite basic and the web app functions more like an API than a front-end web app. Many users might not know how to interact with your Python web application in its current state. This shows you the limitations of using pure Python for web development.
If you want to create more intuitive interfaces, then you’ll need to start using at least a little bit of HTML.
In the next section, you’ll keep iterating over your code and use HTML to create an input box that allows users to enter a number directly on the page rather than through the URL.
Improve the User Interface of Your Web Application
In this section, you’ll learn how to add an HTML <form> input element to your web app to allow users to interact with it in a straightforward manner that they’re used to from other online applications.
To improve the user interface and user experience of your web app, you’ll need to work with languages other than Python, namely front-end languages such as HTML, CSS, and JavaScript. This tutorial avoids going into these as much as possible, to remain focused on using Python.
Note: If you’d like to take a deeper dive into front-end development, then check out Build a JavaScript Front End for a Flask API.
However, if you want to add an input box to your web app, then you’ll need to use some HTML. You’ll implement only the absolute minimum to get your web app looking and feeling more like a website that users will be familiar with. You’ll use the HTML <form> element to collect their input.
Note: If you want to learn more about HTML, then check out Real Python’s HTML and CSS for Python Developers or MDN’s Introduction to HTML.
After the update to your web app, you’ll have a text field where the user can input a temperature in degrees Celsius. There will be a Convert button to convert the user-supplied Celsius temperature into degrees Fahrenheit:
The converted result will be displayed on the next line and will be updated whenever the user clicks Convert.
You’ll also change the functionality of the app so that both the form and the conversion result are displayed on the same page. You’ll refactor the code so that you only need a single URL endpoint.
Collect User Input
Start by creating a <form> element on your landing page. Copy the following few lines of HTML into the return statement of index(), replacing the text message from before:
@app.route("/")
def index():
    return """<form action="" method="get">
                <input type="text" name="celsius">
                <input type="submit" value="Convert">
              </form>"""
When you reload your page at the base URL, you’ll see an input box and a button. The HTML renders correctly. Congratulations, you just created an input form!
Note: Keep in mind that these few lines of HTML don’t constitute a valid HTML page by themselves. However, modern browsers are designed in a way that they can fill in the blanks and create the missing structure for you.
What happens when you enter a value and then click Convert? While the page looks just the same, you might notice that the URL changed. It now displays a query parameter with a value after the base URL.
For example, if you entered 42 into the text box and clicked the button, then your URL would look like this: http://127.0.0.1:8080/?celsius=42. This is good news! The value was successfully recorded and added as a query parameter to the HTTP GET request. Seeing this URL means that you’re once again requesting the base URL, but this time with some extra values that you’re sending along.
However, nothing currently happens with that extra value. While the form is set up as it should be, it’s not yet correctly connected to the code functionality of your Python web app.
In order to understand how to make that connection, you’ll read about each piece of the <form> element to see what the different parts are all about. You’ll look at the following three elements and their attributes separately:
<form>element- Input box
- Submit button
Each of these are separate HTML elements. While this tutorial aims to keep the focus on Python rather than HTML, it’ll still be helpful to have a basic understanding of what goes on in this block of HTML code. Start by looking at the outermost HTML element.
<form> Element
The <form> element creates an HTML form. The other two <input> elements are wrapped inside it:
<form action="" method="get">
  <input type="text" name="celsius" />
  <input type="submit" value="Convert" />
</form>
The <form> element also contains two HTML attributes called action and method:
-
actiondetermines where the data that the user submits will be sent. You’re leaving the value as an empty string here, which makes your browser direct the request to the same URL it was called from. In your case, that’s the empty base URL. -
methoddefines what type of HTTP request the form produces. Using the default of"get"creates an HTTP GET request. This means that the user-submitted data will be visible in the URL query parameters. If you were submitting sensitive data or communicating with a database, then you would need to use an HTTP POST request instead.
After inspecting the <form> element and its attributes, your next step is to take a closer look at the first of the two <input> elements.
Input Box
The second HTML element is an <input> element that’s nested inside the <form> element:
<form action="" method="get">
  <input type="text" name="celsius" />
  <input type="submit" value="Convert" />
</form>
The first <input> element has two HTML attributes:
-
typedefines what type of<input>element should be created. There are many to choose from, such as checkboxes and drop-down elements. In this case, you want the user to enter a number as text, so you’re setting the type to"text". -
namedefines what the value the user enters will be referred to as. You can think of it as the key to a dictionary, where the value is whatever the user inputs into the text box. You saw this name show up in the URL as the key of the query parameter. You’ll need this key later to retrieve the user-submitted value.
HTML <input> elements can have different shapes, and some of them require different attributes. You’ll see an example of this when looking at the second <input> element, which creates a Submit button and is the last HTML element that makes up your code snippet.
Submit Button
The second <input> element creates the button that allows your users to submit their input:
<form action="" method="get">
  <input type="text" name="celsius" />
  <input type="submit" value="Convert" />
</form>
This element also has two HTML attributes, which are named type and value:
-
typedefines what sort of input element will be created. Using the value"submit"creates a button that allows you to send the bundled-up form data onwards. -
valuedefines what text the button should display. Feel free to change it to see how the button displays your changed text.
With this short overview of the different HTML elements and their attributes in mind, you now have a better understanding of what you’re adding to your Python code and what the elements are used for.
The information that you’ll need to connect your form submission to your Flask code is the first <input> element’s name value, celsius, which you’ll use to access the submitted value in your function.
Next, you’ll learn how to change your Python code to correctly process the submitted form input.
Receive User Input
In the action attribute of your <form> element, you specified that the data of your HTML form should be sent back to the same URL it came from. Now you need to include the functionality to fetch the value in index(). For this, you need to accomplish two steps:
-
Import Flask’s
requestobject: Like many web frameworks, Flask passes HTTP requests along as global objects. In order to be able to use this globalrequestobject, you first need to import it. -
Fetch the value: The
requestobject contains the submitted value and gives you access to it through a Python dictionary syntax. You need to fetch it from the global object to be able to use it in your function.
Rewrite your code and add these two changes now. You’ll also want to add the captured value at the end of the form string to display it after the form:
from flask import Flask
from flask import request

app = Flask(__name__)

@app.route("/")
def index():
    celsius = request.args.get("celsius", "")
    return (
        """<form action="" method="get">
                <input type="text" name="celsius">
                <input type="submit" value="Convert">
            </form>"""
        + celsius
    )

@app.route("/<int:celsius>")
def fahrenheit_from(celsius):
    """Convert Celsius to Fahrenheit degrees."""
    fahrenheit = float(celsius) * 9 / 5 + 32
    fahrenheit = round(fahrenheit, 3)  # Round to three decimal places
    return str(fahrenheit)

if __name__ == "__main__":
    app.run(host="127.0.0.1", port=8080, debug=True)
The request.args dictionary contains any data submitted with an HTTP GET request. If your base URL gets called initially, without a form submission, then the dictionary will be empty and you’ll return an empty string as the default value instead. If the page gets called through submitting the form, then the dictionary will contain a value under the celsius key, and you can successfully fetch it and add it to the returned string.
Give it a spin! You’re now able to enter a number and see it displayed right underneath the form’s button. If you enter a new number, then the old one gets replaced. You’re correctly sending and receiving the data that your users are submitting.
Before you move on to integrate the submitted value with your temperature converter code, are there any potential problems you can think of with this implementation?
What happens when you enter a string instead of a number? Give it a try.
Now enter the short HTML code <marquee>BUY USELESS THINGS!!!</marquee> and press Convert.
Currently, your web app accepts any kind of input, be it a number, a string, or even HTML or JavaScript code. This is extremely dangerous because your users might accidentally or intentionally break your web app by entering specific types of content.
Most of the time you should allow Flask to take care of these security issues automatically by using a different project setup. However, you’re in this situation now, so it’s good idea to find out how you can manually make the form you created input safe.
Escape User Input
Taking input from a user and displaying that input back without first investigating what you’re about to display is a huge security hole. Even without malicious intent, your users might do unexpected things that cause your application to break.
Try to hack your unescaped input form by adding some HTML text to it. Instead of entering a number, copy the following line of HTML code, paste it into your input box, and click Convert:
<marquee><a href="https://www.realpython.com">CLICK ME</a></marquee>
Flask inserts the text directly into HTML code, which causes this text input to get interpreted as HTML tags. Because of that, your browser renders the code dutifully, as it would with any other HTML. Instead of displaying back the input as text, you suddenly have to deal with a stylish educational spam link that time-traveled here right from the ’90s:
While this example is harmless and goes away with a refresh of your page, you can imagine how this might present a security problem when other types of content are added in this way. You don’t want to open up the possibility of your users editing aspects of your web app that aren’t meant to be edited.
To avoid this, you can use Flask’s built-in escape(), which converts the special HTML characters <, >, and & into equivalent representations that can be displayed correctly.
You’ll first need to import escape into your Python script to use this functionality. Then, when you submit the form, you can convert any special HTML characters and make your form input ’90s hacker–proof:
from flask import Flask
from flask import request, escape

app = Flask(__name__)

@app.route("/")
def index():
    celsius = str(escape(request.args.get("celsius", "")))
    return (
        """<form action="" method="get">
                <input type="text" name="celsius">
                <input type="submit" value="Convert">
            </form>"""
        + celsius
    )

@app.route("/<int:celsius>")
def fahrenheit_from(celsius):
    """Convert Celsius to Fahrenheit degrees."""
    fahrenheit = float(celsius) * 9 / 5 + 32
    fahrenheit = round(fahrenheit, 3)  # Round to three decimal places
    return str(fahrenheit)

if __name__ == "__main__":
    app.run(host="127.0.0.1", port=8080, debug=True)
Refresh your development server and try submitting some HTML code. Now it’ll be displayed back to you as the text string that you entered.
Note: It’s necessary to convert the escaped sequence back to a Python str. Otherwise, Flask will also greedily convert the <form> element your function returns into escaped strings.
When building larger web applications, you shouldn’t have to deal with escaping your input since all HTML will be handled using templates. If you want to learn more about that, then check out Flask by Example.
After learning how to collect user input and also how to escape it, you’re finally ready to implement the temperature conversion functionality and show a user the Fahrenheit equivalent of the Celsius temperature they entered.
Process User Input
Since this approach uses only one URL endpoint, you can’t rely on Flask to type check the user input via URL path component capturing as you did earlier on. This means you’ll want to reintroduce your try … except block from the initial fahrenheit_from() of the original code.
Note: Since you’re validating the type of the user input in fahrenheit_from(), you don’t need to implement flask.escape(), and it won’t be part of your final code. You can safely remove the import of escape and strip the call to request.args.get() back to its initial state.
This time, fahrenheit_from() won’t be associated with an @app.route decorator. Go ahead and delete that line of code. You’ll call fahrenheit_from() explicitly from index() instead of asking Flask to execute it when a specific URL endpoint is accessed.
After deleting the decorator from fahrenheit_from() and reintroducing the try … except block, you’ll next add a conditional statement to index() that checks whether the global request object contains a celsius key. If it does, then you want to call fahrenheit_from() to calculate the corresponding Fahrenheit degrees. If it doesn’t, then you assign an empty string to the fahrenheit variable instead.
Doing this allows you to add the value of fahrenheit to the end of your HTML string. The empty string won’t be visible on your page, but if the user submitted a value, then it’ll show up underneath the form.
After applying these final changes, you complete the code for your temperature converter Flask app:
 1from flask import Flask
 2from flask import request
 3
 4app = Flask(__name__)
 5
 6@app.route("/")
 7def index():
 8    celsius = request.args.get("celsius", "")
 9    if celsius:
10        fahrenheit = fahrenheit_from(celsius)
11    else:
12        fahrenheit = ""
13    return (
14        """<form action="" method="get">
15                Celsius temperature: <input type="text" name="celsius">
16                <input type="submit" value="Convert to Fahrenheit">
17            </form>"""
18        + "Fahrenheit: "
19        + fahrenheit
20    )
21
22def fahrenheit_from(celsius):
23    """Convert Celsius to Fahrenheit degrees."""
24    try:
25        fahrenheit = float(celsius) * 9 / 5 + 32
26        fahrenheit = round(fahrenheit, 3)  # Round to three decimal places
27        return str(fahrenheit)
28    except ValueError:
29        return "invalid input"
30
31if __name__ == "__main__":
32    app.run(host="127.0.0.1", port=8080, debug=True)
Since there have been quite a few changes, here’s a step-by-step review of the edited lines:
-
Line 2: You’re not using
flask.escape()anymore, so you can remove it from the import statement. -
Lines 8, 11, and 12: As before, you’re fetching the user-submitted value through Flask’s global
requestobject. By using the dictionary method.get(), you assure that an empty string gets returned if the key isn’t found. That’ll be the case if the page is loaded initially and the user hasn’t submitted the form yet. This is implemented in lines 11 and 12. -
Line 19: By returning the form with the default empty string stuck to the end, you avoid displaying anything before the form has been submitted.
-
Lines 9 and 10: After your users enter a value and click Convert, the same page gets loaded again. This time around,
request.args.get("celsius", "")finds thecelsiuskey and returns the associated value. This makes the conditional statement evaluate toTrue, and the user-provided value is passed tofahrenheit_from(). -
Lines 24 to 29:
fahrenheit_from()checks if the user supplied a valid input. If the provided value can be converted to afloat, then the function applies the temperature conversion code and returns the temperature in Fahrenheit. If it can’t be converted, then aValueErrorexception is raised, and the function returns the string"invalid input"instead. -
Line 19: This time, when you concatenate the
fahrenheitvariable to the end of the HTML string, it points to the return value offahrenheit_from(). This means that either the converted temperature or the error message string will be added to your HTML. -
Lines 15 and 18: To make the page easier to use, you also add the descriptive labels
Celsius temperatureandFahrenheitto this same HTML string.
Your page will render correctly even though the way you’re adding these strings doesn’t represent valid HTML. This works thanks to the power of modern browsers.
Keep in mind that if you’re interested in diving deeper into web development, then you’ll need to learn HTML. But for the sake of getting your Python script deployed online, this will do just fine.
You should now be able to use your temperature conversion script inside your browser. You can supply a Celsius temperature through the input box, click the button, and see the converted Fahrenheit result appear on the same web page. Since you’re using the default HTTP GET request, you can also see the submitted data appear in the URL.
Note: In fact, you can even circumvent the form and provide your own value for celsius by supplying an appropriate address, similar to how you were able to use the conversion when you built the script without the HTML form.
For instance, try typing the URL localhost:8080/?celsius=42 directly into your browser, and you’ll see the resulting temperature conversion appear on your page.
Deploy your finished application again to Google App Engine using the gcloud app deploy command. Once the deployment is done, go to the provided URL or run gcloud app browse to see your Python web application live on the Internet. Test it out by adding different types of input. Once you’re satisfied, share your link with the world.
The URL of your temperature converter web application still looks something like https://hello-app-295110.ew.r.appspot.com/. This doesn’t reflect the current functionality of your app.
Revisit the deployment instructions, create a new project on Google App Engine with a better fitting name, and deploy your app there. This will give you practice in creating projects and deploying your Flask apps to Google App Engine.
At this point, you’ve successfully converted your Python script into a Python web app and deployed it to Google App Engine for online hosting. You can use the same process to convert more of your Python scripts into web apps.
Create your own poem generator that allows users to create short poems using a web form. Your web application should use a single page with a single form that accepts GET requests. You can use this example code to get started, or you can write your own.
If you want to learn more about what you can do with Google App Engine, then you can read about using static files and add a CSS file to your Python web application to improve its overall appearance.
Hosting your code online can make it accessible to more people over the Internet. Go ahead and convert your favorite scripts into Flask applications and show them to the world.
Conclusion
You covered a lot of ground in this tutorial! You started with a local Python script and transformed it into a user-friendly, fully deployed Flask application that’s now hosted on Google App Engine.
While working through this tutorial, you learned:
- How web applications provide data over the Internet
- How to refactor your Python script so you can host it online
- How to create a basic Flask application
- How to manually escape user input
- How to deploy your code to Google App Engine
You can now take your local Python scripts and make them available online for the whole world to use. If you’d like to download the complete code for the application you built in this tutorial, then you can click the link below:
Get Sample Code: Click here to get the sample code you’ll use to learn about creating Python web applications with Flask in this tutorial.
If you want to learn more about web development with Python, then you’re now well equipped to experiment with Python web frameworks such as Flask and Django. Keep up the good work!
Watch Now This tutorial has a related video course created by the Real Python team. Watch it together with the written tutorial to deepen your understanding: Deploy Your Python Script on the Web With Flask